The best way to remove Unicode characters from a Python dictionary is a recursive function that iterates over each key and value, checking their type.
 If a value is a dictionary, the function calls itself.
If a value is a string, it’s encoded to ASCII, ignoring non-ASCII characters, and then decoded back to a string, effectively removing any Unicode characters.
This ensures a thorough cleansing of the entire dictionary.
Here’s a minimal example for copy&paste
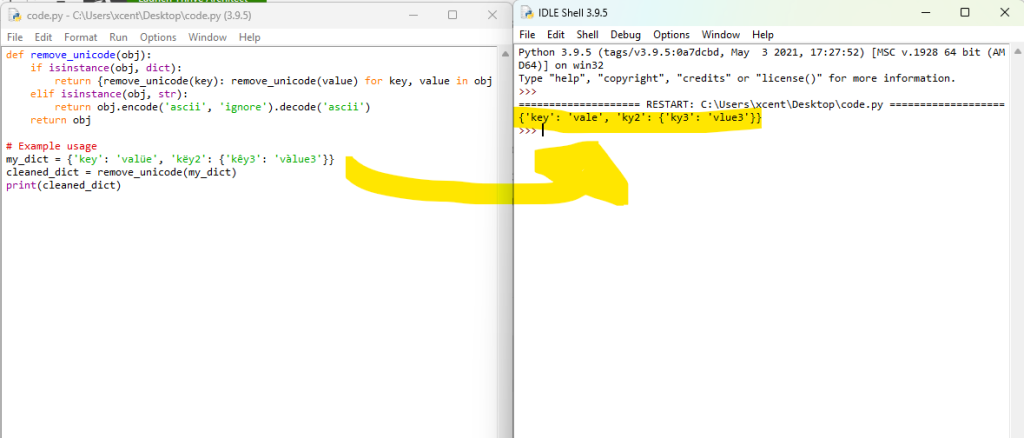
def remove_unicode(obj): if isinstance(obj, dict): return {remove_unicode(key): remove_unicode(value) for key, value in obj.items()} elif isinstance(obj, str): return obj.encode('ascii', 'ignore').decode('ascii') return obj # Example usage
my_dict = {'key': 'valüe', 'këy2': {'kêy3': 'vàlue3'}}
cleaned_dict = remove_unicode(my_dict)
print(cleaned_dict)
In this example, remove_unicode is a recursive function that traverses the dictionary. If it encounters a dictionary, it recursively cleans each key-value pair. If it encounters a string, it encodes the string to ASCII, ignoring non-ASCII characters, and then decodes it back to a string. The example usage shows a nested dictionary with Unicode characters, which are removed in the cleaned_dict.
Understanding Unicode and Dictionaries in Python
You may come across dictionaries containing Unicode values. These Unicode values can be a hurdle when using the data in specific formats or applications, such as JSON editors. To overcome these challenges, you can use various methods to remove the Unicode characters from your dictionaries.
One popular method to remove Unicode characters from a dictionary is by using the encode() method to convert the keys and values within the dictionary into a different encoding, such as UTF-8. This can help you eliminate the 'u' prefix, which signifies a character is a Unicode character. Similarly, you can use external libraries, like Unidecode, that provide functions to transliterate Unicode strings into the closest possible ASCII representation (source).
 Recap: Python dictionaries are a flexible data structure that allows you to store key-value pairs. They enable you to organize and access your data more efficiently. A dictionary can hold a variety of data types, including Unicode strings. Unicode is a widely-used character encoding standard that includes a huge range of characters from different scripts and languages.
When working with dictionaries in Python, you might encounter Unicode strings as keys or values. For example, a dictionary might have keys or values in various languages or contain special characters like emojis (

 ). This diversity is because Python supports Unicode characters to allow for broader text representation and internationalization.
To create a dictionary containing Unicode strings, you simply define key-value pairs with the appropriate Unicode characters. In some cases, you might also have nested dictionaries, where a dictionary’s value is another dictionary. Nested dictionaries can also contain Unicode strings as keys or values.
Consider the following example:
my_dictionary = { "name": "François", "languages": { "primary": "Français", "secondary": "English" }, "hobbies": ["music", "فنون-القتال"]
}
In this example, the dictionary represents a person’s information, including their name, languages, and hobbies. Notice that both the name and primary language contain Unicode characters, and one of the items in the hobbies list is also represented using Unicode characters.
When working with dictionary data that contains Unicode characters, you might need to remove or replace these characters for various purposes, such as preprocessing text for machine learning applications or ensuring compatibility with ASCII-only systems. Several methods can help you achieve this, such as using Python’s built-in encode() and decode() methods or leveraging third-party libraries like Unidecode.
Now that you have a better understanding of Unicode and dictionaries in Python, you can confidently work with dictionary data containing Unicode characters and apply appropriate techniques to remove or replace them when necessary.
Challenges with Unicode in Dictionaries
Your data may contain special characters from different languages. These characters can lead to display, sorting, and searching problems, especially when your goal is to process the data in a way that is language-agnostic.
One of the main challenges with Unicode characters in dictionaries is that they can cause compatibility issues when interacting with certain libraries, APIs, or external tools. For instance, JSON editors may struggle to handle Unicode properly, potentially resulting in malformed data. Additionally, some libraries may not be specifically designed to handle Unicode, and even certain text editors may not display these characters correctly.
Note: Another issue arises when attempting to remove Unicode characters from a dictionary. You may initially assume that using functions like .encode() or .decode() would be sufficient, but these functions can sometimes leave the 'u' prefix, which denotes a unicode string, in place. This can lead to confusion and unexpected results when working with the data.
To address these challenges, various methods can be employed to remove Unicode characters from dictionaries:
- Method 1: You could try converting your dictionary to a JSON object, and then back to a dictionary with the help of the
json library. This process can effectively remove the Unicode characters, making your data more compatible and easier to work with.
- Method 2: Alternatively, you can use a library like
unidecode to convert Unicode to ASCII characters, which can be helpful in cases where you need to interact with systems or APIs that only accept ASCII text.
- Method 3: Another option is to use list or dict comprehensions to iterate over your data and apply the
.encode() and .decode() methods, effectively stripping the unicode characters from your dictionary.
Below are minimal code snippets for each of the three approaches:
Method 1: Using JSON Library
import json my_dict = {'key': 'valüe'}
# Convert dictionary to JSON object and back to dictionary
cleaned_dict = json.loads(json.dumps(my_dict, ensure_ascii=True))
print(cleaned_dict)
In this example, the dictionary is converted to a JSON object and back to a dictionary, ensuring ASCII encoding, which removes Unicode characters.
Method 2: Using Unidecode Library
from unidecode import unidecode my_dict = {'key': 'valüe'}
# Use unidecode to convert Unicode to ASCII
cleaned_dict = {k: unidecode(v) for k, v in my_dict.items()}
print(cleaned_dict)
Here, the unidecode library is used to convert each Unicode string value to ASCII, iterating over the dictionary with a dict comprehension.
Method 3: Using List or Dict Comprehensions
my_dict = {'key': 'valüe'}
# Use .encode() and .decode() to remove Unicode characters
cleaned_dict = {k.encode('ascii', 'ignore').decode(): v.encode('ascii', 'ignore').decode() for k, v in my_dict.items()}
print(cleaned_dict)
In this example, a dict comprehension is used to iterate over the dictionary. The .encode() and .decode() methods are applied to each key and value to strip Unicode characters.
Recommended: Python Dictionary Comprehension: A Powerful One-Liner Tutorial
Fundamentals of Removing Unicode
When working with dictionaries in Python, you may sometimes encounter Unicode characters that need to be removed. In this section, you’ll learn the fundamentals of removing Unicode characters from dictionaries using various techniques.
Firstly, it’s important to understand that Unicode characters can be present in both keys and values of a dictionary. A common scenario that may require you to remove Unicode characters is when you need to convert your dictionary into a JSON object.
One of the simplest ways to remove Unicode characters is by using the str.encode() and str.decode() methods. You can loop through the dictionary, and for each key-value pair, apply these methods to remove any unwanted Unicode characters:
new_dict = {}
for key, value in old_dict.items(): new_key = key.encode('ascii', 'ignore').decode('ascii') if isinstance(value, str): new_value = value.encode('ascii', 'ignore').decode('ascii') else: new_value = value new_dict[new_key] = new_value
Another useful method, particularly for removing Unicode characters from strings, is the isalnum() function. You can use this in combination with a loop to clean your keys and values:
def clean_unicode(string): return "".join(c for c in string if c.isalnum() or c.isspace()) new_dict = {}
for key, value in old_dict.items(): new_key = clean_unicode(key) if isinstance(value, str): new_value = clean_unicode(value) else: new_value = value new_dict[new_key] = new_value
As you can see, removing Unicode characters from a dictionary in Python can be achieved using these techniques.
Using Id and Ast for Unicode Removal
Utilizing the id and ast libraries in Python can be a powerful way to remove Unicode characters from a dictionary. The ast library, in particular, offers an s-expression parser which makes processing text data more straightforward. In this section, you will follow a step-by-step guide to using these powerful tools effectively.
First, you need to import the necessary libraries. In your Python script, add the following lines to import json and ast:
import json
import ast
The next step is to define your dictionary containing Unicode strings. Let’s use the following example dictionary:
my_dict = {u'Apple': [u'A', u'B'], u'orange': [u'C', u'D']}
Now, you can utilize the json.dumps() function and ast.literal_eval() for the Unicode removal process. The json.dumps() function converts the dictionary into a JSON-formatted string. This function removes the Unicode 'u' from the keys and values in your dictionary. After that, you can employ the ast.literal_eval() s-expression parser to convert the JSON-formatted string back to a Python dictionary.
Here’s how to perform these steps:
json_string = json.dumps(my_dict)
cleaned_dict = ast.literal_eval(json_string)
After executing these lines, you will obtain a new dictionary called cleaned_dict without the Unicode characters. Simply put, it should look like this:
{'Apple': ['A', 'B'], 'orange': ['C', 'D']}
By using the id and ast libraries, you can efficiently remove Unicode characters from dictionaries in Python. Following this simple yet effective method, you can ensure the cleanliness of your data, making it easier to work with and process.
Replacing Unicode Characters with Empty String
When working with dictionaries in Python, you might come across cases where you need to remove Unicode characters. One efficient way to do this is by replacing Unicode characters with empty strings.
To achieve this, you can make use of the encode() and decode() string methods available in Python. First, you need to loop through your dictionary and access the strings. Here’s how you can do it:
for key, value in your_dict.items(): cleaned_key = key.encode("ascii", "ignore").decode() cleaned_value = value.encode("ascii", "ignore").decode() your_dict[cleaned_key] = cleaned_value
In this code snippet, the encode() function encodes the string into ‘ASCII’ format and specifies the error-handling mode as ‘ignore’, which helps remove Unicode characters. The decode() function is then used to convert the encoded string back to its original form, without the Unicode characters.
Note: This method assumes your dictionary contains only string keys and values. If your dictionary has nested values, such as lists or other dictionaries, you’ll need to adjust the code to handle those cases as well.
If you want to perform this operation on a single string instead, you can do this:
cleaned_string = original_string.encode("ascii", "ignore").decode()
Applying Encode and Decode Methods
When you need to remove Unicode characters from a dictionary, applying the encode() and decode() methods is a straightforward and effective approach. In Python, these built-in methods help you encode a string into a different character representation and decode byte strings back to Unicode strings.
To remove Unicode characters from a dictionary, you can iterate through its keys and values, applying the encode() and decode() methods. First, encode the Unicode string to ASCII, specifying the 'ignore' error handling mode. This mode omits any Unicode characters that do not have an ASCII representation. After encoding the string, decode it back to a regular string.
Here’s an example:
input_dict = {"𝕴𝖗𝖔𝖓𝖒𝖆𝖓": "𝖙𝖍𝖊 𝖍𝖊𝖗𝖔", "location": "𝕬𝖛𝖊𝖓𝖌𝖊𝖗𝖘 𝕿𝖔𝖜𝖊𝖗"}
output_dict = {} for key, value in input_dict.items(): encoded_key = key.encode("ascii", "ignore") decoded_key = encoded_key.decode() encoded_value = value.encode("ascii", "ignore") decoded_value = encoded_value.decode() output_dict[decoded_key] = decoded_value
In this example, the output_dict will be a new dictionary with the same keys and values as input_dict, but with Unicode characters removed:
{"Ironman": "the hero", "location": "Avengers Tower"}
Keep in mind that the encode() and decode() methods may not always produce an accurate representation of the original Unicode characters, especially when dealing with complex scripts or diacritic marks.
If you need to handle a wide range of Unicode characters and preserve their meaning in the output string, consider using libraries like Unidecode. This library can transliterate any Unicode string into the closest possible representation in ASCII text, providing better results in some cases.
Utilizing JSON Dumps and Literal Eval
When dealing with dictionaries containing Unicode characters, you might want an efficient and user-friendly way to remove or bypass the characters. Two useful techniques for this purpose are using json.dumps from the json module and ast.literal_eval from the ast module.
To begin, import both the json and ast modules in your Python script:
import json
import ast
The json.dumps method is quite handy for converting dictionaries with Unicode values into strings. This method takes a dictionary and returns a JSON formatted string. For instance, if you have a dictionary containing Unicode characters, you can use json.dumps to obtain a string version of the dictionary:
original_dict = {"key": "value with unicode: \u201Cexample\u201D"}
json_string = json.dumps(original_dict, ensure_ascii=False)
The ensure_ascii=False parameter in json.dumps ensures that Unicode characters are encoded in the UTF-8 format, making the JSON string more human-readable.
Next, you can use ast.literal_eval to evaluate the JSON string and convert it back to a dictionary. This technique allows you to get rid of any unnecessary Unicode characters by restricting the data structure to basic literals:
cleaned_dict = ast.literal_eval(json_string)
Keep in mind that ast.literal_eval is more secure than the traditional eval() function, as it only evaluates literals and doesn’t execute any arbitrary code.
By using both json.dumps and ast.literal_eval in tandem, you can effectively manage Unicode characters in dictionaries. These methods not only help to remove Unicode characters but also assist in maintaining a human-readable format for further processing and editing.
Managing Unicode in Nested Dictionaries
Dealing with Unicode characters in nested dictionaries can sometimes be challenging. However, you can efficiently manage this by following a few simple steps.
First and foremost, you need to identify any Unicode content within your nested dictionary. If you’re working with large dictionaries, consider looping through each key-value pair and checking for the presence of Unicode.
One approach to remove Unicode characters from nested dictionaries is to use the Unidecode library. This library transliterates any Unicode string into the closest possible ASCII representation. To use Unidecode, you’ll need to install it first:
pip install Unidecode
Now, you can begin working with the Unidecode library. Import the library and create a function to process each value in the dictionary. Here’s a sample function that handles nested dictionaries:
from unidecode import unidecode def remove_unicode_from_dict(dictionary): new_dict = {} for key, value in dictionary.items(): if isinstance(value, dict): new_value = remove_unicode_from_dict(value) elif isinstance(value, list): new_value = [remove_unicode_from_dict(item) if isinstance(item, dict) else item for item in value] elif isinstance(value, str): new_value = unidecode(value) else: new_value = value new_dict[key] = new_value return new_dict
This function recursively iterates through the dictionary, removing Unicode characters from string values and maintaining the original structure. Use this function on your nested dictionary:
cleaned_dict = remove_unicode_from_dict(your_nested_dictionary)
Handling Special Cases with Regular Expressions
When working with dictionaries in Python, you may come across special characters or Unicode characters that need to be removed or replaced. Using the re module in Python, you can leverage the power of regular expressions to effectively handle such cases.
Let’s say you have a dictionary with keys and values containing various Unicode characters. One efficient way to remove them is by combining the re.sub() function and ord() function. First, import the required re module:
import re
To remove special characters, you can use the re.sub() function, which takes a pattern, replacement, and a string as arguments, and returns a new string with the specified pattern replaced:
string_with_special_chars = "𝓣𝓱𝓲𝓼 𝓲𝓼 𝓪 𝓽𝓮𝓼𝓽 𝓼𝓽𝓻𝓲𝓷𝓰."
clean_string = re.sub(r"[^\x00-\x7F]+", "", string_with_special_chars)
ord() is a useful built-in function that returns the Unicode code point of a given character. You can create a custom function utilizing ord() to check if a character is alphanumeric:
def is_alphanumeric(char): code_point = ord(char) return (code_point >= 48 and code_point <= 57) or (code_point >= 65 and code_point <= 90) or (code_point >= 97 and code_point <= 122)
Now you can use this custom function along with the re.sub() function to clean up your dictionary:
def clean_dict_item(item): return "".join([char for char in item if is_alphanumeric(char) or char.isspace()]) original_dict = {"𝓽𝓮𝓼𝓽1": "𝓗𝓮𝓵𝓵𝓸 𝓦𝓸𝓻𝓵𝓭!", "𝓽𝓮𝓼𝓽2": "𝓘 𝓵𝓸𝓿𝓮 𝓟𝔂𝓽𝓱𝓸𝓷!"}
cleaned_dict = {clean_dict_item(key): clean_dict_item(value) for key, value in original_dict.items()} print(cleaned_dict)
# {'1': ' ', '2': ' '}
Frequently Asked Questions
How can I eliminate non-ASCII characters from a Python dictionary?
To eliminate non-ASCII characters from a Python dictionary, you can use a dictionary comprehension with the str.encode() method and the ascii codec. This will replace non-ASCII characters with their escape codes. Here’s an example:
original_dict = {"key": "value with non-ASCII character: ę"}
cleaned_dict = {k: v.encode("ascii", "ignore").decode() for k, v in original_dict.items()}
What is the best way to remove hex characters from a string in Python?
One efficient way to remove hex characters from a string in Python is using the re (regex) module. You can create a pattern to match hex characters and replace them with nothing. Here’s a short example code:
import re
text = "Hello \x00World!"
clean_text = re.sub(r"\\x\d{2}", "", text)
How to replace Unicode characters with ASCII in a Python dict?
To replace Unicode characters with their corresponding ASCII characters in a Python dictionary, you can use the unidecode library. Install it using pip install unidecode, and then use it like this:
from unidecode import unidecode
original_dict = {"key": "value with non-ASCII character: ę"}
ascii_dict = {k: unidecode(v) for k, v in original_dict.items()}
How can I filter out non-ascii characters in a dictionary?
To filter out non-ASCII characters in a Python dictionary, you can use a dictionary comprehension along with a string comprehension to create new strings containing only ASCII characters.
original_dict = {"key": "value with non-ASCII character: ę"}
filtered_dict = {k: "".join(char for char in v if ord(char) < 128) for k, v in original_dict.items()}
What method should I use to remove ‘u’ from a list in Python?
If you want to remove the ‘u’ Unicode prefix from a list of strings, you can simply convert each element to a regular string using a list comprehension:
unicode_list = [u"example1", u"example2"]
string_list = [str(element) for element in unicode_list]
How do I handle and remove special characters from a dictionary?
Handling and removing special characters from a dictionary can be accomplished using the re module to replace unwanted characters with an empty string or a suitable replacement. Here’s an example:
import re
original_dict = {"key": "value with special character: #!"}
cleaned_dict = {k: re.sub(r"[^A-Za-z0-9\s]+", "", v) for k, v in original_dict.items()}
This will remove any character that is not an alphanumeric character or whitespace from the dictionary values.
If you learned something new today, feel free to join my free email academy. We have cheat sheets too!
The post 5 Expert-Approved Ways to Remove Unicode Characters from a Python Dict appeared first on Be on the Right Side of Change.


 . In this article, we will explore the best ways to remove Unicode characters from a list using Python.
 Lists are a built-in Python data structure used to store and manipulate collections of items. They are mutable, ordered, and can contain elements of different types, including Unicode strings.
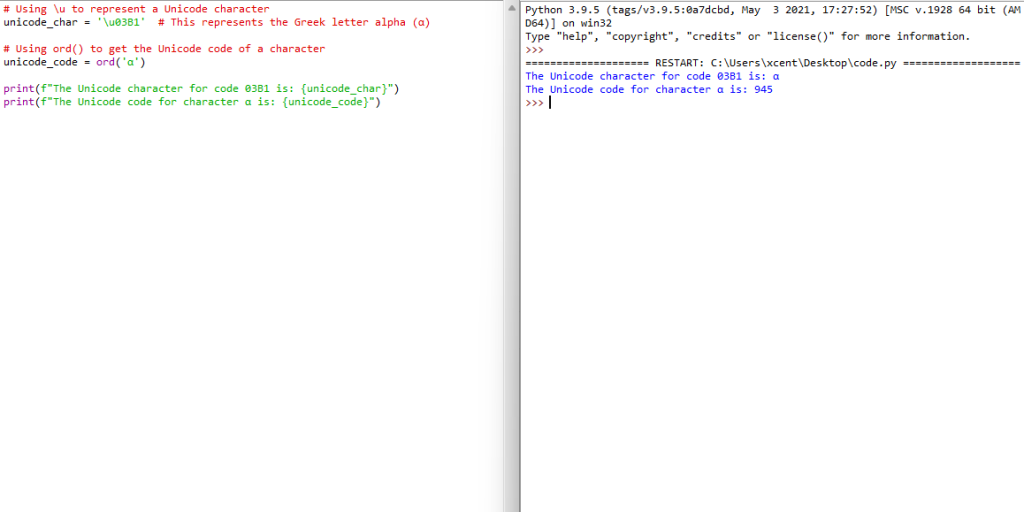


 Disruptive Innovation refers to a new technology, process, or business model that disrupts an existing market. Disruptive innovations often start as simpler, cheaper, and lower-quality solutions compared to existing offerings. They often target an underserved or new market segment. They often create a different value network within the market. However, truly disruptive innovation companies improve over time and eventually displace existing market participants.


 Here’s my personal key take-away (not financial advice):

 ):
):