Posted on Leave a comment

How to Generate PHP Random String Token (8 Ways)

by Vincy. Last modified on October 5th, 2022.

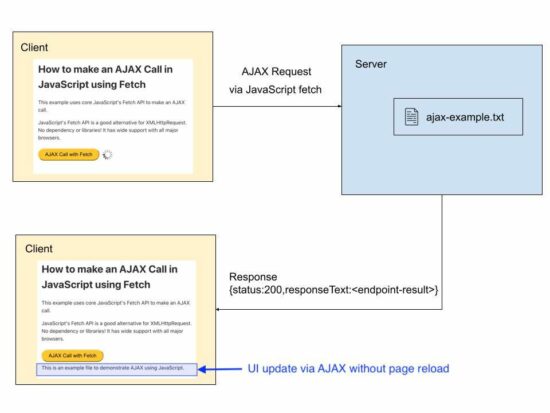
Generating random string token may sound like a trivial work. If you really want something “truly random”, it is one difficult job to do. In a project where you want a not so critical scrambled string there are many ways to get it done.

I present eight different ways of getting a random string token using PHP.

  1. Using random_int()
  2. Using rand()
  3. By string shuffling to generate a random substring.
  4. Using bin2hex()
  5. Using mt_rand()
  6. Using hashing sha1()
  7. Using hashing md5()
  8. Using PHP uniqid()

There are too many PHP functions that can be used to generate the random string. With the combination of those functions, this code assures to generate an unrepeatable random string and unpredictable by a civilian user.

1) Using random_int()

The PHP random_int() function generates cryptographic pseudo random integer. This random integer is used as an index to get the character from the given string base.

The string base includes 0-9, a-z and A-Z characters to return an alphanumeric random number.

Quick example

<?php
/** * Uses random_int as core logic and generates a random string * random_int is a pseudorandom number generator * * @param int $length * @return string */
function getRandomStringRandomInt($length = 16)
{ $stringSpace = '0123456789abcdefghijklmnopqrstuvwxyzABCDEFGHIJKLMNOPQRSTUVWXYZ'; $pieces = []; $max = mb_strlen($stringSpace, '8bit') - 1; for ($i = 0; $i < $length; ++ $i) { $pieces[] = $stringSpace[random_int(0, $max)]; } return implode('', $pieces);
}
echo "<br>Using random_int(): " . getRandomStringRandomInt();
?>

php random string

2) Using rand()

It uses simple PHP rand() and follows straightforward logic without encoding or encrypting.

It calculates the given string base’s length and pass it as a limit to the rand() function.

It gets the random character with the random index returned by the rand(). It applies string concatenation every time to form the random string in a loop.

<?php
/** * Uses the list of alphabets, numbers as base set, then picks using array index * by using rand() function. * * @param int $length * @return string */
function getRandomStringRand($length = 16)
{ $stringSpace = '0123456789abcdefghijklmnopqrstuvwxyzABCDEFGHIJKLMNOPQRSTUVWXYZ'; $stringLength = strlen($stringSpace); $randomString = ''; for ($i = 0; $i < $length; $i ++) { $randomString = $randomString . $stringSpace[rand(0, $stringLength - 1)]; } return $randomString;
}
echo "<br>Using rand(): " . getRandomStringRand();
?>

3) By string shuffling to generate a random substring.

It returns the random integer with the specified length.

It applies PHP string repeat and shuffle the output string. Then, extracts the substring from the shuffled string with the specified length.

<?php
/** * Uses the list of alphabets, numbers as base set. * Then shuffle and get the length required. * * @param int $length * @return string */
function getRandomStringShuffle($length = 16)
{ $stringSpace = '0123456789abcdefghijklmnopqrstuvwxyzABCDEFGHIJKLMNOPQRSTUVWXYZ'; $stringLength = strlen($stringSpace); $string = str_repeat($stringSpace, ceil($length / $stringLength)); $shuffledString = str_shuffle($string); $randomString = substr($shuffledString, 1, $length); return $randomString;
}
echo "<br>Using shuffle(): " . getRandomStringShuffle();
?>

4) Using bin2hex()

Like random_int(), the random_bytes() returns cryptographically secured random bytes.

If the function doesn’t exists, this program then uses openssl_random_pseudo_bytes() function.

<?php
/** * Get bytes of using random_bytes or openssl_random_pseudo_bytes * then using bin2hex to get a random string. * * @param int $length * @return string */
function getRandomStringBin2hex($length = 16)
{ if (function_exists('random_bytes')) { $bytes = random_bytes($length / 2); } else { $bytes = openssl_random_pseudo_bytes($length / 2); } $randomString = bin2hex($bytes); return $randomString;
}
echo "<br>Using bin2hex(): " . getRandomStringBin2hex();
?>

5) Using mt_rand()

PHP mt_rand() is the replacement of rand(). It generates a random string using the Mersenne Twister Random Number Generator.

This code generates the string base dynamically using the range() function.

Then, it runs the loop to build the random string using mt_rand() in each iteration.

<?php
/** * Using mt_rand() actually it is an alias of rand() * * @param int $length * @return string */
function getRandomStringMtrand($length = 16)
{ $keys = array_merge(range(0, 9), range('a', 'z')); $key = ""; for ($i = 0; $i < $length; $i ++) { $key .= $keys[mt_rand(0, count($keys) - 1)]; } $randomString = $key; return $randomString;
}
echo "<br>Using mt_rand(): " . getRandomStringMtrand();
?>

6) Using hashing sha1()

It applies sha1 hash of the string which is the result of the rand().

Then, it extracts the substring from the hash with the specified length.

<?php
/** * * Using sha1(). * sha1 has a 40 character limit and always lowercase characters. * * @param int $length * @return string */
function getRandomStringSha1($length = 16)
{ $string = sha1(rand()); $randomString = substr($string, 0, $length); return $randomString;
}
echo "<br>Using sha1(): " . getRandomStringSha1();
?>

7) Using hashing md5()

It applies md5() hash on the rand() result. Then, the rest of the process are same as the above example.

<?php
/** * * Using md5(). * * @param int $length * @return string */
function getRandomStringMd5($length = 16)
{ $string = md5(rand()); $randomString = substr($string, 0, $length); return $randomString;
}
echo "<br>Using md5(): " . getRandomStringMd5();
?>

8) Using PHP uniqid()

The PHP unigid() function gets prefixed unique identifier based on the current time in microseconds.

It is not generating cryptographically random number like random_int() and random_bytes().

<?php
/** * * Using uniqid(). * * @param int $length * @return string */
function getRandomStringUniqid($length = 16)
{ $string = uniqid(rand()); $randomString = substr($string, 0, $length); return $randomString;
}
echo "<br>Using uniqid(): " . getRandomStringUniqid();
?>

Download

↑ Back to Top

Posted on Leave a comment

How to do Web Push Notification on Browser using JavaScript

by Vincy. Last modified on October 3rd, 2022.

Web push notifications are messages pushed asynchronously from a website and mobile application to an event target.

There are two types of web push notifications:

  1. Desktop notifications are shown when the foreground application is running and they are simple to use.
  2. Notifications that are shown from the background even after the application is not running. It’s via a background service worker sync with the page or app.

This tutorial implements the first type of sending the push notification via JavaScript. It uses the JavaScript Notification class to create and manage notification instances.

Note: To show the notifications, permission should be granted by the user.

web push notification

About the example

This example sends the web push notifications by calling the JavaScript Notification.

It sends only one notification by running this script. It can also be put into a cycle to automatically send notifications at a periodic interval.

This code uses the following steps to push the notification to the event target.

  1. It checks if the client has the required permissions and popups content window to have user acceptance.
  2. It creates a notification instance by supplying the title, body and icon (path).
  3. It refers to the on-click event mapping with the notification instance.

When the user clicks on the notification, it opens the target URL passed while creating the JavaScript Notification class.

index.php

<!DOCTYPE html>
<html>
<head>
<title>Web Push Notification using JavaScript in a Browser</title>
<script src="https://code.jquery.com/jquery-3.6.1.min.js" integrity="sha256-o88AwQnZB+VDvE9tvIXrMQaPlFFSUTR+nldQm1LuPXQ=" crossorigin="anonymous"></script>
</head>
<body> <div class="phppot-container"> <h1>Web Push Notification using JavaScript in a Browser</h1> <script> pushNotify(); function pushNotify() { if (!("Notification" in window)) { // checking if the user's browser supports web push Notification alert("Web browser does not support desktop notification"); } else if (Notification.permission === "granted") { console.log("Permission to show web push notifications granted."); // if notification permissions is granted, // then create a Notification object createNotification(); } else if (Notification.permission !== "denied") { alert("Going to ask for permission to show web push notification"); // User should give explicit permission Notification.requestPermission().then((permission) => { // If the user accepts, let's create a notification createNotification(); }); } // User has not granted to show web push notifications via Browser // Let's honor his decision and not keep pestering anymore } function createNotification() { var notification = new Notification('Web Push Notification', { icon: 'https://phppot.com/badge.png', body: 'New article published!', }); // url that needs to be opened on clicking the notification // finally everything boils down to click and visits right notification.onclick = function() { window.open('https://phppot.com'); }; } </script> </div>
</body>
</html>

Permissions required

The following screenshot shows the settings to enable notification in the browser level and the system level.

Browser level permission

browser permission

OS level permission

This is to allow the Google Chrome application to receive notifications. Similarly, select appropriate browser applications like Safai and Firefox to allow notification in them.

system permission

↑ Back to Top

Share this page

Posted on Leave a comment

Amazon like Product Category Tree

by Vincy. Last modified on September 29th, 2022.

This PHP script will help if you want to display an Amazon-like product category tree. It will be useful for displaying the category menu in a hierarchical order, just like a tree.

The specialty of this PHP code is that it builds a multi-level category tree with infinite depth. It uses the recursion method to obtain this.

In a previous tutorial, we have to see a multi-level dropdown menu with a fixed depth.

Let’s look into the upcoming sections to see how the code is built to display the category tree in a page.

category tree

Category Database

This script contains the category database with data. The insert query creates category records which are mapped with its parent appropriately.

The category records containing parent=0 are known as the main category. Each record has the sort order to set the display priority on the UI.

structure.sql

CREATE TABLE `category` ( `id` int(10) UNSIGNED NOT NULL, `category_name` varchar(50) COLLATE utf8mb4_unicode_ci NOT NULL, `parent` int(10) UNSIGNED NOT NULL DEFAULT 0, `sort_order` int(11) NOT NULL DEFAULT 0
); --
-- Dumping data for table `category`
-- INSERT INTO `category` (`id`, `category_name`, `parent`, `sort_order`) VALUES
(1, 'Features', 0, 0),
(2, 'Domain', 0, 1),
(3, 'Digital', 0, 2),
(4, 'Gift cards', 1, 0),
(5, 'International', 1, 1),
(6, 'Popular', 1, 2),
(7, 'e-Gift cards', 4, 0),
(8, 'Business gift cards', 4, 1),
(9, 'In offer', 5, 0),
(10, 'Shipping', 5, 1),
(11, 'Celebrity favourites', 6, 0),
(12, 'Current year hits', 6, 1),
(13, 'Electronics', 2, 0),
(14, 'Arts', 2, 1),
(15, 'Gadgets', 2, 2),
(16, 'Camera', 13, 0),
(17, 'Car electronic accessories', 13, 1),
(18, 'GPS', 13, 2),
(19, 'Handcrafted', 14, 0),
(20, 'Gold enameled', 14, 1),
(21, 'Jewelry', 14, 2),
(22, 'Fabric', 19, 0),
(23, 'Needle work', 19, 1),
(24, 'PSP', 15, 0),
(25, 'Smart phones', 15, 1),
(26, 'Apps', 3, 0),
(27, 'Music', 3, 1),
(28, 'Movies', 3, 2),
(29, 'Dev apps', 26, 0),
(30, 'App Hardwares', 26, 1),
(31, 'Podcasts', 27, 0),
(32, 'Live', 27, 1),
(33, 'Recently viewed', 28, 0),
(34, 'You may like', 28, 1),
(35, 'Blockbusters', 28, 2); --
-- Indexes for dumped tables
-- --
-- Indexes for table `category`
--
ALTER TABLE `category` ADD PRIMARY KEY (`id`); --
-- AUTO_INCREMENT for dumped tables
-- --
-- AUTO_INCREMENT for table `category`
--
ALTER TABLE `category` MODIFY `id` int(10) UNSIGNED NOT NULL AUTO_INCREMENT, AUTO_INCREMENT=36;

Category menu rendering in HTML

This is an initiator that calls the PHP recursive parsing to get the Category Tree HTML. In the PHP ZipArchive post, we used the same recursion concept to compress the contents of the enclosed directories.

Also, it has a UI holder to render the HTML hierarchical category menu.

A PHP class CategoryTree is created to read and parse the category array from the database.

index.php

<!DOCTYPE html>
<html lang="en">
<head>
<meta name="viewport" content="width=device-width, initial-scale=1.0">
</head>
<body>
<?php
require_once __DIR__ . '/CategoryTree.php';
$categoryTree = new CategoryTree();
$categoryResult = $categoryTree->getCategoryResult();
?>
<h1>Choose category</h1> <div class="category-menu">
<?php
echo $categoryTree->getCategoryTreeHTML($categoryResult);
?>
</div>
</body>
</html>

This styles gives the category tree a pleasing look. Since it displays an infinite level of child categories, this CSS will help to rectify the default UI constraints.

body { font-family: Arial; margin-left: 10px; margin-right: 20px;
} ul.category-container li { list-style: none; padding-left: 10px; width: 100%;
} .category-container a { text-decoration: none; color: #000;
} .parent-depth-0 { font-size: 22px; font-weight: bold; border-bottom: #ccc 1px solid; padding: 15px 0px 15px 0px;
} .parent-depth-all { font-size: 16px; padding-top: 15px; font-weight: normal;
} .no-child { font-size: 16px; font-weight: normal; padding: 15px 0px 0px 0px;
} .category-menu { width: 270px; overflow-y: scroll; max-height: 800px; background: #fffcf2; padding: 0px;
} ul.category-container { padding: 10px;
}

Read category data and build in tree format

This is the main PHP class that reads the dynamic categories from the database.

The getCategoryTreeHTML the function parses the category result array. It recursively calls and parses the levels of category by its parent.

In WordPress, there is a category walker to parse the terms and taxonomies. We have created a custom WordPress walker to parse categories efficiently.

It sets the argument parent=0 to build parent-level category menu items.

The resultant category tree HTML will be a nested UL-LI list to show the multi-level menu.

CategoryTree.php

<?php class CategoryTree
{ private $connection; function __construct() { $this->connection = mysqli_connect('localhost', 'root', '', 'db_category_tree'); } function getCategoryTreeHTML($category, $parent = 0) { $html = ""; if (isset($category['parentId'][$parent])) { $html .= "<ul class='category-container'>\n"; foreach ($category['parentId'][$parent] as $cat_id) { if (! isset($category['parentId'][$cat_id])) { $child = ""; if ($category['categoryResult'][$cat_id]['parent'] != 0) { $child = "no-child"; } $html .= "<li class= '$child " . "parent-" . $category['categoryResult'][$cat_id]['parent'] . "' >\n" . $category['categoryResult'][$cat_id]['category_name'] . "</li> \n"; } if (isset($category['parentId'][$cat_id])) { $parentDepth0 = "parent-depth-all"; if ($category['categoryResult'][$cat_id]['parent'] == 0) { $parentDepth0 = "parent-depth-0"; } $html .= "<li class= '$parentDepth0 " . 'parent-' . $category['categoryResult'][$cat_id]['parent'] . "'>\n " . $category['categoryResult'][$cat_id]['category_name'] . " \n"; $html .= $this->getCategoryTreeHTML($category, $cat_id); $html .= "</li> \n"; } } $html .= "</ul> \n"; } return $html; } function getCategoryResult() { $query = "SELECT * FROM category ORDER BY parent, sort_order"; $result = mysqli_query($this->connection, $query); $category = array(); while ($row = mysqli_fetch_assoc($result)) { $category['categoryResult'][$row['id']] = $row; $category['parentId'][$row['parent']][] = $row['id']; } return $category; }
}
?>

Where category tree code can be used?

The category tree is used in many places. For example, most shopping cart websites have a category filter or menu to classify the showcase products.

The Amazon shop’s category menu ads value to the end user to narrow down the vast area to find their area of interest.

Also, tutorial websites display the table of contents in the form of a tree order.

Download

↑ Back to Top

Posted on Leave a comment

Datatrans Payments API for Secure Payment

by Vincy. Last modified on September 28th, 2022.

Datatrans is one of the popular payment gateway systems in Europe for e-commerce websites. It provides frictionless payment solutions.

The Datatrans Payment gateway is widely popular in European countries. One of my clients from Germany required this payment gateway integrated into their online shop.

In this tutorial, I share the knowledge of integrating Datatrans in a PHP application. It will save the developers time to do research with the long-form documentation.

There are many integration options provided by this payment gateway.

  1. Redirect and lightbox
  2. Secure fields
  3. Mobile SDK
  4. API endpoints

In this tutorial, we will see the first integration option to set up the Datatrans payment gateway. We have seen many payment gateway integration examples in PHP in the earlier articles.

A working example follows helps to understand things easily. Before seeing the example, get the Datatrans merchant id and password. It will be useful for authentication purposes while accessing this payment API.

datatrans api payment

Get Datatrans merchant id and password

The following steps lead to getting the merchant id and password of your Datatrans account.

    1. Open a Datatrans sandbox account and verify it via email.
    2. Set up your account by selecting the username, group name(Login) and password.
    3. After Set up it will show the following details
      • Login credentials.
      • Sandbox URL of the admin dashboard.
      • Datatrans Merchant Id for Web, Mobile SDK.
    4. Visit the sandbox URL and log in using the credential got in step 3.
    5. Click Change Merchant and Choose merchant to see the dashboard.
    6. Go to UPP Administration -> Security to copy the (Marchant Id)Username and Password for API access.

When we see CCAvenue payment integration, it also listed a few steps to get the merchant id from the dashboard.

datatrans merchant account credentials

Application configuration

This config file is created for this example to have the API keys used across the code.

It configures the URL that has to be called by the DataTrans server after the payment.

Config.php (Configure Datatrans authentication details)

<?php
class Config { const WEB_ROOT = 'http://localhost/pp-article-code/data-trans/'; const MERCHANT_ID = 'YOUR_MERCHANT_ID'; const PASSWORD = 'YOUR_MERCHANT_DASHBOARD_PASSWORD'; const SUCCESS_URL = Config::WEB_ROOT . 'return.php'; const CANCEL_URL = Config::WEB_ROOT . 'return.php?status=cancelled'; const ERROR_URL = Config::WEB_ROOT . 'return.php?status=error';
}
?>

Show the “Pay now” option

First, a landing page shows a product tile with a payment option. It will show a “Pay via DataTrans” button in the browser.

On clicking this button, it will call the AJAX script to get the transaction id.

This page includes the Datatrans JavaScript library to start payment with the transaction id.

index.php (Product tile with pay button)

<HTML>
<HEAD>
<TITLE>Datatrans Payments API for Secure Payment</TITLE>
<link rel="stylesheet" type="text/css" href="css/style.css">
<script src="https://code.jquery.com/jquery-3.6.0.min.js" integrity="sha256-/xUj+3OJU5yExlq6GSYGSHk7tPXikynS7ogEvDej/m4=" crossorigin="anonymous"></script> </HEAD>
<BODY> <div class="container"> <h1>Datatrans Payments API for Secure Payment</h1> <div class="outer-container"> <img src="image/camera.jpg" alt="camera image"> <div class="inner-container"> <p class="text-style">A6900 MirrorLess Camera</p> <p class="price-color-align"> $289.61<input type="hidden" name="amount" id="amount" value="289.61" /> </p> <input type="button" id="pay-now" class="pay-button" value="Pay via DataTrans" onClick="initiate()" /> </div> </div> </div> <script src="https://pay.sandbox.datatrans.com/upp/payment/js/datatrans-2.0.0.js"></script>
</BODY>
</HTML>

Get transaction id and proceed with payment via API

The initiate() function posts the amount to the PHP file to initiate Datatrans payment.

As the result, the PHP will return the transaction id to process the payment further.

The proceedPayment() function calls the Datatrans JavaScript API to start the payment. It will show a Datatrans overlay with card options to choose payment methods.

index.php (AJAX script to call Datatrans initiation)

function initiate() { $.ajax({ method: "POST", url: "initialize-datatrans-ajax.php", dataType: "JSON", data: { "amount": $("#amount").val() } }) .done(function(response) { if (response.responseType == 'success') { proceedPayment(response.transactionId); } else { alert(response.responseType + ": " + response.message); } }); }; function proceedPayment(transactionId) { Datatrans.startPayment({ transactionId: transactionId, 'opened': function() { console.log('payment-form opened'); }, 'loaded': function() { console.log('payment-form loaded'); }, 'closed': function() { console.log('payment-page closed'); }, 'error': function() { console.log('error'); } });
}

Initiate payment transaction to get the Datatrans payment transaction id

This file is the PHP endpoint called via AJAX script to get the Datatrans transaction id.

It invokes the DatatransPaymentService to post the cURL request to the Datatrans API. It requested to initiate the payment and receives the transaction id from the Datatrans server.

This output will be read in the AJAX success callback to start the payment via the JavaScript library.

initialize-datatrans-ajax.php

<?php
require_once 'DatatransPaymentService.php';
$dataTransPaymentService = new DatatransPaymentService();
$amount = $_POST["amount"];
$orderId = rand();
$result = $dataTransPaymentService->initializeTransaction($amount, $orderId);
print $result;
?>

Datatrans payment transaction service to call API via PHP cURL

This service call contains the initializeTransaction() method which prepares the cURL request in PHP to the Datatrans API.

It passed the amount, currency and more details to the API endpoint to request the transaction id.

DatatransPaymentService.php

<?php class DatatransPaymentService
{ public function initializeTransaction($amount, $orderId) { $url = 'https://api.sandbox.datatrans.com/v1/transactions'; require_once __DIR__ . '/Config.php'; $amount = $amount * 100; $postFields = json_encode(array( 'amount' => $amount, 'currency' => "USD", 'refno' => $orderId, 'redirect' => [ 'successUrl' => Config::SUCCESS_URL, "cancelUrl" => Config::CANCEL_URL, "errorUrl" => Config::ERROR_URL ] )); $key = Config::MERCHANT_ID . ':' . Config::PASSWORD; $keyBase64 = base64_encode($key); $ch = curl_init(); curl_setopt_array($ch, array( CURLOPT_URL => $url, CURLOPT_RETURNTRANSFER => true, CURLOPT_CUSTOMREQUEST => "POST", CURLOPT_POSTFIELDS => $postFields, CURLOPT_HTTPAUTH => CURLAUTH_BASIC, CURLOPT_HTTPHEADER => array( "Authorization: Basic " . $keyBase64, "Content-Type: application/json" ) )); $curlResponse = curl_exec($ch); $curlJSONObject = json_decode($curlResponse); if (empty($curlResponse)) { $curlError = curl_error($ch); } else if (! empty($curlJSONObject->error)) { $curlError = $curlJSONObject->error->code . ": " . $curlJSONObject->error->message; } curl_close($ch); if (empty($curlJSONObject->transactionId)) { $result = array( 'responseType' => "Error", 'message' => $curlError ); } else { $result = array( 'responseType' => "success", 'transactionId' => $curlJSONObject->transactionId ); } $result = json_encode($result); return $result; }
}
?>

Call application URL after payment

return.php

<HTML>
<HEAD>
<TITLE>Datatrans payment status notice</TITLE>
</HEAD>
<BODY> <div class="text-center">
<?php
if (! empty($_GET["status"])) { ?> <h1>Something wrong with the payment process!</h1> <p>Kindly contact admin with the reference of your transaction id <?php echo $_GET["datatransTrxId"]; ?></p>
<?php
} else { ?> <h1>Your order has been placed</h1> <p>We will contact you shortly.</p>
<?php
}
?>
</div>
</BODY>
</HTML>

Download

↑ Back to Top

Posted on Leave a comment

AJAX Call in JavaScript with Example

by Vincy. Last modified on September 27th, 2022.

This is a pure JavaScript solution to use AJAX without jQuery or any other third-party plugins.

The AJAX is a way of sending requests to the server asynchronously from a client-side script. In general, update the UI with server response without reloading the page.

I present two different methods of calling backend (PHP) with JavaScript AJAX.

  1. via XMLHTTPRequest.
  2. using JavaScript fetch prototype.

This tutorial creates simple examples of both methods. It will be an easy start for beginners of AJAX programming. It simply reads the content of a .txt file that is in the server via JavaScript AJAX.

If you want to search for a code for using jQuery AJAX, then we also have examples in it.

ajax javascript

AJAX call via XMLHTTPRequest

This example uses XMLHttpRequest in JavaScript to send an AJAX request to the server.

The below script has the following AJAX lifecycle to get the response from the server.

  1. It instantiates XMLHttpRequest class.
  2. It defines a callback function to handle the onreadystatechange event.
  3. It prepares the AJAX request by setting the request method, server endpoint and more.
  4. Calls send() with the reference of the XMLHttpRequest instance.

In the onreadystatechange event, it can read the response from the server. This checks the HTTP response code from the server and updates the UI without page refresh.

During the AJAX request processing, it shows a loader icon till the UI gets updated with the AJAX response data.

ajax-xhr.php

<!DOCTYPE html>
<html>
<head>
<title>How to make an AJAX Call in JavaScript with Example</title>
<link rel='stylesheet' href='style.css' type='text/css' />
<link rel='stylesheet' href='form.css' type='text/css' />
<style>
#loader-icon { display: none;
}
</style>
</head>
<body> <div class="phppot-container"> <h1>How to make an AJAX Call in JavaScript</h1> <p>This example uses plain JavaScript to make an AJAX call.</p> <p>It uses good old JavaScript's XMLHttpRequest. No dependency or libraries!</p> <div class="row"> <button onclick="loadDocument()">AJAX Call</button> <div id="loader-icon"> <img src="loader.gif" /> </div> </div> <div id='ajax-example'></div> <script> function loadDocument() { document.getElementById("loader-icon").style.display = 'inline-block'; var xmlHttpRequest = new XMLHttpRequest(); xmlHttpRequest.onreadystatechange = function() { if (xmlHttpRequest.readyState == XMLHttpRequest.DONE) { document.getElementById("loader-icon").style.display = 'none'; if (xmlHttpRequest.status == 200) { // on success get the response text and // insert it into the ajax-example DIV id. document.getElementById("ajax-example").innerHTML = xmlHttpRequest.responseText; } else if (xmlHttpRequest.status == 400) { // unable to load the document alert('Status 400 error - unable to load the document.'); } else { alert('Unexpected error!'); } } }; xmlHttpRequest.open("GET", "ajax-example.txt", true); xmlHttpRequest.send(); }
</script> </body>
</html>

Using JavaScript fetch prototype

This example calls JavaScript fetch() method by sending the server endpoint URL as its argument.

This method returns the server response as an object. This response object will contain the status and the response data returned by the server.

As like in the first method, it checks the status code if the “response.status” is 200. If so, it updates UI with the server response without reloading the page.

ajax-fetch.php

<!DOCTYPE html>
<html>
<head>
<title>How to make an AJAX Call in JavaScript using Fetch API with Example</title>
<link rel='stylesheet' href='style.css' type='text/css' />
<link rel='stylesheet' href='form.css' type='text/css' />
<style>
#loader-icon { display: none;
}
</style>
</head>
<body> <div class="phppot-container"> <h1>How to make an AJAX Call in JavaScript using Fetch</h1> <p>This example uses core JavaScript's Fetch API to make an AJAX call.</p> <p>JavaScript's Fetch API is a good alternative for XMLHttpRequest. No dependency or libraries! It has wide support with all major browsers.</p> <div class="row"> <button onclick="fetchDocument()">AJAX Call with Fetch</button> <div id="loader-icon"> <img src="loader.gif" /> </div> </div> <div id='ajax-example'></div> <script> async function fetchDocument() { let response = await fetch('ajax-example.txt'); document.getElementById("loader-icon").style.display = 'inline-block'; console.log(response.status); console.log(response.statusText); if (response.status === 200) { document.getElementById("loader-icon").style.display = 'none'; let data = await response.text(); document.getElementById("ajax-example").innerHTML = data; } }
</script> </body>
</html>

An example use case scenarios of using AJAX in an application

AJAX is a powerful tool. It has to be used in an effective way wherever needed.

The following are the perfect example scenarios of using AJAX in an application.

  1. To update the chat window with recent messages.
  2. To have the recent notification on a social media networking website.
  3. To update the scoreboard.
  4. To load recent events on scroll without page reload.

We have seen how to keep on posting events into a calender using jQuery AJAX script in a previous article.
Download

↑ Back to Top

Posted on Leave a comment

PHP Excel Export Code (Data to File)

by Vincy. Last modified on September 23rd, 2022.

Export data to an excel file is mainly used for taking a backup. When taking database backup, excel format is a convenient one to read and manage easily. For some applications exporting data is important to take a backup or an offline copy of the server database.

This article shows how to export data to excel using PHP. There are many ways to implement this functionality. We have already seen an example of data export from MySQL.

This article uses the PHPSpreadSheet library for implementing PHP excel export.

It is a popular library that supports reading, and writing excel files. It will smoothen the excel import-export operations through its built-in functions.

The complete example in this article will let create your own export tool or your application.
php excel export

About this Example

It will show a minimal interface with the list of database records and an “Export to Excel” button. By clicking this button, it will call the custom ExportService created for this example.

This service instantiates the PHPSpreadsheet library class and sets the column header and values. Then it creates a writer object by setting the PHPSpreadsheet instance to output the data to excel.

Follow the below steps to let this example run in your environment.

  1. Create and set up the database with data exported to excel.
  2. Download the code at the end of this article and configure the database.
  3. Add PHPSpreadSheet library and other dependencies into the application.

We have already used the PHPSpreadsheet library to store extracted image URLs.

1) Create and set up the database with data exported to excel

Create a database named “db_excel_export” and import the below SQL script into it.

structure.sql

--
-- Table structure for table `tbl_products`
-- CREATE TABLE `tbl_products` ( `id` int(8) NOT NULL, `name` varchar(255) NOT NULL, `price` double(10,2) NOT NULL, `category` varchar(255) NOT NULL, `product_image` text NOT NULL, `average_rating` float(3,1) NOT NULL
); --
-- Dumping data for table `tbl_products`
-- INSERT INTO `tbl_products` (`id`, `name`, `price`, `category`, `product_image`, `average_rating`) VALUES
(1, 'Tiny Handbags', 100.00, 'Fashion', 'gallery/handbag.jpeg', 5.0),
(2, 'Men\'s Watch', 300.00, 'Generic', 'gallery/watch.jpeg', 4.0),
(3, 'Trendy Watch', 550.00, 'Generic', 'gallery/trendy-watch.jpeg', 4.0),
(4, 'Travel Bag', 820.00, 'Travel', 'gallery/travel-bag.jpeg', 5.0),
(5, 'Plastic Ducklings', 200.00, 'Toys', 'gallery/ducklings.jpeg', 4.0),
(6, 'Wooden Dolls', 290.00, 'Toys', 'gallery/wooden-dolls.jpeg', 5.0),
(7, 'Advanced Camera', 600.00, 'Gadget', 'gallery/camera.jpeg', 4.0),
(8, 'Jewel Box', 180.00, 'Fashion', 'gallery/jewel-box.jpeg', 5.0),
(9, 'Perl Jewellery', 940.00, 'Fashion', 'gallery/perls.jpeg', 5.0); --
-- Indexes for dumped tables
-- --
-- Indexes for table `tbl_products`
--
ALTER TABLE `tbl_products` ADD PRIMARY KEY (`id`); --
-- AUTO_INCREMENT for dumped tables
-- --
-- AUTO_INCREMENT for table `tbl_products`
--
ALTER TABLE `tbl_products` MODIFY `id` int(8) NOT NULL AUTO_INCREMENT, AUTO_INCREMENT=10;

2) Download the code and configure the database

The source code contains the following files. This section explains the database configuration.

excel export file structure

Once you download the excel export code from this page, you can find DataSource.php file in the lib folder. Open it and configure the database details in it as below.

<?php class DataSource
{ const HOST = 'localhost'; const USERNAME = 'root'; const PASSWORD = ''; const DATABASENAME = 'db_excel_export'; ... ...
?>

3) Add PHPSpreadSheet library and other dependencies into the application

When you see the PHPSpreadsheet documentation, it provides an easy to follow installation steps.

It gives the composer command to add the PHPSpreadsheet and related dependencies into the application.

composer require phpoffice/phpspreadsheet

For PHP version 7

Add the below specification to the composer.json file.

{ "require": { "phpoffice/phpspreadsheet": "^1.23" }, "config": { "platform": { "php": "7.3" } }
}

then run

composer update

Note: PHPSpreadsheet requires at least PHP 7.3 version.

How it works

Simple interface with export option

This page fetches the data from the MySQL database and displays it in a grid form. Below the data grid, this page shows an “Excel Export” button.

By clicking this button the action parameter is sent to the URL to call the excel export service in PHP.

index.php

<?php
require_once __DIR__ . '/lib/Post.php';
$post = new post();
$postResult = $post->getAllPost();
$columnResult = $post->getColumnName();
if (! empty($_GET["action"])) { require_once __DIR__ . '/lib/ExportService.php'; $exportService = new ExportService(); $result = $exportService->exportExcel($postResult, $columnResult);
}
?>
<html>
<head>
<meta name="viewport" content="width=device-width, initial-scale=1">
<link href="./style.css" type="text/css" rel="stylesheet" />
</head>
<body> <div id="table-container"> <table id="tab"> <thead> <tr> <th width="5%">Id</th> <th width="35%">Name</th> <th width="20%">Price</th> <th width="25%">Category</th> <th width="25%">product Image</th> <th width="20%">Average Rating</th> </tr> </thead> <tbody> <?php if (! empty($postResult)) { foreach ($postResult as $key => $value) { ?> <tr> <td><?php echo $postResult[$key]["id"]; ?></td> <td><?php echo $postResult[$key]["name"]; ?></td> <td><?php echo $postResult[$key]["price"]; ?></td> <td><?php echo $postResult[$key]["category"]; ?></td> <td><?php echo $postResult[$key]["product_image"]; ?></td> <td><?php echo $postResult[$key]["average_rating"]; ?></td> </tr> <?php } } ?> </tbody> </table> <div class="btn"> <form action="" method="POST"> <a href="<?php echo strtok($_SERVER["REQUEST_URI"]);?><?php echo $_SERVER["QUERY_STRING"];?>?action=export"><button type="button" id="btnExport" name="Export" value="Export to Excel" class="btn btn-info">Export to Excel</button></a> </form> </div> </div>
</body>
</html>

PHP model calls prepare queries to fetch data to export

This is a PHP model class that is called to read data from the database. The data array will be sent to the export service to build the excel sheet object.

The getColumnName() reads the database table column name array. This array will supply data to form the first row in excel to create a column header.

The getAllPost() reads the data rows that will be iterated and set the data cells with the values.

lib/Post.php

<?php
class Post
{ private $ds; public function __construct() { require_once __DIR__ . '/DataSource.php'; $this->ds = new DataSource(); } public function getAllPost() { $query = "select * from tbl_products"; $result = $this->ds->select($query); return $result; } public function getColumnName() { $query = "select * from INFORMATION_SCHEMA.COLUMNS where TABLE_NAME=N'tbl_products'"; $result = $this->ds->select($query); return $result; }
}
?>

PHP excel export service

This service helps to export data to the excel sheet. The resultant file will be downloaded to the browser by setting the PHP header() properties.

The $postResult has the row data and the $columnResult has the column data.

This example instantiates the PHPSpreadSheet library class and sets the column header and values. Then it creates a writer object by setting the spreadsheet instance to output the data to excel.

lib/ExportService.php

<?php
use PhpOffice\PhpSpreadsheet\IOFactory;
use PhpOffice\PhpSpreadsheet\Spreadsheet;
use PhpOffice\PhpSpreadsheet\Writer\Xlsx;
use PhpOffice\PhpSpreadsheet\Calculation\TextData\Replace;
require_once __DIR__ . '/../vendor/autoload.php'; class ExportService
{ public function exportExcel($postResult, $columnResult) { $spreadsheet = new Spreadsheet(); $spreadsheet->getProperties()->setTitle("excelsheet"); $spreadsheet->setActiveSheetIndex(0); $spreadsheet->getActiveSheet()->SetCellValue('A1', ucwords($columnResult[0]["COLUMN_NAME"])); $spreadsheet->getActiveSheet()->SetCellValue('B1', ucwords($columnResult[1]["COLUMN_NAME"])); $spreadsheet->getActiveSheet()->SetCellValue('C1', ucwords($columnResult[2]["COLUMN_NAME"])); $spreadsheet->getActiveSheet()->SetCellValue('D1', ucwords($columnResult[3]["COLUMN_NAME"])); $spreadsheet->getActiveSheet()->SetCellValue('E1', str_replace('_', ' ', ucwords($columnResult[4]["COLUMN_NAME"], '_'))); $spreadsheet->getActiveSheet()->SetCellValue('F1', str_replace('_', ' ', ucwords($columnResult[5]["COLUMN_NAME"], '_'))); $spreadsheet->getActiveSheet() ->getStyle("A1:F1") ->getFont() ->setBold(true); $rowCount = 2; if (! empty($postResult)) { foreach ($postResult as $k => $v) { $spreadsheet->getActiveSheet()->setCellValue("A" . $rowCount, $postResult[$k]["id"]); $spreadsheet->getActiveSheet()->setCellValue("B" . $rowCount, $postResult[$k]["name"]); $spreadsheet->getActiveSheet()->setCellValue("C" . $rowCount, $postResult[$k]["price"]); $spreadsheet->getActiveSheet()->setCellValue("D" . $rowCount, $postResult[$k]["category"]); $spreadsheet->getActiveSheet()->setCellValue("E" . $rowCount, $postResult[$k]["product_image"]); $spreadsheet->getActiveSheet()->setCellValue("F" . $rowCount, $postResult[$k]["average_rating"]); $rowCount ++; } $spreadsheet->getActiveSheet() ->getStyle('A:F') ->getAlignment() ->setWrapText(true); $spreadsheet->getActiveSheet() ->getRowDimension($rowCount) ->setRowHeight(- 1); } $writer = IOFactory::createWriter($spreadsheet, 'Xls'); header('Content-Type: text/xls'); $fileName = 'exported_excel_' . time() . '.xls'; $headerContent = 'Content-Disposition: attachment;filename="' . $fileName . '"'; header($headerContent); $writer->save('php://output'); }
}
?>

Download

↑ Back to Top

Posted on Leave a comment

How to Detect Mobile Device using JavaScript

by Vincy. Last modified on September 20th, 2022.

If you are looking for a client-side solution to detect a mobile device, your search stops here :-). There are properties to detect this on the client side by using JavaScript.

Two methods of detecting if a current device is a mobile device are listed below.

  1. By using JavaScript window.matchMedia() method.
  2. By using navigator.userAgent property.

Both are using JavaScript basic methods to create the mobile device detector code.

1) By using JavaScript window.matchMedia() method

This method is the best one compared to the one using JavaScript navigator.userAgent. Because the userAgent is a setting that can be configured by the end users. They can change it!

matchmedia.html

Quick example

function isMobileDevice() { return window .matchMedia("only screen and (max-width: 760px)").matches;
}
if (isMobileDevice()) { document.write("<b>Detected device is a mobile.</b>");
} else { document .write("<b>Detected device is not a mobile.</b>");
}

The matchMedia() JavaScript custom method is used to do this mobile device detection.

It accepts a media query string and returns an object. This object will contain the current device’s media property and its relevancy.

Then, this object is used to find the match between the current device’s media property with the media query passed.

This program sends the media query containing a max-width of a mobile device that is expected to have.

If the current device’s media screen properties are matched with this argument, then this JavaScript function returns a boolean true.

View Demo

This screenshot is taken from my computer that prints the result of the above quick example.

detect mobile device javascript output

Media match with CSS

It can also be done by CSS instead of JavaScript. Follow the below steps to implement this using CSS.

  • Keep two possible messages in the HTML markup with  style=’display:none’.
  • Write CSS media query section with @media screen and (max-width: 600px).
  • Show and hide the appropriate UI notification element according to the screen width.
<!DOCTYPE html>
<html>
<head>
<title>How to Detect Mobile Device using JavaScript</title>
<meta name="viewport" content="width=device-width, initial-scale=1">
<style>
.mobile { display: none;
} .not-mobile { display: block;
} @media only screen and (max-width: 600px) { .mobile { display: block; } .not-mobile { display: none; }
}
</style>
</head>
<body> <b class="mobile">Detected device is a mobile.</b> <b class="not-mobile">Detected device is not a mobile.</b>
</body>
</html>

2) By using a navigator.userAgent property

The alternate method is for checking the current userAgent to detect if it is a mobile device.

The isMobileDevice() function in the below example does the test with a regex pattern. The regex contains the most possible values of a mobile device’s userAgent.

We have already used regex pattern matching for a JavaScript email validation utility.

The script compares the current device’s userAgent property with the pattern. If a match is found, then this function returns true to print the appropriate result.

navigator.html

<!DOCTYPE html>
<html>
<head>
<title>How to Detect Mobile Device using JavaScript</title>
</head>
<body> <h1>How to Detect Mobile Device using JavaScript</h1> <p>Note: Browser users can change value of "userAgent" via UA spoofing. So be aware of that and do not use this feature to provide a critical function of your website.</p> <script> function isMobileDevice() { return /Android|webOS|iPhone|iPad|iPod|BlackBerry|IEMobile|Opera Mini/i .test(navigator.userAgent); /* for a more detailed test /(android|bb\d+|meego).+mobile|avantgo|bada\/|blackberry|blazer|compal|elaine|fennec|hiptop|iemobile|ip(hone|od)|ipad|iris|kindle|Android|Silk|lge |maemo|midp|mmp|netfront|opera m(ob|in)i|palm( os)?|phone|p(ixi|re)\/|plucker|pocket|psp|series(4|6)0|symbian|treo|up\.(browser|link)|vodafone|wap|windows (ce|phone)|xda|xiino/i .test(navigator.userAgent) || /1207|6310|6590|3gso|4thp|50[1-6]i|770s|802s|a wa|abac|ac(er|oo|s\-)|ai(ko|rn)|al(av|ca|co)|amoi|an(ex|ny|yw)|aptu|ar(ch|go)|as(te|us)|attw|au(di|\-m|r |s )|avan|be(ck|ll|nq)|bi(lb|rd)|bl(ac|az)|br(e|v)w|bumb|bw\-(n|u)|c55\/|capi|ccwa|cdm\-|cell|chtm|cldc|cmd\-|co(mp|nd)|craw|da(it|ll|ng)|dbte|dc\-s|devi|dica|dmob|do(c|p)o|ds(12|\-d)|el(49|ai)|em(l2|ul)|er(ic|k0)|esl8|ez([4-7]0|os|wa|ze)|fetc|fly(\-|_)|g1 u|g560|gene|gf\-5|g\-mo|go(\.w|od)|gr(ad|un)|haie|hcit|hd\-(m|p|t)|hei\-|hi(pt|ta)|hp( i|ip)|hs\-c|ht(c(\-| |_|a|g|p|s|t)|tp)|hu(aw|tc)|i\-(20|go|ma)|i230|iac( |\-|\/)|ibro|idea|ig01|ikom|im1k|inno|ipaq|iris|ja(t|v)a|jbro|jemu|jigs|kddi|keji|kgt( |\/)|klon|kpt |kwc\-|kyo(c|k)|le(no|xi)|lg( g|\/(k|l|u)|50|54|\-[a-w])|libw|lynx|m1\-w|m3ga|m50\/|ma(te|ui|xo)|mc(01|21|ca)|m\-cr|me(rc|ri)|mi(o8|oa|ts)|mmef|mo(01|02|bi|de|do|t(\-| |o|v)|zz)|mt(50|p1|v )|mwbp|mywa|n10[0-2]|n20[2-3]|n30(0|2)|n50(0|2|5)|n7(0(0|1)|10)|ne((c|m)\-|on|tf|wf|wg|wt)|nok(6|i)|nzph|o2im|op(ti|wv)|oran|owg1|p800|pan(a|d|t)|pdxg|pg(13|\-([1-8]|c))|phil|pire|pl(ay|uc)|pn\-2|po(ck|rt|se)|prox|psio|pt\-g|qa\-a|qc(07|12|21|32|60|\-[2-7]|i\-)|qtek|r380|r600|raks|rim9|ro(ve|zo)|s55\/|sa(ge|ma|mm|ms|ny|va)|sc(01|h\-|oo|p\-)|sdk\/|se(c(\-|0|1)|47|mc|nd|ri)|sgh\-|shar|sie(\-|m)|sk\-0|sl(45|id)|sm(al|ar|b3|it|t5)|so(ft|ny)|sp(01|h\-|v\-|v )|sy(01|mb)|t2(18|50)|t6(00|10|18)|ta(gt|lk)|tcl\-|tdg\-|tel(i|m)|tim\-|t\-mo|to(pl|sh)|ts(70|m\-|m3|m5)|tx\-9|up(\.b|g1|si)|utst|v400|v750|veri|vi(rg|te)|vk(40|5[0-3]|\-v)|vm40|voda|vulc|vx(52|53|60|61|70|80|81|83|85|98)|w3c(\-| )|webc|whit|wi(g |nc|nw)|wmlb|wonu|x700|yas\-|your|zeto|zte\-/i .test(navigator.userAgent.substr(0, 4)) */ } if (isMobileDevice()) { document.write("<b>Detected device is a mobile.</b>"); } else { document .write("<b>Detected device is not a mobile.</b>"); } </script>
</body>
</html>

Note: Browser users can change the value of “userAgent” via UA spoofing. So be aware of that and do not use this feature to provide a critical function of your website.

View Demo Download

↑ Back to Top

Posted on Leave a comment

How to Capture Screenshot of Page using JavaScript

by Vincy. Last modified on September 19th, 2022.

We are going to see three different ways of capturing screenshots of a webpage using JavaScript. These three methods give solutions to take screenshots with and without using libraries.

  1. Using html2canvas JavaScript library.
  2. Using plain HTML5 with JavaScript.
  3. Using WebRTC’s getDisplayMedia method.

1) Using the html2canvas JavaScript library

This method uses the popular JS library html2canvas to capture a screenshot from a webpage.

This script implements the below steps to capture a screenshot from the page HTML.

  • It initializes the html2canvas library class and supplies the body HTML to it.
  • It sets the target to append the output screenshot to the HTML body.
  • Generates canvas element and appends to the HTML.
  • It gets the image source data URL from the canvas object.
  • Push the source URL to the PHP via AJAX to save the screenshot to the server.

capture-screenshot/index.html

Quick example

<!DOCTYPE html>
<html>
<head>
<title>How to Capture Screenshot of Page using JavaScript</title>
<link rel='stylesheet' href='form.css' type='text/css' />
</head>
<body> <div class="phppot-container"> <h1>How to Capture Screenshot of Page using JavaScript</h1> <p> <button id="capture-screenshot">Capture Screenshot</button> </p> </div> <script src="https://ajax.googleapis.com/ajax/libs/jquery/3.2.1/jquery.min.js"></script> <script type="text/javascript" src="https://html2canvas.hertzen.com/dist/html2canvas.min.js"></script> <script type="text/javascript"> $('#capture-screenshot').click(function() { const screenshotTarget = document.body; html2canvas(screenshotTarget).then(canvas => { // to image as png use below line // const base64image = canvas.toDataURL("image/png"); // show the image in window use below line // window.location.href = base64image; // screenshot appended to the body as canvas document.body.appendChild(canvas); dataURL = canvas.toDataURL(); // to print the screenshot in console use below line // console.log(dataURL); // following line is optional and it is to save the screenshot // on the server side. It initiates an ajax call pushScreenshotToServer(dataURL); }); }); function pushScreenshotToServer(dataURL) { $.ajax({ url: "push-screenshot.php", type: "POST", data: { image: dataURL }, dataType: "html", success: function() { console.log('Screenshot pushed to server.'); } }); } </script>
</body>
</html>

We have already used this library in codes generating canvas elements with dynamic data. For example, we used html2canvas for creating invoice PDFs from HTML using JavaScript.

capture screenshot javascript

Push the screenshot to PHP to save

This PHP script reads the screenshot binaries posted via AJAX. It prepares the screenshot properties in a JSON format.

capture-screenshot/push-screenshot.php

<?php
if (isset($_POST['image'])) { // should have read and write permission to the disk to write the JSON file $screenshotJson = fopen("screenshot.json", "a") or die("Unable to open screenshot.json file."); $existingContent = file_get_contents('screenshot.json'); $contentArray = json_decode($existingContent, true); $screenshotImage = array( 'imageURL' => $_POST['image'] ); $contentArray[] = $screenshotImage; $fullData = json_encode($contentArray); file_put_contents('screenshot.json', $fullData); fclose($screenshotJson);
}
?>

This will output a “screenshot.json” file with the image data URL and store it in the application.
Video Demo

2) Using plain HTML5 with JavaScript

This JavaScript code includes two functions. One is to generate an image object URL and the other is to take screenshots by preparing the blob object from the page.

It prepares a blob object URL representing the output screenshot image captured from the page. It takes screenshots by clicking the “Capture Screenshot” button in the UI.

It controls the style properties and scroll coordinates of the node pushed to the screenshot object. This is to stop users have the mouse controls on the BLOB object.

In a previous example, we have seen how to create a blob and store it in the MySQL database.

This code will show the captured screenshot on a new page. The new page will have the generated blob URL as blob:http://localhost/0212cfc1-02ab-417c-b92f-9a7fe613808c

html5-javascript/index.html

function takeScreenshot() { var screenshot = document.documentElement .cloneNode(true); screenshot.style.pointerEvents = 'none'; screenshot.style.overflow = 'hidden'; screenshot.style.webkitUserSelect = 'none'; screenshot.style.mozUserSelect = 'none'; screenshot.style.msUserSelect = 'none'; screenshot.style.oUserSelect = 'none'; screenshot.style.userSelect = 'none'; screenshot.dataset.scrollX = window.scrollX; screenshot.dataset.scrollY = window.scrollY; var blob = new Blob([screenshot.outerHTML], { type: 'text/html' }); return blob;
} function generate() { window.URL = window.URL || window.webkitURL; window.open(window.URL .createObjectURL(takeScreenshot()));
}

3) Using WebRTC’s getDisplayMedia method

This method uses the JavaScript MediaServices class to capture the screenshot from the page content.

This example uses the getDisplayMedia() of this class to return the media stream of the current page content.

Note: It needs to grant permission to get the whole or part of the page content on the display.

It prepares an image source to draw into the canvas with the reference of its context. After writing the media stream object into the context, this script converts the canvas into a data URL.

This data URL is used to see the page screenshot captured on a new page.

After reading the media stream object to a screenshot element object, it should be closed. The JS MediaStreamTrack.stop() is used to close the track if it is not needed.

This JavaScript forEach iterates the MediaStream object array to get the track instance to stop.

webrtc-get-display-media/index.html

<!DOCTYPE html>
<html>
<head>
<title>How to Capture Sceenshot of Page using JavaScript</title>
<link rel='stylesheet' href='form.css' type='text/css' />
</head>
<body> <div class="phppot-container"> <p>This uses the WebRTC standard to take screenshot. WebRTC is popular and has support in all major modern browsers. It is used for audio, video communication.</p> <p>getDisplayMedia() is part of WebRTC and is used for screen sharing. Video is rendered and then page screenshot is captured from the video.</p> <p> <p> <button id="capture-screenshot" onclick="captureScreenshot();">Capture Screenshot</button> </p> </div> <script> const captureScreenshot = async () => { const canvas = document.createElement("canvas"); const context = canvas.getContext("2d"); const screenshot = document.createElement("screenshot"); try { const captureStream = await navigator.mediaDevices.getDisplayMedia(); screenshot.srcObject = captureStream; context.drawImage(screenshot, 0, 0, window.width, window.height); const frame = canvas.toDataURL("image/png"); captureStream.getTracks().forEach(track => track.stop()); window.location.href = frame; } catch (err) { console.error("Error: " + err); } }; </script>
</body>
</html>

Video DemoDownload

↑ Back to Top

Posted on Leave a comment

PHP YouTube Video Downloader Script

by Vincy. Last modified on September 15th, 2022.

YouTube is almost the numero uno platform for hosting videos. It allows users to publish and share videos, more like a social network.

Downloading YouTube videos is sometimes required. You must read through the YouTube terms and conditions before downloading videos and act according to the permissions given. For example you may wish to download to have a backup of older videos that are going to be replaced or removed.

This quick example provides a YouTube Video downloader script in PHP. It has a video URL defined in a PHP variable. It also establishes a key to access the YouTube video meta via API.

Configure the key and store the video URL to get the video downloader link using this script.

Quick example

<?php
$apiKey = "API_KEY";
$videoUrl = "YOUTUBE_VIDEO_URL";
preg_match('%(?:youtube(?:-nocookie)?\.com/(?:[^/]+/.+/|(?:v|e(?:mbed)?)/|.*[?&]v=)|youtu\.be/)([^"&?/ ]{11})%i', $videoUrl, $match);
$youtubeVideoId = $match[1];
$videoMeta = json_decode(getYoutubeVideoMeta($youtubeVideoId, $apiKey));
$videoTitle = $videoMeta->videoDetails->title;
$videoFormats = $videoMeta->streamingData->formats;
foreach ($videoFormats as $videoFormat) { $url = $videoFormat->url; if ($videoFormat->mimeType) $mimeType = explode(";", explode("/", $videoFormat->mimeType)[1])[0]; else $mimeType = "mp4"; ?>
<a href="video-downloader.php?link=<?php echo urlencode($url)?>&title=<?php echo urlencode($videoTitle)?>&type=<?php echo $mimeType; ?>"> Download Video</a>
<?php
} function getYoutubeVideoMeta($videoId, $key)
{ $ch = curl_init(); $curlUrl = 'https://www.youtube.com/youtubei/v1/player?key=' . $key; curl_setopt($ch, CURLOPT_URL, $curlUrl); curl_setopt($ch, CURLOPT_ENCODING, 'gzip, deflate'); curl_setopt($ch, CURLOPT_RETURNTRANSFER, 1); curl_setopt($ch, CURLOPT_POST, 1); $curlOptions = '{"context": {"client": {"hl": "en","clientName": "WEB", "clientVersion": "2.20210721.00.00","clientFormFactor": "UNKNOWN_FORM_FACTOR","clientScreen": "WATCH", "mainAppWebInfo": {"graftUrl": "/watch?v=' . $videoId . '",}},"user": {"lockedSafetyMode": false}, "request": {"useSsl": true,"internalExperimentFlags": [],"consistencyTokenJars": []}}, "videoId": "' . $videoId . '", "playbackContext": {"contentPlaybackContext": {"vis": 0,"splay": false,"autoCaptionsDefaultOn": false, "autonavState": "STATE_NONE","html5Preference": "HTML5_PREF_WANTS","lactMilliseconds": "-1"}}, "racyCheckOk": false, "contentCheckOk": false}'; curl_setopt($ch, CURLOPT_POSTFIELDS, $curlOptions); $headers = array(); $headers[] = 'Content-Type: application/json'; curl_setopt($ch, CURLOPT_HTTPHEADER, $headers); $curlResult = curl_exec($ch); if (curl_errno($ch)) { echo 'Error:' . curl_error($ch); } curl_close($ch); return $curlResult;
}
?>

This example code works in the following flow to output the link to download the YouTube video.

  1. Get the unique id of the YouTube video from the input URL.
  2. Request YouTube API via PHP cURL post to access the video metadata.
  3. Get video title, data array in various formats, and MIME type by parsing the cURL response.
  4. Pass the video links, title and mime types to the video downloader script.
  5. Apply PHP readfile() to download the video file by setting the PHP header Content-type.

youtube video downloader links php

The below video downloader script is called by clicking the “Download video” link in the browser.

It receives the video title, and extension to define the output video file name. It also gets the video link from which it reads the video to be downloaded to the browser.

This script sets the content header in PHP to output the YouTube video file.

video-downloader.php

<?php
// this PHP script reads and downloads the video from YouTube
$downloadURL = urldecode($_GET['link']);
$downloadFileName = urldecode($_GET['title']) . '.' . urldecode($_GET['type']);
if (! empty($downloadURL) && substr($downloadURL, 0, 8) === 'https://') { header("Cache-Control: public"); header("Content-Description: File Transfer"); header("Content-Disposition: attachment;filename=\"$downloadFileName\""); header("Content-Transfer-Encoding: binary"); readfile($downloadURL);
}
?>

View Demo

Collect YouTube video URL via form and process video downloader script

In the quick example, it has a sample to hardcode the YouTube video URL to a PHP variable.

But, the below code will allow users to enter the video URL instead of the hardcode.

An HTML form will post the entered video URL to process the PHP cURL request to the YouTube API.

After posting the video URL, the PHP flow is the same as the quick example. But, the difference is, that it displays more links to download videos in all the adaptive formats.

index.php

<form method="post" action=""> <h1>PHP YouTube Video Downloader Script</h1> <div class="row"> <input type="text" class="inline-block" name="youtube-video-url"> <button type="submit" name="submit" id="submit">Download Video</button> </div>
</form>
<?php
if (isset($_POST['youtube-video-url'])) { $videoUrl = $_POST['youtube-video-url']; ?>
<p> URL: <a href="<?php echo $videoUrl;?>"><?php echo $videoUrl;?></a>
</p>
<?php
}
if (isset($_POST['submit'])) { preg_match('%(?:youtube(?:-nocookie)?\.com/(?:[^/]+/.+/|(?:v|e(?:mbed)?)/|.*[?&]v=)|youtu\.be/)([^"&?/ ]{11})%i', $videoUrl, $match); $youtubeVideoId = $match[1]; require './youtube-video-meta.php'; $videoMeta = json_decode(getYoutubeVideoMeta($youtubeVideoId, $key)); $videoThumbnails = $videoMeta->videoDetails->thumbnail->thumbnails; $thumbnail = end($videoThumbnails)->url; ?>
<p> <img src="<?php echo $thumbnail; ?>">
</p>
<?php $videoTitle = $videoMeta->videoDetails->title; ?>
<h2>Video title: <?php echo $videoTitle; ?></h2>
<?php $shortDescription = $videoMeta->videoDetails->shortDescription; ?>
<p><?php echo str_split($shortDescription, 100)[0];?></p>
<?php $videoFormats = $videoMeta->streamingData->formats; if (! empty($videoFormats)) { if (@$videoFormats[0]->url == "") { ?>
<p> <strong>This YouTube video cannot be downloaded by the downloader!</strong><?php $signature = "https://example.com?" . $videoFormats[0]->signatureCipher; parse_str(parse_url($signature, PHP_URL_QUERY), $parse_signature); $url = $parse_signature['url'] . "&sig=" . $parse_signature['s']; ?> </p>
<?php die(); } ?>
<h3>With Video & Sound</h3>
<table class="striped"> <tr> <th>Video URL</th> <th>Type</th> <th>Quality</th> <th>Download Video</th> </tr> <?php foreach ($videoFormats as $videoFormat) { if (@$videoFormat->url == "") { $signature = "https://example.com?" . $videoFormat->signatureCipher; parse_str(parse_url($signature, PHP_URL_QUERY), $parse_signature); $url = $parse_signature['url'] . "&sig=" . $parse_signature['s']; } else { $url = $videoFormat->url; } ?> <tr> <td><a href="<?php echo $url; ?>">View Video</a></td> <td><?php if($videoFormat->mimeType) echo explode(";",explode("/",$videoFormat->mimeType)[1])[0]; else echo "Unknown";?></td> <td><?php if($videoFormat->qualityLabel) echo $videoFormat->qualityLabel; else echo "Unknown"; ?></td> <td><a href="video-downloader.php?link=<?php echo urlencode($url)?>&title=<?php echo urlencode($videoTitle)?>&type=<?php if($videoFormat->mimeType) echo explode(";",explode("/",$videoFormat->mimeType)[1])[0]; else echo "mp4";?>"> Download Video</a></td> </tr> <?php } ?> </table>
<?php // if you wish to provide formats based on different formats // then keep the below two lines $adaptiveFormats = $videoMeta->streamingData->adaptiveFormats; include 'adaptive-formats.php'; ?> <?php }
}
?>

This program will output the following once it has the video downloader response.

php youtube video downloader

PHP cURL script to get the video metadata

The PHP cURL script used to access the YouTube endpoint to read the file meta is already seen in the quick example.

The above code snippet has a PHP require_once statement for having the cURL post handler.

The youtube-video-meta.php file has this handler to read the video file meta. It receives the unique id of the video and the key used in the PHP cURL parsing.

In a recently posted article, we have collected file meta to upload to Google Drive.

Display YouTube video downloaders in adaptive formats

The landing page shows another table of downloads to get the video file in the available adaptive formats.

The PHP script accesses the adaptiveFormats property of the Youtube video meta-object to display these downloads.

adaptive-formats.php

<h3>YouTube Videos Adaptive Formats</h3>
<table class="striped"> <tr> <th>Type</th> <th>Quality</th> <th>Download Video</th> </tr> <?php foreach ($adaptiveFormats as $videoFormat) { try { $url = $videoFormat->url; } catch (Exception $e) { $signature = $videoFormat->signatureCipher; parse_str(parse_url($signature, PHP_URL_QUERY), $parse_signature); $url = $parse_signature['url']; } ?> <tr> <td><?php if(@$videoFormat->mimeType) echo explode(";",explode("/",$videoFormat->mimeType)[1])[0]; else echo "Unknown";?></td> <td><?php if(@$videoFormat->qualityLabel) echo $videoFormat->qualityLabel; else echo "Unknown"; ?></td> <td><a href="video-downloader.php?link=<?php print urlencode($url)?>&title=<?php print urlencode($videoTitle)?>&type=<?php if($videoFormat->mimeType) echo explode(";",explode("/",$videoFormat->mimeType)[1])[0]; else echo "mp4";?>">Download Video</a></td> </tr> <?php }?>
</table>

View DemoDownload

↑ Back to Top

Posted on Leave a comment

JavaScript this Keyword

by Vincy. Last modified on September 13th, 2022.

JavaScript this keyword is for referring to objects of the current context. If no context around, it points to the window context by default.

There is more context the JavaScript can refer to via this keyword. The below list shows some of them.

  • Global context
  • Method context
  • function context
  • Class context
  • Event context

In these contexts JavaScript this keyword refers to the different objects correspondingly.

The below code uses the ‘this’ keyword to print the main and sub-category breadcrumb in the browser.

Quick Example

This example uses ‘JavaScript this’ in the object’s method to read properties.


<script>
const category = { mainCategory: "Gadgets", subCategory: "Mobile phones", DisplayCategoryTree : function() { return this.mainCategory + " -> " + this.subCategory; }
};
document.write(category.DisplayCategoryTree());
</script>

javascript this

How it works

The behavior of using ‘this’ varies based on several factors. Some of them are listed below.

  1. It differs between dynamic and explicit binding.
  2. It works differently on strict and non-strict modes.
  3. It varies based on the enclosing contexts.
  4. It differs based on how and where they are called or used.

Generally, the ‘this’ will behave with dynamic binding. JavaScript supports explicit binding with the bind() method to change the default.

Without default value, the JavaScript ‘this’ returns ‘undefined’ in a strict mode.

Different usages of ‘this’ in JavaScript

There are different usage practices in JavaScript to use the ‘this’ keyword to refer to a context. Let us see about the following 2 among those practices.

  1. Set default values to the ‘this’.
  2. Arrow function.

By default, the ‘this’ refers to the global context. But, in strict mode, functions need a default value to use ‘this’ as a reference. The JavaScript classes are always in a strict mode and require object reference to use ‘this’.

The JavaScript arrow functions give compact code. So we can choose it for writing a limited code with purposes. But, I prefer to use traditional expressions while coding.

More examples using JavaScript this

This section gives more examples of the ‘JavaScript this’ keyword. It shows how ‘this’ will work in different scenarios and contexts.

It gives code for accessing properties of a class or JavaScript const block.

It accesses the HTML elements on event handling. It helps to manipulate the DOM objects via JavaScript with the reference of the ‘this’ keyword.

Example 1: Accessing object properties via this using JavaScript call() function

This program binds the properties of an object with the method of another object. It uses the JavaScript call() to log the properties with the reference of the ‘this’ object.

bind-objects-and-get-properties-with-this.html


<script>
const category = { DisplayCategoryTree : function() { return this.mainCategory + " -> " + this.subCategory; }
};
const categoryData = { mainCategory: "Gadgets", subCategory: "Mobile phones",
}; console.log(category.DisplayCategoryTree.call(categoryData));
</script>

Example 2: JavaScript this in Strict mode

In strict mode, JavaScript this keyword refers to the global window context. But, within a function, it returns undefined.

javascript-this-in-strict-mode.html


<script> "use strict";
let obj = this;
// 'this' is 'window' object
console.log(obj); function getContext() { return this;
}
// In strict mode, JavaScript 'this' inside a funtion is 'undefined'
console.log(getContext());
</script>

Example 3: Set or get object properties using this keyword

This example sets the properties of an object. Also. it reads them using the JavaScript this keyword. It defines functions to get or set the properties.

javascript-getter-setter-with-this-object-html.php


<script>
const Properties = { color: "Black", size: "Big", type: "2D", getColor: function() { return this.color; }, setColor: function(newColor) { this.color = newColor; }, getSize: function() { return this.size; }, setSize: function(newSize) { this.size = newSize; }, getType: function() { return this.type; }, setType: function(newType) { this.type = newType; }
};
Properties.setColor("White");
Properties.setSize("small");
Properties.setType("3D"); document.write("Color: "+ Properties.getColor()+"<br>");
document.write("Size: "+ Properties.getSize()+"<br>");
document.write("Type: "+ Properties.getType());
</script>

Example 4: JavaScript this object in different contexts

This script logs the ‘JavaScript this’ object in different contexts. The program creates two classes and logs the ‘this’ object from their constructors. It returns the corresponding owner instance and logs it into the developer console.

I have written a similar tutorial on PHP constructors and destructors earlier.

From a jQuery document.ready() function, ‘this’ returns Document:[object HTMLDocument].

this-in-different-context.php


<script src="https://code.jquery.com/jquery-3.6.0.min.js"></script>
<script>
var x = this;
console.log("Default:" + x); class Cart { constructor() { console.log("Class:" + this + " of " + this.constructor.name); }
}
const cart = new Cart(); class Product { constructor() { console.log("Class:" + this + " of " + this.constructor.name); }
}
const product = new Product(); $(document).ready(function(){ var x = this; console.log("Document:" + x);
});
</script>

This program logs the following in the developer console. The ‘this’ object refers to a different context.

javascript this reference

Example 5: JavaScript this keyword in event context

The below code contains HTML button with an on-click event handler. It passes the ‘this’ object to manipulate the button element style. Here, the JavaScript this object refers to the button element.

The on-click event calls the highlight(this) method. It will change the button background color on click.

this-in-event-handler.html


<button onclick="highlight(this)">Button</button>
<script>
function highlight(obj) { obj.style.backgroundColor = '#0099FF';
}
</script>

Example 6: Using the Arrow function

See the below example that creates a compact code to get a global context using ‘this’.

It creates a function consisting of a one-line code to return the global object. This line uses the JavaScript arrow function to use ‘this’.

arrow-function.html


<script>
var getGlobal = (() => this);
console.log(getGlobal());
</script>

Conclusion

I hope you have a good idea of this basic JavaScript concept. The example code guides you on how to use ‘this’ in JavaScript.

The examples with event handlers and arrow functions return relevant object references. Let me know your valuable feedback on this article in the comment section.
Download

↑ Back to Top