Posted on Leave a comment

Send Email from Localhost using PHP with SMTP and PHPMailer

by Vincy. Last modified on August 17th, 2022.

Localhost is the web developer’s favorite home. Local development environment is always convenient to develop and debug scripts.

Mailing via a script with in-built PHP function. This may not work almost always in a localhost. You need to have a sendmail program and appropriate configurations.

If the PHP mail() is not working on your localhost, there is an alternate solution to sending email. You can use a SMTP server and send email from localhost and it is the popular choice for sending emails for PHP programmers.

This example shows code to use PHPMailer to send email using SMTP from localhost.

mail sending from localhost using smtp

PHP Mail sending script with SMTP

This program uses the PHPMailer library to connect SMTP to send emails. You can test this in your localhost server. You need access to a SMTP server.

Before running this code, configure the SMTP settings to set the following details.

  1. Authentication directive and security protocol.
  2. Configure SMTP credentials to authenticate and authorize mail sending script.
  3. Add From, To and Reply-To addresses using the PHPMailer object.
  4. Build email body and add subject before sending the email.

The above steps are mandatory with the PHPMailer mail sending code. Added to that, this mailing library supports many features. Some of them are,

Set the SMTP Debug = 4 in development mode to print the status details of the mail-sending script.

<?php
use PHPMailer\PHPMailer\PHPMailer;
use PHPMailer\PHPMailer\SMTP;
use PHPMailer\PHPMailer\Exception; require_once __DIR__ . '/vendor/phpmailer/src/Exception.php';
require_once __DIR__ . '/vendor/phpmailer/src/PHPMailer.php';
require_once __DIR__ . '/vendor/phpmailer/src/SMTP.php'; $mail = new PHPMailer(true); $mail->SMTPDebug = 0;
$mail->isSMTP();
$mail->Host = 'SET-SMTP-HOST';
$mail->SMTPAuth = true;
$mail->SMTPSecure = "ssl";
$mail->Port = 465; $mail->mailer = "smtp"; $mail->Username = 'SET-SMTP-USERNAME';
$mail->Password = 'SET-SMTP-PASSWORD'; // Sender and recipient address
$mail->SetFrom('SET-SENDER-EMAIL', 'SET-SENDER_NAME');
$mail->addAddress('ADD-RECIPIENT-EMAIL', 'ADD-RECIPIENT-NAME');
$mail->addReplyTo('ADD-REPLY-TO-EMAIL', 'ADD-REPLY-TO-NAME'); // Setting the subject and body
$mail->IsHTML(true);
$mail->Subject = "Send email from localhost using PHP";
$mail->Body = 'Hello World!'; if ($mail->send()) { echo "Email is sent successfully.";
} else { echo "Error in sending an email. Mailer Error: {$mail->ErrorInfo}";
}
?>

Google and Microsoft disabled insecure authentication

Earlier, programmers conveniently used GMail’s SMTP server for sending emails via PHP. Now, less secure APPs configuration in Google is disabled. Google and Microsoft force authentication via OAuth 2 to send email.

There is ill-informed text going around in this topic. People say that we cannot send email via Google SMTP any more. That is not the case. They have changed the authentication method.

IMPORTANT: I have written an article to help you send email using xOAuth2 via PHP. You can use this and continue to send email using Google or other email service providers who force to use OAuth.

Alternate: Enabling PHP’s built-in mail()

  1. If you do not have access to an email SMTP server.
  2. If you are not able to use xOAuth2 and Google / Microsoft’s mailing service.

In the above situations, you may try to setup your own server in localhost. Yes! that is possible and it will work.

PHP has a built-in mail function to send emails without using any third-party libraries.

The mail() function is capable of simple mail sending requirements in PHP.

In localhost, it will not work without setting the php.ini configuration. Find the following section in your php.ini file and set the sendmail path and related configuration.

php.ini mail setting

Download

↑ Back to Top

Posted on Leave a comment

How to Upload Files to Google Drive with JavaScript

by Vincy. Last modified on August 15th, 2022.

This article gives a working example script to learn how to upload files to Google Drive via JavaScript.

Creating a JavaScript solution to the Drive file upload process is very simple. It uses gapi library to implement this feature on the client side.

In a recently posted tutorial, we created an example code for achieving Google Drive upload in PHP.

Prerequisites

It needs two libraries loaded to achieve JavaScript via Google Drive upload.

  1. Google sign-in library for identity verification.
  2. Google API client library for JavaScript-based API access.

Added to that, create the API app and get the credentials.

  1. Enable the Google Drive API.
  2. Get the API key and Web client id from the Google developer console.

Go to the Google developer console and click “Create Credentials” to set the API key and web client id. We have seen how to get the Google API keys from the developer console in previous articles.

Steps to upload files to Google Drive with JavaScript

These are the steps to implement uploading files from an application to Google Drive using JavaScript.

  1. Authorize by proving the identity via Google sign-in API (GSI) library challenge.
  2. Get the access token.
  3. Prepare the upload request by specifying the Google drive directory target (optional).
  4. Hit Google Drive V3 endpoint to post file content and metadata via JavaScript FormData.

authorize and upload to google drive

Example code for uploading files to Drive

The below code shows the landing page interface in HTML and the JavaScript asset created for uploading the files to Google Drive.

HTML code to display controls for requesting authorization and upload

When landing on the home page, it displays an Authorize button in the UI. On clicking this button, it shows the Google sign-in overlay dialog to proceed with the authorization request.

In this step, the user must prove their identity to have access to upload to the Drive directory.

index.php

<!DOCTYPE html>
<html>
<head>
<title>Google Drive upload using JavaScript</title>
<meta charset="utf-8" />
<meta name="viewport" content="width=device-width, initial-scale=1" />
<link rel="stylesheet" type="text/css" href="css/style.css" />
<link rel="stylesheet" type="text/css" href="css/form.css" />
<style>
#content { display: none;
}
</style>
</head>
<body> <!--Add HTML buttons to sign in and sign out--> <div class="phppot-container"> <h1>Google Drive upload using JavaScript</h1> <div> <div class="row"> <input type="button" id="authorize_button" onclick="handleAuthClick()" value="Authorize"> <input type="button" id="signout_button" onclick="handleSignoutClick()" value="Sign Out"> </div> </div> <div id="content" class="success message"><?php if(isset($message)) { echo $message; } ?></div> </div> <script type="text/javascript" src="./js/gapi-upload.js"></script> <script async defer src="https://apis.google.com/js/api.js" onload="gapiLoaded()"></script> <script async defer src="https://accounts.google.com/gsi/client" onload="gisLoaded()"></script>
</body>
</html>

JavaScript to handle user authorization and file upload sequence

This JavaScript code initializes the gapi and gsi on a callback of loading these Google JavaScript libraries.

It also contains the handlers to trigger API requests for the following actions.

  1. Google authorization with identity proof.
  2. Upload files with the access token.
  3. Refresh gapi upload action once authorized.
  4. Signout.

This JavaScript code requires the authorization credentials to be configured. Set the CLIENT_ID and API_KEY in this script before running this example.

In this example, it sets the Google Drive folder id to upload the file via JavaScript. This configuration is optional. If no target is needed, remove the parameter from the file meta array.

js/gapi-upload.js

// TODO: Set the below credentials
const CLIENT_ID = 'SET-YOUR-CLIENT-ID';
const API_KEY = 'SET-YOUR-API-KEY'; // Discovery URL for APIs used by the quickstart
const DISCOVERY_DOC = 'https://www.googleapis.com/discovery/v1/apis/drive/v3/rest'; // Set API access scope before proceeding authorization request
const SCOPES = 'https://www.googleapis.com/auth/drive.file';
let tokenClient;
let gapiInited = false;
let gisInited = false; document.getElementById('authorize_button').style.visibility = 'hidden';
document.getElementById('signout_button').style.visibility = 'hidden'; /** * Callback after api.js is loaded. */
function gapiLoaded() { gapi.load('client', initializeGapiClient);
} /** * Callback after the API client is loaded. Loads the * discovery doc to initialize the API. */
async function initializeGapiClient() { await gapi.client.init({ apiKey: API_KEY, discoveryDocs: [DISCOVERY_DOC], }); gapiInited = true; maybeEnableButtons();
} /** * Callback after Google Identity Services are loaded. */
function gisLoaded() { tokenClient = google.accounts.oauth2.initTokenClient({ client_id: CLIENT_ID, scope: SCOPES, callback: '', // defined later }); gisInited = true; maybeEnableButtons();
} /** * Enables user interaction after all libraries are loaded. */
function maybeEnableButtons() { if (gapiInited && gisInited) { document.getElementById('authorize_button').style.visibility = 'visible'; }
} /** * Sign in the user upon button click. */
function handleAuthClick() { tokenClient.callback = async (resp) => { if (resp.error !== undefined) { throw (resp); } document.getElementById('signout_button').style.visibility = 'visible'; document.getElementById('authorize_button').value = 'Refresh'; await uploadFile(); }; if (gapi.client.getToken() === null) { // Prompt the user to select a Google Account and ask for consent to share their data // when establishing a new session. tokenClient.requestAccessToken({ prompt: 'consent' }); } else { // Skip display of account chooser and consent dialog for an existing session. tokenClient.requestAccessToken({ prompt: '' }); }
} /** * Sign out the user upon button click. */
function handleSignoutClick() { const token = gapi.client.getToken(); if (token !== null) { google.accounts.oauth2.revoke(token.access_token); gapi.client.setToken(''); document.getElementById('content').style.display = 'none'; document.getElementById('content').innerHTML = ''; document.getElementById('authorize_button').value = 'Authorize'; document.getElementById('signout_button').style.visibility = 'hidden'; }
} /** * Upload file to Google Drive. */
async function uploadFile() { var fileContent = 'Hello World'; // As a sample, upload a text file. var file = new Blob([fileContent], { type: 'text/plain' }); var metadata = { 'name': 'sample-file-via-js', // Filename at Google Drive 'mimeType': 'text/plain', // mimeType at Google Drive // TODO [Optional]: Set the below credentials // Note: remove this parameter, if no target is needed 'parents': ['SET-GOOGLE-DRIVE-FOLDER-ID'], // Folder ID at Google Drive which is optional }; var accessToken = gapi.auth.getToken().access_token; // Here gapi is used for retrieving the access token. var form = new FormData(); form.append('metadata', new Blob([JSON.stringify(metadata)], { type: 'application/json' })); form.append('file', file); var xhr = new XMLHttpRequest(); xhr.open('post', 'https://www.googleapis.com/upload/drive/v3/files?uploadType=multipart&fields=id'); xhr.setRequestHeader('Authorization', 'Bearer ' + accessToken); xhr.responseType = 'json'; xhr.onload = () => { document.getElementById('content').innerHTML = "File uploaded successfully. The Google Drive file id is <b>" + xhr.response.id + "</b>"; document.getElementById('content').style.display = 'block'; }; xhr.send(form);
}

Google Drive JavaScript Upload Response

Once authorized, the JavaScript calls the uploadFile() function to hit the Google Drive V3 API to post the file binary.

The below screenshot shows the uploaded Google Drive file id in the success message.

After sign-in, the landing page UI will display the signout option. It also shows a Refresh button to trigger upload action again in case of any issues on uploading.

file upload ack with google drive file id
Download

↑ Back to Top

Posted on Leave a comment

Disable mouse right click, cut, copy, paste with JavaScript or jQuery

by Vincy. Last modified on August 14th, 2022.

Before learning how to disable the cut, copy, paste and right-click event in JavaScript we should know first Why.

Why we need this is, for copying and manipulating content displayed on the client. It lets the user struggle to do the following for example.

  1. Take the copyrighted site content by copy and paste.
  2. Save media files by right-clicking and saving assets.

We implement this disabling by using the below steps. The first two of them are mandatory and the 3rd one is optional.

  1. Listen to the event type cut, copy, paste and right-click.
  2. Prevent the default behavior with the reference of the event object.
  3. Acknowledge users by showing alert messages [optional step].

View Demo

disable cut copy paste right click

Example 1 – Disabling cut, copy, paste and mouse right-click events

This JavaScript disables the cut, copy, paste and right-click on a textarea content.

It defines a callback invoked on document ready event. It uses jQuery.

In this callback, it listens to the cut, copy, paste and the mouse right-click action requests.

When these requests are raised this script prevents the default behavior. Hence, it stops the expected action based on the cut, copy, and other requests mentioned above.

$(document).ready(function() { $('textarea').on("cut", function(e) { e.preventDefault(); alertUser('Cut'); }); $('textarea').on("copy", function(e) { e.preventDefault(); alertUser('Copy'); }); $('textarea').on("paste", function(e) { e.preventDefault(); alertUser('Paste'); }); $("textarea").on("contextmenu", function(e) { e.preventDefault(); alertUser('Mouse right click'); });
}); function alertUser(message) { $("#phppot-message").text(message + ' is disabled.'); $("#phppot-message").show();
}

HTML with Textarea and alert box

This HTML has the textarea. The JavaScript targets this textarea content to disable the cut, copy and more events.

Once disabled the default behavior, the UI should notify the user by displaying a message.

So, it contains an HTML alert box to show a red ribbon with a related error message to let the user understand.

It includes the jQuery library with a CDN URL. Insert the above script next to the jQuery include then run the example.

The downloadable at the end of this article contains the complete working example.

<!DOCTYPE html>
<html>
<head>
<title>Disable mouse right click, cut, copy, paste with JavaScript or jQuery</title>
<meta name="viewport" content="width=device-width, initial-scale=1" />
<link rel="stylesheet" type="text/css" href="css/style.css" />
<link rel="stylesheet" type="text/css" href="css/form.css" />
<style>
#phppot-message { display: none;
}
</style>
<script src="https://code.jquery.com/jquery-3.6.0.min.js" integrity="sha256-/xUj+3OJU5yExlq6GSYGSHk7tPXikynS7ogEvDej/m4=" crossorigin="anonymous"></script> </head> <body> <div class="phppot-container"> <h2>Disable mouse right click, cut, copy, paste</h2> <textarea name="notes" class="full-width" rows="5"></textarea> <div id="phppot-message" class="error"></div> </div>
</body>
</html>

Example 2 – Thin version using jQuery

This example is a thin version of the above. It also uses the jQuery library to disable the cut, copy paste and right-click events.

This binds all the events to be disabled. It has a single-line code instead of creating exclusive listeners for each event.

This method has a slight disadvantage. That is, it shows a generic message while stopping any one of the cut, copy, paste and right-click events.

In the first method, the acknowledgment message is too specific. That message gives more clarity on what is triggered and what is disabled and prevented.

But, the advantage of the below example is that it is too thin to have it as a client-side feature in our application.

$(document).ready(function() { $('textarea').bind('cut copy paste contextmenu', function(e) { e.preventDefault(); $("#phppot-message").text('The Cut copy paste and the mouse right-click are disabled.'); $("#phppot-message").show(); });
});

Example 3 – For JavaScript lovers

Do you want a pure JavaScript solution for this example? The below script achieves this to disable cut, copy, paste and right-click.

It has no jQuery or any other client-side framework or libraries. I believe that the frameworks are for achieving a volume of effects, utils and more.

If the application is going to have thin requirements, then no need for any framework.

HTML with onCut, onCopy, onPaste and onContextMenu attributes

The Textarea field in the below HTML has the following callback attributes.

  • onCut
  • OnCopy
  • onPaste
  • onContextMenu

In these event occurrences, it calls the disableAction(). It sends the event object and a string to specify the event occurred.

<textarea name="notes" class="full-width" rows="5" onCut="disableAction(event, 'Cut');" onCopy="disableAction(event, 'Copy');" onpaste="disableAction(event, 'Paste');" oncontextmenu="disableAction(event, 'Right click');"></textarea>
<div id="phppot-message" class="error"></div>

JavaScript function called on cut, copy, paste and on right click

In the JavaScript code, it reads the event type and disables it.

The event.preventDefault() is the common step in all the examples to disable the cut, copy, paste and right click.

function disableAction(event, action) { event.preventDefault(); document.getElementById("phppot-message").innerText = action + ' is disabled.'; document.getElementById("phppot-message").style.display = 'block';
}

Disclaimer

The keyboard or mouse event callbacks like onMouseDown() or onKeyDown lags in performance. Also, it has its disadvantages. Some of them are listed below.

  1. The keys can be configured and customized. So, event handling with respect to the keycode is not dependable.
  2. On clicking the mouse right, it displays the menu before the onMouseDown() gets and checks the key code. So, disabling mouse-right-click is failed by using onMouseDown() callback.
  3. Above all, an user can easily disable JavaScript in his browser and use the website.

View DemoDownload

↑ Back to Top

Posted on Leave a comment

Add Google reCaptcha V3 Example with PHP

by Vincy. Last modified on August 11th, 2022.

Google reCaptcha V3 is the latest version provided with the highest security in comparison. Google contains different captcha services with reCaptcha V2. There are the (I am not a Robot) checkbox, invisible captcha and etc.

With the V3, Google guarantees zero friction while predicting the score for the website interactions. The score and the response report returned by the reCaptcha V3 is a very good security measure. It helps to take action accordingly to safeguard the website.

Like other Google reCaptcha concepts, the V3 also has more than one method to integrate the captcha challenge. Those are two as listed below.

  1. Programmatic invocation of the challenge.
  2. Automatic binding of the challenge with the form button.

This article explains to implement both methods by creating examples.

The below diagram will help to have a quick look at the Google reCaptcha V3 process flow.  Continue reading to learn how to get the API keys and integrate reCaptcha for your website.

Read also,

  1. PHP Contact Form with Google reCAPTCHA.
  2. Customize Google Invisible reCAPTCHA on a Webpage.

If you prefer custom captcha code using PHP, you may check the linked article for example code.

google recaptcha validation process

How to get Google reCaptcha keys

This is a two-step simple process to get the API keys to add Google reCaptcha to a website.

These steps are listed below with screenshots.

  1. Register your site domain.
  2. Copy the reCaptcha site key and the secret key.

Step1: Register your site domain

Go to the Google recaptcha admin console to register a domain to integrate reCaptcha V3.

The below screenshot masked the data related to the domain and site owner details. Enter your site details in the place of the masked data.

register domain create keys

Step2: Copy the reCaptcha site key and the secret key.

Once registration is done, the reCaptcha V3 keys are displayed below. Copy these details and configure them into the website code.

The site key is used to render the Google reCaptcha on the client side. And, the secret key is used for server-side verification.

The following example contains an application configuration file for this. Continue reading to know how to configure.

google recaptcha keys

About this example

This example renders the reCaptcha script and element in the landing UI. It has the configuration to make the website reCaptcha ready with the API keys.

It gets the token from the Google reCaptcha API and appends it to the form. On submit, the server-side PHP script receives the token to send the siteverify request to the API.

The reCaptcha API returns a JSON response with a score, success boolean, and more details. Based on the score (between 0 to 1), it helps to gauge the interaction’s standard. We have enabled a custom captcha solution based on the login validity standard.

It integrates the Google reCaptcha V3 programmatic challenge in the root. If you want to implement the “automatic binding” method, then it is in a separate folder.

The below structure shows the reCaptcha example files order and location. It will be helpful to set up this code correctly in a development environment.

google recaptcha php files

Application configuration file

It configures the Google reCaptcha V3 site and the secret keys used in the examples below.

The site key is used to render the Google recaptcha element on the client side. The secret key is used in the PHP files to build the site verification request parameters.

Config.php

<?php class Config
{ const GOOGLE_RECAPTCHA_SITE_KEY = ''; const GOOGLE_RECAPTCHA_SECRET_KEY = '';
} ?>

Method 1: Programatically invoking Google reCaptcha token via script

This method is used when the developer wants to have more programming control over the reCaptcha token.

During the explicit execution, it sets parameters to the request. These parameters can be returned with the Google reCaptcha V3 response. This will be helpful for additional verification.

HTML page renders form with reCaptcha JS

This landing page loads the JavaScript API while rendering the form UI. It uses the Google reCaptcha site key while loading the JavaScript.

index.php

<?php
require_once __DIR__ . '/Config.php';
?>
<html>
<head>
<link rel="stylesheet" type="text/css" href="css/form.css" />
<link rel="stylesheet" type="text/css" href="css/style.css" />
<title>Form with Google reCaptcha V3</title> <script src="https://www.google.com/recaptcha/api.js?render=<?php echo Config::GOOGLE_RECAPTCHA_SITE_KEY; ?>"></script>
</head>
<body> <div class="phppot-container tile-container"> <h3 class="text-center">Google reCaptcha V3</h3> <form id="frm" name="frm" method="post" onSubmit="getToken(event)"> <div> <div class="row"> <label>Feedback</label> <input type="text" name="txt_report" class="full-width" required> </div> <div class="row"> <input type="submit" value="Send" class="full-width"> </div> <div id="ack-message"></div> </div> </form> </div>
</body>
</html>

Execute reCaptcha JavaScript API for token

It executes the Google reCaptcha request explicitly. The callback function of this action will return the reCaptcha token.

Then, the callback dynamically creates an input element using JavaScript. It loads the token to this element and appends it to the form.

After getting the token field, the form is submitted via JavaScript. The submitForm function posts the form data to the PHP via AJAX. In a previous article, we have seen how to enable PHP custom captcha using AJAX.

index.php (Javascript Google reCaptcha execute)

// Execute Google reCaptcha v3 to get token function getToken(event) { event.preventDefault(); grecaptcha.ready(function() { grecaptcha.execute('<?php echo Config::GOOGLE_RECAPTCHA_SITE_KEY; ?>', { action: 'submit' }).then(function(token) { var button = document.createElement('input'); button.type = 'hidden'; button.name = 'recaptcha_token'; button.id = 'recaptcha_token'; button.value = token; var form = document.getElementById("frm"); form.appendChild(button); submitForm(); });; });
} // Submit reCaptcha token to the PHP
function submitForm() { const form = document.getElementById('frm'); const formData = new FormData(form); var xhttp = new XMLHttpRequest(); xhttp.open('POST', 'form-action.php', true); xhttp.send(formData); xhttp.onreadystatechange = function() { if (xhttp.readyState == 4 && xhttp.status == 200) { document.getElementById("ack-message").innerHTML = xhttp.responseText; document.getElementById('recaptcha_token').remove(); } }
}

Verify website interaction using Google reCaptcha V3 API

The form submits action calls this PHP script by sending the reCaptcha token. It builds the post parameters with the Google reCaptcha v3 secret key and token.

This PHP script uses cURL to post the request to the reCaptcha API. The cUrl response returns the JSON  data as given by the Google API.

It returns the score about the interaction made on the website. This score will be between 0.0 (lower) and 1.1(higher) ranking. It helps to predict the necessary steps to make to protect the site.

form-action.php

//PHP reCaptcha validation
<?php
require_once __DIR__ . '/Config.php'; $reCaptchaToken = $_POST['recaptcha_token'];
$postArray = array( 'secret' => Config::GOOGLE_RECAPTCHA_SECRET_KEY, 'response' => $reCaptchaToken
); $postJSON = http_build_query($postArray); $curl = curl_init();
curl_setopt($curl, CURLOPT_URL, "https://www.google.com/recaptcha/api/siteverify");
curl_setopt($curl, CURLOPT_RETURNTRANSFER, true);
curl_setopt($curl, CURLOPT_POST, 1);
curl_setopt($curl, CURLOPT_POSTFIELDS, $postJSON);
$response = curl_exec($curl);
curl_close($curl);
$curlResponseArray = json_decode($response, true); if ($curlResponseArray["success"] == true && ! empty($curlResponseArray["action"]) && $curlResponseArray["score"] >= 0.5) { mail("[email protected]", "New report", $_POST["txt_report"]); $output = "<div id='phppot-message' class='success'>Feedback received.</div>";
} else { $output = "<div id='phppot-message' class='error'>Invalid request.</div>";
}
print $output;
exit();

Method 2: Automatic binding callback with the submit button

This is a basic and simple method of integrating Google reCaptcha V3 for a site. In this automatic binding of the reCaptcha challenge, it gets the token in the callback.

Site HTML to bind the reCaptcha challenge automatically

It loads the Google reCaptcha JavaScript API as we did in method 1.

The g-recaptcha field binds the callback, action, and reCaptcha site key with the HTML5 data attributes.

 automatic-binding/index.php

<?php
session_start();
require_once __DIR__ . '/../Config.php';
?>
<html>
<head>
<link rel="stylesheet" type="text/css" href="./../css/form.css" />
<link rel="stylesheet" type="text/css" href="./../css/style.css" />
<title>Form with Google reCaptcha V3</title> <script src="https://www.google.com/recaptcha/api.js"></script>
</head>
<body> <div class="phppot-container tile-container"> <h3 class="text-center">Google reCaptcha Automatic Binding</h3> <form id="frm" name="frm" method="post" action="action.php"> <div> <div class="row"> <label>Feedback</label> <input type="text" name="txt_report" class="full-width" required> </div> <div class="row"> <input type="button" class="g-recaptcha full-width" data-sitekey="<?php echo Config::GOOGLE_RECAPTCHA_SITE_KEY; ?>" data-callback='onSubmit' data-action='submit' value="Send" /> </div> <?php if (! empty($_SESSION["ack_message"])) { ?> <div id="ack-message"><?php echo $_SESSION["ack_message"]; ?></div> <?php } $_SESSION["ack_message"] = ""; ?> </div> </form> </div>
</body>
</html>

JavaScript callback to append token field to the form

This callback function is linked with the Google reCaptcha element, which is the send button of the form. So, on clicking the send button, it calls the onSubmit JavaScript function.

This callback has the reCaptcha token to be appended to the form data.

automatic-binding/index.php (JavaScript callback)

// JavaScript
function onSubmit(token) { var button = document.createElement('input'); button.type = 'hidden'; button.name = 'recaptcha_token'; button.value = token; var form = document.getElementById("frm"); form.appendChild(button); form.submit();
}

PHP action to predict Google reCaptcha score

In PHP, it verifies the site and checks the interaction score. It contains the same code as the form-action.php we used in method 1.

The difference is that the response is sent via session instead of printing it to AJAX callback.

automatic-binding/action.php

//Google reCaptcha V3 server-side verification
<?php
require_once __DIR__ . '/Config.php'; $reCaptchaToken = $_POST['recaptcha_token']; $postArray = array( 'secret' => Config::GOOGLE_RECAPTCHA_SECRET_KEY, 'response' => $reCaptchaToken
); $postJSON = http_build_query($postArray); $curl = curl_init();
curl_setopt($curl, CURLOPT_URL, "https://www.google.com/recaptcha/api/siteverify");
curl_setopt($curl, CURLOPT_RETURNTRANSFER, true);
curl_setopt($curl, CURLOPT_POST, 1);
curl_setopt($curl, CURLOPT_POSTFIELDS, $postJSON);
$response = curl_exec($curl);
curl_close($curl); $curlResponseArray = json_decode($response, true); if ($curlResponseArray["success"] == true && $curlResponseArray["score"] >= 0.5) { mail("[email protected]", "New report", $_POST["txt_report"]); $output = "<div id='phppot-message' class='success'>Feedback received.</div>";
} else { $output = "<div id='phppot-message' class='error'>Invalid request.</div>";
} $_SESSION["ack_message"] = $output;
header("Location: automatic-binding.php");
?>

Download

↑ Back to Top

Posted on Leave a comment

JavaScript Autocomplete TextBox (autosuggest) from Database

by Vincy. Last modified on August 9th, 2022.

AutoComplete is a feature to suggest relevant results on typing into a textbox. For example, Google search textbox autosuggest search phrases on keypress.

It can be enabled using client-side tools and attributes. The data for the autosuggest textbox can be static or dynamic.

For loading remote data dynamically, the source possibility is either files or databases. This article uses the database as a source to have dynamic results at the backend.

The below example has an idea for a quick script for enabling the autocomplete feature. It uses JavaScript jQuery and jQuery UI libraries to implement this easily.

The jQuery autocomplete() uses the PHP endpoint autocomplete.php script. Then, load the remote data into the textbox on the UI.

View Demo

Example 1: Simple autocomplete

Quick example

<link rel="stylesheet" href="https://cdnjs.cloudflare.com/ajax/libs/jqueryui/1.13.2/themes/base/jquery-ui.min.css" />
<script src="https://code.jquery.com/jquery-3.6.0.min.js"></script>
<script src="https://cdnjs.cloudflare.com/ajax/libs/jqueryui/1.13.2/jquery-ui.min.js"></script>
<script>
$(document).ready(function(){ $( "#textbox" ).autocomplete({ source: "autocomplete.php", minLength: 2 });
});
</script>
<input id="textbox" class="full-width" />

This PHP endpoint script reads the database results and forms the output JSON for the autocomplete textbox.

It receives the searched term from the UI and looks into the database for relevant suggestions.

autocomplete.php

<?php
$name = $_GET['term'];
$name = "%$name%";
$conn = mysqli_connect('localhost', 'root', '', 'phppot_autocomplete');
$sql = "SELECT * FROM tbl_post WHERE title LIKE ?";
$statement = $conn->prepare($sql);
$statement->bind_param('s', $name);
$statement->execute();
$result = $statement->get_result();
$autocompleteResult = array();
if (! empty($result)) { while ($row = $result->fetch_assoc()) { $autocompleteResult[] = $row["title"]; }
}
print json_encode($autocompleteResult);
?>

This database is for setting up the database created for this quick example. The next example also needs this database for displaying the autosuggest values.

Run the below database queries for getting a good experience with the above code execution.

CREATE TABLE `tbl_post` ( `id` int(11) UNSIGNED NOT NULL, `title` text DEFAULT NULL
) ENGINE=InnoDB DEFAULT CHARSET=utf8mb4; --
-- Dumping data for table `tbl_post`
-- INSERT INTO `tbl_post` (`id`, `title`) VALUES
(1, 'Button on click event capture.'),
(2, 'On key press action.'),
(3, 'Overlay dialog window.);

javascript autocomplete
Example 2: Load autocomplete with ID

The AutoComplete function sends an additional parameter with the default term argument. That is to limit the number of results shown in the autocomplete textbox.

It returns the database results based on the searched term as a key-value pair. A JavaScript callback iterates the result and maps the key-value as label-value pair.

It is helpful when the result id is required while selecting a particular item from the autosuggest list.

The below screenshot shows the item value and id is populated. This data is put into the textbox on selecting the autocomplete list item.

autocomplete result with id

The below JavaScript code has two textboxes. One textbox is enabled with the autocomplete feature.

On typing into that textbox, the JavaScript autocomplete calls the server-side PHP script. The callback gets the JSON output returned by the PHP script.

This JSON data contains an association of dynamic results with their corresponding id. On selecting the autocomplete result item, the select callback function access the UI.item object.

Using this object, it gets the id and post title from the JSON data bundle. Then this JavaScript callback function targets the UI textboxes to populate the title and id of the selected item.

<script>
$(document).ready(function() { $("#textbox").autocomplete({ minlength: 3, source: function(request, response) { $.ajax({ url: "get-result-by-additional-param.php", type: "POST", dataType: "json", data: { q: request.term, limit: 10 }, success: function(data) { response($.map(data, function(item) { return { label: item.title, value: item.postId }; })); } }); }, select: function(event, ui) { event.preventDefault(); $('#textbox').val(ui.item.label); $('#itemId').val(ui.item.value); } });
});
</script>
<div class="row"> <label>Type for suggestion</label> <input id="textbox" class="full-width" />
</div>
<div class="row"> <label>Item id</label> <input id="itemId" class="full-width" />
</div>

This PHP script receives the post parameters sent via the autocomplete function.

The search keyword and the result limit are sent from the source callback of the autocomplete initiation.

This PHP script substitutes those parameters into the database query execution process.

Once found the results, it bundles the array into a JSON format to print as an auto-suggestion list.

get-result-by-additional-param.php

<?php
$name = $_POST['q'];
$limit = $_POST['limit'];
$name = "%$name%";
$conn = mysqli_connect('localhost', 'root', '', 'phppot_autocomplete');
$sql = "SELECT * FROM tbl_post WHERE title LIKE ? LIMIT $limit";
$statement = $conn->prepare($sql);
$statement->bind_param('s', $name);
$statement->execute();
$result = $statement->get_result();
$autocompleteResult = array();
if (! empty($result)) { $i = 0; while ($row = $result->fetch_assoc()) { $autocompleteResult[$i]["postId"] = $row["id"]; $autocompleteResult[$i]["title"] = $row["title"]; $i ++; }
}
print json_encode($autocompleteResult);
?>

Example 3: AutoComplete with recent search

This example shows the autocomplete box with text and image data. The database for this example contains additional details like description and featured_image for the posts.

If you want a sleek and straightforward autocomplete solution with text, then use the above two examples.

This example uses BootStrap and plain JavaScript without jQuery. It displays recent searches on focusing the autocomplete textbox.

Create AutoComplete UI with Bootstrap and JavaScript Includes

See this HTML loads the autocomplete textbox and required JavaScript and CSS assets for the UI. The autocomplete.js handles the autosuggest request raised from the UI.

The autocomplete textbox has the onKeyPress and onFocus attributes. The onKeyPress attribute calls JavaScript to show an autosuggest list. The other attribute is for displaying recent searches on the focus event of the textbox.

autocomplete-with-search-history/index.php

<link href="https://cdn.jsdelivr.net/npm/[email protected]/dist/css/bootstrap.min.css" rel="stylesheet" integrity="sha384-gH2yIJqKdNHPEq0n4Mqa/HGKIhSkIHeL5AyhkYV8i59U5AR6csBvApHHNl/vI1Bx" crossorigin="anonymous">
<script src="./assets/autocomplete.js"></script>
<style>
.post-icon { width: 50px; height: 50px; border-radius: 50%; margin-right: 15px;
} .remove-link { font-size: 0.75em; font-style: italic; color: #0000FF; cursor: pointer;
}
</style>
<input id="textbox" class="form-control" onkeyup="showSuggestionList(this.value)" onfocus="showRecentSearch()" autocomplete="off" />
<span id="auto-suggestion-box"></span>

Get the autosuggest list from the tbl_post database table

The below JavaScript function is called on the keypress event of the autocomplete field. In the previous examples, it receives a JSON response to load the dynamic suggestion.

In this script, it receives the HTML response from the endpoint. This HTML is with an unordered list of autosuggest items.

function showSuggestionList(searchInput) { if (searchInput.length &gt; 1) { var xhttp = new XMLHttpRequest(); xhttp.open('POST', 'ajax-endpoint/get-auto-suggestion.php', true); xhttp.setRequestHeader(&quot;Content-type&quot;, &quot;application/x-www-form-urlencoded&quot;); xhttp.send(&quot;formData=&quot; + searchInput); xhttp.onreadystatechange = function() { if (xhttp.readyState == 4 &amp;&amp; xhttp.status == 200) { document.getElementById('auto-suggestion-box').innerHTML = xhttp.responseText; } } } else { document.getElementById('auto-suggestion-box').innerHTML = ''; }
}

ajax-endpoint/get-auto-suggestion.php

<?php
require_once __DIR__ . '/../lib/DataSource.php';
$dataSource = new DataSource(); if (isset($_POST["formData"])) { $searchInput = filter_var($_POST["formData"], FILTER_SANITIZE_STRING); $highlight = '<b>' . $searchInput . '</b>'; $query = "SELECT * FROM tbl_post WHERE title LIKE ? OR description LIKE ? ORDER BY id DESC LIMIT 15"; $result = $dataSource->select($query, 'ss', array( "%" . $searchInput . "%", "%" . $searchInput . "%" )); if (! empty($result)) { ?>
<ul class="list-group">
<?php foreach ($result as $row) { ?> <li class="list-group-item text-muted" data-post-id="<?php echo $row["id"]; ?>" onClick="addToHistory(this)" role="button"><img class="post-icon" src="<?php echo $row["featured_image"]; ?>" /><span> <?php echo str_ireplace($searchInput, $highlight, $row["title"]); ?> </span></li>
<?php } ?>
</ul>
<?php }
}
?>

javascript autocomplete without jquery

Add to search history

When selecting the suggested list item, it triggers this JavaScript function on click.

This function reads the post id and title added to the HTML5 data attribute. Then passes these details to the server-side PHP script.

function addToHistory(obj) { var selectedResult = obj.dataset.postId; fetch("ajax-endpoint/add-to-history.php", { method: "POST", body: JSON.stringify({ selectedResult: selectedResult }) }).then(function() { document.getElementById('textbox').value = obj.innerText; });
}

This PHP endpoint checks if the selected item is already added to the database history table.

In the database, the tbl_search_history stores the search history.

If data is not found in the database, then the search instance will be added to this table.

ajax-endpoint/add-to-history.php

<?php
require_once __DIR__ . '/../lib/DataSource.php';
$dataSource = new DataSource(); $post_data = json_decode(file_get_contents('php://input'), true);
$selectedResult = filter_var($post_data['selectedResult'], FILTER_SANITIZE_STRING);
if (isset($selectedResult)) { $query = "SELECT * FROM tbl_search_history, tbl_post WHERE tbl_search_history.post_id = tbl_post.id AND tbl_post.id = ?"; $result = $dataSource->select($query, 'i', array( $selectedResult )); if (empty($result)) { $query = " INSERT INTO tbl_search_history (post_id) VALUES (?)"; $result = $dataSource->insert($query, 'i', array( $selectedResult )); }
}
?>

Show search history by focusing on the autocomplete textbox

This function calls the PHP endpoint to fetch the stored search history. It also receives the HTML response from the server side.

The response HMTL is loaded into the autosuggest textbox in the UI.

function showRecentSearch() { if (!(document.getElementById('textbox').value)) { fetch("ajax-endpoint/show-search-history.php", { method: "POST" }).then(function(response) { return response.text(); }).then(function(responseData) { if (responseData != "") { document.getElementById('auto-suggestion-box').innerHTML = responseData; } }); }
}

In this PHP file, it joins the tbl_post and the tbl_search_history database tables. It is to filter the already searched keyword list.

ajax-endpoint/show-search-history.php

<?php
require_once __DIR__ . '/../lib/DataSource.php';
$dataSource = new DataSource(); $post_data = json_decode(file_get_contents('php://input'), true);
$query = "SELECT tbl_post.* FROM tbl_search_history, tbl_post WHERE tbl_search_history.post_id = tbl_post.id ORDER BY id DESC LIMIT 10"; $result = $dataSource->select($query); ?>
<ul class="list-group">
<?php foreach ($result as $row) { ?> <li class="list-group-item text-muted" role="button"><img class="post-icon" src="<?php echo $row["featured_image"]; ?>" /><span><?php echo $row["title"]; ?></span> <span title="Remove from history" class="remove-link" onClick="removeFromHistory(this, <?php echo $row["id"]; ?>)">[remove]</span></li>
<?php } ?>
</ul>

Remove history from the autosuggest textbox

When focusing on the autocomplete textbox, the UI will display the recently searched post titles.

If the user wants to remove the recent searches, it is possible by this code.

The autosuggest entries have the remove link in the UI. On clicking the link, the corresponding record will be deleted.

function removeFromHistory(obj, postId) { fetch("ajax-endpoint/remove-history.php", { method: "POST", body: JSON.stringify({ postId: postId }) }).then(function() { obj.parentNode.remove(); });
}

This PHP code removes the search instances stored in the tbl_search_history database. The delete request posts the record id to fire the delete action.

ajax-endpoint/remove-history.php

<?php
require_once __DIR__ . '/../lib/DataSource.php';
$dataSource = new DataSource(); $post_data = json_decode(file_get_contents('php://input'), true);
$postId = filter_var($post_data['postId'], FILTER_SANITIZE_STRING);
$query = " DELETE FROM tbl_search_history WHERE post_id = ?"; $result = $dataSource->insert($query, 'i', array( $postId
));
?>

autocomplete with search history
View DemoDownload

↑ Back to Top

Posted on Leave a comment

How to Upload Files to Google Drive with API using PHP

by Vincy. Last modified on August 5th, 2022.

Uploading files to Google Drive programmatically can be done by the Google API. It uses OAuth to authenticate requests and authorize access.

This tutorial describes uploading files to Google Drive using PHP. It gives a simple PHP script to easily understand the Google API and upload files.

It also uses a database to save the uploaded file details with the Google Drive reference.

It handles errors that can occur for the following reasons during the upload process.

  1. When the file binary is empty on the PHP script.
  2. When the user fails to submit the form and proceeds to upload without form data.
  3. When the Google OAuth request is failed to get the access token.
  4. When the cURL request to the Google API is failed to return the status code 200.

On successful upload without any of the above uncertainties, this code shows the Google Drive link to see the uploaded file preview.

The below figure shows the file upload form with the success and failure responses.

php google drive upload

How to create API credentials to access Google Drive

Login to your Google account and go to the developer console. Then follow the below steps to create API credentials to access Google Drive to upload a file.

  1. Create a new project or select an existing project from the Google console header.
  2. Click the Library menu and enable Google Drive API. Use the filter to shortlist this API.
  3. Choose the OAuth consent screen menu to create the app. Fill up the following to register the app.
    • App name
    • support email
    • authorized domain
    • developer contact detail (email).
  4. Select Credentials->Create Credentials, then select OAuth client ID. Then, enter the following details.
    • Choose Application type as Web Application.
    • Add authorized JavaScript origin.
    • Add authorized redirect URI.

After completing these steps, the console will display the Google web client id and the secret key. These credentials are used for the authentication process to get access to Google Drive.

oauth credential

Example application files structure

Let us see the PHP example code created for this article to upload a file to Google Drive. The following figure shows the file structure of this example.

google drive file upload example

Application config file

This PHP file contains the constants used in this example. The API credentials and the endpoints are stored as PHP constants with this file.

The endpoint URI configured in this file is to hit the Google Drive API for the following purpose.

  • To set scope during OAuth redirect.
  • To get the access token after authentication with the API credentials GOOGLE_WEB_CLIENT_ID and GOOGLE_WEB_CLIENT_SECRET.
  • To upload file to Drive
  • To add metadata to the uploaded file

The AUTHORIZED_REDIRECT_URI is to set the callback. The API will call this URI with the access code to proceed with file upload after authentication.

lib/Config.php

<?php class Config
{ const GOOGLE_WEB_CLIENT_ID = 'add client id'; const GOOGLE_WEB_CLIENT_SECRET = 'add client secret'; const GOOGLE_ACCESS_SCOPE = 'https://www.googleapis.com/auth/drive'; const AUTHORIZED_REDIRECT_URI = 'https://domain-name/php-google-drive-upload/callback.php'; const GOOGLE_OAUTH2_TOKEN_URI = 'https://oauth2.googleapis.com/token'; const GOOGLE_DRIVE_FILE_UPLOAD_URI = 'https://www.googleapis.com/upload/drive/v3/files'; const GOOGLE_DRIVE_FILE_META_URI = 'https://www.googleapis.com/drive/v3/files/';
} ?>

Landing form with file upload option

This is a simple HTML form that calls the PHP endpoint upload.php on submitting. The file data is posted to this PHP file to upload to a local directory and to Google Drive.

I have just managed field validation by using HTML5 required attribute. You can also add exclusive JavaScript validation for this file upload form.

We have already seen code for doing server-side file validation in PHP.

index.php

<?php
session_start(); ?>
<html>
<head>
<title>How to upload file to Google drive</title>
<link rel="stylesheet" type="text/css" href="css/style.css" />
<link rel="stylesheet" type="text/css" href="css/form.css" />
<style>
input.btn-submit { background: #ffc72c url("google-drive-icon.png") no-repeat center left 45px; text-align: right; padding-right: 45px;
}
</style>
</head>
<body> <div class="phppot-container tile-container"> <form method="post" action="upload.php" class="form" enctype="multipart/form-data">
<?php if(!empty($_SESSION['responseMessage'])){ ?> <div id="phppot-message" class="<?php echo $_SESSION['responseMessage']['messageType']; ?>"> <?php echo $_SESSION['responseMessage']['message']; ?> </div>
<?php $_SESSION['responseMessage'] = "";
}
?>
<h2 class="text-center">Upload file to drive</h2> <div> <div class="row"> <label class="inline-block">Select file to upload</label> <input type="file" name="file" class="full-width" required> </div> <div class="row"> <input type="submit" name="submit" value="Upload to Drive" class="btn-submit full-width"> </div> </div> </form> </div>
</body>
</html>

PHP code upload file to a directory, save to database and redirect to Google

This HTML form action endpoint performs file upload to a directory. It saves the file path to the database and redirects to the Google OAuth URI.

This URI sets the scope, app client id and redirect path (callback.php) to get the access code from the Google Drive API endpoint.

In case of error occurrence, it calls application utils to acknowledge and guide users properly.

upload.php

<?php
session_start();
require_once __DIR__ . '/lib/Util.php';
$util = new Util(); if (! empty($_POST['submit'])) { require_once __DIR__ . '/lib/Config.php'; require_once __DIR__ . '/lib/FileModel.php'; $fileModel = new FileModel(); if (! empty($_FILES["file"]["name"])) { $fileName = basename($_FILES["file"]["name"]); $targetFilePath = "data/" . $fileName; if (move_uploaded_file($_FILES["file"]["tmp_name"], $targetFilePath)) { $fileInsertId = $fileModel->insertFile($fileName); if ($fileInsertId) { $_SESSION['fileInsertId'] = $fileInsertId; $googleOAuthURI = 'https://accounts.google.com/o/oauth2/auth?scope=' . urlencode(Config::GOOGLE_ACCESS_SCOPE) . '&redirect_uri=' . Config::AUTHORIZED_REDIRECT_URI . '&response_type=code&client_id=' . Config::GOOGLE_WEB_CLIENT_ID . '&access_type=online'; header("Location: $googleOAuthURI"); exit(); } else { $util->redirect("error", 'Failed to insert into the database.'); } } else { $util->redirect("error", 'Failed to upload file.'); } } else { $util->redirect("error", 'Choose file to upload.'); }
} else { $util->redirect("error", 'Failed to find the form data.');
}
?>

Callback action to get access token and proceed file upload to Google Drive

This page is called by Google API after performing the OAuth request. The API sends a code parameter while calling this redirect URL.

It calls the getAccessToken() a function defined in the service class. It passes API credentials to get the access token.

When the token is received, this file builds the file content and file meta to be uploaded to Google Drive via cURL request.

The uploadFileToGoogleDrive() accepts access token and the file information to set the cURL options. It returns the file id of the uploaded file to Google Drive.

Then, the addFileMeta() PHP function accepts the array of file metadata. It returns the Google Drive file meta data received as a cURL response.

This metadata id is used in the success response to allow users to view the uploaded file in Google Drive.

callback.php

<?php
session_start();
require_once __DIR__ . '/lib/Util.php';
$util = new Util();
if (isset($_GET['code'])) { require_once __DIR__ . '/lib/Config.php'; require_once __DIR__ . '/lib/GoogleDriveUploadService.php'; $googleDriveUploadService = new GoogleDriveUploadService(); $googleResponse = $googleDriveUploadService->getAccessToken(Config::GOOGLE_WEB_CLIENT_ID, Config::AUTHORIZED_REDIRECT_URI, Config::GOOGLE_WEB_CLIENT_SECRET, $_GET['code']); $accessToken = $googleResponse['access_token']; if (! empty($accessToken)) { require_once __DIR__ . '/lib/FileModel.php'; $fileModel = new FileModel(); $fileId = $_SESSION['fileInsertId']; if (! empty($fileId)) { $fileResult = $fileModel->getFileRecordById($fileId); if (! empty($fileResult)) { $fileName = $fileResult[0]['file_base_name']; $filePath = 'data/' . $fileName; $fileContent = file_get_contents($filePath); $fileSize = filesize($filePath); $filetype = mime_content_type($filePath); try { // Move file to Google Drive via cURL $googleDriveFileId = $googleDriveUploadService->uploadFileToGoogleDrive($accessToken, $fileContent, $filetype, $fileSize); if ($googleDriveFileId) { $fileMeta = array( 'name' => basename($fileName) ); // Add file metadata via Google Drive API $googleDriveMeta = $googleDriveUploadService->addFileMeta($accessToken, $googleDriveFileId, $fileMeta); if ($googleDriveMeta) { $fileModel->updateFile($googleDriveFileId, $fileId); $_SESSION['fileInsertId'] = ''; $driveLink = '<a href="https://drive.google.com/open?id=' . $googleDriveMeta['id'] . '" target="_blank"><b>Open in Google Drive</b></a>.'; $util->redirect("success", 'File uploaded. ' . $driveLink); } } } catch (Exception $e) { $util->redirect("error", $e->getMessage()); } } else { $util->redirect("error", 'Failed to get the file content.'); } } else { $util->redirect("error", 'File id not found.'); } } else { $util->redirect("error", 'Something went wrong. Access forbidden.'); }
}
?>

PHP service class to prepare requests and hit Google Drive API via cURL

The service class contains functions that build the PHP cURL request to hit the Google Drive API.

All the cURL requests use POST methods to submit parameters to the API endpoints.

It gets the response code and the data in the specified format. In case of a cURL error or getting a response code other than 200, it throws exceptions.

On getting the status code 200, it receives the Google Drive file reference and metadata JSON response appropriately.

lib/GoogleDriveUploadService.php

<?php
require_once __DIR__ . '/Config.php'; class GoogleDriveUploadService
{ public function getAccessToken($clientId, $authorizedRedirectURI, $clientSecret, $code) { $curlPost = 'client_id=' . $clientId . '&redirect_uri=' . $authorizedRedirectURI . '&client_secret=' . $clientSecret . '&code=' . $code . '&grant_type=authorization_code'; $curl = curl_init(); curl_setopt($curl, CURLOPT_URL, Config::GOOGLE_OAUTH2_TOKEN_URI); curl_setopt($curl, CURLOPT_RETURNTRANSFER, 1); curl_setopt($curl, CURLOPT_POST, 1); curl_setopt($curl, CURLOPT_SSL_VERIFYPEER, FALSE); curl_setopt($curl, CURLOPT_POSTFIELDS, $curlPost); $curlResponse = json_decode(curl_exec($curl), true); $responseCode = curl_getinfo($curl, CURLINFO_HTTP_CODE); if ($responseCode != 200) { $errorMessage = 'Problem in getting access token'; if (curl_errno($curl)) { $errorMessage = curl_error($curl); } throw new Exception('Error: ' . $responseCode . ': ' . $errorMessage); } return $curlResponse; } public function uploadFileToGoogleDrive($accessToken, $fileContent, $filetype, $fileSize) { $curl = curl_init(); curl_setopt($curl, CURLOPT_SSL_VERIFYPEER, false); curl_setopt($curl, CURLOPT_SSL_VERIFYHOST, false); curl_setopt($curl, CURLOPT_URL, Config::GOOGLE_DRIVE_FILE_UPLOAD_URI . '?uploadType=media'); curl_setopt($curl, CURLOPT_BINARYTRANSFER, 1); curl_setopt($curl, CURLOPT_POST, 1); curl_setopt($curl, CURLOPT_POSTFIELDS, $fileContent); curl_setopt($curl, CURLOPT_RETURNTRANSFER, true); curl_setopt($curl, CURLOPT_HTTPHEADER, array( 'Content-Type: ' . $filetype, 'Content-Length: ' . $fileSize, 'Authorization: Bearer ' . $accessToken )); $curlResponse = json_decode(curl_exec($curl), true); $responseCode = curl_getinfo($curl, CURLINFO_HTTP_CODE); if ($responseCode != 200) { $errorMessage = 'Failed to upload file to drive'; if (curl_errno($curl)) { $errorMessage = curl_error($curl); } throw new Exception('Error ' . $responseCode . ': ' . $errorMessage); } curl_close($curl); return $curlResponse['id']; } public function addFileMeta($accessToken, $googleDriveFileId, $fileMeta) { $curl = curl_init(); curl_setopt($curl, CURLOPT_URL, Config::GOOGLE_DRIVE_FILE_META_URI . $googleDriveFileId); curl_setopt($curl, CURLOPT_RETURNTRANSFER, 1); curl_setopt($curl, CURLOPT_POST, 1); curl_setopt($curl, CURLOPT_SSL_VERIFYPEER, false); curl_setopt($curl, CURLOPT_SSL_VERIFYHOST, false); curl_setopt($curl, CURLOPT_HTTPHEADER, array( 'Content-Type: application/json', 'Authorization: Bearer ' . $accessToken )); curl_setopt($curl, CURLOPT_CUSTOMREQUEST, 'PATCH'); curl_setopt($curl, CURLOPT_POSTFIELDS, json_encode($fileMeta)); $curlResponse = json_decode(curl_exec($curl), true); $responseCode = curl_getinfo($curl, CURLINFO_HTTP_CODE); if ($responseCode != 200) { $errorMessage = 'Failed to add file metadata'; if (curl_errno($curl)) { $errorMessage = curl_error($curl); } throw new Exception('Error ' . $responseCode . ': ' . $errorMessage); } curl_close($curl); return $curlResponse; }
}
?>

PHP model class to build queries and parameters to insert, read and update file data log

This PHP model class defines functions to keep track of the database log for the uploaded file.

In the callback, it writes the Google Drive file id with the reference of the last inserted id in the session.

lib/FileModel.php

<?php
require_once __DIR__ . '/DataSource.php'; class FileModel extends DataSource
{ function insertFile($fileBaseName) { $query = "INSERT INTO google_drive_upload_response_log (file_base_name, create_at) VALUES (?, NOW())"; $paramType = 's'; $paramValue = array( $fileBaseName ); $insertId = $this->insert($query, $paramType, $paramValue); return $insertId; } function getFileRecordById($fileId) { $query = "SELECT * FROM google_drive_upload_response_log WHERE id = ?"; $paramType = 'i'; $paramValue = array( $fileId ); $result = $this->select($query, $paramType, $paramValue); return $result; } function updateFile($googleFileId, $fileId) { $query = "UPDATE google_drive_upload_response_log SET google_file_id=? WHERE id=?"; $paramType = 'si'; $paramValue = array( $googleFileId, $fileId ); $this->update($query, $paramType, $paramValue); }
}
?>

This file is a simple PHP Util class having only a redirect function as of now.

We can enhance this function by adding more utils. For example, it can have JSON encode decode to convert the cURL response into an array.

lib/Util.php

<?php class Util
{ function redirect($type, $message) { $_SESSION['responseMessage'] = array( 'messageType' => $type, 'message' => $message ); header("Location: index.php"); exit(); }
}
?>

Installation steps

Before running this example to upload a file to Google Drive, do the following steps. It will let the development environment be ready with the required configurations and resources.

  1. Configure database details with lib/DataSource.php. The source code includes this file.
  2. Configure Google API keys with lib/Config.php. Also, provide the domain and subfolder for setting the callback with AUTHORIZED_REDIRECT_URI.
  3. Import the below SQL script into your target database.

sql/structure.sql

--
-- Table structure for table `google_drive_upload_response_log`
-- CREATE TABLE `google_drive_upload_response_log` ( `id` int NOT NULL, `google_file_id` varchar(255) CHARACTER SET utf8 COLLATE utf8_general_ci DEFAULT NULL, `file_base_name` varchar(255) CHARACTER SET utf8 COLLATE utf8_general_ci DEFAULT NULL, `create_at` datetime NOT NULL DEFAULT CURRENT_TIMESTAMP ON UPDATE CURRENT_TIMESTAMP
) ENGINE=InnoDB DEFAULT CHARSET=utf8mb4 COLLATE=utf8mb4_0900_ai_ci; --
-- Indexes for dumped tables
-- --
-- Indexes for table `google_drive_upload_response_log`
--
ALTER TABLE `google_drive_upload_response_log` ADD PRIMARY KEY (`id`); --
-- AUTO_INCREMENT for dumped tables
-- --
-- AUTO_INCREMENT for table `google_drive_upload_response_log`
--
ALTER TABLE `google_drive_upload_response_log` MODIFY `id` int NOT NULL AUTO_INCREMENT;

Download

↑ Back to Top

Posted on Leave a comment

Convert HTML Table to Excel using JavaScript

by Vincy. Last modified on July 25th, 2022.

Converting a HTML table to an excel file is a standard requirement of reporting websites. It will be simple and easier if the conversion is taking place on the client side.

There are many client-side and server-side plugins to perform the excel export. For example, PHPSpreadSheet allows writing data into excel and exporting.

This article will give different options and approaches to achieving the HTML table to excel conversion with JavaScript.

This simple example includes a few lines of JavaScript that build the template for excel export.

It uses the following steps to convert the exported excel report of tabular data.

  1. Defines HTML template structure with required meta.
  2. Include the table’s inner HTML into the template.
  3. Marks the location by specifying the protocol to download the file via browser.
  4. Redirect via JavaScript to point to the location with the encoded excel content.

Quick example

A JavaScript handler to set export template and push HTML table data.

function exportToExcel() { var location = 'data:application/vnd.ms-excel;base64,'; var excelTemplate = '<html> ' + '<head> ' + '<meta http-equiv="content-type" content="text/plain; charset=UTF-8"/> ' + '</head> ' + '<body> ' + document.getElementById("table-conatainer").innerHTML + '</body> ' + '</html>' window.location.href = location + window.btoa(excelTemplate);
}

View demo

The below HTML table code displays a product listing and it is static. Refer jsPDF AutoTables examples to render a dynamic table by loading row by row.

The button below this table triggers the export to excel process on the click event. The exportToExcel() function handles the event and proceeds the client-side export.

<div id="table-conatainer"> <table class="striped"> <thead> <tr> <th>S.No</th> <th>Product Name</th> <th>Price</th> <th>Model</th> </tr> </thead> <tbody> <tr> <td>1q</td> <td>GIZMORE Multimedia Speaker with Remote Control, Black</td> <td>2300</td> <td>2020</td> </tr> <tr> <td>2</td> <td>Black Google Nest Mini</td> <td>3400</td> <td>2021</td> </tr> </tbody> </table>
</div>

html table excel javascript

Let us see more options available for converting HTML table data into an excel file.

Option 2: Export as CSV to view in excel

This example is for parsing the HTML table content via JavaScript. It follows the below steps to export an HTML table to excel as CSV.

  1. Accessing HTML table element object.
  2. Convert the object into an array of row data.
  3. Iterate row data array to prepare comma-separated values of records.
  4. Set the protocol and content type to export the CSV data prepared from the table.

The below JavaScript function implements the above steps to export table data on the client side.

function exportCSVExcel() { var tableElement = document.getElementById("table-product-list"); var sourceData = "data:text/csv;charset=utf-8,"; var i = 0; while (row = tableElement.rows[i]) { sourceData += ([ row.cells[0].innerText, row.cells[1].innerText, row.cells[2].innerText, row.cells[3].innerText ]).join(",") + "\r\n"; i++; } window.location.href = encodeURI(sourceData);
}

Option 3 – Export HTML table to excel using jQuery-based plugin

The jQuery table2excel plugin is a popular solution to arrive HTML to excel export.

It has many features with the export core functionalities. Those are,

  1. Excludes/includes HTML tags like inputs, links, or images that are in the source table HTML.
  2. Excludes some table components with the reference of that particular element’s class or id selectors.
  3. Provides properties to set file name with which the exported data will be downloaded to the browser.

Include the jQuery and the table2excel plugin file in the <head> section as below.

There are alternative methods to install the table2excel plugin. Its Github page provides documentation of installation and usage methodologies.

<script src="https://ajax.googleapis.com/ajax/libs/jquery/2.2.4/jquery.min.js"></script>
<script src="https://cdn.rawgit.com/rainabba/jquery-table2excel/1.1.0/dist/jquery.table2excel.min.js"></script>

Then, initiate the plugin class by pointing to the source HTML table element.

The below JavaScript does the initiation. During instantiation, it sets the options array to specify a file name, extension and applicable flags.

function exportCSVExcel() { $('#table-product-list').table2excel({ exclude: ".no-export", filename: "download.xls", fileext: ".xls", exclude_links: true, exclude_inputs: true });
}

This example uses the same HTML table source for the export operation. The difference is that the source table content marks some of the rows with no-export class.

This class is configured in the above script with exclude property of this plugin class.

Conclusion:

So, we have seen three simple implementations of adding HTML table to excel feature. Though the export feature is vital, we must have a component that provides a seamless outcome.

I hope, the above solution can be a good base for creating such components. It is adaptable for sure to dock more features to have an efficient excel report generation tool.

View demoDownload

↑ Back to Top

Posted on Leave a comment

Add Watermark using PHP to Existing or New PDF

by Vincy. Last modified on July 16th, 2022.

FPDF is a fantastic library for working with PDF documents in PHP. It is the most popular one with a large number of plugins that enhances its core features.

Adding a watermark to a PDF document is a basic need in document editing work. Imagine that you have a project where you need to create a feature-rich PDF document editor project with the sole purpose of managing watermarks.

This PHP script will help you as a foundation code to solve your basic watermarking needs. You can use this as a base and build on top of it if you require more.

I have covered two aspects of adding watermarks.

  1. Add a watermark to an existing PDF document.
  2. Add a watermark to a new PDF document.

I am also presenting an online demo that watermarks a PDF document using this PHP script.

If you are looking for adding a watermark to a web page with a generated image using PHP, refer to this linked article.

View demo

PHP Watermark PDF

Add a watermark to an existing PDF document

To add a watermark to an existing PDF document, I am using FPDF and FPDI libraries. FPDF is the foundation and FPDI is used to load and edit an existing document.

FPDI helps to load an existing PDF document and use it as a template in FPDF to create a document.

You need to download both FPDF and FPDI libraries and add it to the project. Refer to the project file structure image below.

existing-pdf-watermark.php

<?php
require_once __DIR__ . '/fpdf/fpdf.php';
require_once __DIR__ . '/FPDI/src/autoload.php'; function addWatermark($x, $y, $watermarkText, $angle, $pdf)
{ $angle = $angle * M_PI / 180; $c = cos($angle); $s = sin($angle); $cx = $x * 1; $cy = (300 - $y) * 1; $pdf->_out(sprintf('q %.5F %.5F %.5F %.5F %.2F %.2F cm 1 0 0 1 %.2F %.2F cm', $c, $s, - $s, $c, $cx, $cy, - $cx, - $cy)); $pdf->Text($x, $y, $watermarkText); $pdf->_out('Q');
} $pdf = new \setasign\Fpdi\Fpdi();
$fileInput = 'example.pdf';
$pages_count = $pdf->setSourceFile($fileInput);
for ($i = 1; $i <= $pages_count; $i ++) { $pdf->AddPage(); $tplIdx = $pdf->importPage($i); $pdf->useTemplate($tplIdx, 0, 0); $pdf->SetFont('Times', 'B', 70); $pdf->SetTextColor(192, 192, 192); $watermarkText = 'CONFIDENTIAL'; addWatermark(105, 220, $watermarkText, 45, $pdf); $pdf->SetXY(25, 25);
}
$pdf->Output();
?>

Add a watermark to a new PDF document

Following PHP script is as simple as it gets. The Header function is used to render the PDF document page header. This is called by the AddPage function.

addWatermark is the key function responsible for creating the watermark. It sets the watermark text and performs the rotation to position it across the document. The X and Y location of where to start the watermark text and its color is defined in the Header function.

You can make adjustments by setting a smaller font, position, color, etc as per your choice.

new-pdf-watermark.php

<?php
require __DIR__ . '/fpdf/fpdf.php'; class PDF extends FPDF
{ function Header() { // setting the font, color and text for watermark $this->SetFont('Times', 'B', 48); $this->SetTextColor(140, 180, 205); $watermarkText = 'New PDF Watermark - PHP'; $this->addWatermark(35, 190, $watermarkText, 45); } function addWatermark($x, $y, $watermarkText, $angle) { $angle = $angle * M_PI / 180; $c = cos($angle); $s = sin($angle); $cx = $x * $this->k; $cy = ($this->h - $y) * $this->k; $this->_out(sprintf('q %.5F %.5F %.5F %.5F %.2F %.2F cm 1 0 0 1 %.2F %.2F cm', $c, $s, - $s, $c, $cx, $cy, - $cx, - $cy)); $this->Text($x, $y, $watermarkText); $this->_out('Q'); }
} $pdf = new PDF();
$pdf->AddPage();
$pdf->SetFont('Arial', '', 12);
$pdfDocumentContent = "Lorem ipsum dolor sit amet, consectetur adipiscing elit, sed do eiusmod tempor incididunt ut labore et dolore magna aliqua. Ut enim ad minim veniam, quis nostrud exercitation ullamco laboris nisi ut aliquip ex ea commodo consequat. Duis aute irure dolor in reprehenderit in voluptate velit esse cillum dolore eu fugiat nulla pariatur. .\n\n";
for ($i = 0; $i < 15; $i ++) { $pdf->MultiCell(0, 5, $pdfDocumentContent, 0, 'J');
}
$pdf->Output();
?>

PHP project structure

PHP PDF Watermark Project Structure

I have given the complete PHP project as a free download below. The dependent libraries FPDF and FPDI are not available in the project download zip file. You can download them from their official website and add them to your project as per the given project structure above before adding watermarks.

View demo Download

↑ Back to Top

Posted on Leave a comment

How to Add Custom Field to Product in WooCommerce

by Vincy. Last modified on June 29th, 2022.

WooCommerce is the best among the top eCommerce software which is free. It is based on WordPress platform. Setting up a shopping cart is quite easy with WooCommerce.

In previous articles, we have seen some WooCommerce-based code for the following utilities.

The WooCommerce product showcase displays the information that meets the customer demand. Sometimes preliminary details cannot convey all and let the customer identify their destiny.

This is something that needs adding additional information using custom-field integration. WooCommerce plugins support adding custom fields to products via the admin interface.

We will see those options below and their usage methodologies of them.

Why a WooCommerce shop admin needs Custom Fields

Before adding custom fields to a product, learn why a WooCommerce shop needs this.

Because, some of the shops have a routine product gallery with usual data like title, image and price. In that case, the custom fields are not required.

The below list shows the advantages of this custom fields feature on a WooCommerce shop.

  • To add product metadata that is for displaying additional information about products.
  • To allow customers to provide more specifications on the products to purchase.
  • To add user-friendly interactive fields to save their effort on giving customizations.
  • To add promotions, offers, discounts and all.
  • To support end-user to specify a delivery date, time and place.
  • To apply tax, and shipping by toggling the custom switch.

Types of custom fields creation supported by WooCommerce plugins

The available WooCommerce plugins can add two types of custom fields for products.

  1. Data fields – The field accepts information to be displayed on the UI.
  2. Add-on fields – Fields that collect data from the user on the storefront.

1. Data fields – The field accepts information to be displayed on the UI

This custom field is for showing more information apart from the regular title, price and all. This will help to show product metadata about features, version, rating and all.

For example, a monitor, to show extra information like,

Brand Dell
Model Dell 20H
Screen Size 23
Features HDMI, Anti-glare

2. Add-on fields – Fields that collect data from the user on the storefront

This type of custom field is about creating options for the customer to interact with. It is to allow adding more specifications or customization on the pursued product.

It is for adding personalized information by the customers on the product purchase. Example,

  • A multi-option field to select the size or color of a T-shirt.
  • A text field to collect a brand name to be engraved on a purchased pen.

Methods of adding custom fields display in WooCommerce

  1. Using WooCommerce plugins.
  2. Adding code to display custom fields for products.

Method 1: Using the plugin

We have taken three plugins to support adding custom fields to a product in a WooCommerce shop. Those are having advanced features and are also easy to set up.

  1. Advanced Product Fields for WooCommerce
  2. Product Addons for WooCommerce
  3. Advanced Custom Fields

1. Advanced Product Fields for WooCommerce

This plugin is used for adding additional fields to the WooCommerce product page. It helps to embed product add-on fields to allow customers to personalize the order.

Look into the plugin details and prerequisites below.

Version 4.5 or higher
Active installations 20,000+
PHP version 5.6 or higher
Last updated 2 weeks ago

Features

  • The custom product field selected on the product page can be carried over to the cart and checkout pages. It is persistent on the entire flow until the order receipt.
  • Smooth product field builder in the backend with a seamless experience.
  • It has the option to add multiple prices to manipulate the base price of the products on selection.
  • It supports all possible interactive fields with the show hide option.
  • It allows products and custom-field mapping interfaces to control the visibility.
  • WooCommerce tax figure customization is possible.
  • Multi-lingual in translation-ready themes.

Steps to use

Download this plugin from the official WordPress repository. Then install and activate it for the WooCommerce shop. If you are new to WordPress, then see here how to set up a plugin.

  1. Go to Product -> Add New via the WooCommerce admin menu.
  2. Click “Custom fields” under the “Product data” panel.
  3. Configure “Field group layout” settings. It is to specify the position of the label or a field note if any. Also, it helps to mark a field as mandatory.
  4. Select “Add the first field” or “Add field” and specify field type, label, and all.
  5. Add conditional rules to add dependencies between fields to be displayed.

This is the WooCommerce admin interface to add the custom fields for products. I have added the Size option for the product as a ratio group.

advanced product field setting

This will show the added custom field on the product front end as a radio option.

advanced product field output

2. Product Addons for WooCommerce

This plugin says the purpose clearly by its name itself. Yes, it is to add more add-on fields to let the customer interact with the shop to personalize the purchase.

An easy custom form builder allows for building a field group for the WooCommerce shop pages. Have a look at the version and other details below.

WordPress Version 4.0 or higher
Active installations 30,000+
PHP version 5.6 or higher
Last updated at 3 weeks ago

Download this plugin from the WordPress repository linked. The plugin provides a drag-and-drop interface to build custom field groups for products.

Features

  • Capable of personalizing the purchase order.
  • It saves the customer’s personalized data via a custom field added for products in the backend.
  • For builder helps to design a group of the custom fields.
  • Allows more types of fields like text, number and email fields, combo fields and all.
  • In the base version, it allows adding <p> and <h*> tags to display product meta in the front end.

Steps to use

There are a few steps to add and display a custom field on a product page of a WooCommerce theme.

  1. Go to Products->Custom Product Addons via the WordPress admin menu.
  2. Add a new form of product custom fields group and publish it.
  3. Go to Products and open a new or edit product panel.
  4. Choose “Custom Product Options” from the Product data group.
  5. Check the form to add a mapping between custom fields and products.

See the following two screenshots to add custom fields and map them for the product.

product addons settings

product addons mapping

Then, the WooCommerce shop will show the custom fields on the single product page.

product addons output

3. Advanced Custom Fields

It supports full control of the WordPress edit screen and custom form data.

WordPress Version 4.7 or higher
Active Installations 2+ million
PHP Version 5.6 or higher
Last updated 6 days ago

The simple and intuitive plugin has powerful functions and over 30 field types

Features

  • It provides powerful functions to customize and add custom fields for the product
  • Good and simple backend interface to add custom field group on a need basis.
  • Supports 30+ field types to set more data apart from the standard custom product fields.

Steps to customize

Download or install via admin to enable this plugin before going to read the below steps.

  1. Add and customize the field group.
  2. Add form fields into the group.
  3. Add data for the custom fields on the product page.
  4. Display the product information on the front end.

Step 1: Add and customize field group

Go to Custom Fields via the admin menu. Add a new field group and specify the UI location and other settings.

It helps to set states and styles to add and show the custom fields on a product page. It manages the relative position and alignment of the field on the UI.

Fields can also be mapped for posts, products, pages and more.

Step 2: Add form fields into the group

The field add interface allows the following data to enter. For combo fields, it asks to enter multiple options to the loaded.

  • label, name, type.
  • Field notes or helps text.
  • If the field is required or not.
  • Place holder and default value.
  • Content to prepend or append.
  • Character restriction, Rules.
  • Field wrapper classes or ids.

Step 3: Add data for the custom fields based on products

If the custom field group is mapped for the location of product pages, then the add/edit page will show it.

Add the data for the custom fields which will be displayed on the WooCommerce product at the shop.

##image

Step 4: Display the product information on the front-end

Then display the custom fields data on the product single page at the front-end.

In this plugin, we need to add a simple shortcode to display the custom fields on the product page.

The [acf field=”<field-id or slug>”] shortcode is used for displaying the custom field group.

There are a couple of functions in WordPress to display the fields for a WooCommerce product.

<php
the_field("<field-id or slug>");
?>

or

<php
$customFieldGroup = get_field("<field-id or slug>");
echo $customFieldGroup;
?>

Method 2: Adding custom fields via the program

Thus, we have seen how to add product custom fields in a WooCommerce platform using plugins. If you want to implement the same without using plugins, it’s very simple with a few steps.

These steps render the custom fields on the WooCommerce product page. After collecting the user inputs in the product page, the custom code will display them on the cart page.

Steps to implement this method by adding custom code are listed below.

  1. Add a custom field in the product data panel on the WooCommerce admin.
  2. Save added custom field data into cart metadata.
  3. Display an input field in a product single page.
  4. Passing the values on the cart and checkout pages.

Add this custom code in the WordPress active theme’s function.php file.

1. Adding custom fields in the product data panel

Create code for displaying custom fields in the WooCommerce product data panel. The woocommerce_product_options_general_product_data hook is used to call this code.

/* Add product meta field for the WooCommerce admin */
function woocommerce_custom_select_dropdown(){ $select = woocommerce_wp_select(array( 'id' => '_select_color', 'label' =>__('Select color', 'woocommerce'), 'options' => array( 'Black' => __('Black','woocommerce'), 'Blue' => __('Blue','wooocommerce'), 'Pink'=> __('Pink','woocommerce') ), ));
}
add_action('woocommerce_product_options_general_product_data', 'woocommerce_custom_select_dropdown');

This example adds a dropdown as a custom field for products. So, it uses the woocommerce_wp_select function to set the following parameters.

  • id
  • label
  • description
  • desc_tip
  • options

There are similar functions to add other types of form fields. For example,

  • woocommerce_wp_textarea_input
  • woocommerce_wp_checkbox
  • woocommerce_wp_hidden_input

2. Save the user input in the custom fields to cart metadata.

Then, another action hook is added to save the custom field value on the product meta. This will be called on saving the product details. It calls the woocommerce_process_product_meta action and hooks the handler.

/* Save custom field data for the product */
function woocommerce_product_custom_fields_save($post_id)
{ $woocommerce_select_color_field = $_POST['_select_color']; if (!empty($woocommerce_select_color_field)) { update_post_meta($post_id, '_select_color', esc_attr($woocommerce_select_color_field)); }
}
add_action('woocommerce_process_product_meta', 'woocommerce_product_custom_fields_save');

3. Display an input field in a product single page

In this section, it prepares an add-on field HTML if the product meta is not empty.

First, the admin chooses and saves the product color option. Then this code will add a dropdown field on the product single page.

It reads the current product meta with the reference of the global post object. Then, it fetches the product meta by the custom field id.

In the WooCommerce product page, this custom field is added before the cart button. It is because of hooking the action woocommerce_before_add_to_cart_button to call this handler.

/* Show add-on field based on the saved custom field */
function woocommerce_display_select_option_value()
{ global $post; $product = wc_get_product($post->ID); $select_option_title_field = $product->get_meta('_select_color'); if ($select_option_title_field) { printf('
<div><select name="color_option" class="input-text text">
<option value="Default Color">Default Color</option>
<option value="' . $select_option_title_field . '">' . $select_option_title_field . '</option> </select></div>', esc_html($select_option_title_field)); }
}
add_action('woocommerce_before_add_to_cart_button', 'woocommerce_display_select_option_value');

4. Display the selected option in the cart and checkout pages

The following filter hooks handle the functions to display the selected custom option. It has the cart and checkout pages as its target to render the UI component.

This code is triggered on loading the cart item data. It calls the filter hook woocommerce_add_cart_item_data and displays the selected custom field value.

It adds the data into the cart item array which will be later used in the checkout page UI.

/* Display selected option in the cart */
function woocommerce_add_custom_field_item_data($cart_item_data, $product_id)
{ if (! empty($_POST['color_option'])) { $cart_item_data['select_field'] = $_POST['color_option']; } return $cart_item_data;
}
add_filter('woocommerce_add_cart_item_data', 'woocommerce_add_custom_field_item_data', 10, 2);

This is to parse the cart item array and display the custom field value on the checkout page.

It uses the woocommerce_cart_item_name hook to do this change in the checkout UI.

/* Display selected option in the checkout */
function woocommerce_cart_display($name, $cart_item, $cart_item_key)
{ if (isset($cart_item['select_field'])) { $name .= sprintf('<p>%s</p>', esc_html($cart_item['select_field'])); } return $name;
}
add_filter('woocommerce_cart_item_name', 'woocommerce_cart_display', 10, 3);

Conclusion

Thus, we have seen both methods to add custom fields to products. It is with or without plugins to enable WooCommerce product custom fields.

I hope, this article gives a basic knowledge in this area. Also, it might help you to understand and replicate the steps to customize your shop.

↑ Back to Top

Posted on Leave a comment

jsPDF AutoTable example – Table to PDF

by Vincy. Last modified on June 17th, 2022.

The jsPDF AutoTables plugin is for converting a table to a PDF. This is a dependable client-side library to generate reports online in a table format.

It has many features around the PDF generation process using this library. It supports customizing the appearance by defining table column structure and styles.

In this article, we will see the capability of this plugin and its usage with examples.

The below code shows a quick example to learn how to use the jsPDF autoTable library to convert tabular data into a PDF.

It builds the options array to specify a body, start position and more to create a PDF document. It outputs a PDF document as a result and prompts to download it to the browser.

Quick example


window.onload = function() { var doc = new jsPDF('p', 'pt', 'letter') // Supply data via script var body = [ ['SL.No', 'Product Name', 'Price', 'Model'], [1, 'I-phone', 75000, '2021'], [2, 'Realme', 25000, '2022'], [3, 'Oneplus', 30000, '2021'], ] // generate auto table with body var y = 10; doc.setLineWidth(2); doc.text(200, y = y + 30, "Product detailed report"); doc.autoTable({ body: body, startY: 70, theme: 'grid', }) // save the data to this file doc.save('auto_table_with_javascript_data');
}

custom styles pdf tables

Basics of jsPDF Autotable

This plugin can receive two types of source formats for generating a standard PDF.

  1. An array of table row data to supply via script.
  2. HTML table element object to parse for converting a table to PDF.

How to integrate?

There are many ways to integrate this library into an application. Those are listed below.

  • Using npm command as like npm install jspdf jspdf-autotable
  • Download the plugin library from Github.
  • Include jsPDF and jsPDF Autotable via CDN URL.
https://cdnjs.cloudflare.com/ajax/libs/jspdf/2.5.1/jspdf.umd.min.js https://cdnjs.cloudflare.com/ajax/libs/jspdf-autotable/3.5.25/jspdf.plugin.autotable.min.js

Features

This list shows some of the widely used features of the jsPDF AutoTables plugin. Other than that, it has more features that can be found in the official documentation page.

  • It provides options to set table content with htmlheadbodyfoot, columns. The html and body are required among them.
  • It provides more control over table cells and columns using CellDef and ColumnDef properties.
  • It has built-in themes for tables and also allows adding custom styles.
  • It provides hooks to callback on an event basis. This callback passes the hookData reference.

Database script

The below SQL script is used for having the backend data for the PDF table source. Import this SQL before running the AutoTable examples using database data to Generate PDF.

It helps to load dynamic data into the HTML table.

  • This HTML source will be used as a reference with the Autotable.html property.
  • This data can also be converted as a JSON object and mentioned in the Autotable.body property to Generate PDF.

structure.sql


--
-- Table structure for table `tbl_product`
-- CREATE TABLE `tbl_product` ( `id` int(11) NOT NULL, `product_name` varchar(255) NOT NULL, `price` varchar(255) NOT NULL, `model` varchar(255) NOT NULL
); --
-- Dumping data for table `tbl_product`
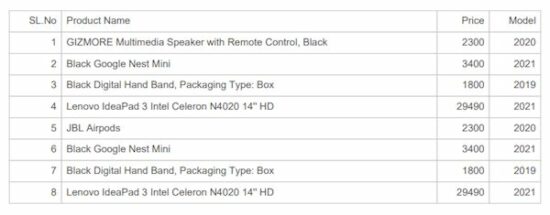
-- INSERT INTO `tbl_product` (`id`, `product_name`, `price`, `model`) VALUES
(1, 'GIZMORE Multimedia Speaker with Remote Control, Black', '2300', '2020'),
(2, 'Black Google Nest Mini', '3400', '2021'),
(3, 'Black Digital Hand Band, Packaging Type: Box', '1800', '2019'),
(4, 'Lenovo IdeaPad 3 Intel Celeron N4020 14\'\' HD ', '29490', '2021'),
(5, 'JBL Airpods', '2300', '2020'),
(6, 'Black Google Nest Mini', '3400', '2021'),
(7, 'Black Digital Hand Band, Packaging Type: Box', '1800', '2019'),
(8, 'Lenovo IdeaPad 3 Intel Celeron N4020 14\'\' HD ', '29490', '2021'); ALTER TABLE `tbl_product` ADD PRIMARY KEY (`id`); ALTER TABLE `tbl_product` MODIFY `id` int(11) NOT NULL AUTO_INCREMENT, AUTO_INCREMENT=11;

Simple HTML Table to PDF generation using jsPDF AutoTables

The PDF table data is dynamic from the database. The below code fetches the database records and display them in the UI with a HTML table.

It also shows a button to trigger the PDF generation on clicking it.

The on click event calls a JavaScript function named generateTable(). It refers to HTML table in the UI in the AutoTable.html option.

html-to-pdf-using-jspdf.php


<?php
namespace Phppot; require_once __DIR__ . '/lib/DataSource.php';
$conn = new DataSource();
$sql = "SELECT * FROM tbl_product";
$result = $conn->select($sql);
?>
<html>
<title>Product</title>
<meta charset="utf-8">
<meta name="viewport" content="width=device-width, initial-scale=1">
<script src="https://cdnjs.cloudflare.com/ajax/libs/jspdf/1.5.3/jspdf.min.js"></script>
<script src="https://cdnjs.cloudflare.com/ajax/libs/jspdf-autotable/3.5.6/jspdf.plugin.autotable.min.js"></script>
<script src="assets/js/jspdf-autotable-custom.js"></script>
<link href="assets/css/style.css" rel="stylesheet" type="text/css" />
</head>
<body> <div class="container"> <h2 class="text-center heading">Product detailed list</h2> <table class="table" id="product-table"> <tr class="border"> <th class="text-align">SL.No</th> <th>Product Name</th> <th class="text-align">Price</th> <th class="text-align">Model</th> </tr> <?php if (! empty($result)) {?> <?php foreach ($result as $k=>$val) {?> <tr class="content border"> <td class="text-align"><?php echo $result[$k]["id"];?></td> <td class="border-dark"><?php echo $result[$k]["product_name"];?></td> <td class="text-align"><?php echo $result[$k]["price"];?></td> <td class="text-align"><?php echo $result[$k]["model"];?></td> </tr> <?php }}?> </table> <input type="button" class="export-button" onclick="generateTable()" value="Generate PDF" /> </div>
</body>
</html>

Generate PDF from HTML table using AutoTable function

This script shows the generateTable() function and prepares the title and the table data to display in the PDF.

The autoTable() function uses the HTML table’s id selector reference to get the table data for the PDF.

Also, it fixes the PDF starting coordinates, themes and styles with the reference of the jsPDF instance.

By parsing the HTML table source, it outputs a PDF document that can be downloaded and saved.


function generateTable() { var doc = new jsPDF('p', 'pt', 'letter'); var y = 20; doc.setLineWidth(2); doc.text(200, y = y + 30, "Product detailed report"); doc.autoTable({ html: '#product-table', startY: 70, theme: 'grid', columnStyles: { 0: { halign: 'right', tableWidth: 100, }, 1: { tableWidth: 100, }, 2: { halign: 'right', tableWidth: 100, }, 3: { halign: 'right', tableWidth: 100, } }, }) doc.save('auto_table_pdf');
}

basic autotable example

Set default theme and custom styles for PDF tables

The jsPDF AutoTable plugin provides built-in themes. The possible values are ‘stripped’, ‘grid’, ‘plain’ and ‘css’.

It also supports adding custom styles by changing the plugin’s default options.

This example uses this plugin to customize the output PDF appearance by applying exclusive styles. These styles are applied on top of the configured theme appearance.

pdf-with-plugin-theme-and-custom-styles.php


<html>
<title>Product</title>
<meta charset="utf-8">
<meta name="viewport" content="width=device-width, initial-scale=1">
<script src="https://cdnjs.cloudflare.com/ajax/libs/jspdf/1.5.3/jspdf.min.js"></script>
<script src="https://cdnjs.cloudflare.com/ajax/libs/jspdf-autotable/3.5.6/jspdf.plugin.autotable.min.js"></script>
<link href="assets/css/style.css" rel="stylesheet" type="text/css" />
</head>
<body> <div class="container"> <input type="button" class="export-button" onclick="setThemeCustomStyle();" value="Generate PDF" /> </div>
</body>
</html>

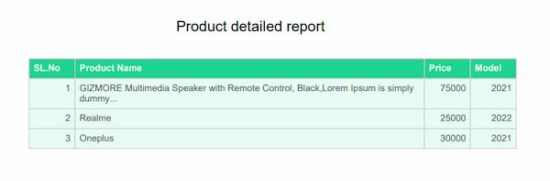
The autoTable sets PDF table theme as grid and applies custom styles using headStyles and columnStyles options.

The custom styles override the cell background color, height and other default settings.


function setThemeCustomStyle() { var doc = new jsPDF('p', 'pt', 'letter') // generate the above data table var body = [ [1, 'GIZMORE Multimedia Speaker with Remote Control, Black,Lorem Ipsum is simply dummy...', 75000, '2021'], [2, 'Realme', 25000, '2022'], [3, 'Oneplus', 30000, '2021'], ] // New Header and Footer Data Include the table var y = 10; doc.setLineWidth(2); doc.text(200, y = y + 30, "Product detailed report"); doc.autoTable({ body: body, startY: 70, head:[['SL.No', 'Product Name', 'Price', 'Model']], headStyles :{lineWidth: 1,fillColor: [30, 212, 145],textColor: [255,255,255], }, theme: 'grid', columnStyles: { 0: { halign: 'right', cellWidth: 50, fillColor: [232, 252, 245], }, 1: { halign: 'left', cellWidth: 380, fillColor: [232, 252, 245], }, 2: { halign: 'right', cellWidth: 50, fillColor: [232, 252, 245], }, 3: { halign: 'right', cellWidth: 50, fillColor: [232, 252, 245], } }, }) // save the data to this file doc.save('auto_table_theme_custom_styles');
}

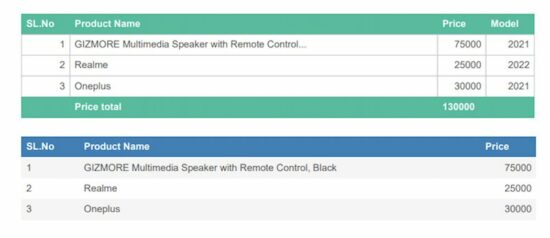
Create a PDF table with a header and footer

When preparing reports in a tabular format, the header, and footer components are most probably required. The header is for classifying the column data with keys or categories.

The footer components’ purpose commonly depends on the type of tabular report. If the table is huge in length, the footer may duplicate the header columns. If the table contains statistical data, the footer may reflect the consolidated figures.

In this way, the header and footer give value-add to the tabular report.

This plugin gives various methods to add header and footer parts along with the table body. Two of them are taken here for implementation in the below examples.

  • Using head and foot properties
  • Using column properties

Using head and foot properties

The page will contain a “Generate” button to call the below JavaScript function. This function initiates autoTable and specify the following properties.

  • body
  • head
  • foot
  • headStyles
  • footStyles
  • columnStyles

Then, To press the export button it not only downloads the table but also shows the table along with the header footer data value that we have added.

jspdf-long-text-header-footer.php


function generateHeaderFooterTable() { var doc = new jsPDF('p', 'pt', 'letter') // generate the above data table var body = [ [1, 'GIZMORE Multimedia Speaker with Remote Control...', 75000, '2021'], [2, 'Realme', 25000, '2022'], [3, 'Oneplus', 30000, '2021'], ] // New Header and Footer Data Include the table var y = 10; doc.setLineWidth(2); doc.text(200, y = y + 30, "Product detailed report"); doc.autoTable({ body: body, startY: 70, head:[['SL.No', 'Product Name', 'Price', 'Model']], foot:[[' ', 'Price total', '130000', ' ']], headStyles :{textColor: [255, 255, 255],}, footStyles :{textColor: [255, 255, 255],}, theme: 'grid', columnStyles: { 0: {halign: 'right', cellWidth: 50,}, 1: {halign: 'left', cellWidth: 380,}, 2: {halign: 'right', cellWidth: 50,}, 3: {halign: 'right', cellWidth: 50,} }, }) ...
... // save the data to this file doc.save('auto_table_header_footer');
}

Using column properties

Using this method, it maps the data key-value pair in the body of the autoTable specification.

Then, it specifies the column name in the header with the corresponding key reference used in the body.

It allows adding styles to the table columns with the columnStyles property. In the below example, it aligns the price column data to the right by setting halign in the columnStyles.


doc.autoTable({ columnStyles: { price: { halign: 'right' } }, body: [ { s_no: '1', product_name: 'GIZMORE Multimedia Speaker with Remote Control, Black', price: '75000' }, { s_no: '2', product_name: 'Realme', price: '25000' }, { s_no: '3', product_name: 'Oneplus', price: '30000' }, ], columns: [ { header: 'SL.No', dataKey: 's_no' }, { header: 'Product Name', dataKey: 'product_name' }, { header: 'Price', dataKey: 'price' }, ],
})

table with header footer

Create PDF with nested data table

First, the UI will show a parent table using the below HTML code. This example will describe how to add a nested table inside this parent while generating a PDF.

The AutoTable plugin provides various callback functions. This example script uses drawCell function to insert the nested table in the callback.

It helps to add more data via JavaScript to the preliminary level of information displayed on load.

jspdf-nested-autotable.php


<html>
<title>Product</title>
<meta charset="utf-8">
<meta name="viewport" content="width=device-width, initial-scale=1"> <script src="https://cdnjs.cloudflare.com/ajax/libs/jspdf/1.5.3/jspdf.min.js"></script>
<script src="https://cdnjs.cloudflare.com/ajax/libs/jspdf-autotable/3.5.6/jspdf.plugin.autotable.min.js"></script>
<link href="assets/css/style.css" rel="stylesheet" type="text/css" />
<script src="assets/js/jspdf-autotable-custom.js"></script>
</head>
<body> <div class="container"> <h2 class="text-center heading">Product detailed list</h2> <table class="table" id="product-table"> <tr class="content border border-dark"> <td>iPhone</td> <td>Version: 13</td> </tr> </table> <input type="button" class="export-button" onclick="generateNestedPdf()" value="Generate PDF" /> </div>
</body>
</html>

The below script refers to the HTML table object to generate the parent table in the PDF. Then, it defines a callback to insert sub information in a child table.

This child table is inserted into a cell on a conditional basis. This condition checks the dataKey and the section attribute of the document instance. The custom styles define the cell dimension.


function generateNestedPdf() { var doc = new jsPDF(); doc.autoTable({ html: '#product-table', head: [["Product", "Specification"]], didDrawCell: function (data) { if (data.column.dataKey === 1 && data.cell.section === 'body') { doc.autoTable({ body: [ ["Model: ", "Mini"], ["Size: ", "6.2 inches"] ], startY: data.cell.y + 10, margin: { left: data.cell.x + data.cell.padding('left') }, tableWidth: 'wrap', theme: 'grid', }); } }, columnStyles: {5: {cellWidth: 40}}, bodyStyles: {minCellHeight: 30} }); doc.save('nested_table_pdf');
};

nested data table

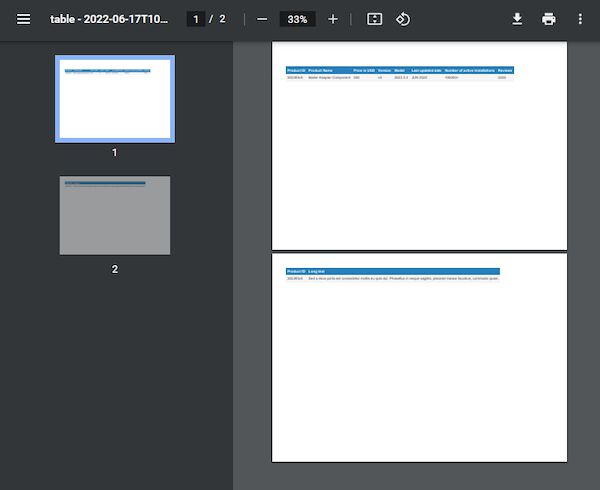
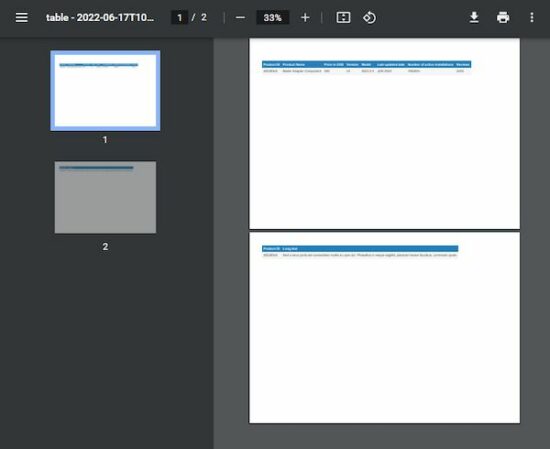
PDF tables with a horizontal page break

This example is very important and useful in a report generation application.

When the loaded table data exceeds the target PDF layer, the table has to be wrapped. It is to prevent the data from being cut off from the PDF boundary.

By enabling the horizontalPageBreak it wraps the table and displays the wrapped content on the next page.

This example shows a 9-column table that wraps the lost column on exceeding the boundary.

It also enables the horizontalPageBreakRepeat to show the mapping for wrapped content with unique column data.

jspdf-horizontal-page-break.php


<html>
<title>Product</title>
<meta charset="utf-8">
<meta name="viewport" content="width=device-width, initial-scale=1">
<script src="https://cdnjs.cloudflare.com/ajax/libs/jspdf/2.5.1/jspdf.umd.js"></script>
<script src="https://cdnjs.cloudflare.com/ajax/libs/jspdf-autotable/3.5.23/jspdf.plugin.autotable.js"></script>
<link href="assets/css/style.css" rel="stylesheet" type="text/css" />
<body> <div class="container"> <input type="button" class="export-button" onclick="generateHorizontalPageBreak();" value="Export PDF" /> </div>
</body>
</html>

The autoTable sets horizontalPageBreak: true to switch on this feature.


function generateHorizontalPageBreak() { var doc = new jspdf.jsPDF('l') var head = [['Product ID', 'Product Name', 'Price in USD', 'Version', 'Model', 'Last updated date', 'Number of active installations', 'Reviews', 'Long text']] var body = [['2022#3v5', 'Mailer Adapter Component', '300', 'v5', '2022.3.3', 'JUN 2022', '100000+', '3245', 'Sed a risus porta est consectetur mollis eu quis dui. Phasellus in neque sagittis, placerat massa faucibus, commodo quam.']] doc.autoTable({ head: head, body: body, startY: 25, // split overflowing columns into pages horizontalPageBreak: true, // repeat this column in split pages horizontalPageBreakRepeat: 0, })
doc.save('table.pdf');
}

Table with Horizontal Page Break

Conclusion

Thus, we have seen various tools in jsPDF AutoTable to create PDF tables. By learning how to convert HTML table to PDF, it will be helpful in a report generation utility of an application.

PDF tables always useful to export statistics or other tabular data from HTML. The source of data can be a database or excel which loaded into HTML tables or converted into an JSON array to parse.

Download

↑ Back to Top