Posted on Leave a comment

How to Create a Guitar in Cinema 4D: Part 2

Final product image
What You’ll Be Creating

Follow this tutorial step-by-step to create a 3D Guitar model that you can use in video games, graphic design and illustration projects whilst learning Cinema 4D quickly. 

Some of the skills you’ll learn in this tutorial include creating basic 3D modelling, importing reference images, adding lighting to the scene and basic rendering techniques.

In the first part of the two-part tutorial, I showed you:

  • How to Import Reference Images
  • How to Prepare for Modelling
  • How to Model the 3D Guitar

In this, the second part of the the tutorial series, I’ll show you:

  • How to Create Colored Materials
  • How to Add Lighting to the Scene
  • How to Render the Guitar

8. How to Create a New Material

Step 1

Located near the bottom of the screen there should be a material selection window. Click on Create > New Material to create a new material to use that you can edit. 

Materials are used to colour in the various objects and parts of the Guitar

Create a new material

Step 2

Double click on the new material icon, displayed as a sphere. This brings up the Material Editor, where you adjust the various properties of the material such as the colour, transparency and reflectance. 

For this particular style you’ll only be interested in flat colour, or Luminance.

Go to the material editor

Step 3

Tick the button for Luminance and untick the boxes for Color and Reflectance. This gives us the cel shaded look for our final image of the Guitar.

Select Luminance

Step 4

Colour the Guitar, starting with the body, by adding the material to the object. Drag and drop the material to the object using the mouse. 

Drag and drop the material onto the object listed on the right of the screen. 

This process is repeated for the other parts of the Guitar. The base colour of the Guitar is as follows:

  • R: 247
  • G: 233
  • B: 63
Choose a yellow color

Step 5

Apply the material colour to the guitar body and the headstock by dragging and dropping the material onto the object listed on the right of the screen or the preview window.

Apply the yellow material to the guitar

9. How to Adjust the Material Properties

Step 1

In the Material Editor, click on the arrow button next to Texture and select Sketch and Toon > Cel from the menu.

Select sketch and toon

Step 2

Click on the new Cel button that appears next to Texture to bring up a new menu.

Click on the new cel button

Step 3

In the new menu, adjust the settings as follows:

  1. Change the Diffuse to match the image at below. It should be grey scale with the colour getting light from left to right
  2. Untick Camera
  3. Tick Lights
  4. Tick Shadows 
  5. Select Multiply from the drop down menu
Adjust the cel settings

Step 4

Select a colour by double-clicking on the colour option box . 

The Material Editor gives you many different options for choosing and picking the colour.

These include RGB, HSV etc. Choose whichever option you’re most familiar with as a flat color. Because of the Multiply shading mode, the different colour shades also appears in the material.

If the material has already been applied to the model, the colour of the model is automatically adjusted to the new material colour. 

This is useful if you change your mind on a certain colour or a certain part of the Guitar model.

Change the base color of the material

Step 5

Because you’ve already applied the material to the model, the colour of the Guitar is automatically adjusted to the new material colour.

New material properties automatically applied to model

10. How to Adjust the Shading

Step 1

To get a better idea of the shading and how our render will turn out as you work on it, click and hold on the Render Button and select Interactive Render Region from the menu. 

Select interactive render region

Step 2

Use the mouse to adjust the window so that it fits around the Guitar model. Look for the very small arrow on the right hand side of the window and use the mouse to drag it to the top right corner of the box. This increases the resolution. 

Decrease the resolution by moving the arrow down if you find that the performance is decreasing.

Increase resolution

Step 3

To change the way the light source is facing go to Options > Default Light.

Add a light object to the scene if you are more comfortable working that way. 

Adjust the default light

Step 4

Change the light source in the Default Light window. Click where you’d like the light source to come from on the sphere and it’ll sync with the view port. 

Experiment with different lighting positions to come up with a lighting situation that you like. 

This is adjusted at anytime so you can change the lighting again if you changed your mind.

Change the light source

11. Other Lighting Solutions

Step 1

To set up the basic lighting, go to the Floor button located in the top menu bar. Left Click-Hold and then select Physical Sky from the menu.

Select physical sky

Step 2

Ensure that Physical Sky is selected in the menu on the right, a new menu appears on the bottom right of the screen. Select the Time and Location tab and choose a time using the left and right arrow keys. 

This changes the lighting of the scene according to the time of the day. Choose a suitable time to light up the scene. You’ll see how the lighting affects the scene in the viewport.

Choose a time

Step 3

To add a light to the scene, select the Add Light button in the top menu bar at the top of the screen.

This creates a Light Object which you can move around the scene. Move the light object using the Move Tool to a suitable position.

Select a light object

Step 4

To customise the lighting further, experiment with the light object options in the bottom right of the screen. Here, adjust the Intensity, Light Type and even Color.

Customise the lighting

12. How to Color the Guitar Neck

Step 1

To create a new material we can duplicate the material by holding CTRL on the keyboard and then using the mouse to click and drag the material to the side.

Duplicate the material

Step 2

Double click on the new material to open up the Material Editor and select Luminance. From there change the colour to the following:

  • R: 106
  • G: 70
  • B: 18
Change the color of the material

Step 3

Apply the new material to the neck by clicking and dragging it directly onto the object.

Apply new material to the neck of the guitar

Step 4

Create a new material. Duplicate a previous material in order to keep the settings from before.

Double click on the new material to open up the Material Editor and select Luminance. From there change the colour to the following:

  • R: 102
  • G: 113
  • B: 117
Make new light grey material

Step 5

Create another new material and change the colour to the following:

  • R: 62
  • G: 77
  • B: 80
Make new dark grey material

Step 6

Use the Polygon Selection Tool to highlight the rectangles of the fretboard, leaving a space in between each one. Then apply one of the two new materials to the selection.

Apply new material to fretboard

Step 7

Highlight the remaining rectangles and apply the second new material to the selection.

Apply new material to fretboard

13. Colour the Tuning Keys, Bridge and End Pin

Step 1

Create a new material and change the colour to the following:

  • R: 209
  • G: 213
  • B: 224
Make new material

Step 2

Select the bridge 3D object and apply the new material to it by dragging and dropping the material onto the object listed on the right of the screen or the preview window.

Apply new material to bridge

Step 3

Apply the same material to the tuning keys.

Apply new material to tuning keys

Step 4

Apply the same material to the end pin at the bottom of the guitar. 

Apply new material to end pin

14. How to Color the Sound Hole Border

Step 1

Create another new material for the sound hole border and change the colour to the following:

  • R: 21
  • G: 175
  • B: 199
Make new color material

Step 2

Select the cylinder 3D object and apply the new material to it by dragging and dropping the material onto the object listed on the right of the screen or the preview window.

Apply new material to sound hole border

15. Render the Guitar Model

Step 1

On the top menu bar, click on the Render Settings button. This brings up the render settings window.

Select render settings button

Step 2

In the Render Settings menu, change the options to what you need. First you will need to tick the Save Settings to select a file location, file format and alpha channel.

Select Alpha Channel if you wish to keep the background see through. This is useful if you wish to add a background to the image in Adobe Photoshop.

Adjust save options

Step 3

In the Output Settings choose the resolution, height and width of the image. 

Adjust output options

Step 4

To ensure that the guitar render is nice and sharp, go to the Anti-Aliasing settings. Select Cubic (Still Image) which can be found under Filter

Adjust anti-aliasing options

Step 5

To create the final image of the guitar, click on the Render button. Remember to make sure that you’ve selected the right view in your viewport (front, right, left or perspective etc.) and that you’re happy with the camera angle. 

Choose a suitable angle in the viewport by navigating around the scene.

Click on the render button

Step 6

For more control over how the final render looks, create a camera object to help. Find a suitable view using the viewport first and then click on the camera button. 

This creates a camera using the current view in the viewport. Check out the camera settings to see how they will affect the final render.

Select the camera button

The End Result

Wait for the final render to finish. Once the render is complete, repeat the steps above and change the camera or the view port to create a new image from a different angle. 

Throughout the course of the project you’ve learnt:

  • How to Import Reference Images
  • How to Prepare for Modelling
  • How to Model the 3D Guitar
  • How to Create Colored Materials
  • How to Add Lighting to the Scene
  • How to Render the Guitar

Feel free to share your own creations below. You can also export your image into Adobe Photoshop to enhance it further or to use it as part of a larger image.

Final 3D guitar model

Posted on Leave a comment

How to Create a Guitar in Cinema 4D: Part 1

Final product image
What You’ll Be Creating

Follow this tutorial step-by-step to create a 3D Guitar model that you can use in video games, graphic design and illustration projects whilst learning Cinema 4D quickly. 

Some of the skills you’ll learn in this tutorial include creating basic 3D modelling, importing reference images, adding lighting to the scene and basic rendering techniques.

In this, the first part of the two-part tutorial, I’ll show you:

  • How to Import Reference Images
  • How to Prepare for Modelling
  • How to Model the 3D Guitar

1. How to Import Reference Images

Step 1

Use the middle mouse button to click anywhere on the viewport. This displays all four views. From there, use the middle mouse button to select the Front view.

Four different views

Step 2

In the Attributes tab select Mode > View Settings.

Select view settings from menu

Step 3

In Viewport [Front] select the Back button and click on the button next to Image. 

Select Back and find reference image

Step 4

Select the reference image from the finder and open it.

Open reference guitar image

Step 5

Once the image is displayed in the background of the viewport, change the transparency of the image. This can sometimes make it easier to model from the reference image.

Change the position and size of the reference image from here using Offset X, Offset Y, Size X and Size Y.

Set transparency to 50 percent

2. How to use Splines to Create the Guitar Body

Step 1

To start modelling the body of the guitar, select the Pen Tool from the top menu bar. This allows you to create a spline to outline the shape of the guitar body.

Select the Pen Tool from the top menu bar

Step 2

Use the Pen Tool to draw out the outline of one side of the guitar body. Use the mouse to click and drag to create curves

Use Pen Tool to draw outline of guitar body

Step 3

Close the spline by clicking on the first point. 

Close the spline

Step 4

Adjust the shape of the spline by selecting the Point Selection Tool and then using the Move Tool to move the points and handles. 

Adjust the shape of the spline

Step 5

Duplicate the spline once you’re happy with the shape. This is done by clicking and dragging the spline in the list view, whilst holding the CTRL key on the keyboard.

Duplicate the spline

Step 6

Select the Object Tool and then select the Rotate Tool. Select one of the splines that you want to rotate to create the other side of the guitar body.

Select object tool and then rotate tool

Step 7

Rotate one of the splines by 180 degrees. This creates the other half of the guitar body. 

Ensure that the splines overlap in the middle 

Rotate duplicate spline 180 degrees

Step 8

Go to the top menu bar and select Array > Spline Mask

Select spline mask from top menu

Step 9

Select both of the splines that you have created and move them inside the Spline Mask. This will create one whole spline for the guitar body.

Put splines inside spline mask

Step 10

Make the spline mask editable by clicking on the Make Editable button. You won’t be able to make any changes to the previous splines after this, so ensure you’re happy with the shape of the guitar body before committing to this step. 

Click the make editable button

Step 11

From the top menu select Subdivision Surface > Extrude. Then place the spline inside extrude.

Select the extrude button from the top menu

Step 12 

This creates a 3D object out of the shape of the spline.

Extrude the spline

Step 13

Use the extrude object options to adjust the look of the guitar body. 

Change the thickness of the object so that it accurately matches the body of a guitar.

Increase guitar thickness

3. How to Create the Sound Hole 

Step 1

Click on the small back arrow on the Cube button and select Cylinder from the list of options. This spawns a Cylinder in the scene.

Select cylinder from top menu

Step 2

Adjust the properties of the Cylinder so that it is facing the correct way, has the correct size.

Rotate cylinder object

Step 3

Return to the front view to use the reference image as a guide to help with the placement and size of the cylinder object.

Move cylinder object to match reference image

Step 4

Click on the small black arrow in the bottom right corner of the Array Tool in the top menu bar. 

Select Boole from the list. This creates a Boole tool in the list of objects on the right of the screen.

Select boole from top menu bar

Step 5

Select the extrude group and cylinder object from the list and place them inside the Boole Tool. 

Ensure that the cylinder object is positioned below the extrude group.

Place extrude and cylinder inside the boole

Step 6

This creates a cut out in the shape of the cylinder object. 

Adjust the position of the cylinder object using the Move Tool until you’re happy with the appearance of the sound hole.

Create the sound hole

Step 7

Click on the small back arrow on the Cube button and select Tube from the list of options. This spawns a Tube object in the scene.

Select the tube object from the top menu bar

Step 8

Adjust so that inner radius is the same as the radius of the cylinder object (that was used to create the sound hole). 

You’ll also want to adjust the outer radius to a suitable size.

Resize tube object

Step 9

Return to the front view to use the reference image as a guide to help with the placement and size of the tube object. 

Carefully align the tube so that it fits directly on top of the sound hole.

Move tube object to match reference image

Step 10

In the perspective view, use the Move Tool to push the tube further into the body until it’s only just above the object surface. 

Ensure that you use the other views (front, left, right, perspective and so on) to check that the shape looks correct from every angle.

Move tube into position

4. Create the Guitar Neck

Step 1

To start modelling the neck of the Guitar, select the Cube object from the top menu bar. This spawns a cube in the viewport.

Spawn a new cube into scene

Step 2

Use the front view to adjust the shape and size of the cube object so that it matches the reference image. 

Ensure you make the neck slightly longer than needed. This is so that you can make additional adjustments to the top and bottom of the object.

Adjust the cube to look like the neck

Step 3

Check that the neck thickness is appropriate in the perspective view and adjust accordingly using the object properties window or the Scale Tool

Adjust the thickness of the neck

Step 4

In the object properties window, increase the number of Y segments for the fretboard. In this example the guitar neck has 14 Y segments.

Increase the Y segments to fourteen

Step 5

Duplicate the cylinder object that was used to create the sound hole (do this by holding CTRL on the keyboard to click and drag a duplicate object). 

Then place both the new cylinder object and the neck object inside a boole.

Duplicate cylinder and move into boole with neck

Step 6

This cuts out the curve for the sound hole for the neck.

Cut a curve into the neck

5. How to Create the Headstock

Step 1

Create a cube object with two Y segments. Then adjust the size of the cube object so that it becomes a suitable size for the headstock.

Spawn a new cube and adjust to the size of the headstock

Step 2

Make the cube object editable and then use the Edge Selection Tool to move the middle edge closer to the bottom.

Move edge closer to the bottom

Step 3

Use the Edge Selection Tool to select the two bottom corners of the object. 

Then use the Scale Tool to move the edges closer together or close to the neck.

Move corners with the edge selection tool

Step 4

Click on the small back arrow on the Cube button and select Capsule from the list of options. This will spawn a capsule in the scene.

Select capsule from the top menu

Step 5

Move the capsule so that half of it sits within the cube object. Then adjust the size of the capsule to something suitable.

Adjust the size of the capsule

Step 6

Duplicate the capsule and place them both side by side inside the cube object. Group both capsules by selecting them both and pressing Alt-G on the keyboard.

Duplicate the capsule

Step 7

Select Boole by clicking on the small arrow on the bottom right of the Array button at the top of the screen.

Select boole from the top menu

Step 8

Place the capsules and the cube object inside the boole, making sure that the capsules are at the bottom. This will create a cutout of the capsules on the headstock.

Create capsule cutouts

6. How to Create the Tuning Machines

Step 1

Create a new cylinder object and resize it down so that it matches the appropriate size for a tuner. 

Once you are happy with the size, use the Move Tool to move it into position in the headstock.

Create a tuner out of a cylinder object

Step 2

Duplicate the cylinder object by holding CTRL button on the keyboard and then click and drag the cylinder using the Move Tool. Do this twice more so that you’re left with three cylinders.

Duplicate the tuner three times

Step 3

Select all three cylinder objects and duplicate them to the other side of the headstock.

Duplicate the tuner objects on the other side of the headstock

7. How to Create the Bridge and Endpin

Step 1

Create a new cube object and scale it down so that it resembles the size of a guitar bridge. 

Once you are happy with the size, use the Move Tool to move the new cube object inside the body of the guitar so that only the top part of the bridge object is above the surface of the body.

Create a bridge out of a new cube

Step 2

Click on the small back arrow on the Cube button and select Cylinder from the list of options. This spawns a Cylinder in the scene.

Select cylinder object from the top menu

Step 3

Resize the cylinder object so that it is a suitable size for the endpin and then use the Move Tool to place it at the bottom of the guitar body. 

Create the endpin out of a cylinder

Step 4

Use the different camera angles to double check the Guitar model to make sure that it looks correct.

New camera angle

Coming Next…

Final guitar model

In the second part of the tutorial series, I’ll show you:

  • How to Create Coloured Materials
  • How to Add Lighting to the Scene
  • How to Render the final Guitar Model
Posted on Leave a comment

Using Kubernetes ConfigMaps to define your Quarkus application’s properties

So, you wrote your Quarkus application, and now you want to deploy it to a Kubernetes cluster. Good news: Deploying a Quarkus application to a Kubernetes cluster is easy. Before you do this, though, you need to straighten out your application’s properties. After all, your app probably has to connect with a database, call other services, and so on. These settings are already defined in your application.properties file, but the values match the ones for your local environment and won’t work once deployed onto your cluster.

So, how do you easily solve this problem? Let’s walk through an example.

Create the example Quarkus application

Instead of using a complex example, let’s take a simple use case that explains the concept well. Start by creating a new Quarkus app:

$ mvn io.quarkus:quarkus-maven-plugin:1.1.1.Final:create

You can keep all of the default values while creating the new application. In this example, the application is named hello-app. Now, open the HelloResource.java file and refactor it to look like this:

@Path("/hello") public class HelloResource { @ConfigProperty(name = "greeting.message") String message; @GET @Produces(MediaType.TEXT_PLAIN) public String hello() { return "hello " + message; } } 

In your application.properties file, now add greeting.message=localhost. The @ConfigProperty annotation is not in the scope of this article, but here we can see how easy it is to inject properties inside our code using this annotation.

Now, let’s start our application to see if it works as expected:

$ mvn compile quarkus:dev

Browse to http://localhost:8080/hello, which should output hello localhost. That’s it for the Quarkus app. It’s ready to go.

Deploy the application to the Kubernetes cluster

The idea here is to deploy this application to our Kubernetes cluster and replace the value of our greeting property with one that will work on the cluster. It is important to know here that all of the properties from application.properties are exposed, and thus can be overridden with environment variables. The convention is to convert the name of the property to uppercase and replace every dot (.) with an underscore (_). So, for instance, our greeting.message will become GREETING_MESSAGE.

At this point, we are almost ready to deploy our app to Kubernetes, but we need to do three more things:

  1. Create a Docker image of your application and push it to a repository that your cluster can access.
  2. Define a ConfgMap resource.
  3. Generate the Kubernetes resources for our application.

To create the Docker image, simply execute this command:

$ docker build -f src/main/docker/Dockerfile.jvm -t quarkus/hello-app .

Be sure to set the right Docker username and to also push to an image registry, like docker-hub or quay. If you are not able to push an image, you can use sebi2706/hello-app:latest.

Next, create the file config-hello.yml:

apiVersion: v1 data: greeting: "Kubernetes" kind: ConfigMap metadata: name: hello-config 

Make sure that you are connected to a cluster and apply this file:

$ kubectl apply -f config-hello.yml

Quarkus comes with a useful extension, quarkus-kubernetes, that generates the Kubernetes resources for you. You can even tweak the generated resources by providing extra properties—for more details, check out this guide.

After installing the extension, add these properties to our application.properties file so it generates extra configuration arguments for our containers specification:

kubernetes.group=yourDockerUsername kubernetes.env-vars[0].name=GREETING_MESSAGE kubernetes.env-vars[0].value=greeting kubernetes.env-vars[0].configmap=hello-config

Run mvn package and view the generated resources in target/kubernetes. The interesting part is in spec.containers.env:

- name: "GREETING_MESSAGE"   valueFrom:   configMapKeyRef:     key: "greeting"    name: "hello-config"

Here, we see how to pass an environment variable to our container with a value coming from a ConfigMap. Now, simply apply the resources:

$ kubectl apply -f target/kubernetes/kubernetes.yml

Expose your service:

kubectl expose deployment hello --type=NodePort

Then, browse to the public URL or do a curl. For instance, with Minikube:

$ curl $(minikube service hello-app --url)/hello

This command should output: hello Kubernetes.

Conclusion

Now you know how to use a ConfigMap in combination with environment variables and your Quarkus’s application.properties. As we said in the introduction, this technique is particularly useful when defining a DB connection’s URL (like QUARKUS_DATASOURCE_URL) or when using the quarkus-rest-client (ORG_SEBI_OTHERSERVICE_MP_REST_URL).

Share

The post Using Kubernetes ConfigMaps to define your Quarkus application’s properties appeared first on Red Hat Developer.

Posted on Leave a comment

CodeReady Workspaces devfile, demystified

With the exciting advent of CodeReady Workspaces (CRW) 2.0 comes some important changes. Based on the upstream project Eclipse Che 7, CRW brings even more of the “Infrastructure as Code” idea to fruition. Workspaces mimic the environment of a PC, an operating system, programming language support, the tools needed, and an editor. The real power comes by defining a workspace using a YAML file—a text file that can be stored and versioned in a source control system such as Git. This file, called devfile.yaml, is powerful and complex. This article will attempt to demystify the devfile.

A Java Maven example

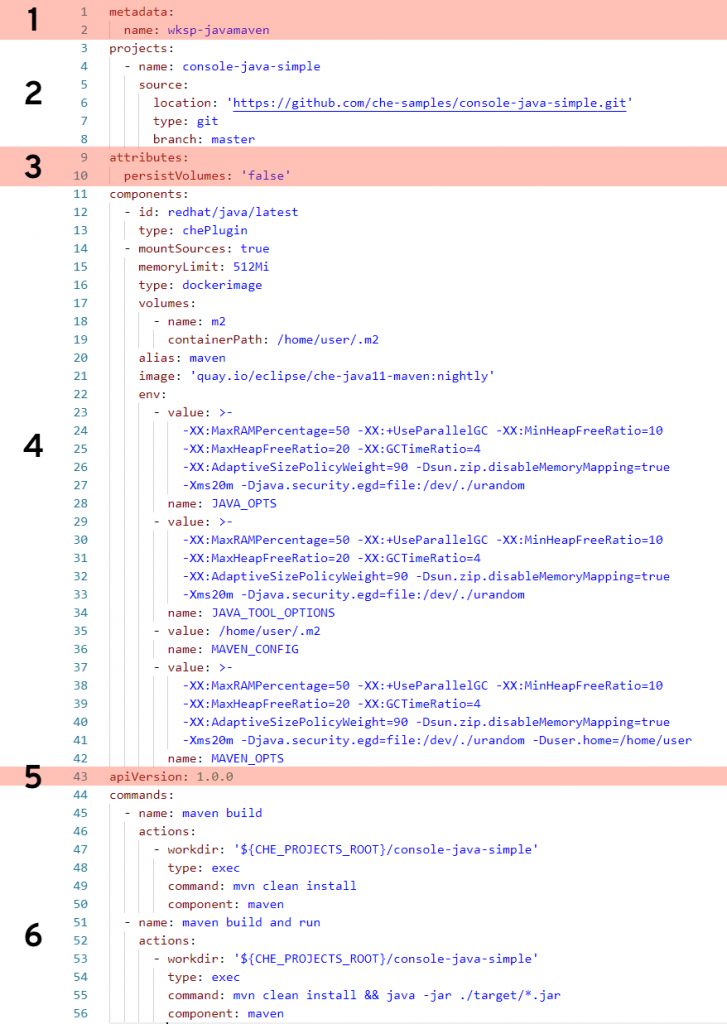
The following devfile defines a workspace that has Java language support, includes the Maven build tool, and has two custom commands.

Let’s break this down.

Section 1: metadata

This section is required, and in this case name is specified as the name of this workspace (wksp-javamaven). You also have the option of a name prefix, in which case the system will generate the rest of the name (e.g., generateName: javamaven-). Using generateName means a user can have multiple instances of this workspace at the same time. This is an important distinction and one which must be addressed by management.

Section 2: projects

This section is optional (but probably a very good idea) and tells the workspace where to find the project that will be included. In this case, we’re pointing to the master branch of a Git repository located on GitHub. You can specify multiple projects for a workspace, and the type can be a zip file as well. While the name of the project does not need to match the name of the repo it’s, again, probably a very good idea. If you make them different, well … then that’s a create opportunity to add confusion and really mess things up.

Section 3: attributes

This part is optional and can pretty much define anything you wish. In this example, it’s specifying that any values stored in any specified volumes are not stored. This will likely be the value you’ll always want. The idea is that, unless you commit your changes to the Git repo, any work done will be lost. Think of it this way: Whereas on your local PC you perform a File –> Save command to keep your work, you’ll instead do git commit. In “devfile-speak,” persistVolumes: false makes the data ephemeral. This setting, false, also makes the workspace perform better.

Section 4: components

This is the heaviest part of this example, where we specify what bits and pieces make up our workspace.

The first component is a Che Plugin, identified at redhat/java/latest. You can see the description of this plug on this GitHub page.

The next component is a type dockerimage that is the maven support for this workspace. Of special note is the setting mountSources: true, which makes the source code available to the container that is running this image. In this particular case, we want our Maven build to have access to the source code—which makes sense.

The volumes: setting defines a directory within the container that is available to this workspace. This is used, for example, to give the workspace access to a needed directory that would otherwise be outside the container and blocked by lack of permissions. In other words, if you run a command in a workspace and get an error message because you are denied access to a directory, you can get around that by defining that directory here, in your devfile, that will be created inside your container.

The remaining settings associated with this component are related to memory limits, security, etc.

Section 5: apiVersion

This section is required and is how you specify which API version you are using. This is pretty much boilerplate text.

Section 6: commands

This is the fun part. In this section, you can define custom commands that are available to the user. Typically, this is where you’ll specify command-line commands that can be run from within the IDE rather than dropping to the command line and typing what may be a lengthy command. The properties here will look pretty much self-explanatory. Note that a macro can be used instead of hard-coded value for the project root directory (e.g., ${CHE_PROJECTS_ROOT}).

Start exploring

There are many settings and variations of devfiles. If you have the ability, I suggest going into your CRW 2.0 instance and exploring any existing workspaces’ devfiles. Take an existing devfile, clone it, then change it and implement it to see what happens. Like any good developer, make changes until you break things, then gain understanding.

Share

The post CodeReady Workspaces devfile, demystified appeared first on Red Hat Developer.

Posted on Leave a comment

How to Create a Computer Screen in Cinema 4D: Part 2

Final product image
What You’ll Be Creating

Follow this tutorial step-by-step to create a 3D Computer Screen model to use in video games, graphic design and illustration projects whilst learning Cinema 4D quickly. 

Some of the skills you’ll learn in this tutorial include creating basic 3D modelling, importing reference images, adding lighting to the scene and basic rendering techniques.

In the first part of the two-part tutorial, I showed you how to:

  • How to Import Reference Images
  • How to Prepare for Modelling
  • How to Model the Computer Screen

In this, the second part of the the tutorial series, I’ll show you how to:

  • How to Create Colored Materials
  • How to Add Lighting to the Scene
  • How to Render the Computer Monitor

9. How to Convert State to Object

Step 1

Select all the objects associated with the Boole modifier. This will include the two cube objects that make up the computer screen.

Apply boole to computer monitor objects

Step 2

With the Boole objects still selected, go to Mesh > Conversion > Current State to Object

Convert current state to object

Step 3

This creates a version of the computer screen objects with all the modifiers collapsed. This means that the new objects lose their modifiers, but retain their shapes so that we can colour them easily. 

You can delete the original boole objects as they won’t be needed in the project anymore. 

Two copies of the same object will appear

Step 4

Feel free to rename the objects to something which is easily recognisable.  

Rename 3D objects

Step 5

Select the neck object and go to Mesh > Conversion > Current State to Object. Once you’ve create the new object, you can delete the original one to avoid clutter and confusion.

Convert neck into object

Step 6

Select the Phong Tags and press the delete key on the keyboard to remove them. 

Delete phong tags

10. How to Create a New Material

Step 1

Located near the bottom of the screen there is a material selection window. Click on Create > New Material to create a new material to use that you can edit. 

Materials are used to colour in the various objects and parts of the Computer Screen.

Select new material

Step 2

Double click on the new material icon (displayed as a sphere). This brings up the Material Editor where you can adjust the various properties of the material such as the colour, transparency and reflectance. 

For this particular style I’m only be interested in flat colour (Luminance).

Open up the material editor

Step 3

Tick the button for Luminance and untick the boxes for Color and Reflectance. This gives the cel shaded look for the final image. 

Select luminance

Step 4

Colour the Computer Monitor by adding the material to the object. Drag and drop the material to the object using the mouse. You can also drag and drop the material onto the object listed on the right of the screen. 

Apply the new material to the computer screen

11. How to Adjust the Material Properties

Step 1

In the Material Editor, click on the arrow button next to Texture and select Sketch and Toon > Cel from the menu.

Select Sketch and Toon

Step 2

Click on the new Cel button that appears next to Texture to bring up a new menu.

Click on the cel button

Step 3

In this new menu, adjust the settings as follows:

  • Change the Diffuse to match the image at below. It should be grey scale with the colour getting light from left to right
  • Deselect Camera
  • Select Lights
  • Select Shadows 
  • Select Multiply from the drop down menu
Adjust the cel settings

Step 4

Select a colour by double-clicking on the color option box . 

The Material Editor gives many different options for choosing and picking colours. These include RGB, HSV and so on. 

Choose whichever option you are most familiar with as a flat colour. Because of the Multiply shading mode, the different colour shades also appear in the material.

If the material has already been applied to the model, the colour of the model is automatically be adjusted to the new material colour. This is useful if you change your mind on a certain colour or a certain part of the Computer Screen model.

Select a color and set shading mode to multiply

Step 5

Because I’ve already applied the material to the model, the colour of the Computer Monitor will automatically be adjusted to match the new material.  

New material settings will be applied

12. How to Adjust the Shading

Step 1

To get a better idea of the shading and how the render will turn out as you work on it, click and hold on the Render Button and select Interactive Render Region from the menu. 

Select interactive render region

Step 2

Use the mouse to adjust the selection window so that it fits around the Computer Screen model. Look for the very small arrow on the right hand side of the window and use the mouse to drag it to the top right corner of the box (this increases the resolution). 

Decrease the resolution by moving the arrow down if you find that the performance is decreasing.

Increase the resolution of the preview window

Step 3

To change the way the light source is facing go to Options > Default Light.

You can also add a light object to the scene if you are more comfortable working that way.  

Select default light

Step 4

Change the light source in the Default Light window. Click where you’d like the light source to come from on the sphere and it will sync with the view port. Experiment with different lighting positions to come up with a lighting situation that you like. 

This can be adjusted at anytime so you can change the lighting again if you changed your mind.

Adjust the default light

Step 5

Secondary-click on the arrow and select Alpha Mode in order to reveal the rest of the viewport. Some people may find working this way easier.

Select the alpha mode

13. Other Lighting Solutions

Step 1

To set up the basic lighting, go to the Floor button located in the top menu bar. Primary-Click-Hold and then select Physical Sky from the menu.

Select physical sky

Step 2

Make sure that Physical Sky is selected in the menu on the right, a new menu will appear on the bottom right of the screen. Select the Time and Location tab and choose a time using the left and right arrow keys. 

This changes the lighting of the scene (according to the time of the day). Choose a suitable time to light up the scene. You’ll see how the lighting affects the scene in the viewport.

Adjust the time and location

Step 3

To add a light to the scene, select the Add Light button in the top menu bar at the top of the screen.

This creates a Light Object which you can move around the scene. Move the light object using the Move Tool to a suitable position.

Select the add light button

Step 4

To customise the lighting further, experiment with the light object options in the bottom right of the screen. Here you can adjust the Intensity, Light Type and even Color.

Adjust the lighting settings

14. How to Colour the Computer Monitor Screen

Step 1

Open up the Material Editor and change material color to the following:

  • R: 194
  • G: 222
  • B: 236

This changes the basic colour of the computer that you can add to the other main objects (i.e. the neck).

Select a new color for the material

Step 2

To create a new material we can duplicate the material by holding CTRL on the keyboard and then using the mouse to click and drag the material to the side.

Duplicate the material

Step 3

Double-click on the new material to open up the Material Editor and select Luminance. From there we can change the colour to the following:

  • R: 56
  • G: 47
  • B: 66
Select a purple color for the new material

Step 4

Apply the new materials to the screen by clicking and dragging it directly onto the screen object.

Apply the new material to the screen

15. How to Color the Monitor Bezel 

Step 1

Create a new material. You may also duplicate a previous material in order to keep the same settings as before.

Double-click on the new material to open up the Material Editor and select Luminance. From there you can change the colour to the following:

  • R: 70
  • G: 69
  • B: 65
Create a new dark grey material

Step 2

Use the Polygon Selection Tool to select all the polygons that make up the bezel of the computer monitor.

Select the screen boder with the polygon selection tool

Step 3

Apply the new material to the selected polygons by clicking and dragging it into the selection. 

Apply dark grey material to the selected border

Step 4

Now that all the materials and colours have been applied to the model, use the perspective view to look around the computer screen to ensure that the colours have been applied properly.

Check the 3D model from all angles

16. How to Create the Power Button 

Part 1

Click on the small back arrow on the Cube button and select Cylinder from the list of options. This will spawn a Cylinder in the scene.

Create a new cylinder object

Part 2

Rotate the cylinder 90 degrees and then use the Scale Tool to scale it down to the appropriate size of a power button.

Rotate and scale the new cylinder

Part 3

Delete the Phong Tag from the newly created cylinder object.

Delete the phong tag

Part 4

Use the Polygon Selection Tool to select the base polygons making up a circle. Press the delete key to remove the polygons from the cylinder object. 

Select the base of the cylinder object and delete it

Part 5

Use the Edge Selection Tool to select the edges of the open hole and then use the Scale Tool to make it larger. 

Select the edges of the cylinder and expand it

Part 6

Once you are happy with the size of your power button, use the mouse to secondary-click the selected edges. Select Close Polygon Hole from the menu.

Cap the empty hole

17. How to use Boole

Step 1

Click on the small black arrow in the bottom right corner of the Array Tool in the top menu bar. Then select Boole from the list. This creates a Boole tool in the list of objects on the right of the screen.

Select boole from the menu

Step 2

Drag and drop both the screen and the new cylinder object into the boole. Ensure that the screen object is above the cylinder object. This will create the power button in the screen.

Add the screen and cylinder objects to the boole

Step 3

With the boole objects still selected, go to Mesh > Conversion > Current State to Object. This will create a copy of the objects with the boole collapsed.

Select the bool and convert current state to object

Step 4

Use the Polygon Selection Tool to select the power button. Then drag and drop the dark grey material colour into the selection.

Select the polygons of the power button and apply a material

Step 5

Check the camera and perspective view to make sure that the computer screen looks correct. Make any final adjustments to the materials to get the colour combination that you want.

Check the model from all angles

The End Result

The computer screen model is now ready for use and to render. Now that the project is complete you can repeat the steps above and change the camera or the view port to create a new image from a different angle. 

Throughout the course of the project you have successfully learnt:

  • How to Import Reference Images
  • How to Prepare for Modelling
  • How to Model the Computer Screen
  • How to Create Coloured Materials
  • How to Add Lighting to the Scene
  • How to Render the Computer Monitor

Feel free to share your own creations below. You can also export your image into Adobe Photoshop to enhance it further or to use it as part of a larger image.

The final computer model

Posted on Leave a comment

Decoupling microservices with Apache Camel and Debezium

The rise of microservices-oriented architecture brought us new development paradigms and mantras about independent development and decoupling. In such a scenario, we have to deal with a situation where we aim for independence, but we still need to react to state changes in different enterprise domains.

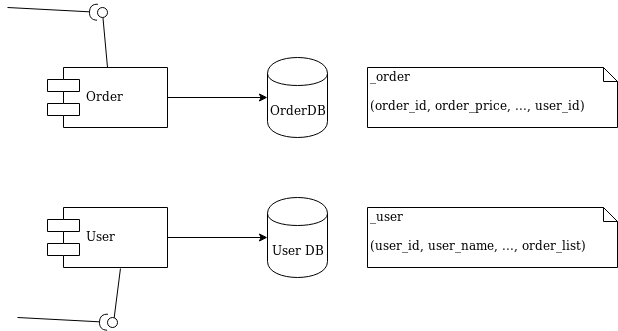
I’ll use a simple and typical example in order to show what we’re talking about. Imagine the development of two independent microservices: Order and User. We designed them to expose a REST interface and to each use a separate database, as shown in Figure 1:

Diagram 1 - Order and User microservices

Figure 1: Order and User microservices.

We must notify the User domain about any change happening in the Order domain. To do this in the example, we need to update the order_list. For this reason, we’ve modeled the User REST service with addOrder and deleteOrder operations.

Solution 1: Queue decoupling

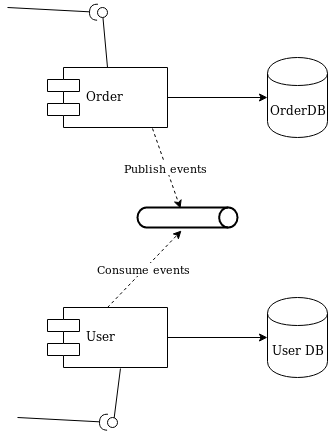
The first solution to consider is adding a queue between the services. Order will publish events that User will eventually process, as shown in Figure 2:

Diagram 2 - decoupling with a queue

Figure 2: Decoupling with a queue.

This is a fair design. However, if you don’t use the right middleware you will mix a lot of infrastructure code into your domain logic. Now that you have queues, you must develop producer and consumer logic. You also have to take care of transactions. The problem is to make sure that every event ends up correctly in both the Order database and in the queue.

Solution 2: Change data capture decoupling

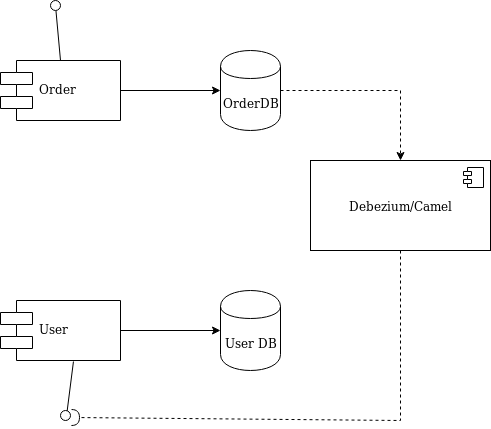
Let me introduce an alternative solution that handles all of that work without your touching any line of your microservices code. I’ll use Debezium and Apache Camel to capture data changes on Order and trigger certain actions on User. Debezium is a log-based data change capture middleware. Camel is an integration framework that simplifies the integration between a source (Order) and a destination (User), as shown in Figure 3:

Diagram 3 - decoupling with Debezium and Camel

Figure 3: Decoupling with Debezium and Camel.

Debezium is in charge of capturing any data change happening in the Order domain and publishing it to a topic. Then a Camel consumer can pick that event and make a REST call to the User API to perform the necessary action expected by its domain (in our simple case, update the list).

Decoupling with Debezium and Camel

I’ve prepared a simple demo with all of the components we need to run the example above. You can find this demo in this GitHub repo. The only part we need to develop is represented by the following source code:

public class MyRouteBuilder extends RouteBuilder { public void configure() { from("debezium:mysql?name=my-sql-connector" + "&databaseServerId=1" + "&databaseHostName=localhost" + "&databaseUser=debezium" + "&databasePassword=dbz" + "&databaseServerName=my-app-connector" + "&databaseHistoryFileName=/tmp/dbhistory.dat" + "&databaseWhitelist=debezium" + "&tableWhitelist=debezium._order" + "&offsetStorageFileName=/tmp/offset.dat") .choice() .when(header(DebeziumConstants.HEADER_OPERATION).isEqualTo("c")) .process(new AfterStructToOrderTranslator()) .to("rest-swagger:http://localhost:8082/v2/api-docs#addOrderUsingPOST") .when(header(DebeziumConstants.HEADER_OPERATION).isEqualTo("d")) .process(new BeforeStructToOrderTranslator()) .to("rest-swagger:http://localhost:8082/v2/api-docs#deleteOrderUsingDELETE") .log("Response : ${body}"); } } 

That’s it. Really. We don’t need anything else.

Apache Camel has a Debezium component that can hook up a MySQL database and use Debezium embedded engine. The source endpoint configuration provides the parameters needed by Debezium to note any change happening in the debezium._order table. Debezium streams the events according to a JSON-defined format, so you know what kind of information to expect. For each event, you will get the information as it was before and after the event occurs, plus a few useful pieces of meta-information.

Thanks to Camel’s content-based router, we can either call the addOrderUsingPOST or deleteOrderUsingDELETE operation. You only have to develop a message translator that can convert the message coming from Debezium:

public class AfterStructToOrderTranslator implements Processor { private static final String EXPECTED_BODY_FORMAT = "{\"userId\":%d,\"orderId\":%d}"; public void process(Exchange exchange) throws Exception { final Map value = exchange.getMessage().getBody(Map.class); // Convert and set body int userId = (int) value.get("user_id"); int orderId = (int) value.get("order_id"); exchange.getIn().setHeader("userId", userId); exchange.getIn().setHeader("orderId", orderId); exchange.getIn().setBody(String.format(EXPECTED_BODY_FORMAT, userId, orderId)); } } 

Notice that we did not touch any of the base code for Order or User. Now, turn off the Debezium process to simulate downtime. You will see that it can recover all events as soon as it turns back on!

You can run the example provided by following the instructions on this GitHub repo.

Caveat

The example illustrated here uses Debezium’s embedded mode. For more consistent solutions, consider using the Kafka connect mode instead, or tuning the embedded engine accordingly.

Share

The post Decoupling microservices with Apache Camel and Debezium appeared first on Red Hat Developer.

Posted on Leave a comment

How Quarkus brings imperative and reactive programming together

The supersonic subatomic Java singularity has expanded!

42 releases, 8 months of community participation, and 177 amazing contributors led up to the release of Quarkus 1.0.  This release is a significant milestone with a lot of cool features behind it. You can read more in the release announcement.

Building on that awesome news, we want to delve into how Quarkus unifies both imperative and reactive programming models and its reactive core. We’ll start with a brief history and then take a deep dive into what makes up this dual-faceted reactive core and how Java developers can take advantage of it.

Microservices, event-driven architectures, and serverless functions are on the rise. Creating a cloud-native architecture has become more accessible in the recent past; however, challenges remain, especially for Java developers. Serverless functions and microservices need faster startup times, consume less memory, and above all offer developer joy. Java, in that regard, has just in recent years done some improvements (e.g., ergonomics enhancements for containers, etc.). However, to have a performing container-native Java, it hasn’t been easy. Let’s first take a look at some of the inherent issues for developing container-native Java applications.

Let’s start with a bit of history.

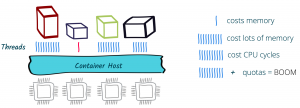
Threads CPUs Java and Containers

Threads and containers

As of version 8u131, Java is more container-aware, due to the ergonomics enhancements. So now, the JVM knows the number of cores it’s running on and can customize thread pools accordingly — typically the fork/join pool. That’s all great, but let’s say we have a traditional web application that uses HTTP servlets or similar on Tomcat, Jetty, or the like. In effect, this application gives a thread to each request allowing it to block this thread when waiting for IO to occur, such as accessing databases, files, or other services. The sizing for such an application depends on the number of concurrent requests rather than the number of available cores; this also means quota or limits in Kubernetes on the number of cores will not be of great help and eventually will result in throttling.

Memory exhaustion

Threads also cost memory. Memory constraints inside a container do not necessarily help. Spreading that over multiple applications and threading to a large extent will cause more switching and, in some cases, performance degradation. Also, if an application uses traditional microservices frameworks, creates database connections, uses caching, and perhaps needs some more memory, then straightaway one would also need to look into the JVM memory management so that it’s not getting killed (e.g., XX:+UseCGroupMemoryLimitForHeap). Even though JVM can understand cgroups as of Java 9 and adapt memory accordingly, it can still get quite complex to manage and size the memory.

Quotas and limits

With Java 11, we now have the support for CPU quotas (e.g., PreferContainerQuotaForCPUCount). Kubernetes also provides support for limits and quotas. This could make sense; however, if the application uses more than the quota again, we end up with sizing based on cores, which in the case of traditional Java applications, using one thread per request, is not helpful at all.

Also, if we were to use quotas and limits or the scale-out feature of the underlying Kubernetes platform, the problem wouldn’t solve itself; we would be throwing more capacity at the underlying issue or end up over-committing resources. And if we were running this on a high load in a public cloud, certainly we would end up using more resources than necessary.

What can solve this?

A straightforward solution to these problems would be to use asynchronous and non-blocking IO libraries and frameworks like Netty, Vert.x, or Akka. They are more useful in containers due to their reactive nature. By embracing non-blocking IO, the same thread can handle multiple concurrent requests. While a request processing is waiting for some IO, the thread is released and so can be used to handle another request. When the IO response required by the first request is finally received, processing of the first request can continue. Interleaving request processing using the same thread reduces the number of threads drastically and also resources to handle the load.

With non-blocking IO, the number of cores becomes the essential setting as it defines the number of IO threads you can run in parallel. Used properly, it efficient dispatches the load on the different cores, handling more with fewer resources.

Is that all?

And, there’s more. Reactive programming improves resource usage but does not come for free. It requires that the application code embrace non-blocking and avoid blocking the IO thread. This is a different development and execution model. Although there are many libraries to help you do this, it’s still a mind-shift.

First, you need to learn how to write code executed asynchronously because, as soon as you start using non-blocking IOs, you need to express what is going to happen once the response is received. You cannot wait and block anymore. To do this, you can pass callbacks, use reactive programming, or continuation. But, that’s not all, you need to use non-blocking IOs and so have access to non-blocking servers and clients for everything you need. HTTP is the simple case, but think about database access, file systems, and so on.

Although end-to-end reactive provides the best efficiency, the shift can be hard to comprehend. Having the ability to mix both reactive and imperative code is becoming essential to:

  1. Use efficiently the resources on hot paths, and
  2. Provide a simpler code style for the rest of the application.

Enter Quarkus

This is what Quarkus is all about: unifying reactive and imperative in a single runtime.

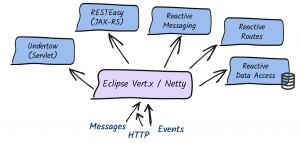
Quarkus uses Vert.x and Netty at its core. And, it uses a bunch of reactive frameworks and extensions on top to help developers. Quarkus is not just for HTTP microservices, but also for event-driven architecture. Its reactive nature makes it very efficient when dealing with messages (e.g., Apache Kafka or AMQP).

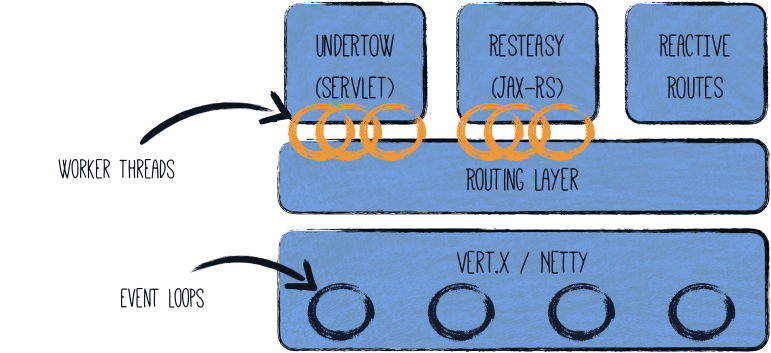
The secret behind this is to use a single reactive engine for both imperative and reactive code.

Quarkus does this quite brilliantly. Between imperative and reactive, the obvious choice is to have a reactive core. What that helps with is a fast non-blocking code that handles almost everything going via the event-loop thread (IO thread). But, if you were creating a typical REST application or a client-side application, Quarkus also gives you the imperative programming model. For example, Quarkus HTTP support is based on a non-blocking and reactive engine (Eclipse Vert.x and Netty). All the HTTP requests your application receive are handled by event loops (IO Thread) and then are routed towards the code that manages the request. Depending on the destination, it can invoke the code managing the request on a worker thread (servlet, Jax-RS) or use the IO was thread (reactive route).

For messaging connectors, non-blocking clients are used and run on top of the Vert.x engine. So, you can efficiently send, receive, and process messages from various messaging middleware.

To help you get started with reactive on Quarkus, there are some well-articulated guides on Quarkus.io:

There are also reactive demo scenarios that you can try online; you don’t need a computer or an IDE, just give it a go in your browser. You can try them out here.

Additional resources

Share

The post How Quarkus brings imperative and reactive programming together appeared first on Red Hat Developer.

Posted on Leave a comment

Open Liberty Java runtime now available to Red Hat Runtimes subscribers

Open Liberty is a lightweight, production-ready Java runtime for containerizing and deploying microservices to the cloud, and is now available as part of a Red Hat Runtimes subscription. If you are a Red Hat Runtimes subscriber, you can write your Eclipse MicroProfile and Jakarta EE apps on Open Liberty and then run them in containers on Red Hat OpenShift, with commercial support from Red Hat and IBM.

Develop cloud-native Java microservices

Open Liberty is designed to provide a smooth developer experience with a one-second startup time, a low memory footprint, and our new dev mode:

Tweet about Open Liberty Dev Mode.

Open Liberty provides a full implementation of MicroProfile 3 and Jakarta EE 8. MicroProfile is a collaborative project between multiple vendors (including Red Hat and IBM) and the Java community that aims to optimize enterprise Java for writing microservices. With a four-week release schedule, Liberty usually has the latest MicroProfile release available soon after the spec is published.

Also, Open Liberty is supported in common developer tools, including VS Code, Eclipse, Maven, and Gradle. Server configuration (e.g., adding or removing a capability, or “feature,” to your app) is through an XML file. Open Liberty’s zero migration policy means that you can focus on what’s important (writing your app!) and not have to worry about APIs changing under you.

Deploy in containers to any cloud

When you’re ready to deploy your app, you can just containerize it and deploy it to OpenShift. The zero migration principle means that new versions of Open Liberty features will not break your app, and you can control which version of the feature your app uses.

Monitoring live microservices is enabled by MicroProfile Metrics, Health, and OpenTracing, which add observability to your apps. The emitted metrics from your apps and from the Open Liberty runtime can be consolidated using Prometheus and presented in Grafana.

Learn with the Open Liberty developer guides

Our Open Liberty developer guides are available with runnable code and explanations to help you learn how to write microservices with MicroProfile and Jakarta EE, and then to deploy them to Red Hat OpenShift.

Get started

To get started with Open Liberty, try the Packaging and deploying applications guide and the Deploying microservices to OpenShift guide.

Share

The post Open Liberty Java runtime now available to Red Hat Runtimes subscribers appeared first on Red Hat Developer.

Posted on Leave a comment

How to Create a Computer Screen in Cinema 4D: Part 1

Final product image
What You’ll Be Creating

Follow this tutorial step-by-step to create a 3D Computer Screen model that you can use in video games, graphic design and illustration projects whilst learning Cinema 4D quickly. 

Some of the skills you’ll learn in this tutorial include creating basic 3D modelling, importing reference images, adding lighting to the scene and basic rendering techniques.

In this, the first part of the two-part tutorial, I’ll show you:

  • How to Import Reference Images
  • How to Prepare for Modelling
  • How to Model the Computer Screen

1. How to Import Reference Images

Step 1

Use the middle mouse button to click anywhere on the viewport. This displays all four views. From there, use the middle mouse button to select the Right view.

Four camera views

Step 2

In the Attributes tab select Mode > View Settings.

View settings

Step 3

In Viewport [Right] select the Back button and click on the button next to Image. 

Select background image

Step 4

Select the reference image from the finder and open it.

Computer monitor background image

Step 5

Once the image is displayed in the background of the viewport, change the transparency of the image. This can sometimes make it easier to model from the reference image.

Change the position and size of the reference image from here using Offset X, Offset Y, Size X and Size Y.

Adjust the transparency

2. How to Model the Computer Screen

Step 1

To start modelling the face computer screen, select the Cube object from the top menu bar. This spawns a cube in the viewport.

Create a cube object

Step 2

Use the reference image of the computer screen in the Front View to help adjust the cube. 

Use the Scale Tool to make the shape of the cube match up with the shape of the computer screen in the image.

Ensure that you use the other views (front, left, right, perspective etc) to check that the shape looks correct from every angle.

Adjust the size of the cube object

Step 3

In the perspective view, use the Scale Tool to increase or reduce the thickness of the shape so that it is close to the thickness of a computer screen. 

The Move Tool widget also allows you to adjust the the cube along different axis (x, y and z). Simply click on the small orange dots that are found next to each arrow and drag along the respective axis to edit the object.

Make the object thinner

Step 4

Select the Edge Selection Tool. Use the Edge Selection Tool to select all four corners of the object. The selected edges will be highlighted in orange.

Use the edge selection tool

Step 5

Make sure to move around the object to select the opposite corners of the object.

Select the corner edges

Step 6

Once the edges have been selected, use the mouse to right click on the selected edges. In the menu that appears, find Bevel and select it.

Use the bevel tool

Step 7

In the adjustment window (usually located in the bottom right of the screen), play around with the following:

  • Bevel Mode: Chamfer
  • Offset Mode: Fixed Distance
  • Offset: 31cm
  • Subdivision: 10
  • Depth: 100%

Feel free to adjust the sliders and values until you are satisfied with the object’s appearance.

Adjust the bevel settings

Step 8

In the images below you can see how the edges are effected once the values have been changed. Increase the number of subdivisions to increase the smoothness of the corner.

Curve the corners

Step 9

Use the reference image of the computer screen in your Front View to help adjust the cube. Use the Scale Tool to make the shape of the cube match up with the shape of the computer screen in the image.

Compare with the background image

3. How to Adjust the shape of the Monitor

Step 1

Use the Polygon Selection Tool to select the back of the object. Then use the Scale Tool and click and drag from anywhere within the preview window to decrease the size of the polygon. 

Scale back of the monitor

Step 2

Next to each object you create you will find the Phong Tag. This is responsible for adjusting the smoothness of an object. You can adjust the angle limit to increase or decrease the smoothness of an object. 

However since we are going for a low poly look we don’t need this. So delete the Phong Tag to remove any smoothness in the model edges.

Delete phong tag

Step 3

Use the Edge Selection Tool to select the front edges of the computer monitor. The select the Bevel Tool (you can access this by right clicking on the edges).

In the adjustment window (usually located in the bottom right of the screen), play around with the following:

  • Bevel Mode: Chamfer
  • Offset Mode: Radial
  • Offset: 8cm
  • Subdivision: 0
Bevel the front facing edges

4. Modify the Topology Using the Knife Tool

Step 1

Once you are happy with the overall shape of the computer monitor we need to convert it into an object. This will allow us to make further edits such as topology.

Make sure that the computer monitor is still selected and then go to Mesh > Conversion > Current State to Object.

Convert current state to object

Step 2

Right click on the object and select the Knife Tool from the menu.

Select knife tool

Step 3

Use the Knife Tool to create an edge near the bottom. You can use the tool to connect one side of the screen to the other.

Cut across the monitor

5. How to Create the Monitor Display

Step 1

In the top menu bar select the Cube to spawn a cube into the scene. Adjust the size of the cube so that it fits nicely within the previous monitor object. 

Create the monitor display

6. Use the Bend Deformer to Create the Neck

Step 1

In the top menu bar select the Cube to spawn another cube into the scene and adjust the shape so that it forms a thin neck shape. You can adjust the object properties as follows:

  • Size X: 200
  • Size Y: 340
  • Size Z: 30
Adjust the cube

Step 2

In order to curve the neck we need to add some segments. In the adjustments window add enough segments to ensure that the curve will appear smooth (in this example I’ve used 50 Y segments).

Add segments to the object

Step 3

In order to create a suitable bend to the computer neck you will need to use the Bend Deformer. Select the Bend button from the top menu bar. 

This spawns a bend deformer object in the list view.

Select the bend deformer

Step 4

In the list view move the Bend Deformer into the neck object. This means that the deformer will affect and influence the cube object only.

Apply the bend deformer

Step 5

With the Bend Deformer selected make sure that Fit to Parent has been ticked. The ensures that the deformer affects the whole neck.

Select fit to parent

Step 6

With the Bend Deformer still selected, go to the parameters box and play around with the Strength

In this tutorial I used the following settings:

  • Strength: 150
  • Angle: -90
Bend deformer settings

Step 7

Use a combination of the Move Tool and the Rotation Tool to place the neck in the correct position underneath the computer monitor.

Move and rotate the neck

7. How to Model the Neck

Step 1

Once you are happy with the placement of the neck we need to convert it into an object. This will collapse the object properties and will allow us to make further edits.

Make sure that the neck is still selected and then go to Mesh > Conversion > Current State to Object.

Convert current state to object

Step 2

Use the Polygon Selection Tool to select the top of the neck. Then use the Move Tool to extend the neck. This will help connect the neck to the computer monitor.

Extend the top of the neck

8. Create the Base of the Computer Monitor

Step 1

Use the Polygon Selection Tool to select the bottom of the neck. Then use the Move Tool to extend it. This will help create the base of the monitor.

Extend the base of the monitor

Step 2

Use the Move Tool to make sure that the neck is in the correct position underneath the computer monitor.

Use move tool to position objects

Step 3

Use the Edge Selection Tool to select the two front facing corners.

Select base corners

Step 4

Right-click on the corners and select the Bevel Tool

Select the bevel tool

Step 5

Use the Bevel Tool to curve the corners of the base. In the edit window, you can change the settings to the following:

  • Bevel Mode: Chamfer 
  • Offset Mode: Fixed Distance
  • Offset: 72 cm
  • Subdivision: 30
  • Depth: 100%
Curve the base corners

Step 6

Click on the small black arrow in the bottom right corner of the Bend Tool in the top menu bar. Then select Taper from the list. This creates a Taper tool in the list of objects on the right of the screen.

Select the taper tool

Step 7

Select the Taper tool and drag it into the Cube object. This will apply the Taper features to the cube which will enable some shape manipulation options.

Apply the taper tool to the base

Step 8

The Taper Tool only affects the area within the cage (this is visualised as a see through cube with purple lines as edges). Use the Rotate Tool to rotate the cage 90 degrees and move it down so that the base is within the cage area.

Move the cage

Step 9

Use the Scale Tool to reduce the cage size so that it only effects the base of the computer monitor. 

Scale the cage to fit the base

Step 10

With the Taper Tool selected, go to the adjustments menu and edit the settings to create a suitable base shape. If the shape is not deforming correctly, try flipping the cage or moving it to a different area. You can input the following:

  • Mode: Limited
  • Strength: -50%
  • Curvature: 0%
Adjust the taper tool settings

Coming Next…

In the second part of the the tutorial series, I’ll show you how to:

  • How to Create Coloured Materials
  • How to Add Lighting to the Scene
  • How to Render the Computer Monitor
Final computer monitor model
Posted on Leave a comment

Want the Secret to Insta-Success? Enrol in the School of Instagram

Why do some people seem to gain Instagram followers effortlessly, while others struggle to get any traction? Find the answer by enrolling in the School of Instagram. It’s completely free to join, and the lessons you learn will take your Instagram account to the next level.

Here’s a quick overview of what you can learn from the School of Instagram. (Hint: it’s just a fraction of what’s on the site itself, so you might want to dive right in and get started with your first free lesson right away!)

1. How to Stand Out on Instagram

Instagram has over a billion active users, with over 100 million photos and videos uploaded every day. How can you possibly stand out in such a crowded field?

Start by binge-reading the ten dedicated lessons in the School of Instagram’s first subject area: How to Stand Out on Instagram.

You’ll learn, among many other things, how to:

How to write an Instagram caption

Successful Instagrammers seem to do all these things naturally, but the truth is that they’ve spent years honing their techniques and learning what works and what doesn’t. The School of Instagram helps you take a massive shortcut and begin using these tried-and-tested tactics right away.

2. How to Plan Your Instagram Content

What do you mean, you don’t plan your Instagram content?

If you’re just using Instagram to connect with friends and family, it’s fine to post off-the-cuff photos of whatever’s happening in your life from moment to moment. But if you want to use Instagram to reach a wider audience, you need to be more strategic. Learn how to do that in Part 2 of the School of Instagram’s curriculum: How to Plan Your Instagram Content.

Planning your Instagram content

You’ll discover time-saving apps you can use to plan your content, create better Instagram Stories, and more. Plus you’ll discover exactly how paid partnerships work and learn how you can grab a slice of the $6.5 billion influencer marketing budget, even if you don’t have a gazillion followers just yet.

Oh, and have you always wondered how to get one of those beautiful blue “Verified” checkmarks next to your name? See the verification process demystified right here.

3. Stuff They Don’t Teach You About Instagram

If you’re an Instagram old-timer, you probably think you know all there is to know about using it.

Think again.

Instagram may be a fairly simple app, but with a billion users, and with humans being the creative beings they are, Instagrammers have come up with a ton of useful hacks to do things Mark Zuckerberg never thought of. Learn all about them in Part 3: Stuff They Don’t Teach You About Instagram.

For example, do you know how to respond more quickly to comments by using the text replacement feature on your phone? How to add animated GIFs to your stories with a few taps? How to offer more poll options with the emoji slider? These are just a few of the Instagram hacks you’ll discover.

Plus Instagram is always adding new features. Learn how to get the most out of the brand-new Instagram Create Mode, launched just last month.

Instagram Create Mode Templates

There’s so much more there too, from killer video trends to turning your Instagram content into a career. To see all of it, just head over to the site and start taking your free lessons.

4. Learn From the Insta-Experts

Let’s face it: there’s a ton of Instagram advice out there. But have you ever noticed that a lot of it is written by people whose own Instagram profiles are… kind of underwhelming?

If you want to succeed on Instagram, you probably want to learn from people who have tens or hundreds of thousands of followers. You want to know what they’ve done to achieve that success. What have they learned along the way? What can you do to reach the same level?

That’s where the “Asking for a Friend” interview series comes in. Watch some successful Instagram entrepreneurs talking about their biggest lessons, their best Instagram tips, how they deal with setbacks, and much more.

You can find these fun and inspiring interviews on the School of Instagram homepage. Here’s one of them, with stylist and digital influencer Kristy Wu.


Create an Insta-Site With Milkshake

If you follow the lessons from the School of Instagram, you’ll soon be building a healthy and fast-growing Instagram following. But how do you translate that into sales or traffic for your other projects? After all, Instagram only lets you put one link in your profile.

The best solution is to build an “Insta website”: an eye-catching, mobile-friendly site that quickly states who you are and what you do. Forget complex web design and hosting fees: you can set up a site quickly and easily using the free Milkshake app.

With Milkshake, you can build a bespoke Insta-site on your phone in minutes, and use it to connect your followers to everything you offer.

The site is specially designed for Instagram’s mobile web browser, so your followers can swipe through your site just like Instagram Stories. Seamless!

You can update the site as often as you like. It’s free to create, and the best part is that no software or design skills are needed! What’s not to like? Download the Milkshake iOS app to get started.

And don’t forget to enrol for the School of Instagram to ensure you’re getting the most out of the platform. They’re adding more lessons and interviews all the time, so sign up to make sure you’re the first to find out about the latest Instagram tips and tricks!