Posted on Leave a comment

Python List reverse()

This tutorial shows you everything you need to know to help you master the essential reverse() method of the most fundamental container data type in the Python programming language.

Definition and Usage:

The list.reverse() reverses the order of the elements in the list. If you want to create a new list with reversed elements, use slicing with negative step size list[::-1].

Here’s a short example:

>>> lst = [1, 2, 3, 4]
>>> lst.reverse()
>>> lst
[4, 3, 2, 1]

In the first line of the example, you create the list lst. You then reverse the order of the elements in the list and print it to the shell.

Code Puzzle — Try It Yourself:

Now you know the basics. Let’s deepen your understanding with a short code puzzle—can you solve it?

You can also solve this puzzle and track your Python skills on our interactive Finxter app.

Syntax: You can call this method on each list object in Python. Here’s the syntax:

list.reverse()

Arguments: The reverse method doesn’t take any arguments.

Return value: The method list.reverse() has return value None. It reverses the elements of the list in place (but doesn’t create a new list). Thus, a return value is not needed.

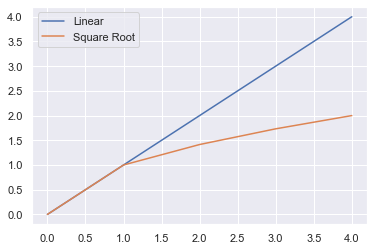
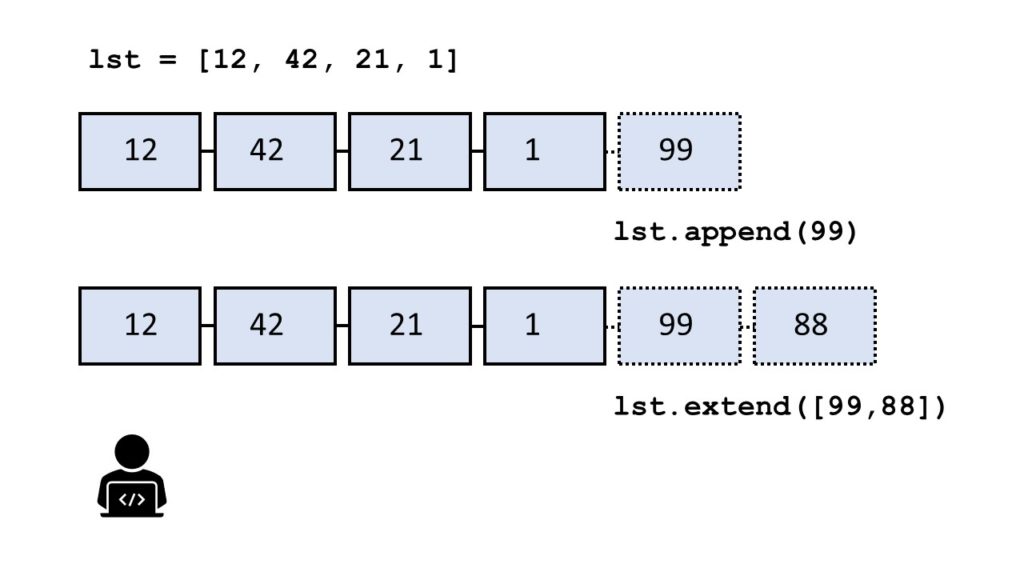
Python List reverse() Time Complexity

The time complexity of the reverse() operation is O(n) for a list with n elements. The standard Python implementation cPython “touches” all elements in the original list to move them to another position. Thus, the time complexity is linear in the number of list elements.

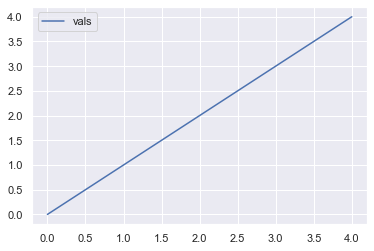
You can see a plot of the time complexity of the reverse() method for growing list size here:

Time complexity of Python List reverse()

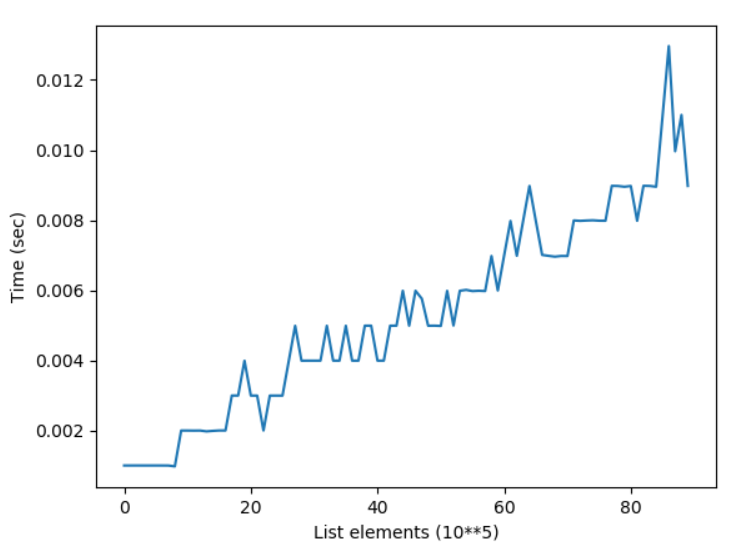
The figure shows how the elapsed time of reversing lists with growing number of elements grows linear to the number of elements.

If you’re interested in the code I used to generate this plot with Matplotlib, this is it:

import matplotlib.pyplot as plt
import time y = []
for i in [100000 * j for j in range(10,100)]: lst = list(range(i)) t0 = time.time() x = lst.reverse() t1 = time.time() y.append(t1-t0) plt.plot(y)
plt.xlabel("List elements (10**5)")
plt.ylabel("Time (sec)")
plt.show()

Python List reverse() In Place

If you call the list.reverse() method on any list object in Python, it reverses the list elements of this particular list object. You say that the reverse method happens in place.

This is a common mistake of many Python beginners. They assume that the reverse() method creates a new list with the elements in reversed order. This is not the case: the reverse() method modifies only the existing list object.

You can see this in the following example:

>>> lst = [1, 2, 3]
>>> lst.reverse()
>>> lst
[3, 2, 1]

In the example, you only reversed the existing list lst. But you didn’t create a new list!

Python List reverse() None

The return value of the list.reverse() method is None. Why? Because the method reverses the list in place. This means that no new list is created. Instead, the method modifies the old list object.

You’ve seen an example of this in the previous section.

Python List Reverse List Without reverse()

You can also reverse a list without using the reverse() method. Let’s have a look at the following table that shows all reverse() alternatives:

Method Description
lst.reverse() Reverses the order of the elements of list lst in place.
list(reversed(lst)) The built-in reversed(lst) method creates a new list object with reversed list elements.
lst[::-1] Slicing with negative indexing is the most concise way of reversing the order of a list. It creates a new list object.
[lst[i] for i in range(len(lst)-1,-1,-1)] Just for fun—one-liner solution to reverse a list using list comprehension and the negative range function.

There is a fifth solution using recursion. But it’s highly inefficient and you shouldn’t use it in practice. If you want to learn about it anyways, read on. But don’t tell me you haven’t been warned!

Python List Reverse Recursive

You can create a recursive function to reverse any list. I’ll give you the code first and explain it later:

>>> reverse = lambda lst: reverse(lst[1:]) + [lst[0]] if lst else []

Let’s check if it does what it’s supposed to do (reversing the list):

>>> reverse([1, 2, 3])
[3, 2, 1]
>>> reverse(["Ann", 1, 42, 0])
[0, 42, 1, 'Ann']
>>> reverse([])
[]
>>> reverse([1])
[1]

Okay, it works!

The recursive one-liner solution uses several Python features you have to understand before you can understand it entirely:

Phew! Quite some information to digest! But that’s not all. If you’ve understood all of the above, you also need to understand recursion. That’s too much to teach in a single paragraph so I’d send you over to my blog article about recursion.

I’ll say only that much: to understand recursion, you first need to understand recursion! 😉

Python List Reverse Slice

Slicing is the easiest way to reverse a list.

To reverse the list lst, you simply use slicing operation lst[::-1] with default start and stop indices (not given) and negative step size -1 (given).

There’s only one case where you shouldn’t use slicing to reverse the list and this is if you don’t want to create a new list. In this case, stick to the lst.reverse() method which reverses the list in place.

Here’s an example of slicing to reverse a given list:

>>> friends = ["Ann", "Carsten", "Bob", "Alice"]
>>> r_friends = friends[::-1]
>>> friends
['Ann', 'Carsten', 'Bob', 'Alice']
>>> r_friends
['Alice', 'Bob', 'Carsten', 'Ann']

You see that the two lists friends and r_friends are independent objects in memory because the slicing operation creates a new list.

Related articles:

Python List Reverse Copy

There are two ways to copy a list and reverse the order of its elements:

  • Use slicing list[::-1], or
  • Call the reversed(list) method and convert the result to a list using the list(...) constructor.

Here are both in action:

>>> lst_1 = ['Alice', 'Bob', 'Ann']
>>> lst_2 = lst_1[::-1]
>>> lst_3 = list(reversed(lst_1))
>>> lst_1
['Alice', 'Bob', 'Ann']
>>> lst_2
['Ann', 'Bob', 'Alice']
>>> lst_3
['Ann', 'Bob', 'Alice']

Python List Partial Reverse

To partially reverse a list lst, use slicing with negative step size: lst[start:stop:-1]. The start and stop values define the part of the list to be reversed and the step size -1 means that you go through the list in reversed order.

Here’s an example of some partial list reversals:

>>> lst = ['a', 'b', 'c', 'd', 'e']
>>> lst[5:2:-1]
['e', 'd']
>>> lst[:1:-1]
['e', 'd', 'c']
>>> lst[3:2:-1]
['d']

All of those slicing operations reversed a subsequence of the original list. Note that the start index must be larger or equal than the stop index because you traverse the list in negative order (well, if you don’t want to have an empty slice object).

Python List Reverse List Comprehension

You can reverse a list with Python’s powerful list comprehension method. (Although I cannot imagine a scenario where this would actually make sense.)

Related article:

List comprehension is a compact way of creating lists. The simple formula is [ expression + context ].

  • Expression: What to do with each list element?
  • Context: What list elements to select? It consists of an arbitrary number of for and if statements.

For example, the expression [x for x in range(3)] creates the list [0, 1, 2].

Here’s how you’d use list comprehension to reverse a list:

[lst[i] for i in range(len(lst)-1,-1,-1)]

You go over all indices in negative order—starting with the last list index len(lst)-1 and ending in the first list index 0. Note that the stop index is not included in the index sequence so I used the value -1 as the stop index for the range() built-in function.

Python List reverse() vs reversed()

What’s the difference between the method list.reverse() and the built-in function reversed(list)?

  • list.reverse() modifies an existing list in place and reverses the order of elements in this list object. No new list object is created.
  • reversed(list) creates a new iterable object by reversing the order of elements of the original list.

So you should use the former if you don’t want to create a new list and the latter if you want to create a new iterable without modifying the existing list.

An example is the following:

>>> lst_1 = [1, 2, 3]
>>> lst_1.reverse()
>>> lst_1
[3, 2, 1]
>>> reversed(lst_1)
<list_reverseiterator object at 0x0000025B58FEC9B0>

The output is not very intuitive but it only means that the reversed() function returns an iterable object.

Python List Deep Reverse

What if you want not only to reverse a list but running a deep reverse where all nested lists are also reversed in a recursive manner?

Here’s how you can do it:

def deep_reverse(lst): ''' Reverses a nested list in place''' # Reverse top-level list lst.reverse() # Recursively reverse all nested lists for element in lst: if isinstance(element, list): deep_reverse(element) lst = [1, 2, 3, [4, 5, 6]]
deep_reverse(lst)
print(lst)

This generates the output:

# OUTPUT: [[6, 5, 4], 3, 2, 1]

Not only the first-level list is reversed but also the second-level list. The code is loosely inspired from this article.

Python List Reverse Enumerate

The enumerate(list) built-in function returns a list of tuples with the first tuple value being the list index and the second tuple value being the list element.

You can reverse the order of enumerated tuples by stacking together the enumerate() function and the list.reverse() method as follows:

>>> for i, el in enumerate(list(reversed([1, 2, 3]))): print(i, el) 0 3
1 2
2 1

This way, you first reverse the list which creates an iterator. You then transform it into a list. The result can be enumerated.

If you want to reverse the order of the indices as well, simply switch the order of both functions:

>>> for i, el in reversed(list(enumerate([1, 2, 3]))): print(i, el) 2 3
1 2
0 1

By first enumerating, you calculate the indices based on the original list. Then you reverse them in the outer function.

Python List Reverse Iterator

The reversed(list) method returns an iterator, not a new list. This is different: an iterator is more efficient than a list. You can easily convert the iterator object into a list by using the list(...) built-in function.

Here’s an example:

>>> reversed([1, 2, 3])
<list_reverseiterator object at 0x0000021735E070B8>
>>> for i in reversed([1, 2, 3]): print(i) 3
2
1

The iterator object doesn’t look pretty in the shell but it’s a more efficient way to iterate over a sequence of values than using lists. Why? Because lists need to maintain all values in memory. Iterators don’t.

Python List Reverse Sort

Do you want to sort a list in descending order? Use the reverse=True argument of the sorted() method. Here’s an example:

>>> sorted([42, 1, 99])
[1, 42, 99]
>>> sorted([42, 1, 99], reverse=True)
[99, 42, 1]

Python List reverse() Index

Rather than just using positive list indices, you can use reverse indexing in Python lists, too. The negative integer index -1 accesses the last element. The negative integer index -2 accesses the second last element and so on. Here’s an example:

>>> lst = ["Alice", "Bob", "Ann"]
>>> lst[-1] 'Ann'
>>> lst[-2] 'Bob'
>>> lst[-3] 'Alice'

Python List Reverse range()

Do you want to iterate over a range of integer values in reverse order? Say, you want to iterate over the numbers from 10 to 0 in reverse order: 10, 9, 8, 7, 6, 5, 4, 3, 2, 1, 0. You can simply achieve this by specifying the start, stop, and step arguments of the range(start, stop, step) method:

>>> for i in range(10, -1, -1): print(i) 10
9
8
7
6
5
4
3
2
1
0

Note that the start argument is included in the range but the stop argument isn’t.

Python List reverse() Doesn’t Work

What if the reverse() method doesn’t work? Chances are that you assume the list.reverse() method has a return value—that is the reversed list. This is not the case! The list.reverse() method returns None because it reverses the list in place. It doesn’t return a new reversed list.

Here’s an example what you’re probably doing:

>>> lst = [1, 2, 3]
>>> print(lst)
[1, 2, 3]
>>> print(lst.reverse())
None

If you really want to have a new list with elements in reversed order, use the Python built-in reversed(list) method:

>>> print(list(reversed([1, 2, 3])))
[3, 2, 1]

The reversed() method reverses the list and returns the reversed list as an iterator object. You need to convert it to a list first before printing it to the shell (and receiving a meaningful output).

Python Reverse List NumPy

To reverse a NumPy array (or even a Python list), you can simply use slicing with negative step size a[::-1]. Here’s an example:

>>> import numpy as np
>>> a = np.array([1, 2, 3])
>>> a[::-1]
array([3, 2, 1])

Python List reverse() Thread Safe

Do you have a multiple threads that access your list at the same time? Then you need to be sure that the list operations (such as reverse()) are actually thread safe.

In other words: can you call the reverse() operation in two threads on the same list at the same time? (And can you be sure that the result is meaningful?)

The answer is yes (if you use the cPython implementation). The reason is Python’s global interpreter lock that ensures that a thread that’s currently working on it’s code will first finish its current basic Python operation as defined by the cPython implementation. Only if it terminates with this operation will the next thread be able to access the computational resource. This is ensured with a sophisticated locking scheme by the cPython implementation.

The only thing you need to know is that each basic operation in the cPython implementation is atomic. It’s executed wholly and at once before any other thread has the chance to run on the same virtual engine. Therefore, there are no race conditions. An example for such a race condition would be the following: the first thread reads a value from the list, the second threads overwrites the value, and the first thread overwrites the value again invalidating the second thread’s operation.

All cPython operations are thread-safe. But if you combine those operations into higher-level functions, those are not generally thread safe as they consist of many (possibly interleaving) operations.

Where to Go From Here?

The list.reverse() method reverses the order of the list elements.

You’ve learned the ins and outs of this important Python list method.

If you keep struggling with those basic Python commands and you feel stuck in your learning progress, I’ve got something for you: Python One-Liners (Amazon Link).

In the book, I’ll give you a thorough overview of critical computer science topics such as machine learning, regular expression, data science, NumPy, and Python basics—all in a single line of Python code!

Get the book from Amazon!

OFFICIAL BOOK DESCRIPTION: Python One-Liners will show readers how to perform useful tasks with one line of Python code. Following a brief Python refresher, the book covers essential advanced topics like slicing, list comprehension, broadcasting, lambda functions, algorithms, regular expressions, neural networks, logistic regression and more. Each of the 50 book sections introduces a problem to solve, walks the reader through the skills necessary to solve that problem, then provides a concise one-liner Python solution with a detailed explanation.

Posted on Leave a comment

Python List pop()

This tutorial shows you everything you need to know to help you master the essential pop() method of the most fundamental container data type in the Python programming language.

Definition and Usage:

The list.pop() method removes and returns the last element from an existing list. The list.pop(index) method with the optional argument index removes and returns the element at the position index.

Here’s a short example:

>>> lst = [1, 2, 3]
>>> lst.pop()
3
>>> lst
[1, 2]

In the first line of the example, you create the list lst. You then remove and return the final element 3 from the list. The result is the list with only two elements [1, 2].

Code Puzzle — Try It Yourself:

Now you know the basics. Let’s deepen your understanding with a short code puzzle—can you solve it?

You can also solve this puzzle and track your Python skills on our interactive Finxter app.

Syntax:

You can call this method on each list object in Python. Here’s the syntax:

list.pop(index=-1)

Arguments:

Argument Description
index Optional argument. You can define the index of the element to be removed and returned. The default argument leads to the removal of the last list element with index -1.

Return value:

The method list.pop() has return value Object. It removes the respective element from the list (default: the last element) and returns it directly to the caller.

Video:

Python List pop() By Index

You can use the list.pop(index) method to with the optional index argument to remove and return the element at position index from the list.

Here’s an example:

>>> customers = ['Alice', 'Bob', 'Ann', 'Frank']
>>> customers.pop(2) 'Ann'
>>> customers
['Alice', 'Bob', 'Frank']
>>> customers.pop(0) 'Alice'
>>> customers
['Bob', 'Frank']

After creating the list with four elements, you first remove and return the second element 'Ann'. Then, you remove and return the first element 'Alice'. The resulting list has only two elements left.

Python List pop() First / Front / Left / Head

The list.pop(index) method to with the optional index argument to remove and return the element at position index from the list. So if you want to remove the first element from the list, simply set index=0 by calling list.pop(0). This will pop the first element from the list.

Here’s an example:

>>> primes = [1, 2, 3, 5, 7, 11]
>>> primes.pop(0)
1
>>> primes
[2, 3, 5, 7, 11]

The pop(0) method removes the first element 1 from the list of prime numbers given in the example.

Python List pop() By Value

In the previous two examples, you’ve seen how to pop elements by index. But can you also pop by value?

Yes, you can by using the list.index(value) method which gives you the index of the element value in the list. Now, you can use the list.pop(index) method on this index to remove the value from the list and get the result as a return value.

Here’s an example where you want to pop the element 7 from the list and store the result in the variable some_prime.

>>> primes = [1, 2, 3, 5, 7, 11]
>>> some_prime = primes.pop(primes.index(7))
>>> some_prime
7

If you’re not interested in the return value but you only want to remove the first occurrence of the value x in the list, use the list.remove(x) method.

Related Article:

Python List pop() Multiple Elements

Python List pop() First n Elements

Python List pop() Last n Elements

Python List pop() Time Complexity … First and Last and General cases

Python List pop() vs remove()

Python List Pop and Push (Stack)

Python List pop() Without Remove

Python List pop() While Iterating

Python List pop() If Not Empty

Python List pop() Slice

Alternatives Ways to Remove Elements From a List

There are some alternative ways to remove elements from the list. See the overview table:

Method Description
lst.remove(x) Remove an element from the list (by value)
lst.pop() Remove an element from the list (by index) and return the element
lst.clear() Remove all elements from the list
del lst[3] Remove one or more elements from the list (by index or slice)
List comprehension Remove all elements that meet a certain condition

Next, you’ll dive into each of those methods to gain some deep understanding.

remove() — Remove An Element by Value

To remove an element from the list, use the list.remove(element) method you’ve already seen previously:

>>> lst = ["Alice", 3, "alice", "Ann", 42]
>>> lst.remove("Ann")
>>> lst
['Alice', 3, 'alice', 42]

Try it yourself:

The method goes from left to right and removes the first occurrence of the element that’s equal to the one to be removed.

Removed Element Does Not Exist

If you’re trying to remove element x from the list but x does not exist in the list, Python throws a Value error:

>>> lst = ['Alice', 'Bob', 'Ann']
>>> lst.remove('Frank')
Traceback (most recent call last): File "<pyshell#19>", line 1, in <module> lst.remove('Frank')
ValueError: list.remove(x): x not in list

pop() — Remove An Element by Index

Per default, the pop() method removes the last element from the list and returns the element.

>>> lst = ['Alice', 'Bob', 'Ann']
>>> lst.pop() 'Ann'
>>> lst
['Alice', 'Bob']

But you can also define the optional index argument. In this case, you’ll remove the element at the given index—a little known Python secret!

>>> lst = ['Alice', 'Bob', 'Ann']
>>> lst.pop(1) 'Bob'
>>> lst
['Alice', 'Ann']

clear() — Remove All Elements

The clear() method simply removes all elements from a given list object.

>>> lst = ['Alice', 'Bob', 'Ann']
>>> lst.clear()
>>> lst
[]

del — Remove Elements by Index or Slice

This trick is also relatively unknown among Python beginners:

  • Use del lst[index] to remove the element at index.
  • Use del lst[start:stop] to remove all elements in the slice.
>>> lst = list(range(10))
>>> lst
[0, 1, 2, 3, 4, 5, 6, 7, 8, 9]
>>> del lst[5]
>>> lst
[0, 1, 2, 3, 4, 6, 7, 8, 9]
>>> del lst[:4]
>>> lst
[4, 6, 7, 8, 9]

Related blog articles:

List Comprehension — Remove Elements Conditionally

Okay, this is kind of cheating because this method does not really remove elements from a list object. It merely creates a new list with some elements that meet your condition.

List comprehension is a compact way of creating lists. The simple formula is [ expression + context ].

  • Expression: What to do with each list element?
  • Context: What list elements to select? It consists of an arbitrary number of for and if statements.

The example [x for x in range(3)] creates the list [0, 1, 2].

You can also define a condition such as all odd values x%2==1 in the context part by using an if condition. This leads us to a way to remove all elements that do not meet a certain condition in a given list.

>>> lst = list(range(10))
>>> lst_new = [x for x in lst if x%2]
>>> lst_new
[1, 3, 5, 7, 9] 

While you iterate over the whole list lst, the condition x%2 requires that the elements are odd.

Related blog articles:

Python List pop() Thread Safe

Do you have a multiple threads that access your list at the same time? Then you need to be sure that the list operations (such as pop()) are actually thread safe.

In other words: can you call the pop() operation in two threads on the same list at the same time? (And can you be sure that the result is meaningful?)

The answer is yes (if you use the cPython implementation). The reason is Python’s global interpreter lock that ensures that a thread that’s currently working on it’s code will first finish its current basic Python operation as defined by the cPython implementation. Only if it terminates with this operation will the next thread be able to access the computational resource. This is ensured with a sophisticated locking scheme by the cPython implementation.

The only thing you need to know is that each basic operation in the cPython implementation is atomic. It’s executed wholly and at once before any other thread has the chance to run on the same virtual engine. Therefore, there are no race conditions. An example for such a race condition would be the following: the first thread reads a value from the list, the second threads overwrites the value, and the first thread overwrites the value again invalidating the second thread’s operation.

All cPython operations are thread-safe. But if you combine those operations into higher-level functions, those are not generally thread safe as they consist of many (possibly interleaving) operations.

Where to Go From Here?

The list.remove(element) method removes the first occurrence of element from the list.

You’ve learned the ins and outs of this important Python list method.

If you keep struggling with those basic Python commands and you feel stuck in your learning progress, I’ve got something for you: Python One-Liners (Amazon Link).

In the book, I’ll give you a thorough overview of critical computer science topics such as machine learning, regular expression, data science, NumPy, and Python basics—all in a single line of Python code!

Get the book from Amazon!

OFFICIAL BOOK DESCRIPTION: Python One-Liners will show readers how to perform useful tasks with one line of Python code. Following a brief Python refresher, the book covers essential advanced topics like slicing, list comprehension, broadcasting, lambda functions, algorithms, regular expressions, neural networks, logistic regression and more. Each of the 50 book sections introduces a problem to solve, walks the reader through the skills necessary to solve that problem, then provides a concise one-liner Python solution with a detailed explanation.

Posted on Leave a comment

Python List copy()

Surprisingly, even advanced Python coders don’t know the details of the copy() method of Python lists. Time to change that!

Definition and Usage: The list.copy() method copies all list elements into a new list. The new list is the return value of the method. It’s a shallow copy—you copy only the object references to the list elements and not the objects themselves.

Here’s a short example:

>>> lst = [1, 2, 3]
>>> lst.copy()
[1, 2, 3]

In the first line, you create the list lst consisting of three integers. You then create a new list by copying all elements.

Puzzle – Try It Yourself:

Syntax: You can call this method on each list object in Python. Here’s the syntax:

list.copy()

Arguments: The method doesn’t take any argument.

Return value: The method list.clear() returns a list object by copying references to all objects in the original list.

Video:

Python List Copy Shallow

Before you can truly understand the copy() method in Python, you must understand the concept of a “shallow copy”.

In object-oriented languages such as Python, everything is an object. The list is an object and the elements in the list are objects, too. A shallow copy of the list creates a new list object—the copy—but it doesn’t create new list elements but simply copies the references to these objects.

You can see that the list below is only a shallow copy pointing to the same elements as the original list.

In Python, the list.copy() method only produces a shallow copy which has much faster runtime complexity.

Here’s an example showing exact this scenario:

>>> lst = [6, 7, [1, 2], "hello"]
>>> lst_2 = lst.copy()
>>> lst_2[2].append(42)
>>> lst[2]
[1, 2, 42]

Changing the third list element of the copied list impacts the third list element of the original list.

Python List Copy Deep

Having understood the concept of a shallow copy, it’s now easy to understand the concept of a deep copy. A shallow copy only copies the references of the list elements. A deep copy copies the list elements themselves which can lead to a highly recursive behavior because the list elements may be lists themselves that need to be copied deeply and so on.

Here’s a simple deep copy of the same list as shown previously:

In contrast to the shallow copy, the list [1, 2] is copied separately for the deep copy list. If one changes this nested list in the original list, the change would not be visible at the deep copy. (Because the nested list of the deep copy list is an independent object in memory.)

Note that in a deep copy, the string object must not be copied. Why? Because strings are immutable so you cannot change them (and, thus, there will be no dirty “side effects” seen by other copies of the list pointing to the same object in memory.

To get a deep copy in Python, use the copy module and use the deepcopy() method:

>>> import copy
>>> lst = [6, 7, [1, 2], "hello"]
>>> lst_2 = copy.deepcopy(lst)
>>> lst_2[2].append(42)
>>> lst[2]
[1, 2]

How to Copy a Python List (Alternatives)?

Say, you want to copy the list. What options are there?

Method Description
list.copy() Returns a shallow copy of the list.
import copy
copy.deepcopy(list)
Import the copy module and uses its method to create a deep copy of list.
list[:] Use slicing with default indices to create a shallow copy of the list.
list(x) use the built-in list constructor list(...) to create a shallow copy of the list x.
[el for el in lst] Use list comprehension to create a shallow copy of the original list lst.

Slicing belongs to the fastest methods (very dirty benchmark here). If you need to refresh your Python slicing skills, here’s a tutorial on the Finxter blog:

Related Articles:

Python List Copy Not Working

The main reason why the list.copy() method may not work for you is because you assume that it creates a deep copy when, in reality, it only creates a shallow copy of the list. To create a deep copy where the list elements themselves are copied (e.g. for multi-dimensional lists), simply import the copy module and use its method deepcopy(x) to copy list x.

>>> import copy
>>> lst = [[1, 2], 3, 4]
>>> lst_2 = copy.deepcopy(lst)

Python List Copy And Append

How to copy a list and append an element in one line of Python code?

Simply use slicing to copy the list and the list concatenation operator + to add the list of a single element [x] to the result. But there are other nice ways, too. Check out the following ways to append element x to a given list lst and return the result as a copy:

  • lst[:] + [x]
  • lst.copy() + [x]
  • [*lst, x]

The third way to copy a list and append a new element is my personal favorite because it’s fast, easy-to-read, and concise. It uses the asterisk operator to unpack the elements of the original list into a new list.

Python List Copy By Value

Do you want to copy all elements in your list “by value”? In other words, you want not only the list object to be copied (shallow copy) but also the list elements (deep copy).

This can be done with the deepcopy() method of Python’s copy library. Here’s an example:

>>> import copy
>>> lst = [6, 7, [1, 2], "hello"]
>>> lst_2 = copy.deepcopy(lst)
>>> lst_2[2].append(42)
>>> lst[2]
[1, 2]

The element 42 was not appended to the nested list of lst.

Python List Copy With Slice

You can simply copy a list lst by using the slice operation lst[:] with default start and stop indices so that all elements are copied in the list. This creates a shallow copy of the list lst.

Related Articles:

Python List Copy Without First Element

To copy a list without its first element, simply use slicing list[1:]. By setting the start index to 1 all elements with index larger or equal to 1 are copied into the new list.

Here’s an example:

>>> lst = [1, 2, 3, 4]
>>> lst[1:]
[2, 3, 4]

Python List Copy Without Last Element

To copy a list without its last element, simply use slicing list[:-1]. By setting the start index to -1 (the right-most list element) all elements but the last one are copied into the new list.

Here’s an example:

>>> lst = [1, 2, 3, 4]
>>> lst[:-1]
[1, 2, 3]

Python List Copy Time Complexity

The time complexity of shallow list copying—examples are list.copy() or slicing list[:]—is linear to the number of elements in the list. For n list elements, the time complexity is O(n). Why? Because Python goes over all elements in the list and adds a copy of the object reference to the new list (copy by reference).

I wrote a quick script to evaluate that the time complexity of copying a list is, in fact, linear in the number of list elements:

import matplotlib.pyplot as plt
import time y = []
for i in [100000 * j for j in range(10)]: lst = list(range(i)) t0 = time.time() lst_2 = lst[:] t1 = time.time() y.append(t1-t0) plt.plot(y)
plt.xlabel("List elements (10**5)")
plt.ylabel("Time (sec)")
plt.show()

Here’s the result:

The runtime grows linearly in the number of list elements.

Python List Copy Partially

How to copy a list partially? To copy only the elements between start index (included) and stop index (excluded), use slicing like this: list[start:stop]. This results in a new list that contains only parts of the list.

Python List Copy Multi-Dimensional List

To copy a multi-dimensional list (a list of lists), you need to create a deep copy. You can accomplish this with the copy library’s deepcopy() method as follows:

>>> import copy
>>> lst = [[1, 2, 3], [4, 5, 6]]
>>> lst_2 = copy.deepcopy(lst)
>>> lst_2
[[1, 2, 3], [4, 5, 6]]

Now check if the copy is really deep by clearing the first list element in the copy:

>>> lst_2[0].clear()
>>> lst
[[1, 2, 3], [4, 5, 6]]
>>> lst_2
[[], [4, 5, 6]]

You can see that the copy was really deep because the first element of the lst was not affected by the clear() method that removed all elements for the deep copy lst_2.

Python List copy() Thread Safe

Do you have a multiple threads that access your list at the same time? Then you need to be sure that the list operations (such as copy()) are actually thread safe.

In other words: can you call the copy() operation in two threads on the same list at the same time? (And can you be sure that the result is meaningful?)

The answer is yes (if you use the cPython implementation). The reason is Python’s global interpreter lock that ensures that a thread that’s currently working on it’s code will first finish its current basic Python operation as defined by the cPython implementation. Only if it terminates with this operation will the next thread be able to access the computational resource. This is ensured with a sophisticated locking scheme by the cPython implementation.

The only thing you need to know is that each basic operation in the cPython implementation is atomic. It’s executed wholly and at once before any other thread has the chance to run on the same virtual engine. Therefore, there are no race conditions. An example for such a race condition would be the following: the first thread reads a value from the list, the second threads overwrites the value, and the first thread overwrites the value again invalidating the second thread’s operation.

All cPython operations are thread-safe. But if you combine those operations into higher-level functions, those are not generally thread safe as they consist of many (possibly interleaving) operations.

Where to Go From Here?

The list.copy() method creates a shallow copy of the list. The copy.deepcopy(list) method creates a deep copy of the list.

You’ve learned the ins and outs of this important Python list method.

If you keep struggling with those basic Python commands and you feel stuck in your learning progress, I’ve got something for you: Python One-Liners (Amazon Link).

In the book, I’ll give you a thorough overview of critical computer science topics such as machine learning, regular expression, data science, NumPy, and Python basics—all in a single line of Python code!

Get the book from Amazon!

OFFICIAL BOOK DESCRIPTION: Python One-Liners will show readers how to perform useful tasks with one line of Python code. Following a brief Python refresher, the book covers essential advanced topics like slicing, list comprehension, broadcasting, lambda functions, algorithms, regular expressions, neural networks, logistic regression and more. Each of the 50 book sections introduces a problem to solve, walks the reader through the skills necessary to solve that problem, then provides a concise one-liner Python solution with a detailed explanation.

Posted on Leave a comment

Python List clear()

Surprisingly, even advanced Python coders don’t know about the clear() method of Python lists. Time to change that!

Definition and Usage: The list.clear() method removes all elements from an existing list. The list becomes empty again.

Here’s a short example:

>>> lst = [1, 2, 3, 4, 5]
>>> lst.clear()
>>> lst
[]

In the first line, you create the list lst consisting of five integers. You then remove all elements from the list. The result is the empty list.

Puzzle – Try It Yourself:

Syntax: You can call this method on each list object in Python. Here’s the syntax:

list.clear()

Arguments: The method doesn’t take any argument.

Return value: The method list.clear() has return value None. It operates on an existing list and, therefore, doesn’t return a new list with the removed element

Video:

Python List clear() vs New List

Now, if you’re an alert reader, you may ask the following interesting question: why to use the clear() method in the first place when you also can simply create a new list and be done with it?

Here’s an example where both ways lead to the same result:

>>> lst = [1, 2, 3]
>>> lst.clear()
>>> lst
[]
>>> lst = [1, 2, 3]
>>> lst = []
>>> lst
[]

I know the code seems to be a bit odd but it shows that instead of clearing an existing list, you can also create a new list. In this case, this leads to the exact same result.

However, Python is an object-oriented language. And if you just create a new object and assign it to a variable, the original list still exists in memory. And other variables may point to the object.

Consider the following code snippet that exemplifies this:

lst = [1, 2, 3]
lst_2 = lst
lst = []
print(lst_2)
# [1, 2, 3]

I’ve created a Python visualization for you so that you can see the objects in memory:

Simply assigning a new list to the variable lst will leave the other variable lst_2 unaffected. Instead, you should have used lst.clear() to make sure that both variables now point to the same empty list object.

lst = [1, 2, 3]
lst_2 = lst
lst.clear()
print(lst_2)
# []

Python List clear() Memory

The effect of the clear() method is that the list is now empty.

In theory, you released the Python virtual machine from the burden of keeping the elements in the memory. Python uses reference counting to determine if some elements in the memory are not referenced anymore (and, thus, can be considered unused). Those elements will be removed—we say, they are deallocated from memory. If you clear the list, you essentially remove all references from the list to the list elements. However, some old list elements may still be referenced from the outside (e.g. by another variable). So they are not necessarily removed because they may still be needed! Just keep this in mind when clearing the list.

In practice, however, even referenced elements may still exist in the memory until the Python garbage collector (or even the operating system) removes the elements from memory.

Python List clear() Complexity

The runtime complexity of list.clear() is O(n) for a list with n elements. Why? Well, you first need to understand what happens if you remove all elements from a list. The list elements are not physically (or, for that matter, digitally) stored in the list. The list contains only references to the real list element objects in memory. If you clear the list, you remove all those references.

The garbage collector in Python goes over all elements in the memory to remove the ones that have a reference count of zero. Why? Because they are the ones that cannot be accessed in the code. Thus, the garbage collector can safely assume that they are unused and are not needed anymore. As you see, the garbage collector needs the reference count information for each element in memory.

The algorithm when clearing a list is simple: reduce the reference count of each list element object by one. The objects that end up with reference count zero can now be removed from memory. But as you need to go over all list elements, the runtime complexity is linear to the list size.

Python List clear() Not Working

The Python list.clear() method was added in Python 3.3 (official source). So if you try to use it for any Python version before that, you must use the del list[:] method that is semantically equivalent and works for earlier Python versions, too.

Related articles on the Finxter blog:

Python List clear() Version 2.7

Have you tried to use Python list.clear() in Python 2.7? It’s not possible. The clear() method was added in Python 3.3 (official source). So if you try to use it for any Python version before that (including 2.7), you must use the del list[:] method that is semantically equivalent and works for earlier Python versions, too.

Related articles on the Finxter blog:

Python List clear() vs del

You may ask: what’s the difference between the list.clear() method and the del operation?

The answer is simple: there isn’t any semantic difference. The list.clear() method is just syntactical sugar for del list[:] (source).

Here’s an example demonstrating that both are, in fact, the same:

>>> lst = [1, 2, 3]
>>> lst.clear()
>>> lst
[]
>>> lst = [1, 2, 3]
>>> del lst[:]
>>> lst
[]

List Removal Alternatives

There are some alternative list methods to remove elements from the list. See the overview table:

Method Description
lst.remove(x) Remove an element from the list (by value)
lst.pop() Remove an element from the list (by index) and return the element
lst.clear() Remove all elements from the list
del lst[3] Remove one or more elements from the list (by index or slice)
List comprehension Remove all elements that meet a certain condition

Python List clear() Thread Safe

Do you have a multiple threads that access your list at the same time? Then you need to be sure that the list operations (such as clear()) are actually thread safe.

In other words: can you call the clear() operation in two threads on the same list at the same time? (And can you be sure that the result is meaningful?)

The answer is yes (if you use the cPython implementation). The reason is Python’s global interpreter lock that ensures that a thread that’s currently working on it’s code will first finish its current basic Python operation as defined by the cPython implementation. Only if it terminates with this operation will the next thread be able to access the computational resource. This is ensured with a sophisticated locking scheme by the cPython implementation.

The only thing you need to know is that each basic operation in the cPython implementation is atomic. It’s executed wholly and at once before any other thread has the chance to run on the same virtual engine. Therefore, there are no race conditions. An example for such a race condition would be the following: the first thread reads a value from the list, the second threads overwrites the value, and the first thread overwrites the value again invalidating the second thread’s operation.

All cPython operations are thread-safe. But if you combine those operations into higher-level functions, those are not generally thread safe as they consist of many (possibly interleaving) operations.

Python List Clear Duplicates

How to remove all duplicates of a given value in the list?

The naive approach is to go over each element and check whether this element already exists in the list. If so, remove it. However, this takes a few lines of code.

A shorter and more concise way is to create a dictionary out of the elements in the list. Each list element becomes a new key to the dictionary. All elements that occur multiple times will be assigned to the same key. The dictionary contains only unique keys—there cannot be multiple equal keys.

As dictionary values, you simply take dummy values (per default).

Related blog articles:

Then, you simply convert the dictionary back to a list throwing away the dummy values. As the dictionary keys stay in the same order, you don’t lose the order information of the original list elements.

Here’s the code:

>>> lst = [1, 1, 1, 3, 2, 5, 5, 2]
>>> dic = dict.fromkeys(lst)
>>> dic
{1: None, 3: None, 2: None, 5: None}
>>> duplicate_free = list(dic)
>>> duplicate_free
[1, 3, 2, 5]

Where to Go From Here?

The list.clear() method removes all elements from the list.

You’ve learned the ins and outs of this important Python list method.

If you keep struggling with those basic Python commands and you feel stuck in your learning progress, I’ve got something for you: Python One-Liners (Amazon Link).

In the book, I’ll give you a thorough overview of critical computer science topics such as machine learning, regular expression, data science, NumPy, and Python basics—all in a single line of Python code!

Get the book from Amazon!

OFFICIAL BOOK DESCRIPTION: Python One-Liners will show readers how to perform useful tasks with one line of Python code. Following a brief Python refresher, the book covers essential advanced topics like slicing, list comprehension, broadcasting, lambda functions, algorithms, regular expressions, neural networks, logistic regression and more. Each of the 50 book sections introduces a problem to solve, walks the reader through the skills necessary to solve that problem, then provides a concise one-liner Python solution with a detailed explanation.

Posted on Leave a comment

Python List remove()

This tutorial shows you everything you need to know to help you master the essential remove() method of the most fundamental container data type in the Python programming language.

Definition and Usage:

The list.remove(element) method removes the first occurrence of the element from an existing list. It does not, however, remove all occurrences of the element in the list!

Here’s a short example:

>>> lst = [1, 2, 99, 4, 99]
>>> lst.remove(99)
>>> lst
[1, 2, 4, 99]

In the first line of the example, you create the list lst. You then remove the integer element 99 from the list—but only its first occurrence. The result is the list with only four elements [1, 2, 4, 99].

Try it yourself:

Syntax:

You can call this method on each list object in Python. Here’s the syntax:

list.remove(element)

Arguments:

Argument Description
element Object you want to remove from the list. Only the first occurrence of the element is removed.

Return value:

The method list.remove(element) has return value None. It operates on an existing list and, therefore, doesn’t return a new list with the removed element

Video:

Code Puzzle:

Now you know the basics. Let’s deepen your understanding with a short code puzzle—can you solve it?

# Puzzle
presidents = ['Obama', 'Trump', 'Washington']
p2 = presidents[:2]
p2.remove('Trump')
print(presidents)
# What's the output of this code snippet?

You can check out the solution on the Finxter app.

Overview:

There are some alternative ways to remove elements from the list. See the overview table:

Method Description
lst.remove(x) Remove an element from the list (by value)
lst.pop() Remove an element from the list (by index) and return the element
lst.clear() Remove all elements from the list
del lst[3] Remove one or more elements from the list (by index or slice)
List comprehension Remove all elements that meet a certain condition

Next, you’ll dive into each of those methods to gain some deep understanding.

remove() — Remove An Element by Value

To remove an element from the list, use the list.remove(element) method you’ve already seen previously:

>>> lst = ["Alice", 3, "alice", "Ann", 42]
>>> lst.remove("Ann")
>>> lst
['Alice', 3, 'alice', 42]

Try it yourself:

The method goes from left to right and removes the first occurrence of the element that’s equal to the one to be removed.

Removed Element Does Not Exist

If you’re trying to remove element x from the list but x does not exist in the list, Python throws a Value error:

>>> lst = ['Alice', 'Bob', 'Ann']
>>> lst.remove('Frank')
Traceback (most recent call last): File "<pyshell#19>", line 1, in <module> lst.remove('Frank')
ValueError: list.remove(x): x not in list

pop() — Remove An Element by Index

Per default, the pop() method removes the last element from the list and returns the element.

>>> lst = ['Alice', 'Bob', 'Ann']
>>> lst.pop() 'Ann'
>>> lst
['Alice', 'Bob']

But you can also define the optional index argument. In this case, you’ll remove the element at the given index—a little known Python secret!

>>> lst = ['Alice', 'Bob', 'Ann']
>>> lst.pop(1) 'Bob'
>>> lst
['Alice', 'Ann']

clear() — Remove All Elements

The clear() method simply removes all elements from a given list object.

>>> lst = ['Alice', 'Bob', 'Ann']
>>> lst.clear()
>>> lst
[]

del — Remove Elements by Index or Slice

This trick is also relatively unknown among Python beginners:

  • Use del lst[index] to remove the element at index.
  • Use del lst[start:stop] to remove all elements in the slice.
>>> lst = list(range(10))
>>> lst
[0, 1, 2, 3, 4, 5, 6, 7, 8, 9]
>>> del lst[5]
>>> lst
[0, 1, 2, 3, 4, 6, 7, 8, 9]
>>> del lst[:4]
>>> lst
[4, 6, 7, 8, 9]

Related blog articles:

List Comprehension — Remove Elements Conditionally

Okay, this is kind of cheating because this method does not really remove elements from a list object. It merely creates a new list with some elements that meet your condition.

List comprehension is a compact way of creating lists. The simple formula is [ expression + context ].

  • Expression: What to do with each list element?
  • Context: What list elements to select? It consists of an arbitrary number of for and if statements.

The example [x for x in range(3)] creates the list [0, 1, 2].

You can also define a condition such as all odd values x%2==1 in the context part by using an if condition. This leads us to a way to remove all elements that do not meet a certain condition in a given list.

>>> lst = list(range(10))
>>> lst_new = [x for x in lst if x%2]
>>> lst_new
[1, 3, 5, 7, 9] 

While you iterate over the whole list lst, the condition x%2 requires that the elements are odd.

Related blog articles:

Python List remove() All

The list.remove(x) method only removes the first occurrence of element x from the list.

But what if you want to remove all occurrences of element x from a given list?

The answer is to use a simple loop:

lst = ['Ann', 'Ann', 'Ann', 'Alice', 'Ann', 'Bob']
x = 'Ann' while x in lst: lst.remove(x) print(lst)
# ['Alice', 'Bob']

You simply call the remove() method again and again until element x is not in the list anymore.

Python List Remove Duplicates

How to remove all duplicates of a given value in the list?

The naive approach is to go over each element and check whether this element already exists in the list. If so, remove it. However, this takes a few lines of code.

A shorter and more concise way is to create a dictionary out of the elements in the list. Each list element becomes a new key to the dictionary. All elements that occur multiple times will be assigned to the same key. The dictionary contains only unique keys—there cannot be multiple equal keys.

As dictionary values, you simply take dummy values (per default).

Related blog articles:

Then, you simply convert the dictionary back to a list throwing away the dummy values. As the dictionary keys stay in the same order, you don’t lose the order information of the original list elements.

Here’s the code:

>>> lst = [1, 1, 1, 3, 2, 5, 5, 2]
>>> dic = dict.fromkeys(lst)
>>> dic
{1: None, 3: None, 2: None, 5: None}
>>> duplicate_free = list(dic)
>>> duplicate_free
[1, 3, 2, 5]

Python List remove() If Exists

How to remove an element from a list—but only if it exists?

The problem is that if you try to remove an element from the list that doesn’t exist, Python throws a Value Error. You can avoid this by checking the membership of the element to be removed first:

>>> lst = ['Alice', 'Bob', 'Ann']
>>> lst.remove('Frank') if 'Frank' in lst else None
>>> lst
['Alice', 'Bob', 'Ann']

This makes use of the Python one-liner feature of conditional assignment (also called the ternary operator).

Related blog articles:

Python List remove() Thread Safe

Do you have a multiple threads that access your list at the same time? Then you need to be sure that the list operations (such as remove()) are actually thread safe.

In other words: can you call the remove() operation in two threads on the same list at the same time? (And can you be sure that the result is meaningful?)

The answer is yes (if you use the cPython implementation). The reason is Python’s global interpreter lock that ensures that a thread that’s currently working on it’s code will first finish its current basic Python operation as defined by the cPython implementation. Only if it terminates with this operation will the next thread be able to access the computational resource. This is ensured with a sophisticated locking scheme by the cPython implementation.

The only thing you need to know is that each basic operation in the cPython implementation is atomic. It’s executed wholly and at once before any other thread has the chance to run on the same virtual engine. Therefore, there are no race conditions. An example for such a race condition would be the following: the first thread reads a value from the list, the second threads overwrites the value, and the first thread overwrites the value again invalidating the second thread’s operation.

All cPython operations are thread-safe. But if you combine those operations into higher-level functions, those are not generally thread safe as they consist of many (possibly interleaving) operations.

Where to Go From Here?

The list.remove(element) method removes the first occurrence of element from the list.

You’ve learned the ins and outs of this important Python list method.

If you keep struggling with those basic Python commands and you feel stuck in your learning progress, I’ve got something for you: Python One-Liners (Amazon Link).

In the book, I’ll give you a thorough overview of critical computer science topics such as machine learning, regular expression, data science, NumPy, and Python basics—all in a single line of Python code!

Get the book from Amazon!

OFFICIAL BOOK DESCRIPTION: Python One-Liners will show readers how to perform useful tasks with one line of Python code. Following a brief Python refresher, the book covers essential advanced topics like slicing, list comprehension, broadcasting, lambda functions, algorithms, regular expressions, neural networks, logistic regression and more. Each of the 50 book sections introduces a problem to solve, walks the reader through the skills necessary to solve that problem, then provides a concise one-liner Python solution with a detailed explanation.

Posted on Leave a comment

Matplotlib Legend – A Helpful Illustrated Guide

You’ve plotted some data in Matplotlib but you don’t know which data shows what? It’s time for a legend!

How to add a legend in Python’s Matplotlib library?

  • Label it with the label keyword argument in your plot method.
  • Before plt.show(), call plt.legend() your plot will be displayed with a legend.

Here’s the minimal example:

import matplotlib.pyplot as plt plt.plot([1, 2, 3], [1, 4, 9], label='squares')
plt.plot([1, 2, 3], [1, 8, 27], label='cubes') plt.legend()
plt.show()

In the following video, I’ll lead you through the article, step by step.

Prettier Example

# Import necessary modules
import matplotlib.pyplot as plt
import numpy as np # Optional: Use seaborn style as it looks nicer than matplotlib's default
import seaborn as sns; sns.set() # Generate data
vals = np.array([0, 1, 2, 3, 4]) # Plot and label
plt.plot(vals, label='vals') plt.legend()
plt.show()

If you plot and label multiple lines, the legend will contain multiple entries.

plt.plot(vals, label='Linear')
plt.plot(vals**2, label='Squared')
plt.plot(vals**0.5, label='Square Root') plt.legend()
plt.show()

You can combine different types of plot – scatter, line, histogram etc. – but you may have to specify the colors manually if you do.

import random # Set seed to reproduce results
random.seed(1) # Generate random data
x = [random.random() for _ in range(100)]
y = [random.random() for _ in range(100)] # Scatter plot
plt.scatter(x, y, label='Data') # Red line plot acting as the 'line of best fit'
plt.plot([0, 1], label='Best Fit', c='r')
plt.legend()
plt.show()

In this example, I first generated some random data before making a scatter plot from it. Then, I drew a line plot on top of it to act as the line of best fit (note that this is just an example and isn’t actually the line of best fit for this dataset!). Unfortunately, matplotlib does not automatically change the color of each plot if you plot a line and a scatter plot on top of each other. So, I manually changed it to red with the c keyword argument.

To learn more about Python’s random module, check out my article.

Let’s dive into a more detailed example of how legends work in matplotlib.

Matplotlib Legend Example

To display a legend on any plot, you must call plt.legend() at some point in your code – usually, just before plt.show() is a good place.

There are 3 ways you can call it:

  1. plt.legend()
  2. plt.legend(labels)
  3. plt.legend(handles, labels)

The first option – plt.legend() – automatically detects which elements to show. It does this by displaying all plots that have been labeled with the label keyword argument. The order of the lines in the legend are the same as the order you plot them.

vals = np.array([0, 1, 2, 3, 4]) # Plot vals first
plt.plot(vals, label='vals') # Plot vals/2 second
plt.plot(vals/2, label='vals/2') # Call plt.legend() without arguments
plt.legend()
plt.show()

First I plotted vals and then plotted vals/2. You can see that vals is displayed first in the legend and is a blue line. Now let’s swap the order.

# Plot vals/2 first
plt.plot(vals/2, label='vals/2') # Plot vals second
plt.plot(vals, label='vals') # Call plt.legend() without arguments
plt.legend()
plt.show()

Now vals/2 is displayed first in the legend and is colored blue. By changing the order of the plots, you change not only the order in the legend but also the colors of the lines.

Note: you can manually control the colors using the c keyword argument if you want to.

The second option –plt.legend(labels) – is rarely used but I’ll show you what it does just for completeness.

The argument labels must be an iterable – most likely a list or tuple – containing the labels you want to display in the legend. Instead of explicitly labeling each line you draw like so:

plt.plot(x_1, label='plot_1')
plt.plot(x_2, label='plot_2')
plt.legend()
plt.show()

You do not label any of the lines explicitly and instead label them based on the order they appear:

plt.plot(x_1)
plt.plot(x_2)
plt.legend(['plot_1', 'plot_2'])
plt.show()

This method does work but can cause you a lot of headaches. For example, the iterable labels must be exactly the same length as the number of lines you draw. Moreover, if you change the order of any of your plots, you must also change the order of the elements in labels. Lastly, it violates The Zen of Python Explicit is better than implicit because you implicitly label each plot based on its order.

It is much easier for everyone if you explicitly label each of the plots rather than implicitly doing so like this. Thus, both the matplotlib docs and I do not recommend you use this method.

The final method – plt.legend(handles, labels) – provides you with the most flexibility but takes slightly longer to write.

Both handles and labels are iterables – usually lists or tuples. The handles are the lines you wish to appear on the legend and the labels are, as I hope you know by now, the word(s) you want to appear in the legend next to each line.

# Save plots with descriptive variable names
linear, = plt.plot(vals)
sqrt, = plt.plot(vals**0.5) # Create iterables handles and labels
handles = [linear, sqrt]
labels = ['Linear', 'Square Root'] # Pass handles and lables to plt.legend()
plt.legend(handles, labels)
plt.show()

First, you must save the output of each line in a variable. The function plt.plot() returns a list of length 1, so you must unpack it by putting a comma after your variable name to get the value inside the list. The value is a matplotlib.lines.Line2D object which is how matplotlib stores lines.

# linear_wrong is a list of length 1
linear_wrong = plt.plot(val) # linear_correct is a Line2D object - what you want
linear_correct, = plt.plot(val)

For ease of reading, I created the lists handles and labels which I then passed to plt.legend(). You can skip this intermediate step if you wish.

The biggest advantage of this method is that you have total control of the order in which the legend’s items appear: the order you pass handles is the order they will appear. This means you can plot them in any order you want and still control the order of the legend entries. This is in contract to method 1 where the order you plot your lines is the order they appear in the legend.

So, to make Square Root appear as the first entry in the legend, do the following.

linear, = plt.plot(vals)
sqrt, = plt.plot(vals**0.5) # Swap order of sqrt and linear
handles_ = [sqrt, linear]
labels_ = ['Square Root', 'Linear'] plt.legend(handles_, labels_)
plt.show()

In this plot, the color of the lines has not changed but the order in the legend has changed because I changed the lists handles and labels.

Finally, one thing many Python programmers don’t know is that if your label starts with an underscore, it will not be displayed in the legend. This may be useful if you have many plots and want to be able to easily scan the code but not display the names in the plots.

# No legend displayed because of underscore
plt.plot(vals, label='_I will not be displayed')
plt.legend()
plt.show()
No handles with labels found to put in legend.

Matplotlib Legend Location

To change the location of a legend in matplotlib, use the loc keyword argument in plt.legend().

By default, matplotlib draws the legend in the ‘best’ location i.e. the place that overlaps the least with the lines drawn. This can be slow if you plot a lot of data, so manually setting a location can speed up the process.

To manually set it, use the loc keyword and one of these 10, self-explanatory, strings:

  • ‘upper right’, ‘upper left’, ‘upper center’
  • ‘lower right’, ‘lower left’, ‘lower center’
  • ‘center right’ or ‘center left’
  • ‘right’ or ‘center’ (for some reason, ‘left’ is not an option)

Here are some examples of putting the legend in different locations. If you are unsure how to plot subplots in matplotlib, check out my article.

fig, axes = plt.subplots(nrows=1, ncols=3, figsize=plt.figaspect(1/3)) # Differnet legend locations
locations = ['best', 'upper center', 'lower left'] for ax, loc in zip(axes.flat, locations): ax.plot(vals, label='vals') ax.set_title(f"Legend loc='{loc}") # Set legend location ax.legend(loc=loc)
plt.show()

You can change the default location for all plots by setting plt.rcParams['legend.loc'] to the loc value of your choice.

Finally, you can choose any coordinate points by passing a 2-tuple to loc instead of a string. This will specify the location of the lower-left corner of the legend as a fraction of the axes. So setting loc=(0.5, 0.5) will place the bottom left corner half way along the x-axis and half way along the y-axis.

plt.plot(vals, label='vals') # Set location of legend
plt.legend(loc=(0.5, 0.5)) plt.title('Legend loc=(0.5, 0.5)')
plt.show()

If you input loc=(2, 2) you get a very stange looking graph because matplotlib places the legend at double the length and double the height of the axes.

plt.plot(vals, label='vals') # Set location of legend
plt.legend(loc=(2, 2)) plt.title('Legend loc=(2, 2)')
plt.show()

Of course, it is possible to place the legend at any coordinate point you want. Just remember to scale it by the maximum x- and y-axis values (both 4 in this example). So, to place the legend at the coordinate points (2, 3), pass loc=(2/4, 3/4).

plt.plot(vals, label='vals') # Set location of legend
plt.legend(loc=(2/4, 3/4)) plt.title('Legend at coordiante points (2, 3)')
plt.show()

Matplotlib Legend Font Size

To change the fontsize of a legend, use the fontsize keyword argument. It can take any int or float – the absolute size in points. Try lots of different sizes to get a feel for it.

You can also pass one of several strings:

['xx-small', 'x-small', 'small', 'medium', 'large', 'x-large', 'xx-large']

These are all relative to the current default font size. Let’s look at some examples.

fig, axes = plt.subplots(nrows=1, ncols=3, figsize=plt.figaspect(1/3)) # Different font sizes to try
fonts = ['xx-small', 'medium', 'x-large'] for ax, font in zip(axes.flat, fonts): ax.plot(vals, label='vals') ax.set_title(f"Legend fontsize='{font}'") # Set fontsize in legend ax.legend(fontsize=font) plt.show()

Matplotlib Legend Title

To add a title to a legend use the title keyword argument.

plt.plot(vals, label='vals') # Add title to legend
plt.legend(title='My Awesome Legend')
plt.show()

Matplotlib Legend Title Font Size

To change the font size of the title for a legend in matplotlib use the title_fontsize keyword argument. Like the fontsize keyword argument, it accepts any int or float – the absolute size in points – or one of the fontsize strings.

The matplotlib docs are actually incorrect because they say that title_fontsize only accepts a string or None.

fig, axes = plt.subplots(nrows=1, ncols=3, figsize=plt.figaspect(1/3)) # Differnet fontsizes to try
title_size = ['large', 5, None] for ax, size in zip(axes.flat, title_size): ax.plot(vals, label='vals') ax.set_title(f"Legend title_fontsize={size}") # Set title_fontsize of the legend ax.legend(title='My Awesome Legend', title_fontsize=size)
plt.show()

Matplotlib Legend Color

You can change both the facecolor and edgecolor of a legend using those keyword arguments in the function call.

The facecolor is the main color and the edgecolor is, you guessed it, the color around the edge of the box.

fig, axes = plt.subplots(nrows=2, ncols=2) # facecolors to choose
colors = ['red', 'blue', 'green', 'yellow'] for ax, color in zip(axes.flat, colors): ax.plot(vals, label=color) # Set facecolor of the legend ax.legend(facecolor=color)
plt.show()

Let’s do the same now but just change the edge color.

fig, axes = plt.subplots(nrows=2, ncols=2) # Edgecolors to choose
colors = ['red', 'blue', 'green', 'yellow'] for ax, color in zip(axes.flat, colors): ax.plot(vals, label=color) # Choose edgecolor of legend ax.legend(edgecolor=color)
plt.show()

Of course, you can mix and match the face and edge colors to your heart’s content.

fig, axes = plt.subplots(nrows=2, ncols=2) # Colors to use
colors = ['red', 'blue', 'green', 'yellow'] # Same as colors but reversed
edges = colors[::-1] for ax, color, edge in zip(axes.flat, colors, edges): ax.plot([0, 1, 2, 3, 4], label=color) # Choose both the facecolor and edgecolor ax.legend(facecolor=color, edgecolor=edge)
plt.show()

Matplotlib Legend Order

To learn how to order elements in a legend, check out the Matplotlib Legend Example section.

Matplotlib Legend Background Color

To learn how to change the background color of a legend, check out the Matplotlib Legend Color section.

Conclusion

That’s it, you now know all the basics of working with legends in matplotlib.

You know the three different ways to call the function – plt.legend(), plt.legend(labels) and plt.legend(handles, labels) – you know how to set its location with both strings and coordinate points. Plus you can change the font size, set a title and even change the font size of the title. Lastly, you can jazz up your legends by setting the facecolor or edgecolor to anything you want.

Where To Go From Here?

Do you wish you could be a programmer full-time but don’t know how to start?

Check out the pure value-packed webinar where Chris – creator of Finxter.com – teaches you to become a Python freelancer in 60 days or your money back!

https://tinyurl.com/become-a-python-freelancer

It doesn’t matter if you’re a Python novice or Python pro. If you are not making six figures/year with Python right now, you will learn something from this webinar.

These are proven, no-BS methods that get you results fast.

This webinar won’t be online forever. Click the link below before the seats fill up and learn how to become a Python freelancer, guaranteed.

https://tinyurl.com/become-a-python-freelancer

Posted on Leave a comment

Python List insert() Method

How can you insert an element at a given index in a given list? Python’s insert() method is your friend.

This tutorial shows you everything you need to know to help you master an essential method of the most fundamental container data type in the Python programming language.

Definition and Usage

The list.insert(i, element) method adds an element element to an existing list at position i. All elements j>i will be moved by one index position to the right.

Here’s a short example:

>>> lst = [1, 2, 3, 4]
>>> lst.insert(3, 99)
>>> lst
[1, 2, 3, 99, 4]

In the first line of the example, you create the list lst. You then insert the integer element 99 at position 3 of the list. The result is the list with five elements [1, 2, 3, 99, 4].

Try it yourself:

Syntax

You can call this method on each list object in Python. Here’s the syntax:

list.insert(index, element)

Arguments

Argument Description
index Integer value representing the position before you want to insert an element
element Object you want to insert into the list.

Video

Code Puzzle

Now you know the basics. Let’s deepen your understanding with a short code puzzle—can you solve it?

# Puzzle
# Puzzle created by Finxter Lee
lst = [1, 3, 4, 5, 6, 7, 8]
lst.insert(1, 2)
print(lst)
# What's the output of this code snippet?

You can check out the solution on the Finxter app.

Examples

Let’s dive into a few more examples:

>>> lst = [1, 2, 3]
>>> lst.insert(0, 99)
>>> lst
[99, 1, 2, 3]
>>> lst.insert(-1, 42)
>>> lst
[99, 1, 2, 42, 3]
>>> lst.insert(100, 0)
>>> lst
[99, 1, 2, 42, 3, 0]

An interesting case is the second one where you use a negative index in the insert() method:

Python List insert() Negative Index

You can use a negative index in the lst.insert(index, element) method. With a negative index you count backwards, starting from the right. In other words, the index -1 stands for the rightmost element in the list. The insert() method inserts the element right in front of the index position. Thus, you get the following behavior where the element is inserted to the second last position:

>>> lst = ["Ann", "Bob", "Alice"]
>>> lst.insert(-1, "Liz")
>>> lst
['Ann', 'Bob', 'Liz', 'Alice']

What happens if you count further, i.e., -2, -3, or even -99? Let’s check:

>>> lst.insert(-2, "Sam")
>>> lst
['Ann', 'Bob', 'Sam', 'Liz', 'Alice']

… and …

>>> lst.insert(-3, "Bob")
>>> lst
['Ann', 'Bob', 'Bob', 'Sam', 'Liz', 'Alice']

… and …

>>> lst.insert(-99, "Hans")
>>> lst
['Hans', 'Ann', 'Bob', 'Bob', 'Sam', 'Liz', 'Alice']

So you can see that every integer index is allowed! If you overshoot (e.g. -99), it will simply insert at the beginning of the list.

Python List insert() At Beginning

The insert() method allows you to add an element at the beginning of a list. Simply use the index 0 in the call lst.insert(0, element) to add element to the beginning of the lst.

Here’s an example:

>>> lst = [1, 2, 3]
>>> lst.insert(0, 99)
>>> lst
[99, 1, 2, 3]

The insert(i, x) method inserts an element x at position i in the list. This way, you can insert an element to each position in the list—even at the first position. Note that if you insert an element at the first position, each subsequent element will be moved by one position. In other words, element i will move to position i+1.

Python List insert() At End

Okay, you can insert an element at every position in the list—just use the first argument to define the insertion index. Consequently, you can “insert” an element at the end of a list by defining an index that’s greater or equal the size of the list. Remember, insert(index, element) inserts element before the element that’s currently at position index. So if you define an index that’s at least the size of the list, you’ll insert the element at the end of the list:

>>> lst = [1, 2, 3, 4, 5, 6]
>>> lst.insert(6, 99)
>>> lst
[1, 2, 3, 4, 5, 6, 99]
>>> lst.insert(100000, 42)
>>> lst
[1, 2, 3, 4, 5, 6, 99, 42]

No matter your concrete choice of the index argument, as long as it’s larger or equal the current size of the list, your element will be inserted at the end of the list.

However, this doesn’t make a lot of sense considering that you can use the append(element) method which adds an element at the end of the list—and is highly efficient (and readable). Read more about the append() method at my detailed blog article.

Here’s an example adding the same elements 99 and 42 to the end of the list:

>>> lst = [1, 2, 3, 4, 5, 6]
>>> lst.append(99)
>>> lst.append(42)
>>> lst
[1, 2, 3, 4, 5, 6, 99, 42]

In Python, there are usually a lot of ways to accomplish the same thing. Using the append() method to add an element to the end of the list is the better way!

Python insert() into Sorted List

How to insert an element into a sorted list (ascending order) and keep the list sorted?

The naive approach is to go over all elements, from first to last, as long as the element to be inserted is still smaller than the current element in the list. As soon as it’s larger, you go back one position and insert it there.

However, the computational complexity of the naive sorted insert algorithm is bad because you need up to n operations to insert an element into a list of n elements.

If you’re interested in the right way of doing it, you can use binary search and the list.insert(i,x) method to insert element x at position i in the list. Here’s the code for the binary search algorithm in Python:

def binary_search(lst, value): lo, hi = 0, len(lst)-1 while lo <= hi: mid = (lo + hi) // 2 if lst[mid] < value: lo = mid + 1 elif value < lst[mid]: hi = mid - 1 else: return mid return -1 l = [3, 6, 14, 16, 33, 55, 56, 89]
x = 56
print(binary_search(l,x))
# 6 (the index of the found element)

Don’t worry if the code looks a bit complicated!

You can find a more detailed discussion of the binary search algorithm at my detailed tutorial on the Finxter blog.

Python List insert() Multiple Elements

How can you insert multiple elements into a list? Just call the insert() method multiple times—once for each element to be inserted! But be careful: you must reverse the order of the elements to be inserted first if you keep the insert position constant. Here’s what I mean:

>>> lst = [1, 2, 3, 4]
>>> insert = [42, 99]
>>> insert.reverse()
>>> for el in insert: lst.insert(2, el) >>> lst
[1, 2, 42, 99, 3, 4]

You want to insert elements 42 and 99 at position 2 of the list lst, in that order. If you’d just iterate over both elements, you’d first insert element 42 before index 2. Now, element 42 obtains the position 2 in the list. Next, you’d insert element 99 before position 2. Now, element 99 obtains position 2 in the list. So basically, you’ve reversed the original order of the elements to be inserted. Therefore, you have to call the reverse() method first before inserting the elements into the list.

There’s really no better alternative. Of course, you could use list concatenation but that is not as efficient because you’d create a new list rather than modify an existing list:

>>> lst = [1, 2, 3, 4]
>>> insert = [42, 99]
>>> lst = lst[:2] + insert + lst[2:]
>>> lst
[1, 2, 42, 99, 3, 4]

This may be more readable but it’s not as efficient because list concatenation creates a new list each time it’s used. If you need to refresh your basic Python slicing skills (e.g. in the operation lst[:2]), check out this detailed blog tutorial.

Python List insert() Complexity

Time Complexity: The insert() method has constant time complexity O(1) no matter the number of elements in the list. The reason is that Python lists are implemented with variable-length array lists so accessing a certain position is fast. Also inserting an element into the array list is fast because you only have to modify the pointers of the preceding and following elements in the list.

Python List insert() vs append()

The difference between the append() and the insert() method is the following:

  • the append(x) method adds new element x to the end of the list, and
  • the insert(i, x) method adds new element x at position i in the list. It shifts all subsequent elements one position to the right.

Here’s an example showing both append() and insert() methods in action:

>>> l = [1, 2, 3]
>>> l.append(99)
>>> l
[1, 2, 3, 99]
>>> l.insert(2, 42)
>>> l
[1, 2, 42, 3, 99]

Both methods help you add new elements to the list. But you may ask:

Which is faster, append() or insert()?

All things being equal, the append() method is significantly faster than the insert() method.

Here’s a small script that shows that the append() method has a huge performance advantage over the insert() method when creating a list with 100,000 elements.

import time l1 = []
l2 = [] t1 = time.time() for i in range(100000): l1.append(i) t2 = time.time() for i in range(100000): l2.insert(0,i) t3 = time.time() print("append(): " + str(t2 - t1) + " seconds")
print("insert(): " + str(t3 - t2) + " seconds") # OUTPUT:
# append(): 0.015607357025146484 seconds
# insert(): 1.5420396327972412 seconds

The experiments were performed on my notebook with an Intel(R) Core(TM) i7-8565U 1.8GHz processor (with Turbo Boost up to 4.6 GHz) and 8 GB of RAM.

Alternatives: Python List append() vs extend()

Instead of inserting an element, you can also add a single element to the end of the list using the append() method or even adding multiple elements to the end of the list using the extend() method.

What’s the difference?

I shot a small video explaining the difference and which method is faster, too:

The method list.append(x) adds element x to the end of the list.

The method list.extend(iter) adds all elements in iter to the end of the list.

The difference between append() and extend() is that the former adds only one element and the latter adds a collection of elements to the list.

You can see this in the following example:

>>> l = []
>>> l.append(1)
>>> l.append(2)
>>> l
[1, 2]
>>> l.extend([3, 4, 5])
>>> l
[1, 2, 3, 4, 5]

In the code, you first add integer elements 1 and 2 to the list using two calls to the append() method. Then, you use the extend method to add the three elements 3, 4, and 5 in a single call of the extend() method.

Which method is faster — extend() vs append()?

To answer this question, I’ve written a short script that tests the runtime performance of creating large lists of increasing sizes using the extend() and the append() methods.

Our thesis is that the extend() method should be faster for larger list sizes because Python can append elements to a list in a batch rather than by calling the same method again and again.

I used my notebook with an Intel(R) Core(TM) i7-8565U 1.8GHz processor (with Turbo Boost up to 4.6 GHz) and 8 GB of RAM.

Then, I created 100 lists with both methods, extend() and append(), with sizes ranging from 10,000 elements to 1,000,000 elements. As elements, I simply incremented integer numbers by one starting from 0.

Here’s the code I used to measure and plot the results: which method is faster—append() or extend()?

import time def list_by_append(n): '''Creates a list & appends n elements''' lst = [] for i in range(n): lst.append(n) return lst def list_by_extend(n): '''Creates a list & extends it with n elements''' lst = [] lst.extend(range(n)) return lst # Compare runtime of both methods
list_sizes = [i * 10000 for i in range(100)]
append_runtimes = []
extend_runtimes = [] for size in list_sizes: # Get time stamps time_0 = time.time() list_by_append(size) time_1 = time.time() list_by_extend(size) time_2 = time.time() # Calculate runtimes append_runtimes.append((size, time_1 - time_0)) extend_runtimes.append((size, time_2 - time_1)) # Plot everything
import matplotlib.pyplot as plt
import numpy as np append_runtimes = np.array(append_runtimes)
extend_runtimes = np.array(extend_runtimes) print(append_runtimes)
print(extend_runtimes) plt.plot(append_runtimes[:,0], append_runtimes[:,1], label='append()')
plt.plot(extend_runtimes[:,0], extend_runtimes[:,1], label='extend()') plt.xlabel('list size')
plt.ylabel('runtime (seconds)') plt.legend()
plt.savefig('append_vs_extend.jpg')
plt.show()

The code consists of three high-level parts:

  • In the first part of the code, you define two functions list_by_append(n) and list_by_extend(n) that take as input argument an integer list size n and create lists of successively increasing integer elements using the append() and extend() methods, respectively.
  • In the second part of the code, you compare the runtime of both functions using 100 different values for the list size n.
  • In the third part of the code, you plot everything using the Python matplotlib library.

Here’s the resulting plot that compares the runtime of the two methods append() vs extend(). On the x axis, you can see the list size from 0 to 1,000,000 elements. On the y axis, you can see the runtime in seconds needed to execute the respective functions.

The resulting plot shows that both methods are extremely fast for a few tens of thousands of elements. In fact, they are so fast that the time() function of the time module cannot capture the elapsed time.

But as you increase the size of the lists to hundreds of thousands of elements, the extend() method starts to win:

For large lists with one million elements, the runtime of the extend() method is 60% faster than the runtime of the append() method.

The reason is the already mentioned batching of individual append operations.

However, the effect only plays out for very large lists. For small lists, you can choose either method. Well, for clarity of your code, it would still make sense to prefer extend() over append() if you need to add a bunch of elements rather than only a single element.

Python List insert() Returns None

The return value of the insert() method is None. The return value of the insert() method is not a modified list with the added elements. Assuming this is a common source of mistakes.

Here’s such an error where the coder wrongly assumed this:

>>> lst = [1, 2].insert(1, 99)
>>> lst[0]
Traceback (most recent call last): File "<pyshell#16>", line 1, in <module> lst[0]
TypeError: 'NoneType' object is not subscriptable

It doesn’t make sense to assign the result of the insert() method to another variable—because it’s always None. Instead, the insert() method changes a list object without creating (and returning) a new list.

Here’s the correct version of the same code:

>>> lst = [1, 2]
>>> lst.insert(1, 99)
>>> lst[1]
99

Now, you change the list object itself by calling the insert() method on it. You through away the None return value because it’s not needed.

Python List insert() Return New List

If you use the lst.insert(index, element) operation, you add the element to the existing list lst. But what if you want to create a new list where all elements were added?

The answer is simply to use the list concatenation operation lst[:index] + [element] + lst[index:] which creates a new list each time it is used. The original list lst will not be affected by the list concatenation operation.

Here’s an example that shows that the insert() method only modifies an existing list:

>>> lst_1 = [1, 2, 3]
>>> lst_2 = lst_1.insert(1, 42)
>>> lst_1
[1, 42, 2, 3]
>>> lst_2
None

And here’s the example that shows how to create a new list inserting element 42 at index 2:

>>> lst_1 = [1, 2, 3]
>>> lst_2 = lst_1[:1] + [42] + lst_1[1:]
>>> lst_1
[1, 2, 3]
>>> lst_2
[1, 42, 2, 3]

By using the list concatenation operation, you can create a new list rather than inserting the element into an existing list.

Python List insert() Thread Safe

Do you have a multiple threads that access your list at the same time? Then you need to be sure that the list operations (such as insert()) are actually thread safe.

In other words: can you call the insert() operation in two threads on the same list at the same time? (And can you be sure that the result is meaningful?)

The answer is yes (if you use the cPython implementation). The reason is Python’s global interpreter lock that ensures that a thread that’s currently working on it’s code will first finish its current basic Python operation as defined by the cPython implementation. Only if it terminates with this operation will the next thread be able to access the computational resource. This is ensured with a sophisticated locking scheme by the cPython implementation.

The only thing you need to know is that each basic operation in the cPython implementation is atomic. It’s executed wholly and at once before any other thread has the chance to run on the same virtual engine. Therefore, there are no race conditions. An example for such a race condition would be the following: the first thread reads a value from the list, the second threads overwrites the value, and the first thread overwrites the value again invalidating the second thread’s operation.

All cPython operations are thread-safe. But if you combine those operations into higher-level functions, those are not generally thread safe as they consist of many (possibly interleaving) operations.

Where to Go From Here?

The list.insert(index, element) method inserts an element to the end of the list before the given index position.

You’ve learned the ins and outs of this important Python list method.

If you keep struggling with those basic Python commands and you feel stuck in your learning progress, I’ve got something for you: Python One-Liners (Amazon Link).

In the book, I’ll give you a thorough overview of critical computer science topics such as machine learning, regular expression, data science, NumPy, and Python basics—all in a single line of Python code!

Get the book from Amazon!

OFFICIAL BOOK DESCRIPTION: Python One-Liners will show readers how to perform useful tasks with one line of Python code. Following a brief Python refresher, the book covers essential advanced topics like slicing, list comprehension, broadcasting, lambda functions, algorithms, regular expressions, neural networks, logistic regression and more. Each of the 50 book sections introduces a problem to solve, walks the reader through the skills necessary to solve that problem, then provides a concise one-liner Python solution with a detailed explanation.

Posted on Leave a comment

Python List extend() Method

How can you not one but multiple elements to a given list? Use the extend() method in Python. This tutorial shows you everything you need to know to help you master an essential method of the most fundamental container data type in the Python programming language.

Definition and Usage

The list.extend(iter) method adds all elements in the argument iterable iter to an existing list.

Here’s a short example:

>>> lst = [1, 2, 3]
>>> lst.extend([4, 5, 6])
>>> lst
[1, 2, 3, 4, 5, 6]

In the first line of the example, you create the list lst. You then append the integers 4, 5, 6 to the end of the list using the extend() method. The result is the list with six elements [1, 2, 3, 4, 5, 6].

Try it yourself:

Syntax

You can call this method on each list object in Python. Here’s the syntax:

list.extend(iterable)

Arguments

Argument Description
iterable All the elements of the iterable will be added to the end of the list—in the order of their occurrence.

Video

Code Puzzle

Now you know the basics. Let’s deepen your understanding with a short code puzzle—can you solve it?

# Puzzle
# Author: Finxter Lee
lst1 = [1, 2, 3]
lst2 = [4, 5, 6]
lst1.append(lst2) lst3 = [1, 2, 3]
lst4 = [4, 5, 6]
lst3.extend(lst4) print(lst1 == lst3)
# What's the output of this code snippet?

You can check out the solution on the Finxter app. (I know it’s tricky!)

Examples

Let’s dive into a few more examples:

>>> lst = [1, 2, 3]
>>> lst.extend({32, 42})
>>> lst
[1, 2, 3, 32, 42]
>>> lst.extend((1, 2))
>>> lst
[1, 2, 3, 32, 42, 1, 2]
>>> lst.extend(range(10,13))
>>> lst
[1, 2, 3, 32, 42, 1, 2, 10, 11, 12]
>>> lst.extend(1)
Traceback (most recent call last): File "<pyshell#10>", line 1, in <module> lst.extend(1)
TypeError: 'int' object is not iterable
>>> 

You can see that the extend() method allows for all sorts of iterables: lists, sets, tuples, and even range objects. But what it doesn’t allow is an integer argument. Why? Because the integer argument isn’t an iterable—it doesn’t make sense to “iterate over all values in an integer”.

Python List extend() At The Beginning

What if you want to use the extend() method at the beginning: you want to “add” a number of elements just before the first element of the list.

Well, you should work on your terminology for starters. But if you insist, you can use the insert() method instead.

Here’s an example:

>>> lst = [1, 2, 3]
>>> lst.insert(0, 99)
>>> lst
[99, 1, 2, 3]

The insert(i, x) method inserts an element x at position i in the list. This way, you can insert an element to each position in the list—even at the first position. Note that if you insert an element at the first position, each subsequent element will be moved by one position. In other words, element i will move to position i+1.

Python List extend() vs +

List concatenation operator +: If you use the + operator on two integers, you’ll get the sum of those integers. But if you use the + operator on two lists, you’ll get a new list that is the concatenation of those lists.

l1 = [1, 2, 3]
l2 = [4, 5, 6]
l3 = l1 + l2
print(l3)

Output:

[1, 2, 3, 4, 5, 6]

The problem with the + operator for list concatenation is that it creates a new list for each list concatenation operation. This can be very inefficient if you use the + operator multiple times in a loop.

How fast is the + operator really? Here’s a common scenario how people use it to add new elements to a list in a loop. This is very inefficient:

import time start = time.time() l = []
for i in range(100000): l = l + [i] stop = time.time() print("Elapsed time: " + str(stop - start))

Output:

Elapsed time: 14.438847541809082

The experiments were performed on my notebook with an Intel(R) Core(TM) i7-8565U 1.8GHz processor (with Turbo Boost up to 4.6 GHz) and 8 GB of RAM.

I measured the start and stop timestamps to calculate the total elapsed time for adding 100,000 elements to a list.

The result shows that it takes 14 seconds to perform this operation.

This seems slow (it is!). So let’s investigate some other methods to concatenate and their performance:

Python List extend() Performance

Here’s a similar example that shows how you can use the extend() method to concatenate two lists l1 and l2.

l1 = [1, 2, 3]
l2 = [4, 5, 6]
l1.extend(l2)
print(l1)

Output:

[1, 2, 3, 4, 5, 6]

But is it also fast? Let’s check the performance!

Performance:

I performed a similar experiment as before for the list concatenation operator +.

import time start = time.time() l = []
l.extend(range(100000)) stop = time.time() print("Elapsed time: " + str(stop - start))

Output:

Elapsed time: 0.0

I measured the start and stop timestamps to calculate the total elapsed time for adding 100,000 elements to a list.

The result shows that it takes negligible time to run the code (0.0 seconds compared to 0.006 seconds for the append() operation above).

The extend() method is the most concise and fastest way to concatenate lists.

Python List append() vs extend()

I shot a small video explaining the difference and which method is faster, too:

The method list.append(x) adds element x to the end of the list.

The method list.extend(iter) adds all elements in iter to the end of the list.

The difference between append() and extend() is that the former adds only one element and the latter adds a collection of elements to the list.

You can see this in the following example:

>>> l = []
>>> l.append(1)
>>> l.append(2)
>>> l
[1, 2]
>>> l.extend([3, 4, 5])
>>> l
[1, 2, 3, 4, 5]

In the code, you first add integer elements 1 and 2 to the list using two calls to the append() method. Then, you use the extend method to add the three elements 3, 4, and 5 in a single call of the extend() method.

Which method is faster — extend() vs append()?

To answer this question, I’ve written a short script that tests the runtime performance of creating large lists of increasing sizes using the extend() and the append() methods.

Our thesis is that the extend() method should be faster for larger list sizes because Python can append elements to a list in a batch rather than by calling the same method again and again.

I used my notebook with an Intel(R) Core(TM) i7-8565U 1.8GHz processor (with Turbo Boost up to 4.6 GHz) and 8 GB of RAM.

Then, I created 100 lists with both methods, extend() and append(), with sizes ranging from 10,000 elements to 1,000,000 elements. As elements, I simply incremented integer numbers by one starting from 0.

Here’s the code I used to measure and plot the results: which method is faster—append() or extend()?

import time def list_by_append(n): '''Creates a list & appends n elements''' lst = [] for i in range(n): lst.append(n) return lst def list_by_extend(n): '''Creates a list & extends it with n elements''' lst = [] lst.extend(range(n)) return lst # Compare runtime of both methods
list_sizes = [i * 10000 for i in range(100)]
append_runtimes = []
extend_runtimes = [] for size in list_sizes: # Get time stamps time_0 = time.time() list_by_append(size) time_1 = time.time() list_by_extend(size) time_2 = time.time() # Calculate runtimes append_runtimes.append((size, time_1 - time_0)) extend_runtimes.append((size, time_2 - time_1)) # Plot everything
import matplotlib.pyplot as plt
import numpy as np append_runtimes = np.array(append_runtimes)
extend_runtimes = np.array(extend_runtimes) print(append_runtimes)
print(extend_runtimes) plt.plot(append_runtimes[:,0], append_runtimes[:,1], label='append()')
plt.plot(extend_runtimes[:,0], extend_runtimes[:,1], label='extend()') plt.xlabel('list size')
plt.ylabel('runtime (seconds)') plt.legend()
plt.savefig('append_vs_extend.jpg')
plt.show()

The code consists of three high-level parts:

  • In the first part of the code, you define two functions list_by_append(n) and list_by_extend(n) that take as input argument an integer list size n and create lists of successively increasing integer elements using the append() and extend() methods, respectively.
  • In the second part of the code, you compare the runtime of both functions using 100 different values for the list size n.
  • In the third part of the code, you plot everything using the Python matplotlib library.

Here’s the resulting plot that compares the runtime of the two methods append() vs extend(). On the x axis, you can see the list size from 0 to 1,000,000 elements. On the y axis, you can see the runtime in seconds needed to execute the respective functions.

The resulting plot shows that both methods are extremely fast for a few tens of thousands of elements. In fact, they are so fast that the time() function of the time module cannot capture the elapsed time.

But as you increase the size of the lists to hundreds of thousands of elements, the extend() method starts to win:

For large lists with one million elements, the runtime of the extend() method is 60% faster than the runtime of the append() method.

The reason is the already mentioned batching of individual append operations.

However, the effect only plays out for very large lists. For small lists, you can choose either method. Well, for clarity of your code, it would still make sense to prefer extend() over append() if you need to add a bunch of elements rather than only a single element.

Python Append List to Another List

To append list lst_1 to another list lst_2, use the lst_2.extend(lst_1) method. Here’s an example:

>>> lst_1 = [1, 2, 3]
>>> lst_2 = [4, 5, 6]
>>> lst_2.extend(lst_1)
>>> lst_2
[4, 5, 6, 1, 2, 3]

Python List extend() Returns None

The return value of the extend() method is None. The return value of the extend() method is not a list with the added elements. Assuming this is a common source of mistakes.

Here’s such an error where the coder wrongly assumed this:

>>> lst = [1, 2].extend([3, 4])
>>> lst[0]
Traceback (most recent call last): File "<pyshell#16>", line 1, in <module> lst[0]
TypeError: 'NoneType' object is not subscriptable

It doesn’t make sense to assign the result of the extend() method to another variable—because it’s always None. Instead, the extend() method changes a list object without creating (and returning) a new list.

Here’s the correct version of the same code:

>>> lst = [1, 2]
>>> lst.extend([3, 4])
>>> lst[0]
1

Now, you change the list object itself by calling the extend() method on it. You through away the None return value because it’s not needed.

Python List Concatenation

So you have two or more lists and you want to glue them together. This is called list concatenation. How can you do that?

These are six ways of concatenating lists (detailed tutorial here):

  1. List concatenation operator +
  2. List append() method
  3. List extend() method
  4. Asterisk operator *
  5. Itertools.chain()
  6. List comprehension
a = [1, 2, 3]
b = [4, 5, 6] # 1. List concatenation operator +
l_1 = a + b # 2. List append() method
l_2 = [] for el in a: l_2.append(el) for el in b: l_2.append(el) # 3. List extend() method
l_3 = []
l_3.extend(a)
l_3.extend(b) # 4. Asterisk operator *
l_4 = [*a, *b] # 5. Itertools.chain()
import itertools
l_5 = list(itertools.chain(a, b)) # 6. List comprehension
l_6 = [el for lst in (a, b) for el in lst]

Output:

'''
l_1 --> [1, 2, 3, 4, 5, 6]
l_2 --> [1, 2, 3, 4, 5, 6]
l_3 --> [1, 2, 3, 4, 5, 6]
l_4 --> [1, 2, 3, 4, 5, 6]
l_5 --> [1, 2, 3, 4, 5, 6]
l_6 --> [1, 2, 3, 4, 5, 6] '''

What’s the best way to concatenate two lists?

If you’re busy, you may want to know the best answer immediately. Here it is:

To concatenate two lists l1, l2, use the l1.extend(l2) method which is the fastest and the most readable.

To concatenate more than two lists, use the unpacking (asterisk) operator [*l1, *l2, ..., *ln].

However, you should avoid using the append() method for list concatenation because it’s neither very efficient nor concise and readable.

Python List extend() Unique – Add If Not Exists

A common question is the following:

How can you add or append elements to a list, but only if they don’t already exist in the list?

When ignoring any performance issues, the answer is simple: use an if condition in combination with the membership operation element in list and only append() the element if the result is False (don’t use extend() for this fine-grained method). As an alternative, you can also use the negative membership operation element not in list and add the element if the result is True.

Example: Say, you want to add all elements between 0 and 9 to a list of three elements. But you don’t want any duplicates. Here’s how you can do this:

lst = [1, 2, 3]
for element in range(10): if element not in lst: lst.append(element)	

Resulting list:

[1, 2, 3, 0, 4, 5, 6, 7, 8, 9]

You add all elements between 0 and 9 to the list but only if they aren’t already present. Thus, the resulting list doesn’t contain duplicates.

But there’s a problem: this method is highly inefficient!

In each loop iteration, the snippet element not in lst searches the whole list for the current element. For a list with n elements, this results in n comparisons, per iteration. As you have n iterations, the runtime complexity of this code snippet is quadratic in the number of elements.

Can you do better?

Sure, but you need to look beyond the list data type: Python sets are the right abstraction here. If you need to refresh your basic understanding of the set data type, check out my detailed set tutorial (with Harry Potter examples) on the Finxter blog.

Why are Python sets great for this? Because they don’t allow any duplicates per design: a set is a unique collection of unordered elements. And the runtime complexity of the membership operation is not linear in the number of elements (as it’s the case for lists) but constant!

Example: Say, you want to add all elements between 0 and 9 to a set of three elements. But you don’t want any duplicates. Here’s how you can do this with sets:

s = {1, 2, 3}
for element in range(10): s.add(element) print(s)

Resulting set:

{0, 1, 2, 3, 4, 5, 6, 7, 8, 9}

The set doesn’t allow for duplicate entries so the elements 1, 2, and 3 are not added twice to the set.

You can even make this code more concise:

s = {1, 2, 3}
s = s.union(range(10)) print(s)

Output:

{0, 1, 2, 3, 4, 5, 6, 7, 8, 9}

The union method creates a new set that consists of all elements in both operands.

Now, you may want to have a list as a result and not a set. The solution is simple: convert the resulting set to a list by using the list(set) conversion method. This has linear runtime complexity and if you call it only once, it doesn’t change the overall runtime complexity of the code snippet (it remains linear in the number of set elements).

Problem: what if you want to maintain the order information and still add all elements that are not already in the list?

The problem with the previous approach is that by converting the list to a set, the order of the list is lost. In this case, I’d advise you to do the following: use two data structures, a list and a set. You use the list to add new elements and keep the order information. You use the set to check membership (constant rather than linear runtime complexity). Here’s the code:

lst = [1, 2, 3]
s = set(lst) for element in range(10): if element not in s: s.add(element) lst.append(element) print(lst)

Resulting list:

[1, 2, 3, 0, 4, 5, 6, 7, 8, 9]

You can see that the resulting list doesn’t contain any duplicates but the order information is maintained. At the same time, the runtime complexity of the code is linear because each loop iteration can be completed in constant time.

The trade-off is that you have to maintain two data structures which results in double the memory overhead. This nicely demonstrates the common inverse relationship between memory and runtime overhead.

Python List extend() Return New List

If you use the lst.extend(iter) operation, you add the elements in iter to the existing list lst. But what if you want to create a new list where all elements were added?

The answer is simply to use the list concatenation operation lst + list(iter) which creates a new list each time it is used. The original list lst will not be affected by the list concatenation operation.

Here’s an example that shows that the extend() method only modifies an existing list:

>>> lst_1 = [1, 2, 3]
>>> lst_2 = lst_1.extend([42, 99])
>>> lst_1
[1, 2, 3, 42, 99]

And here’s the example that shows how to create a new list as you add elements 42 and 99 to a list:

>>> lst_3 = [1, 2, 3]
>>> lst_4 = lst_3 + [42, 99]
>>> lst_3
[1, 2, 3]

By using the list concatenation operation, you can create a new list rather than appending the element to an existing list.

Python List extend() Time Complexity, Memory, and Efficiency

Time Complexity: The extend() method has linear time complexity O(n) in the number of elements n to be added to the list. Adding one element to the list requires only a constant number of operations—no matter the size of the list.

Space Complexity: The extend() method has linear space complexity O(n) in the number of elements n to be added to the list. The operation itself needs only a constant number of bytes for the involved temporary variables. The memory overhead does not depend on the size of the list.

If you’re interested in the most performant ways to add multiple elements to a list, you can see extensive performance tests in this tutorial on the Finxter blog.

Python List extend() at Index

If you want to insert a whole list at a certain position and create a new list by doing so, I’d recommend to use Python slicing. Check out this in-depth blog tutorial that’ll show you everything you need to know about slicing.

Here’s the code that shows how to create a new list after inserting a list at a certain position:

>>> lst = [33, 44, 55]
>>> lst[:2] + [99, 42] + lst[2:]
[33, 44, 99, 42, 55]

Again, you’re using list concatenation to create a new list with element 99 inserted at position 2. Note that the slicing operations lst[:2] and lst[2:] create their own shallow copy of the list.

Python List extend() Thread Safe

Do you have a multiple threads that access your list at the same time? Then you need to be sure that the list operations (such as extend()) are actually thread safe.

In other words: can you call the extend() operation in two threads on the same list at the same time? (And can you be sure that the result is meaningful?)

The answer is yes (if you use the cPython implementation). The reason is Python’s global interpreter lock that ensures that a thread that’s currently working on it’s code will first finish its current basic Python operation as defined by the cPython implementation. Only if it terminates with this operation will the next thread be able to access the computational resource. This is ensured with a sophisticated locking scheme by the cPython implementation.

The only thing you need to know is that each basic operation in the cPython implementation is atomic. It’s executed wholly and at once before any other thread has the chance to run on the same virtual engine. Therefore, there are no race conditions. An example for such a race condition would be the following: the first thread reads a value from the list, the second threads overwrites the value, and the first thread overwrites the value again invalidating the second thread’s operation.

All cPython operations are thread-safe. But if you combine those operations into higher-level functions, those are not generally thread safe as they consist of many (possibly interleaving) operations.

Where to Go From Here?

The list.extend(iter) method adds all elements in iter to the end of the list (in the order of their appearance).

You’ve learned the ins and outs of this important Python list method.

If you keep struggling with those basic Python commands and you feel stuck in your learning progress, I’ve got something for you: Python One-Liners (Amazon Link).

In the book, I’ll give you a thorough overview of critical computer science topics such as machine learning, regular expression, data science, NumPy, and Python basics—all in a single line of Python code!

Get the book from Amazon!

OFFICIAL BOOK DESCRIPTION: Python One-Liners will show readers how to perform useful tasks with one line of Python code. Following a brief Python refresher, the book covers essential advanced topics like slicing, list comprehension, broadcasting, lambda functions, algorithms, regular expressions, neural networks, logistic regression and more. Each of the 50 book sections introduces a problem to solve, walks the reader through the skills necessary to solve that problem, then provides a concise one-liner Python solution with a detailed explanation.

Posted on Leave a comment

How to Go Full-Time ($3000/m) as a Python Freelancerï»ż


 Without Working Full-Time Hours!         

In this article, you are going to learn my exact strategy how to earn $3000 per month as a Python freelancer without actually working full-time and without sacrificing time with your family!

This article is based on the following webinar I gave to my community of Python coders. You can also watch the webinar if you prefer video (100% Free)!

At the end of this article, you will know the exact steps you need to perform to become a well-paid Python freelancer. So stick around, if you like the idea of working part-time as a Python freelancer receiving a full-time income.

Are you broke?

Especially in the US, but also in Europe, many people are broke. What is the definition of broke? You don’t have any leftover money to account for special circumstances. It’s that easy.

It is reported that the average debt of college students is $27,225. But is this debt really a problem? The popular consultant Dan Lok (he calls himself world’s highest paid consultant), has a somehow different view on debt. Let me read one of his statements for you:

“You don’t have a debt problem, you have an income problem. You don’t have an income problem, you have a SKILL problem!”.

Because if you are skilled, you can always sell your service at a higher rate.

Suppose there are two employees: Bob and Alice. Bob has $10,000 in assets and a yearly income of $31,524. Bob is debt free. So many people would consider Bobs financial state as convenient (when in fact he is broke). Alice on the other hand has an inconvenient $100,000 in debt. BUT, Alice can sell her skills at a rate of $131,000 per year. What happens after two years? Alice can easily outsave Bob by tens of thousands of Dollars – even if she starts with a lot of debt. You can also see this scenario on the right-hand figure. The higher the skills, the more you can expect to earn.

How much money do you earn per hour?

Do you actually know how much money you currently earn? An average employee works for 1811 hours per year. As an employee it is very hard to earn more than $90,000. In fact, the median wage of all workers in the US is $24. For example, if you are a student, you are earning -$4 per hour, school teachers earn $37 per hour. If you push yourself very hard and become an extremely skilled employee, you might become a university professor with a yearly salary of $98,423. This is $54 per hour. First, know your hourly wage. Second, improve it.

Develop your new high-income skill: Python development!

So how to increase your value to the marketplace? This article and the associated free webinar have two goals:

  • First, creating a new high-income skill for you: Python development.
  • Second, show you how and why to switch the road from being a full-time employee to being at least part-time self-employed.

On the graphic, you can see the income distribution of Python freelancers. The median wage of a Python freelancer is $51!

Let me repeat this: the median wage of a Python freelancer is $51! This means that an average, self-employed Python freelancer easily reaches the income level of a university professor. Think about this: can you become a university professor? It’s totally up to you to answer this question. But you can certainly become average-skilled Python freelancer, can’t you?

About me

You are probably wondering why I am qualified to teach you this topic. Let me quickly introduce myself so that we can go to a more personal level. I’m currently in a transition phase from being an employed doctoral researcher working at the university in Germany (for maybe $24 per hour) to becoming self-employed in the Python education sector. My research included processing large graph data sets (like the web document graph). However, for a few months now, I have parental leave caring about my two children. In the evenings and weekends, I create courses, write books (like my newest book “Coffee Break Python“, and create code puzzles for my Python learning app Finxter.com).

Why to become Python freelancer?

How would your life look like if you only needed to work part-time as a Python freelancer doing projects you like?

I have already stressed the first point: Imagine you work from home and see your kids growing up and having the flexibility to spend more quality time with your wife or husband. But there is also an equally important point if you need to take care of your family. And that is: you can increase your value to the marketplace. And there is virtually no upper limit of your hourly rate. If you are and employee you basically have an upper limit – you have seen that a professor earns $53 per hour. But I have seen many freelancers earning $100-$200 per hour. It all depends on how expensive you can make yourself for the marketplace.

For some of my students, being a Python freelancer is also a lifestyle choice. For example one of my students is successfully employed in the US and earns good money there. But his dream is to go back to India to his family working as a Python freelancer. Doing this, he earns dollars and pays rupees for his living expenses. Why not enjoying the benefits of globalization?

It’s also good to diversify your income streams. You could spend one day per month to earn $400-$500 per month as an additional source of income that you can spend for you or your family (or even safe it for later).

Finally, being a Python freelancer is also a lot of fun. You have to stretch your abilities regarding Python but also regarding soft skills such as communication ability and language skills. If you are not a native speaker (like me), it’s very nice to improve your skills that way while you are getting paid for doing good work for other people.

Can you already see yourself working as a Python freelancer?

How to sell your Python skills for money ($$$)?

There are basically three ways of becoming a Python freelancer. The first is being a consultant working for a big company. The second is to be a freelancer working on a platform such as Upwork or Fiverr doing mostly smaller tasks. The third option is to create your own platform that you own (for example, creating your own website and drive traffic to it). I call it the hybrid approach because you have some elements of both previous options.

Now, we will dive a bit deeper into each of these options.

Career path 1: Work for a big client as a consultant

The first way of becoming self-employed is to work for one or a few big clients as a consultant. Working as a consultant has some advantages. You work in a business-to-business setting which allows you to tap into large earning potentials. There is a lot of money in business-to-business — especially if you focus on high-ticket sales.

However, many people I know working as consultants heavily rely on one or two big clients. They are not diversified at all. And if you work for a single big company, you will have very limited freedom in terms of your projects and working conditions. Many Python consultants report that the pressure is hard and it feels like working as an employee.

This is not the focus of this article, however. So if you prefer to work as a consultant, I would NOT recommend that you take this specific course.

Career path 2: Sell your micro-services as a freelancer

The second way — and this is the focus of this article and also the free webinar which comes with this article — is to sell your services as a Python freelancer on existing freelancing platforms such as Upwork and Fiverr.

These platforms are very convenient. You could start today creating your freelancing account and start with your first gig in the evening. Then you solve the jobs (which takes maybe a week or even only a day). You are very flexible, you can learn fast and without too much pain or commitment.

Also, you have a small feedback cycle: you can go over the whole cycle of acquiring a client, doing the work, finishing the job, and getting reviewed. Over time, you will become an expert in the soft skills and communication part, and you will learn about many different areas where your Python skills can help people out.

It’s the perfect option of getting a foot in the door and to converge, job-by-job, to your final specializations (in case you want to specialize to increase your earning potential on the freelancing market).

Finally, there is no startup overhead. Marketing is simple. We will learn later that you need to have two things: an attractive profile and good ratings.

Of course, nothing is perfect. When working as a freelancer, you don’t own the platforms. You don’t own the clients. As a default, if you don’t do anything against it (later we will see that you can also acquire the clients from the platform and creating your own database of clients to mitigate this last point. Also, these platforms get their significant cut of 25% for each job. That’s quite something.

So overall, working as a freelancer on these platforms is all about getting testimonials, skills, and experiences.

Career path 3: sell your services on your own platform

Finally, the third option is also the one with the highest income potential. You create your own platform (for example setting up a WordPress page where you offer your details and service offerings). You retain 100% of the control over your income, your projects, and even your testimonials. The sky’s the limit (you can earn hundreds of dollars per hour, if you are smart about it).

However, there is also the need for you to market your services. You need to install a marketing funnel. For example, you attract potential customers using Facebook ads. Then, you set up a landing page with a lead magnet so that they are motivated giving you your email address. Finally, you will nurture your leads sending them tons of value via email and build a relationship with them.

While this seems to be complex, it is definitely the most profitable long-term strategy. However, in the short term, it’s much better for most people to gain experiences and testimonials on the freelancing platforms and then gradually shift their focus towards their own platform as they get to know more and more clients.

So these are the three potential career paths for you. This article and the associated webinar focus on the second option as a starting point.

A simple formula for success

This article is about how to go full-time as a Python freelancer without actually working fulltime hours. The success formula is simple. You start working as a Python freelancer now (no matter your current skill level). Then, you keep increasing your value to the marketplace until you have reached at least average Python freelance level. At this point, you will charge $51 per hour.

Would you consider a daily income of $100 as a fulltime income? According to US statistics, earning $3000 per month is already above the median salary. Now, the plan is to work for two hours on your core freelancing activities. The rest of your time you are free to spend with your family, for rest, learning, or finding even better freelancing jobs. That’s it. The strategy is simple but none the less effective. It provides you a clear and manageable path to your new freelancing lifestyle.

The top-3 secrets to earn more money as a Python freelancer on Upwork

How can you increase your value to the marketplace such that you can easily work at average Python freelancing level? What’s the magic key that will allow you to open the doors to your dream clients?

Next, I will give you 3 secrets how you can connect with your clients.

First, use research insights of psychology to build trust. Second, become a specialist rather tan a generalist. Third, leverage network effects.

Secret #1: earn trust

The key is to earn trust and to be attractive. Clients pay more and you will get the better jobs if you are trustworthy and attractive to them. I made a small experiment and searched for the keyword “Python” on the Upwork.com freelancing platform. All proposed freelancers had a job satisfaction rate of 100%.

So how to earn trust? You collect positive ratings. The more ratings you have the better. And the better the rating the better. If you buy properties in the real estate sector, it’s all about location. Trust me, in the freelancing sector, it’s all about ratings. You NEED to engineer your ratings. If you have good ratings, you will always find jobs, no matter how good your external achievements are. You don’t even need an academic degree, you can find the best jobs if you have good ratings. With good ratings, you will always find good, well-paid and attractive jobs. Rating is king.

How to actually get good ratings? We have seen that good ratings are important. There are five basic ways.

  • The first way is communication: be very responsive, be very positive, be a yes-man and be generous with your offers.
  • The second way is to acquire a lot of Python skills (and this is the focus on this article).
  • The third way is to overdeliver. Always. If your task is to give him 100 Python puzzles and you send him 110 Python puzzles, you can almost be sure to get the 5-star rating on the platform. You not only delivered what he asked you to deliver, but you OVERdelivered the task. This is a simple but effective 3-step way to get great ratings.
  • The fourth way is a very important and underestimated point: the reciprocity rule. If you give something away, the receiving person will feel the obligation to give back to you. That’s why they have free food in supermarkets. I have hired many freelancers for my website finxter.com and some of them were really smart. When applying for the project, they just gave me something for free. For example, the project was “develop 100 Python puzzles” and they just gave me 1-3 Python puzzles for free. I was feeling the strong urge to give back to those freelancers by hiring them (I even wanted to hire ALL of them to not miss out on giving back to them). This is a powerful mindset: give first, then you will receive.
  • The fifth way is the following: on some platforms like Upwork, you can complete small Python tests. Certificates go a long way building trust with your clients. You can also solve Python puzzles and download your personal certificate on our Python online learning application Finxter.com.

Secret #2: Money flows to specialists!

There are other tricks that will impact your success on these platforms. One is the specificity of your skill set. The more specific, the better and the more trustworthy.

If you just sell your services telling them “I can program any Python program you need” then they will not really trust you that you are the expert in any Python field. But if you tell them that you are the go-to expert for anything regarding Python Django Authentication, then they will definitely go for you if they need just that. You are honest and authentic about your specific skill set – these signals confidence and expertise to the clients.

What are the skills that the marketplace seeks? There are some foundations which any good Python freelancer must master. These are basic and complex data types, lambda functions, list comprehension, complexity of data structure access, basic algorithms, keywords, and so on. Knowing about the foundations already qualifies you doing Python freelance jobs.

However, if you want to increase your earning potential, you need to specialize in more advanced knowledge areas. Examples are Machine learning, data analysis, web scraping, or web development (e.g. Django). Each of these area consists of subtopics like scikit-learn, regression analysis, numpy, etc. In each of these specialization, you become more focused toward this specific area which automatically increases your value to the client. But an important observation is also that every specialization builds upon a solid foundation. So don’t be lazy and skip the foundations!

Secret #3: Leverage network effects

Finally, just to motivate you again that it’s all about rating. The Internet follows a universal law: “The winner takes it all”. The rich get richer and the popular people get even more popular. If you are already winning on these platforms, you will win even more. People tend to simply reinforce the decisions of their peers. If all of them gave you 5 stars, most clients will simply default to giving you 5 stars as well. The network effect is a well-researched phenomenon in all kinds of networks like social networks, the web, and also freelancer rating networks.

There are two basic tactics that you can use to leverage this information to earn more money and increase your value to the marketplace.

  • First, focus on your initial jobs. See your initial jobs as investments in your future. Even if you did them for free (and I’m not advocating this), they will be profitable in the future by attracting the better jobs and clients.
  • Second, you should prefer many small jobs over few large jobs – because this way, you will gain your credibility faster (many people subconsciously have the simple heuristic: more jobs & more ratings = better freelancer).

How many skills do you need before starting with your freelancing career?

The short answer is to just start now and figure out how to solve the problems as you go.

You will be paid for your learning time. I have annotated the income scale of Python freelancers with the Python levels you can have. As you can see, if you are just beginning with your Python career, you will — of course — earn less, but you will still earn something, make a lot of experiences and gain practical insights into WHAT to learn and WHERE your knowledge gaps are.

The long answer is: if you don’t feel confident, yet, you can master the Python basics first. You can already specialize in a Python topic. And to gain even more confidence, you can even do some toy projects to learn. One of my secret tips for learning to freelance in Python is to learn with archived freelancing projects. You can already gain practical experience and learn the type of projects that people have paid freelancers for. Still – I would always recommend to just start doing real Python projects and then put in all the effort to earn your five-star rating.

How to learn the Python basics?

My recommendation is that you use a personalized training plan which has a very practical focus. You divide your time into two blocks: one block takes 70% of your LEARNING time. You use this time to work on practical Python projects which can be archived freelancing Python projects that challenge you to go to higher levels. You could even spend this learning time on your dream projects – this is even better because it keeps you highly motivated and engaged. The key is to NOT STOP WORKING ON THESE until you have successfully finished them and created a minimum viable product.

The rest of the time (30%), you will invest in solving Python puzzles, work through Python courses, read Python books. You can see that this is a highly practical approach – I’m talking about your learning time which is mainly practical. The reason is that for any subject you want to acquire or even master, you need to have the practical motivation. You need to open your knowledge gap to see what you don’t know before stuffing things in your brain. Ask any expert on Quora – they will tell you that practice-first is the way to learn Python fast. There is no shortcut.

Puzzle-based learning Python

On the theoretical part, I recommend solving Python puzzles as your main lever for your personal improvement. Python puzzles are a powerful tool to become more and more proficient in reading and understanding Python source code.

What’s a Python puzzle? A Python puzzle is an educative snippet of Python source code that teaches a single computer science concept by activating the learner’s curiosity and involving them in the learning process.

The Python puzzles range from easy to complex – each puzzle will push your theoretical and practical code understanding skills one step further. The puzzle-based learning method is very effective and proven by tens of thousands of online students.

Here is an example of a code puzzle:

What’s the output of this code snippet?

Check your correct solution of this puzzle here.

How would your life change if you developed the high-income skill Python to become a Python freelancer?

In this article, I have shown you a simple way out of the rat race of working 8 hours a day, 5 days a week, for 40 years.

In the free webinar with the title

“How to go full-time ($3000/m) as a Python freelancer — without working full-time hours” (Click to join),

I will give you a detailed training plan such that you can start earning money with your Python skills. I show you a new way of becoming a Python expert that is fun, that challenges you to reach higher levels of code understanding, and that gives you a highly practical tool for developing and sharpening your new high-income skill Python.

Posted on Leave a comment

How to Check Your Python Version?

Simple Answer: To check your Python version, run python --version in your command line or shell.

This general method works across all major operating systems (Windows, Linux, and macOS).


Do you need to google important Python keywords again and again? Simply download this popular Python cheat sheet, print the high-resolution PDF, and pin it to your office wall: 🐍


In the following video, I’ll show you how to check your Python version for each operating system (Windows, macOS, Linux, Ubuntu) and programming framework (Jupyter). Or scroll down to read the step-by-step instructions on how to check your Python version.

The Python version output consists of three numbers major:minor:micro. For example, version 3.7.2 means that

  • the major version is 3,
  • the minor version is 7, and
  • the micro version is 2.

[ATTENTION] Different major versions are NOT fully compatible. Different minor versions are compatible.


“Best Python Book on Market”


For example, you can execute code written in Python 3.6.4 in Python 3.7.2 because they are the same major version — Python 3. But you cannot execute code written in Python 2.7.4 in Python 3.7.2 because they are different major versions.

Note that new minor versions can add changes to the language. For example, in Python 3.8 they introduced the reversed() function with dictionaries. You cannot use the reversed() function in older versions of Python. But the vast majority of the language is the same.

Check Python Version Windows 10 (Exact Steps)

Three steps to check the Python version on your Win 10 operating system:

  1. Open the Powershell application: Press the Windows key to open the start screen. In the search box, type “powershell”. Press enter.
  2. Execute command: type python --version and press enter.
  3. The Python version appears in the next line below your command.

Check Python Version Windows 7 (Exact Steps)

Three steps to check the Python version on your Win 7 operating system.

  1. Open the command prompt application: Press the Windows key to open the start screen. In the search box type “command”. Click on the command prompt application.
  2. Execute command: type python --version and press enter.
  3. The Python version appears in the next line right below your command.

Check Python Version Mac (Exact Steps)

Four steps to check the Python version on your Mac operating system.

  1. Press CMD + Space to open Spotlight.
  2. Type “terminal” and press enter.
  3. Execute command: type python --version or python -V and press enter.
  4. The Python version appears in the next line below your command.

Check Python Version Linux (Exact Steps)

Three steps to check the Python version on your Linux operating system.

  1. Open the terminal application (for example, bash).
  2. Execute command: type in python --version or python -V and press enter.
  3. The Python version appears in the next line below your command.

Check Python Version Ubuntu (Exact Steps)

Four steps to check the Python version on your Ubuntu operating system.

  1. Open Dash: click the upper left symbol.
  2. Open terminal: type “terminal”, click on the terminal app.
  3. Execute command: type python --version or python -V and press enter.
  4. The Python version appears in the next line right below your command.

Check Python Version Jupyter (Exact Steps)

Three steps to check the Python version in a Jupyter notebook.

  1. Open the Jupyter notebook: type jupyter notebook in your terminal/console.
  2. Write the following Python code snippet in a code cell:

from platform import python_version
print(python_version())

3. Execute the script.

As an alternative, you can also use the following Python code snippet to check your Python version in a Jupyter notebook:

>>> import sys
>>> sys.version

Here is a screenshot on my computer:

How to Check Which Python Version Runs Your Script?

Sometimes, you want to check Python’s version in your Python program.

To achieve this, simply import the sys module and print the sys.version attribute to your Python shell:

>>> import sys
>>> print(sys.version)
3.7.2 (tags/v3.7.2:9a3ffc0492, Dec 23 2018, 23:09:28) [MSC v.1916 64 bit (AMD64)]

Import the built-in sys module and print sys.version for human-readable output. 

What are the Different Python Versions?

Python has three main versions: version 1, version 2, and version 3. Version 4 is currently (2019) under development.

Here is the version history from Wikipedia.

  • Python 0.9.0 – February 20, 1991
    • Python 0.9.1 – February 1991
    • Python 0.9.2 – Autumn, 1991
    • Python 0.9.4 – December 24, 1991
    • Python 0.9.5 – January 2, 1992
    • Python 0.9.6 – April 6, 1992
    • Python 0.9.8 – January 9, 1993
    • Python 0.9.9 – July 29, 1993
  • Python 1.0 – January 1994
    • Python 1.2 – April 10, 1995
    • Python 1.3 – October 12, 1995
    • Python 1.4 – October 25, 1996
    • Python 1.5 – December 31, 1997
    • Python 1.6 – September 5, 2000
  • Python 2.0 – October 16, 2000
    • Python 2.1 – April 15, 2001
    • Python 2.2 – December 21, 2001
    • Python 2.3 – July 29, 2003
    • Python 2.4 – November 30, 2004
    • Python 2.5 – September 19, 2006
    • Python 2.6 – October 1, 2008
    • Python 2.7 – July 3, 2010
  • Python 3.0 – December 3, 2008
    • Python 3.1 – June 27, 2009
    • Python 3.2 – February 20, 2011
    • Python 3.3 – September 29, 2012
    • Python 3.4 – March 16, 2014
    • Python 3.5 – September 13, 2015
    • Python 3.6 – December 23, 2016
    • Python 3.7 – June 27, 2018

As there are some significant differences in syntax, you should always install the latest version in Python. Keep yourself updated on the official Python website here.

How to Upgrade to a Newer Version?

If you are not using a virtual environment, go to python.org/downloads to download and install whatever version you need. It’s the easiest way to upgrade Python.

But now you’ll run into the following problem: how do I run a specific Python version? Check out this StackOverflow answer to learn the exact steps.

Or you can make your life easier by using virtual environments. These let you have multiple versions of Python installed on your system. Plus, you can switch between them instantaneously. One option is to use the built-in module venv. If you’re a Data Scientist, the industry standard is Anaconda.

Installing and upgrading different Python versions is easy when you use virtual environments. For a full tutorial of virtual environments, read over our introductory Finxter blog article.

How to Check if Python 3 is Installed?

If you’ve installed multiple installations of Python, running python --version may give you only the version of Python 2. To check which version of Python 3 is installed on your computer, simply run the command python3 --version instead of python --version.

How to Check Python Version – Detailed

Not only does Python have major, minor and micro versions. Each of those versions has further versions, namely the release level and serial.

These are displayed when you run

>>> import sys
>>> sys.version_info
sys.version_info(major=3, minor=8, micro=0, releaselevel='final', serial=0)

In the above code, I am running Python 3.8.0.

Most of the time, you will only care about the major, minor and micro releases. Release level and serial are usually for the core Python Dev team to work on changes to the language.

The possible release levels are ‘alpha’, ‘beta’, ‘candidate’, or ‘final’. Alpha contains the first updates made to the language. Beta means the language can be tested with some users but still won’t work perfectly. This is where the phrase ‘beta testers’ comes from. A ‘candidate’ has only a few small bugs left to fix. Final is the last version and the one released to the general public. If you want to try out new features before anyone else, you can download these release levels. However, if you just want a version of Python that works, you should choose ‘final’. When you download any version of Python, it will be a ‘final’ release unless stated otherwise.

Serial is for the smallest changes. The Python Dev team increments it as they make changes to the alpha, beta and candidate versions. All final versions have serial=0. They add future changes to the next major/minor/micro releases.

How to Make Sure My Script Runs a Specific Python Version?

Let’s say you’ve just installed Python 3.8. Your script, my_file.py, uses a brand new feature: reversed() when iterating over a dictionary. For other people to run this script, they must also run Python 3.8. So you should put a check at the start to let other users know this.

We do this by adding an assert statement at the top of my_file.py

# my_file.py
import sys
assert sys.version_info >= (3, 8) my_dict = dict(a=1, b=2, c=3)
for key in reversed(my_dict): print(key)

The assert statement raises an AssertionError if the statement is False. If the statement is True, the script continues to run.

For example, if I am running Python 3.7 and execute my_file.py from the terminal, this happens

# Running Python 3.7
$ python my_file.py
Traceback (most recent call last): File "my_file.py", line 10, in <module> assert sys.version_info >= (3,8)
AssertionError

But if I am running Python 3.8, the assert statement does not raise an error, and it executes the rest of the script.

# Running Python 3.8
$ python my_file.py
c
b
a

Note: I have used the Anaconda virtual environment to install and quickly switch between multiple Python versions.

Where to Go From Here?

In summary, you can check the Python version by typing python --version in your operating system shell or command line.


Do you struggle with Python? And Python source code sometimes feels like a closed book to you?

If this applies to you, check out my free email course! The course guides you step-by-step to a deeper and deeper Python level of code understanding. Here is what my readers say:

Thank you for your newsletter. I find these newsletters highly informative.

Collen

As a fellow educator and fellow (former) Ph.D. student, I just wanted to let you know that I’m really impressed with your teaching materials. You’re doing a really good job!

Daniel