Posted on Leave a comment

Quarkus and Mutiny

Quarkus is a foundation for building Java based applications; whether for the desktop, server or cloud. An excellent write up on usage can be found at https://fedoramagazine.org/using-the-quarkus-framework-on-fedora-silverblue-just-a-quick-look/. This article is primer for coding asynchronous processes using Quarkus and Mutiny.

So what is Mutiny? Mutiny allows streaming of objects in an event driven flow. The stream might originate from a local process or something remote like a database. Mutiny streaming is accomplished by either a Uni or a Multi object. We are using the Uni to stream one object — a List containing many integers. A subscribe pattern initiates the stream.

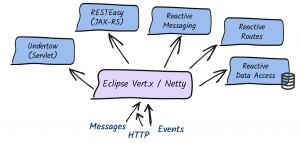
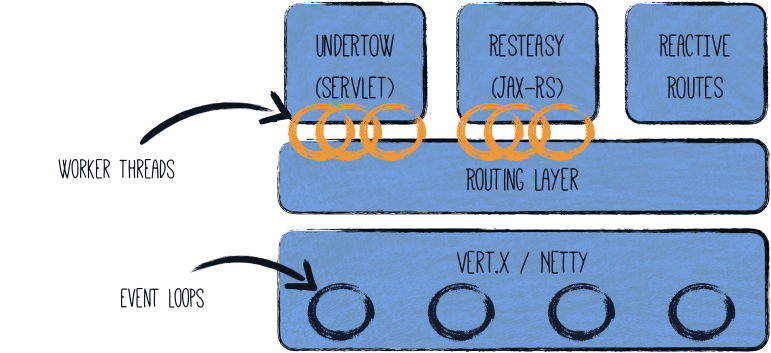
A traditional program is executed and results are returned before continuing. Mutiny can easily support non-blocking code to run processes concurrently. RxJava, ReactiveX and even native Java are alternatives. Mutiny is easy to use (the exposed API is minimal) and it is the default in many of the Quarkus extensions. The two extensions used are quarkus-mutiny and quarkus-vertx. Vert.x is the underlying framework wrapped by Quarkus. The Promise classes are supplied by quarkus-vertx. A promise returns a Uni stream when the process is complete. To get started, install a Java JDK and Maven.

Bootstrap

The minimum requirement is either Java-11 or Java-17 with Maven.

With Java-11:

$ sudo dnf install -y java-11-openjdk-devel maven

With Java-17:

$ sudo dnf install -y java-17-openjdk-devel maven

Bootstrap Quarkus and Mutiny with the Maven call below. The extension quarkus-vertx is not included to demonstrate how to add additional extensions. Locate an appropriate directory before executing. The directory mutiny-demo will be created with the initial application.

$ mvn io.quarkus.platform:quarkus-maven-plugin:2.6.2.Final:create \ -DprojectGroupId=fedoramag \ -DprojectArtifactId=mutiny-demo \ -DprojectVersion=1.0.0 \ -DclassName="org.demo.mag.Startup" \ -Dextensions="mutiny" \ -DbuildTool=gradle

Now that Gradle is bootstrapped, other extensions can be added. In the mutiny-demo directory execute:

$ ./gradlew addExtension --extensions='quarkus-vertx'

To view all available extensions execute:

$ ./gradlew listExtensions

To get all of the defined Gradle tasks execute:

$ ./gradlew tasks

Mutiny Code

The className entry on the Quarkus bootstrap is org.demo.mag.Startup which creates the file src/main/java/org/demo/map/Startup.java. Replace the contents with the following code:

package org.demo.mag; import java.util.List;
import java.util.concurrent.ExecutionException;
import java.util.function.IntSupplier;
import java.util.stream.Collectors;
import java.util.stream.IntStream; import io.quarkus.runtime.Quarkus;
import io.quarkus.runtime.QuarkusApplication;
import io.quarkus.runtime.annotations.QuarkusMain;
import io.smallrye.mutiny.Uni;
import io.smallrye.mutiny.tuples.Tuple2;
import io.vertx.mutiny.core.Promise; @QuarkusMain
public class Startup implements QuarkusApplication { public static void main(String... args) { Quarkus.run(Startup.class, args); } @Override public int run(String... args) throws InterruptedException, ExecutionException { final Promise<String> finalMessage = Promise.promise(); final String elapsedTime = "Elapsed time for asynchronous method: %d milliseconds"; final int[] syncResults = {0}; Application.runTraditionalMethod(); final Long millis = System.currentTimeMillis(); Promise<List<Integer>> promiseRange = Application.getRange(115000); Promise<Tuple2<Promise<List<Integer>>, Promise<List<Integer>>>> promiseCombined = Application.getCombined(10000, 15000); Promise<List<Integer>> promiseReverse = Application.getReverse(24000); /* * Retrieve the Uni stream and on the complete event obtain the List<Integer> */ promiseRange.future().onItem().invoke(list -> { System.out.println("Primes Range: " + list.size()); if(syncResults[0] == 1) { finalMessage.complete(String.format(elapsedTime, System.currentTimeMillis() - millis)); } { syncResults[0] = 2; } return; }).subscribeAsCompletionStage(); promiseReverse.future().onItem().invoke(list -> { System.out.println("Primes Reverse: " + list.size()); return; }).subscribeAsCompletionStage(); /* * Notice that this finishes before the other two prime generators(smaller lists). */ promiseCombined.future().onItem().invoke(p -> { /* * Notice that "Combined Range" displays first */ p.getItem2().future().invoke(reverse -> { System.out.println("Combined Reverse: " + reverse.size()); return; }).subscribeAsCompletionStage(); p.getItem1().future().invoke(range -> { System.out.println("Combined Range: " + range.size()); /* * Nesting promises to get multple results together */ p.getItem2().future().invoke(reverse -> { System.out.println(String.format("Asserting that expected primes are equal: %d -- %d", range.get(0), reverse.get(reverse.size() - 1))); assert range.get(0) == reverse.get(reverse.size() - 1) : "Generated primes incorrect"; if(syncResults[0] == 2) { finalMessage.complete(String.format(elapsedTime, System.currentTimeMillis() - millis)); } else { syncResults[0] = 1; } return; }).subscribeAsCompletionStage(); return; }).subscribeAsCompletionStage(); return; }).subscribeAsCompletionStage(); // Note: on very fast machines this may not display first. System.out.println("This should display first - indicating asynchronous code."); // blocking for final message String elapsedMessage = finalMessage.futureAndAwait(); System.out.println(elapsedMessage); return 0; } public static class Application { public static Promise<List<Integer>> getRange(int n) { final Promise<List<Integer>> promise = Promise.promise(); // non-blocking - this is only for demonstration(emulating some remote call) new Thread(() -> { try { /* * RangeGeneratedPrimes.primes is blocking, only returns when done */ promise.complete(RangeGeneratedPrimes.primes(n)); } catch (Exception exception) { Thread.currentThread().interrupt(); } }).start(); return promise; } public static Promise<List<Integer>> getReverse(int n) { final Promise<List<Integer>> promise = Promise.promise(); new Thread(() -> { try { // Generating a new object stream promise.complete(ReverseGeneratedPrimes.primes(n)); } catch (Exception exception) { Thread.currentThread().interrupt(); } }).start(); return promise; } public static Promise<Tuple2<Promise<List<Integer>>, Promise<List<Integer>>>> getCombined(int ran, int rev) { final Promise<Tuple2<Promise<List<Integer>>, Promise<List<Integer>>>> promise = Promise.promise(); new Thread(() -> { try { Uni.combine().all() /* * Notice that these are running concurrently */ .unis(Uni.createFrom().item(Application.getRange(ran)), Uni.createFrom().item(Application.getReverse(rev))) .asTuple().onItem().call(tuple -> { promise.complete(tuple); return Uni.createFrom().nullItem(); }) .onFailure().invoke(Throwable::printStackTrace) .subscribeAsCompletionStage(); } catch (Exception exception) { Thread.currentThread().interrupt(); } }).start(); return promise; } public static void runTraditionalMethod() { Long millis = System.currentTimeMillis(); System.out.println("Traditiona1-1: " + RangeGeneratedPrimes.primes(115000).size()); System.out.println("Traditiona1-2: " + RangeGeneratedPrimes.primes(10000).size()); System.out.println("Traditiona1-3: " + ReverseGeneratedPrimes.primes(15000).size()); System.out.println("Traditiona1-4: " + ReverseGeneratedPrimes.primes(24000).size()); System.out.println(String.format("Elapsed time for traditional method: %d milliseconds\n", System.currentTimeMillis() - millis)); } } public interface Primes { static List<Integer> primes(int n) { return null; }; } public abstract static class PrimeBase { static boolean isPrime(int number) { return IntStream.rangeClosed(2, (int) (Math.sqrt(number))) .allMatch(n -> number % n != 0); } } public static class RangeGeneratedPrimes extends PrimeBase implements Primes { public static List<Integer> primes(int n) { return IntStream.rangeClosed(2, n) .filter(x -> isPrime(x)).boxed() .collect(Collectors.toList()); } } public static class ReverseGeneratedPrimes extends PrimeBase implements Primes { public static List<Integer> primes(int n) { List<Integer> list = IntStream.generate(getReverseList(n)).limit(n - 1) .filter(x -> isPrime(x)).boxed() .collect(Collectors.toList()); return list; } private static IntSupplier getReverseList(int startValue) { IntSupplier reverse = new IntSupplier() { private int start = startValue; public int getAsInt() { return this.start--; } }; return reverse; } }
}

Testing

The Quarkus install showcases the quarkus-resteasy extension by default. We are not using it, replace the contents of src/test/java/org/demo/mag/StartupTest.java with:

package org.demo.mag; import io.quarkus.test.junit.QuarkusTest;
import io.vertx.mutiny.core.Promise; import java.util.List; import org.demo.mag.Startup;
import org.junit.jupiter.api.Assertions;
import org.junit.jupiter.api.Tag;
import org.junit.jupiter.api.Test; @QuarkusTest
public class StartupTest { Promise<List<Integer>> promise = Promise.promise(); Promise<Void> promiseAndAwait = Promise.promise(); List<Integer> testValue; @Tag("DEV") @Test public void testVerifyAsync() { Assertions.assertEquals( null , testValue); promise.future().onItem().invoke(list -> { testValue = list; promiseAndAwait.complete(); }).subscribeAsCompletionStage(); Assertions.assertEquals(null, testValue); promise.complete(Startup.ReverseGeneratedPrimes.primes(100)); promiseAndAwait.futureAndAwait(); Assertions.assertNotNull(testValue); Assertions.assertEquals(2, testValue.get(testValue.size()-1)); }
}

Optional

To reduce download volume, remove the following entries from the build.gradle file.

	implementation 'io.quarkus:quarkus-resteasy' testImplementation 'io.rest-assured:rest-assured'

Installation and Execution

The next step is to build the project. This includes downloading all dependencies as well as compiling and executing the Startup.java program. Everything is included in one file for brevity.

$ ./gradlew quarkusDev

The above command produces a banner and console output from Quarkus and the program.

This is development mode. Notice the prompt: “Press [space] to restart”. To review edits hit the space-bar and enter-key to re-compile and execute. Enter q to quit.

To build an Uber jar (all dependencies included) execute:

$ ./gradlew quarkusBuild -Dquarkus.package.type=uber-jar

This creates a jar in the build directory named mutiny-demo-1.0.0-runner.jar. To run the jar file, enter the following command.

$ java -jar ./build/mutiny-demo-1.0.0-runner.jar

To remove the banner and console logs, add the following lines to the src/main/resources/application.properties file.

%prod.quarkus.log.console.enable=false
%prod.quarkus.banner.enabled=false

The output might look similar to the following.

	Traditional-1: 9592 Traditional-2: 1229 Traditional-3: 2262 Traditional-4: 2762 Elapsed time for traditional method: 67 milliseconds Combined Range: 1229 This should display first - indicating asynchronous code. Combined Reverse: 2262 Primes Reverse: 2762 Asserting that expected primes are equal: 2 -- 2 Primes Range: 9592 Elapsed time for asynchronous method: 52 milliseconds

You will still get the banner and logs in development mode.

To go one step further, Quarkus can generate an executable out of the box using GraalVM.

$ ./gradlew build -Dquarkus.package.type=native

The executable generated by the above command will be ./build/mutiny-demo-1.0.0-runner.

The default GraalVM is a downloaded container. To override this, set the environment variable GRAALVM_HOME to your local install. Don’t forget to install the native-image with the following command.

$ ${GRAALVM_HOME}/bin/gu install native-image

The Code

The code, generates prime numbers for a range, reversed on a limit and a combination of the two. For example, consider the range: “Promise<List<Integer>> promiseRange = Application.getRange(115000);”.

This generates all primes between 1 and 115000 and displays the number of primes in the range. It is executed first but displays its results last. The code near the end of the main method — System.out.println (“This should display first – indicating asynchronous code.”); — displays first. This is an example of asynchronous code. We can run multiple processes concurrently. However, the order of completion is unpredictable. The traditional calls are orderly and the results can be collected when completed.

Execution can be blocked until a result is returned. The code does exactly that to display the asynchronous elapsed time message. At the end of the main method we have: “String elapsedMessage = finalMessage.futureAndAwait();”. The message arrives from either promiseRange or promiseCombined — the two longest running processes. But even this is not guaranteed. The state of the underling OS is unknown. One of the other processes might finish last. Normally, asynchronous calls are nested to co-ordinate results. This is demonstrated in the promiseCombined promise to evaluate the results of range and reversed primes.

Conclusion

The comparison between the traditional method and asynchronous method suggests that the asynchronous method can be up to 25% faster on a modern computer. An older CPU that does not have the resources and computing power produces results faster with the traditional method. If a computer has many cores, why not use them‽

More documentation can be found on the following web sites.

Posted on Leave a comment

Using the Quarkus Framework on Fedora Silverblue – Just a Quick Look

Quarkus is a framework for Java development that is described on their web site as:

A Kubernetes Native Java stack tailored for OpenJDK HotSpot and GraalVM, crafted from the best of breed Java libraries and standards

https://quarkus.io/ – Feb. 5, 2020

Silverblue — a Fedora Workstation variant with a container based workflow central to its functionality — should be an ideal host system for the Quarkus framework.

There are currently two ways to use Quarkus with Silverblue. It can be run in a pet container such as Toolbox/Coretoolbox. Or it can be run directly in a terminal emulator. This article will focus on the latter method.

Why Quarkus

According to Quarkus.io: “Quarkus has been designed around a containers first philosophy. What this means in real terms is that Quarkus is optimized for low memory usage and fast startup times.” To achieve this, they employ first class support for Graal/Substrate VM, build time Metadata processing, reduction in reflection usage, and native image preboot. For details about why this matters, read Container First at Quarkus.

Prerequisites

A few prerequisites will need to configured before you can start using Quarkus. First, you need an IDE of your choice. Any of the popular ones will do. VIM or Emacs will work as well. The Quarkus site provides full details on how to set up the three major Java IDE’s (Eclipse, Intellij Idea, and Apache Netbeans). You will need a version of JDK installed. JDK 8, JDK 11 or any distribution of OpenJDK is fine. GrallVM 19.2.1 or 19.3.1 is needed for compiling down to native. You will also need Apache Maven 3.53+ or Gradle. This article will use Maven because that is what the author is more familiar with. Use the following command to layer Java 11 OpenJDK and Maven onto Silverblue:

$ rpm-ostree install java-11-openjdk* maven

Alternatively, you can download your favorite version of Java and install it directly in your home directory.

After rebooting, configure your JAVA_HOME and PATH environment variables to reference the new applications. Next, go to the GraalVM download page, and get GraalVM version 19.2.1 or version 19.3.1 for Java 11 OpenJDK. Install Graal as per the instructions provided. Basically, copy and decompress the archive into a directory under your home directory, then modify the PATH environment variable to include Graal. You use it as you would any JDK. So you can set it up as a platform in the IDE of your choice. Now is the time to setup the native image if you are going to use one. For more details on setting up your system to use Quarkus and the Quarkus native image, check out their Getting Started tutorial. With these parts installed and the environment setup, you can now try out Quarkus.

Bootstrapping

Quarkus recommends you create a project using the bootstrapping method. Below are some example commands entered into a terminal emulator in the Gnome shell on Silverblue.

$ mvn io.quarkus:quarkus-maven-plugin:1.2.1.Final:create \ -DprojectGroupId=org.jakfrost \ -DprojectArtifactId=silverblue-logo \ -DclassName="org.jakfrost.quickstart.GreetingResource" \ -Dpath="/hello"
$ cd silverblue-logo

The bootstrapping process shown above will create a project under the current directory with the name silverblue-logo. After this completes, start the application in development mode:

$ ./mvnw compile quarkus:dev

With the application running, check whether it responds as expected by issuing the following command:

$ curl -w '\n' http://localhost:8080/hello

The above command should print hello on the next line. Alternatively, test the application by browsing to http://localhost:8080/hello with your web browser. You should see the same lonely hello on an otherwise empty page. Leave the application running for the next section.

Injection

Open the project in your favorite IDE. If you are using Netbeans, simply open the project directory where the pom.xml file resides. Now would be a good time to have a look at the pom.xml file.

Quarkus uses ArC for its dependency injection. ArC is a dependency of quarkus-resteasy, so it is already part of the core Quarkus installation. Add a companion bean to the project by creating a java class in your IDE called GreetingService.java. Then put the following code into it:

import javax.enterprise.context.ApplicationScoped; @ApplicationScoped
public class GreetingService { public String greeting(String name) { return "hello " + name; } }

The above code is a verbatim copy of what is used in the injection example in the Quarkus Getting Started tutorial. Modify GreetingResource.java by adding the following lines of code:

import javax.inject.Inject;
import org.jboss.resteasy.annotations.jaxrs.PathParam; @Inject GreetingService service;//inject the service @GET //add a getter to use the injected service @Produces(MediaType.TEXT_PLAIN) @Path("/greeting/{name}") public String greeting(@PathParam String name) { return service.greeting(name); }

If you haven’t stopped the application, it will be easy to see the effect of your changes. Just enter the following curl command:

$ curl -w '\n' http://localhost:8080/hello/greeting/Silverblue

The above command should print hello Silverblue on the following line. The URL should work similarly in a web browser. There are two important things to note:

  1. The application was running and Quarkus detected the file changes on the fly.
  2. The injection of code into the app was very easy to perform.

The native image

Next, package your application as a native image that will work in a podman container. Exit the application by pressing CTRL-C. Then use the following command to package it:

$ ./mvnw package -Pnative -Dquarkus.native.container-runtime=podman

Now, build the container:

$ podman build -f src/main/docker/Dockerfile.native -t silverblue-logo/silverblue-logo

Now run it with the following:

$ podman run -i --rm -p 8080:8080 localhost/silverblue-logo/silverblue-logo

To get the container build to successfully complete, it was necessary to copy the /target directory and contents into the src/main/docker/ directory. Investigation as to the reason why is still required, and though the solution used was quick and easy, it is not an acceptable way to solve the problem.

Now that you have the container running with the application inside, you can use the same methods as before to verify that it is working.

Point your browser to the URL http://localhost:8080/ and you should get a index.html that is automatically generated by Quarkus every time you create or modify an application. It resides in the src/main/resources/META-INF/resources/ directory. Drop other HTML files in this resources directory to have Quarkus serve them on request.

For example, create a file named logo.html in the resources directory containing the below markup:

<!DOCTYPE html>
<!--
To change this license header, choose License Headers in Project Properties.
To change this template file, choose Tools | Templates
and open the template in the editor.
-->
<html> <head> <title>Silverblue</title> <meta charset="UTF-8"> <meta name="viewport" content="width=device-width, initial-scale=1.0"> </head> <body> <div> <img src="fedora-silverblue-logo.png" alt="Fedora Silverblue"/> </div> </body>
</html>

Next, save the below image alongside the logo.html file with the name fedora-silverblue-logo.png:

Now view the results at http://localhost:8080/logo.html.

Testing your application

Quarkus supports junit 5 tests. Look at your project’s pom.xml file. In it you should see two test dependencies. The generated project will contain a simple test, named GreetingResourceTest.java. Testing for the native file is only supported in prod mode. However, you can test the jar file in dev mode. These tests are RestAssured, but you can use whatever test library you wish with Quarkus. Use Maven to run the tests:

$ ./mvnw test

More details can be found in the Quarkus Getting Started tutorial.

Further reading and tutorials

Quarkus has an extensive collection of tutorials and guides. They are well worth the time to delve into the breadth of this microservices framework.

Quarkus also maintains a publications page that lists some very interesting articles on actual use cases of Quarkus. This article has only just scratched the surface of the topic. If what was presented here has piqued your interest, then follow the above links for more information.

Posted on Leave a comment

Using Kubernetes ConfigMaps to define your Quarkus application’s properties

So, you wrote your Quarkus application, and now you want to deploy it to a Kubernetes cluster. Good news: Deploying a Quarkus application to a Kubernetes cluster is easy. Before you do this, though, you need to straighten out your application’s properties. After all, your app probably has to connect with a database, call other services, and so on. These settings are already defined in your application.properties file, but the values match the ones for your local environment and won’t work once deployed onto your cluster.

So, how do you easily solve this problem? Let’s walk through an example.

Create the example Quarkus application

Instead of using a complex example, let’s take a simple use case that explains the concept well. Start by creating a new Quarkus app:

$ mvn io.quarkus:quarkus-maven-plugin:1.1.1.Final:create

You can keep all of the default values while creating the new application. In this example, the application is named hello-app. Now, open the HelloResource.java file and refactor it to look like this:

@Path("/hello") public class HelloResource { @ConfigProperty(name = "greeting.message") String message; @GET @Produces(MediaType.TEXT_PLAIN) public String hello() { return "hello " + message; } } 

In your application.properties file, now add greeting.message=localhost. The @ConfigProperty annotation is not in the scope of this article, but here we can see how easy it is to inject properties inside our code using this annotation.

Now, let’s start our application to see if it works as expected:

$ mvn compile quarkus:dev

Browse to http://localhost:8080/hello, which should output hello localhost. That’s it for the Quarkus app. It’s ready to go.

Deploy the application to the Kubernetes cluster

The idea here is to deploy this application to our Kubernetes cluster and replace the value of our greeting property with one that will work on the cluster. It is important to know here that all of the properties from application.properties are exposed, and thus can be overridden with environment variables. The convention is to convert the name of the property to uppercase and replace every dot (.) with an underscore (_). So, for instance, our greeting.message will become GREETING_MESSAGE.

At this point, we are almost ready to deploy our app to Kubernetes, but we need to do three more things:

  1. Create a Docker image of your application and push it to a repository that your cluster can access.
  2. Define a ConfgMap resource.
  3. Generate the Kubernetes resources for our application.

To create the Docker image, simply execute this command:

$ docker build -f src/main/docker/Dockerfile.jvm -t quarkus/hello-app .

Be sure to set the right Docker username and to also push to an image registry, like docker-hub or quay. If you are not able to push an image, you can use sebi2706/hello-app:latest.

Next, create the file config-hello.yml:

apiVersion: v1 data: greeting: "Kubernetes" kind: ConfigMap metadata: name: hello-config 

Make sure that you are connected to a cluster and apply this file:

$ kubectl apply -f config-hello.yml

Quarkus comes with a useful extension, quarkus-kubernetes, that generates the Kubernetes resources for you. You can even tweak the generated resources by providing extra properties—for more details, check out this guide.

After installing the extension, add these properties to our application.properties file so it generates extra configuration arguments for our containers specification:

kubernetes.group=yourDockerUsername kubernetes.env-vars[0].name=GREETING_MESSAGE kubernetes.env-vars[0].value=greeting kubernetes.env-vars[0].configmap=hello-config

Run mvn package and view the generated resources in target/kubernetes. The interesting part is in spec.containers.env:

- name: "GREETING_MESSAGE"   valueFrom:   configMapKeyRef:     key: "greeting"    name: "hello-config"

Here, we see how to pass an environment variable to our container with a value coming from a ConfigMap. Now, simply apply the resources:

$ kubectl apply -f target/kubernetes/kubernetes.yml

Expose your service:

kubectl expose deployment hello --type=NodePort

Then, browse to the public URL or do a curl. For instance, with Minikube:

$ curl $(minikube service hello-app --url)/hello

This command should output: hello Kubernetes.

Conclusion

Now you know how to use a ConfigMap in combination with environment variables and your Quarkus’s application.properties. As we said in the introduction, this technique is particularly useful when defining a DB connection’s URL (like QUARKUS_DATASOURCE_URL) or when using the quarkus-rest-client (ORG_SEBI_OTHERSERVICE_MP_REST_URL).

Share

The post Using Kubernetes ConfigMaps to define your Quarkus application’s properties appeared first on Red Hat Developer.

Posted on Leave a comment

CodeReady Workspaces devfile, demystified

With the exciting advent of CodeReady Workspaces (CRW) 2.0 comes some important changes. Based on the upstream project Eclipse Che 7, CRW brings even more of the “Infrastructure as Code” idea to fruition. Workspaces mimic the environment of a PC, an operating system, programming language support, the tools needed, and an editor. The real power comes by defining a workspace using a YAML file—a text file that can be stored and versioned in a source control system such as Git. This file, called devfile.yaml, is powerful and complex. This article will attempt to demystify the devfile.

A Java Maven example

The following devfile defines a workspace that has Java language support, includes the Maven build tool, and has two custom commands.

Let’s break this down.

Section 1: metadata

This section is required, and in this case name is specified as the name of this workspace (wksp-javamaven). You also have the option of a name prefix, in which case the system will generate the rest of the name (e.g., generateName: javamaven-). Using generateName means a user can have multiple instances of this workspace at the same time. This is an important distinction and one which must be addressed by management.

Section 2: projects

This section is optional (but probably a very good idea) and tells the workspace where to find the project that will be included. In this case, we’re pointing to the master branch of a Git repository located on GitHub. You can specify multiple projects for a workspace, and the type can be a zip file as well. While the name of the project does not need to match the name of the repo it’s, again, probably a very good idea. If you make them different, well … then that’s a create opportunity to add confusion and really mess things up.

Section 3: attributes

This part is optional and can pretty much define anything you wish. In this example, it’s specifying that any values stored in any specified volumes are not stored. This will likely be the value you’ll always want. The idea is that, unless you commit your changes to the Git repo, any work done will be lost. Think of it this way: Whereas on your local PC you perform a File –> Save command to keep your work, you’ll instead do git commit. In “devfile-speak,” persistVolumes: false makes the data ephemeral. This setting, false, also makes the workspace perform better.

Section 4: components

This is the heaviest part of this example, where we specify what bits and pieces make up our workspace.

The first component is a Che Plugin, identified at redhat/java/latest. You can see the description of this plug on this GitHub page.

The next component is a type dockerimage that is the maven support for this workspace. Of special note is the setting mountSources: true, which makes the source code available to the container that is running this image. In this particular case, we want our Maven build to have access to the source code—which makes sense.

The volumes: setting defines a directory within the container that is available to this workspace. This is used, for example, to give the workspace access to a needed directory that would otherwise be outside the container and blocked by lack of permissions. In other words, if you run a command in a workspace and get an error message because you are denied access to a directory, you can get around that by defining that directory here, in your devfile, that will be created inside your container.

The remaining settings associated with this component are related to memory limits, security, etc.

Section 5: apiVersion

This section is required and is how you specify which API version you are using. This is pretty much boilerplate text.

Section 6: commands

This is the fun part. In this section, you can define custom commands that are available to the user. Typically, this is where you’ll specify command-line commands that can be run from within the IDE rather than dropping to the command line and typing what may be a lengthy command. The properties here will look pretty much self-explanatory. Note that a macro can be used instead of hard-coded value for the project root directory (e.g., ${CHE_PROJECTS_ROOT}).

Start exploring

There are many settings and variations of devfiles. If you have the ability, I suggest going into your CRW 2.0 instance and exploring any existing workspaces’ devfiles. Take an existing devfile, clone it, then change it and implement it to see what happens. Like any good developer, make changes until you break things, then gain understanding.

Share

The post CodeReady Workspaces devfile, demystified appeared first on Red Hat Developer.

Posted on Leave a comment

Decoupling microservices with Apache Camel and Debezium

The rise of microservices-oriented architecture brought us new development paradigms and mantras about independent development and decoupling. In such a scenario, we have to deal with a situation where we aim for independence, but we still need to react to state changes in different enterprise domains.

I’ll use a simple and typical example in order to show what we’re talking about. Imagine the development of two independent microservices: Order and User. We designed them to expose a REST interface and to each use a separate database, as shown in Figure 1:

Diagram 1 - Order and User microservices

Figure 1: Order and User microservices.

We must notify the User domain about any change happening in the Order domain. To do this in the example, we need to update the order_list. For this reason, we’ve modeled the User REST service with addOrder and deleteOrder operations.

Solution 1: Queue decoupling

The first solution to consider is adding a queue between the services. Order will publish events that User will eventually process, as shown in Figure 2:

Diagram 2 - decoupling with a queue

Figure 2: Decoupling with a queue.

This is a fair design. However, if you don’t use the right middleware you will mix a lot of infrastructure code into your domain logic. Now that you have queues, you must develop producer and consumer logic. You also have to take care of transactions. The problem is to make sure that every event ends up correctly in both the Order database and in the queue.

Solution 2: Change data capture decoupling

Let me introduce an alternative solution that handles all of that work without your touching any line of your microservices code. I’ll use Debezium and Apache Camel to capture data changes on Order and trigger certain actions on User. Debezium is a log-based data change capture middleware. Camel is an integration framework that simplifies the integration between a source (Order) and a destination (User), as shown in Figure 3:

Diagram 3 - decoupling with Debezium and Camel

Figure 3: Decoupling with Debezium and Camel.

Debezium is in charge of capturing any data change happening in the Order domain and publishing it to a topic. Then a Camel consumer can pick that event and make a REST call to the User API to perform the necessary action expected by its domain (in our simple case, update the list).

Decoupling with Debezium and Camel

I’ve prepared a simple demo with all of the components we need to run the example above. You can find this demo in this GitHub repo. The only part we need to develop is represented by the following source code:

public class MyRouteBuilder extends RouteBuilder { public void configure() { from("debezium:mysql?name=my-sql-connector" + "&databaseServerId=1" + "&databaseHostName=localhost" + "&databaseUser=debezium" + "&databasePassword=dbz" + "&databaseServerName=my-app-connector" + "&databaseHistoryFileName=/tmp/dbhistory.dat" + "&databaseWhitelist=debezium" + "&tableWhitelist=debezium._order" + "&offsetStorageFileName=/tmp/offset.dat") .choice() .when(header(DebeziumConstants.HEADER_OPERATION).isEqualTo("c")) .process(new AfterStructToOrderTranslator()) .to("rest-swagger:http://localhost:8082/v2/api-docs#addOrderUsingPOST") .when(header(DebeziumConstants.HEADER_OPERATION).isEqualTo("d")) .process(new BeforeStructToOrderTranslator()) .to("rest-swagger:http://localhost:8082/v2/api-docs#deleteOrderUsingDELETE") .log("Response : ${body}"); } } 

That’s it. Really. We don’t need anything else.

Apache Camel has a Debezium component that can hook up a MySQL database and use Debezium embedded engine. The source endpoint configuration provides the parameters needed by Debezium to note any change happening in the debezium._order table. Debezium streams the events according to a JSON-defined format, so you know what kind of information to expect. For each event, you will get the information as it was before and after the event occurs, plus a few useful pieces of meta-information.

Thanks to Camel’s content-based router, we can either call the addOrderUsingPOST or deleteOrderUsingDELETE operation. You only have to develop a message translator that can convert the message coming from Debezium:

public class AfterStructToOrderTranslator implements Processor { private static final String EXPECTED_BODY_FORMAT = "{\"userId\":%d,\"orderId\":%d}"; public void process(Exchange exchange) throws Exception { final Map value = exchange.getMessage().getBody(Map.class); // Convert and set body int userId = (int) value.get("user_id"); int orderId = (int) value.get("order_id"); exchange.getIn().setHeader("userId", userId); exchange.getIn().setHeader("orderId", orderId); exchange.getIn().setBody(String.format(EXPECTED_BODY_FORMAT, userId, orderId)); } } 

Notice that we did not touch any of the base code for Order or User. Now, turn off the Debezium process to simulate downtime. You will see that it can recover all events as soon as it turns back on!

You can run the example provided by following the instructions on this GitHub repo.

Caveat

The example illustrated here uses Debezium’s embedded mode. For more consistent solutions, consider using the Kafka connect mode instead, or tuning the embedded engine accordingly.

Share

The post Decoupling microservices with Apache Camel and Debezium appeared first on Red Hat Developer.

Posted on Leave a comment

How Quarkus brings imperative and reactive programming together

The supersonic subatomic Java singularity has expanded!

42 releases, 8 months of community participation, and 177 amazing contributors led up to the release of Quarkus 1.0.  This release is a significant milestone with a lot of cool features behind it. You can read more in the release announcement.

Building on that awesome news, we want to delve into how Quarkus unifies both imperative and reactive programming models and its reactive core. We’ll start with a brief history and then take a deep dive into what makes up this dual-faceted reactive core and how Java developers can take advantage of it.

Microservices, event-driven architectures, and serverless functions are on the rise. Creating a cloud-native architecture has become more accessible in the recent past; however, challenges remain, especially for Java developers. Serverless functions and microservices need faster startup times, consume less memory, and above all offer developer joy. Java, in that regard, has just in recent years done some improvements (e.g., ergonomics enhancements for containers, etc.). However, to have a performing container-native Java, it hasn’t been easy. Let’s first take a look at some of the inherent issues for developing container-native Java applications.

Let’s start with a bit of history.

Threads CPUs Java and Containers

Threads and containers

As of version 8u131, Java is more container-aware, due to the ergonomics enhancements. So now, the JVM knows the number of cores it’s running on and can customize thread pools accordingly — typically the fork/join pool. That’s all great, but let’s say we have a traditional web application that uses HTTP servlets or similar on Tomcat, Jetty, or the like. In effect, this application gives a thread to each request allowing it to block this thread when waiting for IO to occur, such as accessing databases, files, or other services. The sizing for such an application depends on the number of concurrent requests rather than the number of available cores; this also means quota or limits in Kubernetes on the number of cores will not be of great help and eventually will result in throttling.

Memory exhaustion

Threads also cost memory. Memory constraints inside a container do not necessarily help. Spreading that over multiple applications and threading to a large extent will cause more switching and, in some cases, performance degradation. Also, if an application uses traditional microservices frameworks, creates database connections, uses caching, and perhaps needs some more memory, then straightaway one would also need to look into the JVM memory management so that it’s not getting killed (e.g., XX:+UseCGroupMemoryLimitForHeap). Even though JVM can understand cgroups as of Java 9 and adapt memory accordingly, it can still get quite complex to manage and size the memory.

Quotas and limits

With Java 11, we now have the support for CPU quotas (e.g., PreferContainerQuotaForCPUCount). Kubernetes also provides support for limits and quotas. This could make sense; however, if the application uses more than the quota again, we end up with sizing based on cores, which in the case of traditional Java applications, using one thread per request, is not helpful at all.

Also, if we were to use quotas and limits or the scale-out feature of the underlying Kubernetes platform, the problem wouldn’t solve itself; we would be throwing more capacity at the underlying issue or end up over-committing resources. And if we were running this on a high load in a public cloud, certainly we would end up using more resources than necessary.

What can solve this?

A straightforward solution to these problems would be to use asynchronous and non-blocking IO libraries and frameworks like Netty, Vert.x, or Akka. They are more useful in containers due to their reactive nature. By embracing non-blocking IO, the same thread can handle multiple concurrent requests. While a request processing is waiting for some IO, the thread is released and so can be used to handle another request. When the IO response required by the first request is finally received, processing of the first request can continue. Interleaving request processing using the same thread reduces the number of threads drastically and also resources to handle the load.

With non-blocking IO, the number of cores becomes the essential setting as it defines the number of IO threads you can run in parallel. Used properly, it efficient dispatches the load on the different cores, handling more with fewer resources.

Is that all?

And, there’s more. Reactive programming improves resource usage but does not come for free. It requires that the application code embrace non-blocking and avoid blocking the IO thread. This is a different development and execution model. Although there are many libraries to help you do this, it’s still a mind-shift.

First, you need to learn how to write code executed asynchronously because, as soon as you start using non-blocking IOs, you need to express what is going to happen once the response is received. You cannot wait and block anymore. To do this, you can pass callbacks, use reactive programming, or continuation. But, that’s not all, you need to use non-blocking IOs and so have access to non-blocking servers and clients for everything you need. HTTP is the simple case, but think about database access, file systems, and so on.

Although end-to-end reactive provides the best efficiency, the shift can be hard to comprehend. Having the ability to mix both reactive and imperative code is becoming essential to:

  1. Use efficiently the resources on hot paths, and
  2. Provide a simpler code style for the rest of the application.

Enter Quarkus

This is what Quarkus is all about: unifying reactive and imperative in a single runtime.

Quarkus uses Vert.x and Netty at its core. And, it uses a bunch of reactive frameworks and extensions on top to help developers. Quarkus is not just for HTTP microservices, but also for event-driven architecture. Its reactive nature makes it very efficient when dealing with messages (e.g., Apache Kafka or AMQP).

The secret behind this is to use a single reactive engine for both imperative and reactive code.

Quarkus does this quite brilliantly. Between imperative and reactive, the obvious choice is to have a reactive core. What that helps with is a fast non-blocking code that handles almost everything going via the event-loop thread (IO thread). But, if you were creating a typical REST application or a client-side application, Quarkus also gives you the imperative programming model. For example, Quarkus HTTP support is based on a non-blocking and reactive engine (Eclipse Vert.x and Netty). All the HTTP requests your application receive are handled by event loops (IO Thread) and then are routed towards the code that manages the request. Depending on the destination, it can invoke the code managing the request on a worker thread (servlet, Jax-RS) or use the IO was thread (reactive route).

For messaging connectors, non-blocking clients are used and run on top of the Vert.x engine. So, you can efficiently send, receive, and process messages from various messaging middleware.

To help you get started with reactive on Quarkus, there are some well-articulated guides on Quarkus.io:

There are also reactive demo scenarios that you can try online; you don’t need a computer or an IDE, just give it a go in your browser. You can try them out here.

Additional resources

Share

The post How Quarkus brings imperative and reactive programming together appeared first on Red Hat Developer.

Posted on Leave a comment

Open Liberty Java runtime now available to Red Hat Runtimes subscribers

Open Liberty is a lightweight, production-ready Java runtime for containerizing and deploying microservices to the cloud, and is now available as part of a Red Hat Runtimes subscription. If you are a Red Hat Runtimes subscriber, you can write your Eclipse MicroProfile and Jakarta EE apps on Open Liberty and then run them in containers on Red Hat OpenShift, with commercial support from Red Hat and IBM.

Develop cloud-native Java microservices

Open Liberty is designed to provide a smooth developer experience with a one-second startup time, a low memory footprint, and our new dev mode:

Tweet about Open Liberty Dev Mode.

Open Liberty provides a full implementation of MicroProfile 3 and Jakarta EE 8. MicroProfile is a collaborative project between multiple vendors (including Red Hat and IBM) and the Java community that aims to optimize enterprise Java for writing microservices. With a four-week release schedule, Liberty usually has the latest MicroProfile release available soon after the spec is published.

Also, Open Liberty is supported in common developer tools, including VS Code, Eclipse, Maven, and Gradle. Server configuration (e.g., adding or removing a capability, or “feature,” to your app) is through an XML file. Open Liberty’s zero migration policy means that you can focus on what’s important (writing your app!) and not have to worry about APIs changing under you.

Deploy in containers to any cloud

When you’re ready to deploy your app, you can just containerize it and deploy it to OpenShift. The zero migration principle means that new versions of Open Liberty features will not break your app, and you can control which version of the feature your app uses.

Monitoring live microservices is enabled by MicroProfile Metrics, Health, and OpenTracing, which add observability to your apps. The emitted metrics from your apps and from the Open Liberty runtime can be consolidated using Prometheus and presented in Grafana.

Learn with the Open Liberty developer guides

Our Open Liberty developer guides are available with runnable code and explanations to help you learn how to write microservices with MicroProfile and Jakarta EE, and then to deploy them to Red Hat OpenShift.

Get started

To get started with Open Liberty, try the Packaging and deploying applications guide and the Deploying microservices to OpenShift guide.

Share

The post Open Liberty Java runtime now available to Red Hat Runtimes subscribers appeared first on Red Hat Developer.

Posted on Leave a comment

New features in Red Hat CodeReady Studio 12.13.0.GA and JBoss Tools 4.13.0.Final for Eclipse 2019-09

JBoss Tools 4.13.0 and Red Hat CodeReady Studio 12.13 for Eclipse 2019-09 are here and waiting for you. In this article, I’ll cover the highlights of the new releases and show how to get started.

Installation

Red Hat CodeReady Studio (previously known as Red Hat Developer Studio) comes with everything pre-bundled in its installer. Simply download it from our Red Hat CodeReady Studio product page and run it like this:

java -jar codereadystudio-<installername>.jar

JBoss Tools or Bring-Your-Own-Eclipse (BYOE) CodeReady Studio requires a bit more.

This release requires at least Eclipse 4.13 (2019-09), but we recommend using the latest Eclipse 4.13 2019-09 JEE Bundle because then you get most of the dependencies pre-installed.

Once you have installed Eclipse, you can either find us on the Eclipse Marketplace under “JBoss Tools” or “Red Hat CodeReady Studio.”

For JBoss Tools, you can also use our update site directly:

http://download.jboss.org/jbosstools/photon/stable/updates/

What’s new?

Our main focus for this release was improvements for container-based development and bug fixing. Eclipse 2019-06 itself has a lot of new cool stuff, but I’ll highlight just a few updates in both Eclipse 2019-06 and JBoss Tools plugins that I think are worth mentioning.

Red Hat OpenShift

OpenShift Container Platform 4.2 support

With the new OpenShift Container Platform (OCP) 4.2 now available (see the announcement), even if this is a major shift compared to OCP 3, Red Hat CodeReady Studio and JBoss Tools are compatible with this major release in a transparent way. Just define your connection to your OCP 4.2 based cluster as you did before for an OCP 3 cluster, and use the tooling!

CodeReady Containers 1.0 Server Adapter

A new server adapter has been added to support the next generation of CodeReady Containers 1.0. Although the server adapter itself has limited functionality, it is able to start and stop the CodeReady Containers virtual machine via its crc binary. Simply hit Ctrl+3 (Cmd+3 on OSX) and type new server, which will bring up a command to set up a new server.

crc server adapter

Enter crc in the filter textbox.

You should see the Red Hat CodeReady Containers 1.0 server adapter.

Select Red Hat CodeReady Containers 1.0 and click Next.

All you have to do is set the location of the CodeReady Containers crc binary file and the pull secret file location, which can be downloaded from https://cloud.redhat.com/openshift/install/crc/installer-provisioned.

Once you’re finished, a new CodeReady Containers server adapter will then be created and visible in the Servers view.

Once the server is started, a new OpenShift connection should appear in the OpenShift Explorer view, allowing the user to quickly create a new Openshift application and begin developing their AwesomeApp in a highly replicatable environment.

Server tools

Wildfly 18 Server Adapter

A server adapter has been added to work with Wildfly 18. It adds support for Java EE 8 and Jakarta EE 8.

EAP 7.3 Beta Server Adapter

A server adapter has been added to work with EAP 7.3 Beta.

Hibernate Tools

Hibernate Runtime Provider Updates

A number of additions and updates have been performed on the available Hibernate runtime providers.

The Hibernate 5.4 runtime provider now incorporates Hibernate Core version 5.4.7.Final and Hibernate Tools version 5.4.7.Final.

The Hibernate 5.3 runtime provider now incorporates Hibernate Core version 5.3.13.Final and Hibernate Tools version 5.3.13.Final.

Platform

Views, Dialogs and Toolbar

The new Quick Search dialog provides a convenient, simple and fast way to run a textual search across your workspace and jump to matches in your code. The dialog provides a quick overview showing matching lines of text at a glance. It updates as quickly as you can type and allows for quick navigation using only the keyboard. A typical workflow starts by pressing the keyboard shortcut Ctrl+Alt+Shift+L (or Cmd+Alt+Shift+L on Mac). Typing a few letters updates the search result as you type. Use Up-Down arrow keys to select a match, then hit Enter to open it in an editor.

Save editor when Project Explorer has focus

You can now save the active editor even when the Project Explorer has focus. In cases where an extension contributes Saveables to the Project Explorer, the extension is honored and the save action on the Project Explorer will save the provided saveable item instead of the active editor.

“Show In” context menu available for normal resources

The Show In context menu is now available for an element inside a resource project on the Project Explorer.

Show colors for additions and deletions in Compare viewer

In simple cases such as a two-way comparison or a three-way comparison with no merges and conflicts, the Compare viewer now shows different colors, depending on whether text has been added, removed, or modified. The default colors are green, red, and black, respectively.

The colors can be customized through usual theme customization approaches, including using related entries in the Colors and Fonts preference page.

Editor status line shows more selection details

The status line for Text Editors now shows the cursor position, and when the editor has something selected, it shows the number of characters in the selection as well. This also works in the block selection mode.

These two new additions to the status line can be disabled via the General > Editors > Text Editors preference page.

Shorter dialog text

Several dialog texts have been shortened. This allows you to capture important information faster.

Previously:

Now:

Close project via middle-click

In the Project Explorer, you can now close a project using middle-click.

Debug

Improved usability of Environment tab in Launch Configurations

In the Environment tab of the Launch Configuration dialog, you can now double-click on an environment variable name or value and start editing it directly from the table.

Right-clicking on the environment variable table now opens a context menu, allowing for quick addition, removal, copying, and pasting of environment variables.

Show Command Line for external program launch

The External Tools Configuration dialog for launching an external program now supports the Show Command Line button.

Preferences

Close editors automatically when reaching 99 open editors

The preference to close editors automatically is now enabled by default. It will be triggered when you have opened 99 files. If you continue to open editors, old editors will be closed to protect you from performance problems. You can modify this setting in the Preferences dialog via the General > Editors > Close editors automatically preference.

In-table color previews for Text Editor appearance color options

You can now see all the colors currently being used in Text Editors from the Appearance color options table, located in the Preferences > General > Editors > Text Editor page.

Automatic detection of UI freezes in the Eclipse SDK

The Eclipse SDK has been configured to show stack traces for UI freezes in the Error Log view by default for new workspaces. You can use this information to identify and report slow parts of the Eclipse IDE.

You can disable the monitoring or tweak its settings via the options in the General > UI Responsiveness Monitoring preference page as shown below.

Themes and Styling

Start automatically in dark theme based on OS theme

On Linux and Mac, Eclipse can now start automatically in dark theme when the OS theme is dark. This works by default, that is on a new workspace or when the user has not explicitly set or changed the theme in Eclipse.

Display of Help content respects OS theme

More and more operating systems provide a system-wide dark theme. Eclipse now respects this system-wide theme setting when the Eclipse help content is displayed in an external browser. A prerequisite for this is a browser that supports the prefers-color-scheme CSS media query.

As of the time of writing, the following browser versions support it:

  • Firefox version 67
  • Chrome version 76
  • Safari version 12.1

Help content uses high-resolution icons.

The Help System, as well as the help content of the Eclipse Platform, the Java Development Tooling, and the Plug-in Development Environment, now uses high-resolution icons. They are now crisp on high-resolution displays and also look much better in the dark theme.

Improved dark theme on Windows

Labels, Sections, Checkboxes, Radio Buttons, FormTexts, and Sashes on forms now use the correct background color in the dark mode on windows.

General Updates

Interactive performance

Interactive performance has been further improved in this release and several UI freezes have been fixed.

Show key bindings when command is invoked

For presentations, screencasts, and learning purposes, it is very helpful to show the corresponding key binding when a command is invoked. When the command is invoked (via a key binding or menu interaction) the key binding, the command’s name and description are shown on the screen.

You can activate this in the Preferences dialog via the Show key binding when command is invoked checkbox on the General > Keys preference page. To toggle this setting quickly, you can use the Toggle Whether to Show Key Binding command (e.g., via the quick access).

Java Developement Tools (JDT)

Java 13 Support

Java 13 is out, and Eclipse JDT supports Java 13 for 4.13 via Marketplace.

The release notably includes the following Java 13 features:

  • JEP 354: Switch Expressions (Preview).
  • JEP 355: Text Blocks (Preview).

Please note that these are preview language features; hence, the enable preview option should be on. For an informal introduction of the support, please refer to Java 13 Examples wiki.

Java Views and Dialogs

Synchronize standard and error output in console

The Eclipse Console view currently can not ensure that mixed standard and error output is shown in the same order as it is produced by the running process. For Java applications, the launch configuration Common tab now provides an option to merge standard and error output. This ensures that standard and error output is shown in the same order it was produced but also disables the individual coloring of error output.

Java Editor

Convert to enhanced ‘for’ loop using Collections

The Java quickfix/cleanup Convert to enhanced ‘for’ loop is now offered on for loops that are iterating through Collections. The loop must reference the size method as part of the condition and if accessing elements in the body, must use the get method. All other Collection methods other than isEmpty invalidate the quickfix being offered.

Initialize ‘final’ fields

A Java quickfix is now offered to initialize an uninitialized final field in the class constructor. The fix will initialize a String to the empty string, a numeric base type to 0, and, for class fields, it initializes them using their default constructor if available or null if no default constructor exists.

Autoboxing and Unboxing

Use Autoboxing and Unboxing when possible. These features are enabled only for Java 5 and higher.

Improved redundant modifier removal

The Remove redundant modifier now also removes useless abstract modifier on the interfaces.

For the given code:

You get this:

Javadoc comment generation for module

Adding a Javadoc comment to a Java module (module-info.java) will result in automatic annotations being added per the new module comment preferences.

The $(tags) directive will add @uses and @provides tags for all uses and provides module statements.

Chain Completion Code Assist

Code assist for “Chain Template Proposals” will be available. These will traverse reachable local variables, fields, and methods, to produce a chain whose return type is compatible with the expected type in a particular context.

The preference to enable the feature can be found in the Advanced sub-menu of the Content Assist menu group (Preferences > Java > Editor > Content Assist > Advanced).

Java Formatter

Remove excess blank lines

All the settings in the Blank lines section can now be configured to remove excess blank lines, effectively taking precedence over the Number of empty lines to preserve setting. Each setting has its own button to turn the feature on, right next to its number control. The button is enabled only if the selected number of lines is smaller than the Number of empty lines to preserve; otherwise, any excess lines are removed anyway.

Changes in blank lines settings

There’s quite a lot of changes in the Blank lines section of the formatter profile.

Some of the existing subsections and settings are now phrased differently to better express their function:

  • The Blank lines within class declarations subsection is now Blank lines within type declaration.
  • Before first declaration is now Before first member declaration.
  • Before declarations of the same kind is now Between member declarations of different kind.
  • Before member class declarations is now Between member type declarations.
  • Before field declarations is now Between field declarations.
  • Before method declarations is now Between method/constructor declarations.

More importantly, a few new settings have been added to support more places where the number of empty lines can be controlled:

  • After last member declaration in a type (to complement previously existing Before first member declaration setting).
  • Between abstract method declarations in a type (these cases were previously handled by Between method/constructor declarations).
  • At end of method/constructor body (to complement previously existing At beginning of method/constructor body setting).
  • At beginning of code block and At end of code block.
  • Before statement with code block and After statement with code block.
  • Between statement groups in ‘switch.’

Most of the new settings have been put in a new subsection Blank lines within method/constructor declarations.

JUnit

JUnit 5.5.1

JUnit 5.5.1 is here and Eclipse JDT has been updated to use this version.

Debug

Enhanced support for –patch-module during launch

The Java Launch Configuration now supports patching of different modules by different sources during the launch. This can be verified in the Override Dependencies…​ dialog in the Dependencies tab in a Java Launch Configuration.

Java Build

Full build on JDT core preferences change

Manually changing the settings file .settings/org.eclipse.jdt.core.prefs of a project will result in a full project build, if the workspace auto-build is on. For example, pulling different settings from a git repository or generating the settings with a tool will now trigger a build. Note that this includes timestamp changes, even if actual settings file contents were not changed.

For the 4.13 release, it is possible to disable this new behavior with the VM property: -Dorg.eclipse.disableAutoBuildOnSettingsChange=true. It is planned to remove this VM property in a future release.

And more…​

You can find more noteworthy updates in on this page.

What is next?

Having JBoss Tools 4.13.0 and Red Hat CodeReady Studio 12.13 out we are already working on the next release for Eclipse 2019-12.

Share

The post New features in Red Hat CodeReady Studio 12.13.0.GA and JBoss Tools 4.13.0.Final for Eclipse 2019-09 appeared first on Red Hat Developer.

Posted on Leave a comment

Quarkus: Modernize “helloworld” JBoss EAP quickstart, Part 1

Quarkus is, in its own words, “Supersonic subatomic Java” and a “Kubernetes native Java stack tailored for GraalVM & OpenJDK HotSpot, crafted from the best of breed Java libraries and standards.” For the purpose of illustrating how to modernize an existing Java application to Quarkus, I will use the Red Hat JBoss Enterprise Application Platform (JBoss EAP) quickstarts helloworld quickstart as sample of a Java application builds using technologies (CDI and Servlet 3) supported in Quarkus.

It’s important to note that both Quarkus and JBoss EAP rely on providing developers with tools based—as much as possible—on standards. If your application is not already running on JBoss EAP, there’s no problem. You can migrate it from your current application server to JBoss EAP using the Red Hat Application Migration Toolkit. After that, the final and working modernized version of the code is available in the https://github.com/mrizzi/jboss-eap-quickstarts/tree/quarkus repository inside the helloworld module.

This article is based on the guides Quarkus provides, mainly Creating Your First Application and Building a Native Executable.

Get the code

To start, clone the JBoss EAP quickstarts repository locally, running:

$ git clone https://github.com/jboss-developer/jboss-eap-quickstarts.git Cloning into 'jboss-eap-quickstarts'... remote: Enumerating objects: 148133, done. remote: Total 148133 (delta 0), reused 0 (delta 0), pack-reused 148133 Receiving objects: 100% (148133/148133), 59.90 MiB | 7.62 MiB/s, done. Resolving deltas: 100% (66476/66476), done. $ cd jboss-eap-quickstarts/helloworld/

Try plain, vanilla helloworld

The name of the quickstart is a strong clue about what this application does, but let’s follow a scientific approach in modernizing this code, so first things first: Try the application as it is.

Deploy helloworld

  1. Open a terminal and navigate to the root of the JBoss EAP directory EAP_HOME (which you can download).
  2. Start the JBoss EAP server with the default profile by typing the following command:
$ EAP_HOME/bin/standalone.sh 

Note: For Windows, use the EAP_HOME\bin\standalone.bat script.

After a few seconds, the log should look like:

[org.jboss.as] (Controller Boot Thread) WFLYSRV0025: JBoss EAP 7.2.0.GA (WildFly Core 6.0.11.Final-redhat-00001) started in 3315ms - Started 306 of 527 services (321 services are lazy, passive or on-demand)
  1. Open http://127.0.0.1:8080 in a browser, and a page like Figure 1 should appear:
The JBoss EAP home page.

Figure 1: The JBoss EAP home page.

  1. Following instructions from Build and Deploy the Quickstart, deploy the helloworld quickstart and execute (from the project root directory) the command:
$ mvn clean install wildfly:deploy 

This command should end successfully with a log like this:

[INFO] ------------------------------------------------------------------------ [INFO] BUILD SUCCESS [INFO] ------------------------------------------------------------------------ [INFO] Total time: 8.224 s 

The helloworld application has now been deployed for the first time in JBoss EAP in about eight seconds.

Test helloworld

Following the Access the Application guide, open http://127.0.0.1:8080/helloworld in the browser and see the application page, as shown in Figure 2:

JBoss EAP's Hello World.

Figure 2: JBoss EAP’s Hello World.

Make changes

Change the createHelloMessage(String name) input parameter from World to Marco (my ego is cheap):

writer.println("<h1>" + helloService.createHelloMessage("Marco") + "</h1>");

Execute again the command:

$ mvn clean install wildfly:deploy 

and then refresh the web page in the browser to check the message displayed changes, as shown in Figure 3:

JBoss EAP's Hello Marco.

Figure 3: JBoss EAP’s Hello Marco.

Undeploy helloworld and shut down

If you want to undeploy (optional) the application before shutting down JBoss EAP, run the following command:

$ mvn clean install wildfly:undeploy 

To shut down the JBoss EAP instance, enter Ctrl+C in the terminal where it’s running.

Let’s modernize helloworld

Now we can leave the original helloworld behind and update it.

Create a new branch

Create a new working branch once the quickstart project finishes executing:

$ git checkout -b quarkus 7.2.0.GA 

Change the pom.xml file

The time has come to start changing the application. starting from the pom.xml file. From the helloworld folder, run the following command to let Quarkus add XML blocks:

$ mvn io.quarkus:quarkus-maven-plugin:0.23.2:create 

This article uses the 0.23.2 version. To know which is the latest version is, please refer to https://github.com/quarkusio/quarkus/releases/latest/, since the Quarkus release cycles are short.

This command changed the pom.xml, file adding:

  • The property <quarkus.version> to define the Quarkus version to be used.
  • The <dependencyManagement> block to import the Quarkus bill of materials (BOM). In this way, there’s no need to add the version to each Quarkus dependency.
  • The quarkus-maven-plugin plugin responsible for packaging the application, and also providing the development mode.
  • The native profile to create application native executables.

Further changes required to pom.xml, to be done manually:

  1. Move the <groupId> tag outside of the <parent> block, and above the <artifactId> tag. Because we remove the <parent> block in the next step, the <groupId> must be preserved.
  2. Remove the <parent> block: The application doesn’t need the JBoss parent pom anymore to run with Quarkus.
  3. Add the <version> tag (below the <artifactId> tag) with the value you prefer.
  4. Remove the <packaging> tag: The application won’t be a WAR anymore, but a plain JAR.
  5. Change the following dependencies:
    1. Replace the javax.enterprise:cdi-api dependency with io.quarkus:quarkus-arc, removing <scope>provided</scope> because—as stated in the documentation—this Quarkus extension provides the CDI dependency injection.
    2. Replace the org.jboss.spec.javax.servlet:jboss-servlet-api_4.0_spec dependency with io.quarkus:quarkus-undertow, removing the <scope>provided</scope>, because—again as stated in the documentation—this is the Quarkus extension that provides support for servlets.
    3. Remove the org.jboss.spec.javax.annotation:jboss-annotations-api_1.3_spec dependency because it’s coming with the previously changed dependencies.

The pom.xml file’s fully changed version is available at https://github.com/mrizzi/jboss-eap-quickstarts/blob/quarkus/helloworld/pom.xml.

Note that the above mvn io.quarkus:quarkus-maven-plugin:0.23.2:create command, besides the changes to the pom.xml file, added components to the project. The added file and folders are:

  • The files mvnw and mvnw.cmd, and .mvn folder: The Maven Wrapper allows you to run Maven projects with a specific version of Maven without requiring that you install that specific Maven version.
  • The docker folder (in src/main/): This folder contains example Dockerfile files for both native and jvm modes (together with a .dockerignore file).
  • The resources folder (in src/main/): This folder contains an empty application.properties file and the sample Quarkus landing page index.html (more in the section “Run the modernized helloworld“).

Run helloworld

To test the application, use quarkus:dev, which runs Quarkus in development mode (more details on Development Mode here).

Note: We expect this step to fail as changes are still required to the application, as detailed in this section.

Now run the command to check if and how it works:

$ ./mvnw compile quarkus:dev [INFO] Scanning for projects... [INFO] [INFO] ----------------< org.jboss.eap.quickstarts:helloworld >---------------- [INFO] Building Quickstart: helloworld quarkus [INFO] --------------------------------[ war ]--------------------------------- [INFO] [INFO] --- maven-resources-plugin:2.6:resources (default-resources) @ helloworld --- [INFO] Using 'UTF-8' encoding to copy filtered resources. [INFO] Copying 2 resources [INFO] [INFO] --- maven-compiler-plugin:3.1:compile (default-compile) @ helloworld --- [INFO] Nothing to compile - all classes are up to date [INFO] [INFO] --- quarkus-maven-plugin:0.23.2:dev (default-cli) @ helloworld --- Listening for transport dt_socket at address: 5005 INFO [io.qua.dep.QuarkusAugmentor] Beginning quarkus augmentation INFO [org.jbo.threads] JBoss Threads version 3.0.0.Final ERROR [io.qua.dev.DevModeMain] Failed to start quarkus: java.lang.RuntimeException: io.quarkus.builder.BuildException: Build failure: Build failed due to errors [error]: Build step io.quarkus.arc.deployment.ArcProcessor#validate threw an exception: javax.enterprise.inject.spi.DeploymentException: javax.enterprise.inject.UnsatisfiedResolutionException: Unsatisfied dependency for type org.jboss.as.quickstarts.helloworld.HelloService and qualifiers [@Default] - java member: org.jboss.as.quickstarts.helloworld.HelloWorldServlet#helloService - declared on CLASS bean [types=[javax.servlet.ServletConfig, java.io.Serializable, org.jboss.as.quickstarts.helloworld.HelloWorldServlet, javax.servlet.GenericServlet, javax.servlet.Servlet, java.lang.Object, javax.servlet.http.HttpServlet], qualifiers=[@Default, @Any], target=org.jboss.as.quickstarts.helloworld.HelloWorldServlet] at io.quarkus.arc.processor.BeanDeployment.processErrors(BeanDeployment.java:841) at io.quarkus.arc.processor.BeanDeployment.init(BeanDeployment.java:214) at io.quarkus.arc.processor.BeanProcessor.initialize(BeanProcessor.java:106) at io.quarkus.arc.deployment.ArcProcessor.validate(ArcProcessor.java:249) at sun.reflect.NativeMethodAccessorImpl.invoke0(Native Method) at sun.reflect.NativeMethodAccessorImpl.invoke(NativeMethodAccessorImpl.java:62) at sun.reflect.DelegatingMethodAccessorImpl.invoke(DelegatingMethodAccessorImpl.java:43) at java.lang.reflect.Method.invoke(Method.java:498) at io.quarkus.deployment.ExtensionLoader$1.execute(ExtensionLoader.java:780) at io.quarkus.builder.BuildContext.run(BuildContext.java:415) at org.jboss.threads.ContextClassLoaderSavingRunnable.run(ContextClassLoaderSavingRunnable.java:35) at org.jboss.threads.EnhancedQueueExecutor.safeRun(EnhancedQueueExecutor.java:2011) at org.jboss.threads.EnhancedQueueExecutor$ThreadBody.doRunTask(EnhancedQueueExecutor.java:1535) at org.jboss.threads.EnhancedQueueExecutor$ThreadBody.run(EnhancedQueueExecutor.java:1426) at java.lang.Thread.run(Thread.java:748) at org.jboss.threads.JBossThread.run(JBossThread.java:479) Caused by: javax.enterprise.inject.UnsatisfiedResolutionException: Unsatisfied dependency for type org.jboss.as.quickstarts.helloworld.HelloService and qualifiers [@Default] - java member: org.jboss.as.quickstarts.helloworld.HelloWorldServlet#helloService - declared on CLASS bean [types=[javax.servlet.ServletConfig, java.io.Serializable, org.jboss.as.quickstarts.helloworld.HelloWorldServlet, javax.servlet.GenericServlet, javax.servlet.Servlet, java.lang.Object, javax.servlet.http.HttpServlet], qualifiers=[@Default, @Any], target=org.jboss.as.quickstarts.helloworld.HelloWorldServlet] at io.quarkus.arc.processor.Beans.resolveInjectionPoint(Beans.java:428) at io.quarkus.arc.processor.BeanInfo.init(BeanInfo.java:371) at io.quarkus.arc.processor.BeanDeployment.init(BeanDeployment.java:206) ... 14 more 

It failed. Why? What happened?

The UnsatisfiedResolutionException exception refers to the HelloService class, which is a member of the HelloWorldServlet class (java member: org.jboss.as.quickstarts.helloworld.HelloWorldServlet#helloService). The problem is that HelloWorldServlet needs an injected instance of HelloService, but it can not be found (even if the two classes are in the very same package).

It’s time to return to Quarkus guides to leverage the documentation and understand how @Inject—and hence Contexts and Dependency Injection (CDI)—works in Quarkus, thanks to the Contexts and Dependency Injection guide. In the Bean Discovery paragraph, it says, “Bean classes that don’t have a bean defining annotation are not discovered.”

Looking at the HelloService class, it’s clear there’s no bean defining annotation, and one has to be added to have Quarkus to discover the bean. So, because it’s a stateless object, it’s safe to add the @ApplicationScoped annotation:

@ApplicationScoped public class HelloService { 

Note: The IDE should prompt you to add the required package shown here (add it manually if need be):

import javax.enterprise.context.ApplicationScoped; 

If you’re in doubt about which scope to apply when the original bean has no scope defined, please refer to the JSR 365: Contexts and Dependency Injection for Java 2.0—Default scope documentation.

Now, try again to run the application, executing again the ./mvnw compile quarkus:dev command:

$ ./mvnw compile quarkus:dev [INFO] Scanning for projects... [INFO] [INFO] ----------------< org.jboss.eap.quickstarts:helloworld >---------------- [INFO] Building Quickstart: helloworld quarkus [INFO] --------------------------------[ war ]--------------------------------- [INFO] [INFO] --- maven-resources-plugin:2.6:resources (default-resources) @ helloworld --- [INFO] Using 'UTF-8' encoding to copy filtered resources. [INFO] Copying 2 resources [INFO] [INFO] --- maven-compiler-plugin:3.1:compile (default-compile) @ helloworld --- [INFO] Changes detected - recompiling the module! [INFO] Compiling 2 source files to /home/mrizzi/git/forked/jboss-eap-quickstarts/helloworld/target/classes [INFO] [INFO] --- quarkus-maven-plugin:0.23.2:dev (default-cli) @ helloworld --- Listening for transport dt_socket at address: 5005 INFO [io.qua.dep.QuarkusAugmentor] (main) Beginning quarkus augmentation INFO [io.qua.dep.QuarkusAugmentor] (main) Quarkus augmentation completed in 576ms INFO [io.quarkus] (main) Quarkus 0.23.2 started in 1.083s. Listening on: http://0.0.0.0:8080 INFO [io.quarkus] (main) Profile dev activated. Live Coding activated. INFO [io.quarkus] (main) Installed features: [cdi] 

This time the application runs successfully.

Run the modernized helloworld

As the terminal log suggests, open a browser to http://0.0.0.0:8080(the default Quarkus landing page), and the page shown in Figure 4 appears:

The Quarkus dev landing page.

Figure 4: The Quarkus dev landing page.

This application has the following context’s definition in the WebServlet annotation:

@WebServlet("/HelloWorld") public class HelloWorldServlet extends HttpServlet { 

Hence, you can browse to http://0.0.0.0:8080/HelloWorldto reach the page shown in Figure 5:

The Quarkus dev Hello World page.

Figure 5: The Quarkus dev Hello World page.

It works!

Make changes

Please, pay attention to the fact that the ./mvnw compile quarkus:dev command is still running, and we’re not going to stop it. Now, try to apply the same—very trivial—change to the code and see how Quarkus improves the developer experience:

writer.println("<h1>" + helloService.createHelloMessage("Marco") + "</h1>");

Save the file, and then refresh the web page to check that Hello Marco appears, as shown in Figure 6:

The Quarkus dev Hello Marco page.

Figure 6: The Quarkus dev Hello Marco page.

Take time to check the terminal output:

INFO [io.qua.dev] (vert.x-worker-thread-3) Changed source files detected, recompiling [/home/mrizzi/git/forked/jboss-eap-quickstarts/helloworld/src/main/java/org/jboss/as/quickstarts/helloworld/HelloWorldServlet.java] INFO [io.quarkus] (vert.x-worker-thread-3) Quarkus stopped in 0.003s INFO [io.qua.dep.QuarkusAugmentor] (vert.x-worker-thread-3) Beginning quarkus augmentation INFO [io.qua.dep.QuarkusAugmentor] (vert.x-worker-thread-3) Quarkus augmentation completed in 232ms INFO [io.quarkus] (vert.x-worker-thread-3) Quarkus 0.23.2 started in 0.257s. Listening on: http://0.0.0.0:8080 INFO [io.quarkus] (vert.x-worker-thread-3) Profile dev activated. Live Coding activated. INFO [io.quarkus] (vert.x-worker-thread-3) Installed features: [cdi] INFO [io.qua.dev] (vert.x-worker-thread-3) Hot replace total time: 0.371s 

Refreshing the page triggered the source code change detection and the Quarkus automagic “stop-and-start.” All of this executed in just 0.371 seconds (that’s part of the Quarkus “Supersonic Subatomic Java” experience).

Build the helloworld packaged JAR

Now that the code works as expected, it can be packaged using the command:

$ ./mvnw clean package

This command creates two JARs in the /target folder. The first is helloworld-<version>.jar, which is the standard artifact built from the Maven command with the project’s classes and resources. The second is helloworld-<version>-runner.jar, which is an executable JAR.

Please pay attention to the fact that this is not an uber-jar, because all of the dependencies are copied into the /target/lib folder (and not bundled within the JAR). Hence, to run this JAR in another location or host, both the JAR file and the libraries in the /lib folder have to be copied, considering that the Class-Path entry of the MANIFEST.MF file in the JAR explicitly lists the JARs from the lib folder.

To create an uber-jar application, please refer to the Uber-Jar Creation Quarkus guide.

Run the helloworld packaged JAR

Now, the packaged JAR can be executed using the standard java command:

$ java -jar ./target/helloworld-<version>-runner.jar INFO [io.quarkus] (main) Quarkus 0.23.2 started in 0.673s. Listening on: http://0.0.0.0:8080 INFO [io.quarkus] (main) Profile prod activated. INFO [io.quarkus] (main) Installed features: [cdi] 

As done above, open the http://0.0.0.0:8080 URL in a browser, and test that everything works.

Build the helloworld quickstart-native executable

So far so good. The helloworld quickstart ran as a standalone Java application using Quarkus dependencies, but more can be achieved by adding a further step to the modernization path: Build a native executable.

Install GraalVM

First of all, the tools for creating the native executable have to be installed:

  1. Download GraalVM 19.2.0.1 from https://github.com/oracle/graal/releases/tag/vm-19.2.0.1.
  2. Untar the file using the command:

$ tar xvzf graalvm-ce-linux-amd64-19.2.0.1.tar.gz

  1. Go to the untar folder.
  2. Execute the following to download and add the native image component:

$ ./bin/gu install native-image

  1. Set the GRAALVM_HOME environment variable to the folder created in step two, for example:

$ export GRAALVM_HOME={untar-folder}/graalvm-ce-19.2.0.1)

More details and install instructions for other operating systems are available in Building a Native Executable—Prerequisites Quarkus guide.

Build the helloworld native executable

As stated in the Building a Native Executable—Producing a native executable Quarkus guide, “Let’s now produce a native executable for our application. It improves the startup time of the application and produces a minimal disk footprint. The executable would have everything to run the application including the ‘JVM’ (shrunk to be just enough to run the application), and the application.”

To create the native executable, the Maven native profile has to be enabled by executing:

$ ./mvnw package -Pnative

The build took me about 1:10 minutes and the result is the helloworld-<version>-runner file in the /target folder.

Run the helloworld native executable

The /target/helloworld-<version>-runner file created in the previous step. It’s executable, so running it is easy:

$ ./target/helloworld-<version>-runner INFO [io.quarkus] (main) Quarkus 0.23.2 started in 0.006s. Listening on: http://0.0.0.0:8080 INFO [io.quarkus] (main) Profile prod activated. INFO [io.quarkus] (main) Installed features: [cdi] 

As done before, open the http://0.0.0.0:8080 URL in a browser and test that everything is working.

Next steps

I believe that this modernization, even of a basic application, is the right way to approach a brownfield application using technologies available in Quarkus. This way, you can start facing the issues and tackling them to understand and learn how to solve them.

In part two of this series, I’ll look at how to capture memory consumption data in order to evaluate performance improvements, which is a fundamental part of the modernization process.

Share

The post Quarkus: Modernize “helloworld” JBoss EAP quickstart, Part 1 appeared first on Red Hat Developer.

Posted on Leave a comment

Managing JBoss EAP/Wildfly using Jcliff

Systems management can be a difficult task. Not only does one need to determine what the end state should be but, more importantly, how to ensure systems attain and remain at this state. Doing so in an automated fashion is just as critical, because there may be a large number of target instances. In regard to enterprise Java middleware application servers, these instances are typically configured using a set of XML based files. Although these files may be manually configured, most application servers have a command-line based tool or set of tools that abstracts the end user from having to worry about the underlying configuration. WebSphere Liberty includes a variety of tools to manage these resources, whereas JBoss contains the jboss-cli tool.

Although each tool accomplishes its utilitarian use case as it allows for proper server management, it does fail to adhere to one of the principles of automation and configuration management: idempotence. Ensuring the desired state does not equate to executing the same action with every iteration. Additional intelligence must be introduced. Along with idempotence, another core principle of configuration management is that values be expressed declaratively and stored in a version control system.

Jcliff is a Java-based utility that is built on top of the JBoss command-line interface and allows for the desired intent for the server configuration to be expressed declaratively, which in turn can be stored in a version control system. We’ll provide an overview of the Jcliff utility including inherent benefits, installation options, and several examples showcasing the use.

The problem space

Before beginning to work with Jcliff, one must be cognizant of the underlying JBoss architecture. The configuration of the JBoss server can be expressed using Dynamic Model Representation (DMR) notation. The following is an example of DMR:

{ "system-property" => { "foo" => "bar", "bah" => "gah" } } 

The DMR example above describes several Java system properties that will be stored within the JBoss configuration. These properties can be added using the JBoss CLI by executing the following command:

/system-property=foo:add(value=bar) /system-property=bah:add(value=gah) 

The challenge is that the same commands cannot be executed more than once. Otherwise, an error similar to the following is produced.

{ "outcome" => "failed", "failure-description" => "WFLYCTL0212: Duplicate resource [(\"system-property\" => \"foo\")]", "rolled-back" => true } 

Where Jcliff excels is that it includes the necessary intelligence to determine the current state of the JBoss configuration and then applying the appropriate configurations necessary. This is critical to adopting proper configuration management when working with JBoss.

Installing Jcliff

With a baseline understanding of Jcliff, let’s discuss the methods in which one can obtain the utility. First, Jcliff can be built from source from the project repository, given that it’s a freely open source project. Alternatively, Jcliff can be installed using popular software packaging tools in each of the primary operating system families.

Linux (rpm)

Jcliff can be consumed on a Linux package when capable of consuming an rpm using a package manager.

First, install the yum repository:

$ cat /etc/yum.repos.d/jcliff.repo [jcliff] baseurl = http://people.redhat.com/~rpelisse/jcliff.yum/ gpgcheck = 0 name = JCliff repository 

Once this repository has been added, JCliff can be installed by using Yum or Dnf:

Using yum:

$ sudo yum install jcliff 

Or using dnf:

$ sudo dnf install jcliff 

Manual installation

Jcliff can also be installed manually without the need to leverage a package manager. This is useful for those on Linux distributions that cannot consume rpm packages. Simply download and unpack the archive from the release artifact from the project repository.

$ curl -O \ https://github.com/bserdar/jcliff/releases/download/v2.12.1/jcliff-2.12.1-dist.tar.gz $ tar xzvf jcliff-2.12.1-dist.tar.gz 

Place the resulting Jcliff folder in the destination of your choosing. This location is known as JCLIFF_HOME. Add this environment variable and add it to the path as described below:

$ export JCLIFF_HOME=/path/to/jcliff-2.12.1/ $ export PATH=${JCLIFF_HOME}/bin:${PATH} 

At this point, you should be able to execute the jcliff command.

OSX

While users on OSX can take advantage of the manual installation option, those making use of the brew package manager can use this tool as well.

Execute the following commands to install Jcliff using Brew:

$ brew tap redhat-cop/redhat-cop $ brew install redhat-cop/redhat-cop/jcliff 

Windows

Fear not, Windows users; you can also make use of Jcliff without having to compile from source. Windows, in the same vein as OSX, does not have an official package manager, but Chocolatey has been given this role.

Execute the following command to install Jcliff using Chocolatey:

$ choco install jcliff 

Using Jcliff

With Jcliff properly installed on your machine, let’s walk through a simple example to demonstrate the use of the tool. As discussed previously, Jcliff makes use of files that describe the target configuration. At this point, you may have questions like: What is the format of these configurations, and where do I begin?

Let’s take a simple example and look into adding a new system property to the JBoss configuration. Launch an instance of JBoss and connect using the JBoss command-line interface:

$ /bin/jboss-cli.sh --connect [standalone@localhost:9990 /] ls /system-property [standalone@localhost:9990 /] 

Now, use Jcliff to update the configuration. First, we’ll need to create a Jcliff rule. The rule resembles DMR format and appears similar to the following:

$ cat jcliff-prop { "system-property" => { "jcliff.enabled" => "true", } } 

Then we can simply ask JCliff to run this script against our JBoss server:

$ jcliff jcliff-prop Jcliff version 2.12.4 2019-10-02 17:03:40:0008: /core-service=platform-mbean/type=runtime:read-attribute(name=system-properties) 2019-10-02 17:03:41:0974: /system-property=jcliff.enabled:add(value="true") 

Use the JBoss CLI to verify the changes have been applied.

$ “${JBOSS_HOME}/bin/jboss-cli.sh” --connect --command=/system-property=jcliff.enabled:read-resource { "outcome" => "success", "result" => {"value" => "true"} } 

To demonstrate how Jcliff handles repetitive executions, run the previous Jcliff command again. Inspect the output.

$ jcliff jcliff-prop Jcliff version 2.12.4 2019-10-02 17:05:34:0107: /core-service=platform-mbean/type=runtime:read-attribute(name=system-properties) 

Notice that only 1 command was executed against the JBoss server instead of two? This action was a result of assessing the current state within JBoss and determining that no action was necessary to reach the desired state. Mission accomplished.

Next steps

Although the preceding scenario was not overly complex, you should now have the knowledge necessary to understand the capabilities and functionality of the Jcliff utility as well as the benefits afforded through declarative configurations and automation. When building out enterprise-grade systems, however, Jcliff would not be executed manually. You would want to integrate the utility into a proper configuration management tool that employs many of the automation and configuration principles described earlier. Fortunately, Jcliff has been integrated into several popular configuration management tools.

In an upcoming article, we’ll provide an overview of the configuration management options available with Jcliff, along with examples that will allow you to quickly build out enterprise-grade confidence with Jcliff.

Share

The post Managing JBoss EAP/Wildfly using Jcliff appeared first on Red Hat Developer.