The kernel team is working on final integration for Linux kernel 6.4. This version was just recently released, and will arrive soon in Fedora Linux. As a result, the Fedora Linux kernel and QA teams have organized a test week from Sunday, July 09, 2023 to Sunday, July 16, 2023. The wiki page in this article contains links to the test images you’ll need to participate. Please continue reading for details.
How does a test week work?
A test week is an event where anyone can help ensure changes in Fedora Linux work well in an upcoming release. Fedora community members often participate, and the public is welcome at these events. If you’ve never contributed before, this is a perfect way to get started.
To contribute, you only need to be able to do the following things:
Download test materials, which include some large files
Read and follow directions step by step
The wiki page for the kernel test day has a lot of good information on what and how to test. After you’ve done some testing, you can log your results in the test day web application. If you’re available on or around the days of the event, please do some testing and report your results. We have a document which provides all the necessary steps.
Happy testing, and we hope to see you on one of the test days.
If you have not already – now is the best time to read through the first part of the event report before getting into the second part here.
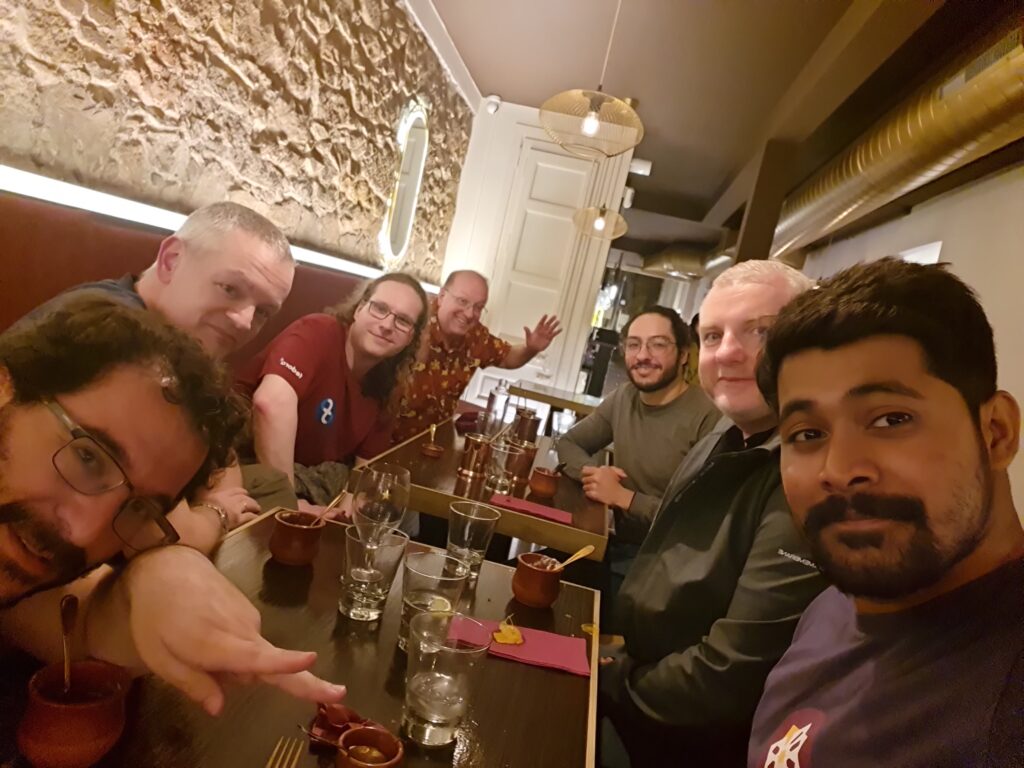
From left to right – Actually, never mind – there are too many people there.
Day 2 Wednesday, 22nd March 2023 The team members decided to start a bit late on the second day to ensure that everyone gets enough rest after the adventurous first day. Once the joint breakfast was completed in the hotel restaurant, the members started heading off to the office by 10 in the morning. They were were gracefully served Catalonian snacks by Lenka Segura, Japanese souvenirs by David Kirwan, and German sweets by Julia Bley for the duration of the meeting. Matthew Miller started the second day with his talk about the Fedora Project strategy and how Community Platform Engineering fits into the picture. This talk was followed by the one by Tomas Hrcka about how the Fedora Release Engineering team addresses its responsibilities. The team took a short break after the first couple of sessions, before heading into the next set.
After a short break, the team continued with three lightning talks delivered about OpenShift operators by David Kirwan, Packit by Frantisek Lachman and Laura Barcziova, and Pulp by Miroslav Suchy. Miroslav Suchy delivered a thought-provoking talk about the scope of tooling for the Community Platform Engineering team, and how it contributes to Fedora Linux. With that, the folks dispersed into small groups for lunch. Once they were back in the office, Hunor Csomortáni delivered a talk about revisiting source-git and the plans for unifying package sources in the pipeline. This was followed by a talk by Carl George about the EPEL 10 plans for improvements that would be coming very soon. The final interesting talk of the day was delivered by Brian Stinson about the expectations of RHEL from Fedora Linux and CentOS Stream.
In the evening, at around 19:00, the team members left for a regional burger restaurant, Tio Joe’s. This had been booked in advance and was near the hotel premises . With toasts made to the team members that were now united after a long time, they not only enjoyed the appetizing food that was served but also the company of the friends that they had bonded with over the course of the last couple days.
Once the dinner was over, at around 21:30, some folks headed back to the hotel for a respite. The remainder went to the Trompos Karaoke Bar to participate in the fun karaoke night session organized by Aurelien Bompard. People queued up their songs and soon began to collaborate in performing their favorite songs in duos and in choirs. This was a fitting end to the night, as late as 02:00, and a fun look at their singing preferences.
Day 3 Thursday, 23rd March 2023
This was the day of departure for a lot of people. Since they would miss out on the sessions on this third day, it was incredibly light in terms of the agenda and activities. Many of the team members checked out of their hotel rooms after breakfast at 09:00 and left their luggage with the hotel before leaving for the office.
Stefan Mattejiet started off the last day with his discussion session about CPE Futurespective, and understanding what direction the team should head in the coming times. The interesting discussion felt a lot inspired by the established logic model planning structure used for Fedora Council community initiatives. This structure starts off with planning the general objectives first and then going back to the implementation details later.
The next session was hosted by Aoife Moloney who kicked off an interesting discussion about the limited-scope projects that the team undertakes and the maintainers for the applications that the team takes care of. The members participated in pointing out the things that currently work great and those that could use some improvements. This was the last planned session for the day and the group assembled to be a part of the “Community Platform Engineering family picture”. After that, they dispersed into small groups to have their lunches in their preferred places.
With no more planned talks after lunchtime, the team members were divided into smaller groups for breakout rooms to participate in more detailed discussions. Michal Konecny lead the one for the infrastructure and release engineering team.
The team started slowly thinning down even more in the late afternoon, with the members bidding farewell to each other in the office and returning to the hotel. Some members decided to stay longer to explore Barcelona a bit more. Others began collecting their luggage from the hotel and leaving for the airport. With “goodbyes” waved to teammates and “resolves” about the next thing, the members departed from the face-to-face meeting with a new zeal and energy to contribute in an even better way to the community.
Even with minor hiccups and some teammates not being able to join the event, the meeting event turned out to be a grand success – both in uniting the members and in strategizing the team’s efforts. The members of the team surely look forward to the next time they get together.
Back in 2018, a previous article demonstrated how to use LVM to clone the root filesystem before upgrading Fedora Linux so as to have a fallback in the unlikely event that something goes wrong. Today, the default Fedora Workstation install uses Btrfs. Now you can use a Btrfs snapshot to make creating a bootable fallback much easier. Note that converting or migrating a system to Btrfs from another filesystem is outside the scope of this article.
Check that root filesystem is Btrfs
This example uses a Pinebook aarch64 laptop. Before proceeding, first make sure that Btrfs is being used for the root (system) filesystem. Not every spin or image uses Btrfs by default.
The above example output shows that the file system mounted on “root” (“/”) is type Btrfs. Notice that three mountpoints show the same backing device and the same Used and Available blocks. This is because they are parts (subvolumes) mounted from a single Btrfs filesystem. The /f34 subvolume is my bootable snapshot from last year.
A default Fedora Btrfs install creates one Btrfs filesystem with two subvolumes — root and home — mounted on / and /home respectively. Let’s see what other subvolumes I’ve added:
$ sudo btrfs subvol list /
ID 272 gen 110428 top level 5 path root
ID 273 gen 110426 top level 5 path home
ID 300 gen 109923 top level 5 path f34
ID 301 gen 95852 top level 5 path home.22Jul26
ID 302 gen 95854 top level 5 path f36.22Jul26
There is an f34 subvol from the last system-upgrade and two readonly snapshots of home and f36. The easiest way to add and delete snapshots is to mount the Btrfs root. I will update the system and create a new snapshot of the current f36 root subvolume. If you have renamed your root subvolume, then you presumably know enough to adjust the following example accordingly for your system.
Create the Btrfs fallback snapshot
$ sudo dnf update --refresh
... lots of stuff updated (reboot if kernel updated)
$ sudo mkdir -p /mnt/root
$ sudo mount /dev/mmcblk2p3 /mnt/root
$ cd /mnt/root
$ ls
f34 f36.22Jul26 home home.22Jul26 root
$ sudo btrfs subvol snapshot root f36
Create a snapshot of 'root' in './f36'
Because Btrfs snapshots are filesystem based, it is not necessary to “sync” before the snapshot, as I recommended for LVM. To boot from the new subvol as a fallback, you will need to edit /mnt/root/f36/etc/fstab with your favorite editor. If you are a beginner, nano is a dirt simple text editor with minimal features. Here are some lines from my fstab file:
Change subvol=root to subvol=f36. This change is to the file in the snapshot, not your production fstab. You can compare them with diff /etc/fstab /mnt/root/f36/etc/fstab. In my case, I also deleted my f34 snapshot from last year with sudo btrfs subvol delete f34.
Test the Btrfs fallback snapshot
Now you are ready to test the fallback. You could use grubby or edit an entry in /boot/loader/entries to change subvol=root to subvol=f36. But in the interest of safety for beginners, I will have you edit the GRUB entry at boot time instead. Checkout this article on GRUB for tips on getting to the GRUB menu. Once you are there, press the e key to edit the default kernel entry. Don’t worry — your changes are in volatile memory only. If you mess up, reboot to start over. Just like with fstab, find subvol=root and change it to subvol=f36. Press F10 or Ctrl+X to boot your modified entry. With these changes, the system should boot into your new snapshot. Look at /etc/fstab to make sure you are booting from the right subvol, or enter mount | grep subvol to see what subvolume is mounted on “/”.
Do the Fedora Linux system upgrade
If your fallback is working, reboot back to your normal root filesystem (and confirm as above). Then proceed with the standard system-upgrade outlined on the wiki page. TIP: Before running dnf system-upgrade reboot, make another snapshot of root. Call it something like root.dl. That way, you don’t have to download five gigabytes of packages again should you discover that there wasn’t enough free space. The snapshot will not take up any additional space because all but the downloaded packages are shared with root and f36. About that sharing of disk blocks …
dnf system-upgrade gets confused about free space as reported by Btrfs because the f36 files in the root subvolume use the same disk locations as the same files in the f36 subvolume. So removing them from the root subvolume during the upgrade process doesn’t actually free up any space. If you run out of space, and you reboot — the graphical user interface (GUI) won’t start. Use Ctrl+Alt+F2 to login on a text console and practice your command line interface skills. Figuring out what to remove to free up space or how to expand the root filesystem is beyond the scope of this article (mine is often on an LVM volume and can be expanded). Having more than 50% free for the upgrade is a safe bet.
Recovery
Should something go wrong, you can reboot and edit the GRUB entry to boot the fallback. If you are a beginner, you’ll want some hand holding if you do end up needing to change the GRUB entry on disk (so you don’t have to edit at each boot). It is straight forward to delete or rename the broken root subvol. Snapshot the f36 subvol (or the root.dl snapshot) to try the system-upgrade process again. Here is an example of starting over after booting into the fallback system on subvol f36:
$ mount | grep subvol
$ sudo mount /dev/mmcblk2p3 /mnt/root
$ cd /mnt/root
$ sudo mv root root.failed
$ sudo btrfs subvol snapshot f36 root
Create a snapshot of 'f36' in './root' Don't forget to edit /mnt/root/root/etc/fstab to change the subvol mounted on "/" to "root".
As it turns out, the new kernel-6.2.11 for f38 did not boot on my Pinebook after the system-upgrade! (Don’t worry, ARM is an alternative CPU architecture for Fedora Linux — this is very unlikely to happen to you on a mainstream device.) I was indeed able to boot back to f36 by editing the GRUB entry for kernel-6.2.10 at boot time as described above. I am now using f38 again — but with kernel-6.2.10 from f36.
Update: kernel-6.2.12 is out and it works on the Pinebook.
Expiration
As you update the f38 system, it will eventually want to delete the last f36 kernel from /boot. That is normally not a problem, as by that time you have settled into f38, and the f36 snapshot is just an archive. If you want to keep your fork (f36 snapshot) bootable indefinitely, you should preserve a working f36 kernel under /boot. The simplest way to do so is to set installonly_limit=0 in /etc/dnf/dnf.conf and manually remove old kernels. It is simple and safe (but annoying).
Outline of a more complex solution (not for beginners): Run find /boot -name "*fc36*" to list all the kernel and GRUB files for your f36 subvolume snapshot that are under /boot (which is not in the snapshot). Copy them to a backup location (I would mount the f36 subvolume and copy to a backup directory there). While booted from f38, for each f36 kernel version, use dnf to remove that specific kernel version (for example, dnf remove kernel-core-5.19.11-200.fc36). Do not remove the f38 kernels! Now restore the f36 kernels you saved to /boot. The f38 system doesn’t know about f36 kernels anymore, and it will not remove them from /boot.
The problem with that method is the danger of accidentally removing the running f38 kernel. If anyone has a better method, let me know in the comments.
Future directions
Those comfortable with modifying GRUB entries might consider creating a snapshot subvolume named f38, modifying the current GRUB entry to boot into that, rebooting, and running the system-upgrade in that subvolume. Then always name the subvol for the root filesystem after the Fedora Linux release it contains. I did not do that for this article for two reasons.
Naming the current active subvolume root matches the Fedora Linux default.
Sticking with root for the current subvol does not require any permanent changes outside of the normal system-upgrade procedure.
As this article has demonstrated, readonly snapsnots are useful as local restore points in case things go wrong when making significant system changes (such as a system release upgrade). These snapshots can also be sent to a remote backup using Btrfs’ send subcommand. (And if the remote backup device already contains previous backups, Btrfs can do an incremental send that only transmits changed files to save time and space.) If you intend to archive these snapshots long term, the key to not getting confused about which ones are which and what order to restore them is to use a consistent naming convention. See the article on Btrfs snapshots for backup for more information about using Btrfs’ send command to create backups.
A FIDO U2F security key is a small USB and/or NFC based device. It is a hardware security token with modules for many security related use-cases. There are several brands of FIDO compliant keys, including NitroKey, SoloKey v2, and YubiKey. FIDO, in contrast to proprietary protocols like Yubico OTP, is hardware token agnostic and the tools used are manufacturer independent.
This post introduces the FIDO protocol(s) and shows how to install and enable a FIDO U2F security key as an alternative authentication factor for logging into a terminal, GDM, or authenticating for sudo.
This post will not cover storing OpenPGP keys or X.509 certificates because those features are hardware dependent and not part of the FIDO U2F standard.
Keep a backup security key
As soon as you start working with security tokens you have to account for the potential to lock yourself out of accounts tied to these tokens. As hardware security tokens are unique and designed to be extremely hard to copy you cannot just make a backup of it like you can with software vaults like KeePass or AndOTP. Consequently, all registrations you make with your primary key you should immediately repeat with a second backup key that you will store in a secure location, maybe even a safe.
In practice this means you will need to register both hardware tokens with your Linux and web accounts, generate OpenSSH private keys twice, and upload both OpenSSH public keys to the servers and services you use (for example, GitHub).
Should you lose a key, you’ll want to use your second key to sign in on every service the keys are registered with, remove the lost key, and register a new one. This is especially true for password-less logins using a FIDO2 protocol.
FIDO2, U2F and the FIDO Alliance
FIDO2 is a collection of standards maintained by the FIDO Alliance. The FIDO Alliance hopes to eventually get rid of passwords altogether and instead provide procedures to authenticate users securely through multiple factors but without the need for passwords.
The standard consists of the World Wide Web Consortium’s (W3C) Web Authentication (WebAuthn) and the FIDO Alliance’s Client-to-Authenticator Protocol (CTAP). WebAuthn is a standard API to request and process public key challenges for authentication. With this, browsers send a challenge to a client which then produces a response with a private key that the challenger then verifies using a previously exchanged public key. How the challenge answer is produced is unknown to the service and it is controlled by the CTAP. The user might be prompted for several verification methods like biometrics, PIN, or presence check (or some combination of these methods). These checks are the same for authentication as they are when registering the key with the service.
A access PIN to protect any interaction with the hardware token is optional and it is unset by default. Most keys will self-invalidate after eight sequential failed attempts at entering the access PIN. The only way to recover an invalidated key and set a new PIN is to reset the key. However, when a key is reset, all its service registrations will be lost!
A FIDO2 key also supports the FIDO U2F protocol (now renamed CTAP1). This protocol is designed for second- or multi-factor (but not password-less) authentication. Linux’s PAM authentication system can also be configured to use the U2F protocol. Although FIDO U2F is not designed for password-less authentication, the U2F PAM module does allow password-less authentication.
Security implications
FIDO2 / U2F works by tying the security key to your user account. Most keys have a basic presence-check which is enabled / used by default. They typically perform a presence-check by lighting up and prompting you to touch the key. A FIDO2 PIN is optional and it will be unset by default. When the key is registered for signing in to your Linux account or for using sudo, it is sufficient to have the device and key physically present. A FIDO2 PIN is an important additional verification step to ensure that only you can use the key for authentication.
Wait! Now I have to keep track of an additional PIN? Isn’t this just a shorter password?
The concerned reader
A FIDO2 PIN is not a password. It is a short, easy-to-remember phrase. This is not a problem because:
You need physical access to the key and you need to know the PIN.
Failing to enter the PIN eight times will invalidate the key which makes it hard to brute-force.
On the contrary, you can now use a secure password stored in a password manager that you don’t need to remember.
Local system authentication uses Pluggable Authentication Modules (PAM). The PAM module for U2F devices (and hence authentication) is pam_u2f. Whether your key supports FIDO2 or FIDO U2F will depend on its firmware version and hardware model.
The setup is as follows:
Install the PAM module.
Register a key with your user account.
Use authselect to activate smart card support in PAM.
Authselect is a tool for configuring PAM with reproducible profiles. By using authselect’s profiles, manually altering configuration files under the /etc/pam.d directory can be avoided.
Dependencies
The required packages are available in the official repositories.
The FIDO2 standard defines an optional PIN for access protection. There is no PUK or other way to restore a lost or invalidated PIN so make sure you have a backup approach for authentication. If the PIN is invalidated through sequential entry of invalid PINs, the only way to recover is to reset the key. However, resetting your key removes all its credentials and disconnects it from all previously registered services.
The fido2-tools package contains a tool to set the FIDO2 PIN of your key: fido2-token. Get a list of currently connected FIDO2 devices with fido2-token -L and set a new pin with fido2-token -C </path/to/device>:
[…]$ fido2-token -L
/dev/hidraw1: vendor=0x1050, product=0x0407 (Yubico YubiKey OTP+FIDO+CCID)
[…]$ fido2-token -C /dev/hidraw1
Enter current PIN for /dev/hidraw1: Enter new PIN for /dev/hidraw1:
Register the security key with your local account(s)
Use the tool pamu2fcfg to retrieve a configuration line that goes into ~/.config/Yubico/u2f_keys. pam_u2f is a Yubico-provided, generic module for U2F keys, hence the Yubico specific default configuration path. Each configuration line in this file consists of a username and a key-specific credential / config part separated by colons. Be sure to only use one line per user.
fedora-user:owBYtPIH2yzjlSQaRrVcxB...Pg==,es256,+presence+pin[:another key for this user]
If the key is PIN protected you’ll be asked to enter the PIN for this operation. Use the following for the initial registration of your first key:
pam_u2f also supports the use of a central authentication file. In that case, be sure to use one line per user and to keep all the keys of a given user on the same line. If two lines reference the same username only the last one will be used! Have a look at the pam_u2f man page for all available options.
Configure PAM with authselect
authselect is a tool for controling your system’s PAM configuration. It introduces profiles as an additional layer of abstraction. One authselect profile can change several PAM configuration files. Profiles have parameters that control additional features and behaviors like enabling FIDO U2F security keys. A detailed tour of authselect is planned for a future article.
Display the currently active authselect profile. With the SSSD (System Security Service Daemon) profile selected and U2F support enabled, the output might resemble the following:
[…]$ authselect current
Profile ID: sssd
Enabled features:
- with-pam-u2f
Activate FIDO U2F support in PAM using authselect with the with-pam-u2f flag:
[…]$ sudo authselect select sssd with-pam-u2f
If you also want to use your fingerprint reader you have to enable both features:
This activates the sssd profile with pam_u2f and fingerprint reader support. For example, when using sudo on a terminal with the above authselect profile configuration, you’ll first be asked for a fingerprint and if that fails for the U2F key. GDM, however, will use the U2F key first.
Unlocking the GNOME keyring daemon
When using biometrics, a U2F key, or any other method that does not require a passphrase to sign in to GNOME, the Login keyring cannot be unlocked automatically. This is because, by default, the keyring passphrase is set to the same value as your login passphrase. Normally, PAM passes your login passphrase to the keyring daemon. Since you are not entering a passphrase when authenticating via methods such as biometrics or U2F keys, there is no passphrase for PAM to pass to the keyring daemon. There is no straight forward solution to this problem.
If you use LUKS encryption for your home partition and operate a single-user system, you could remove the passphrase from your keyring. This will leave your gnome keyring unencrypted at the file level. But it will still be encrypted at the block level by LUKS. LUKS encryption is equivalent to the default file-based keyring encryption on a single-user system since the keyring’s encryption is only designed to protect its contents from offline access. The keyring will be decrypted / unlocked after login either way and any runtime application or malware can potentially access the keyring’s contents after it is unlocked. Since LUKS is also an offline protection mechanism, it can be considered an equivalent alternative to the keyring’s normal file-based encryption.
LUKS encryption and the keyring’s normal file-based encryption are not equivalent if your system is used by multiple users. In the case of a multi-user system with the keyrings protected only by LUKS, any user with authorization to decrypt the disk and boot the system will be able to access any other user’s keyring on that same system.
Removing the GNOME Login keyring passphrase is straight forward. Just set a new empty password and the keyring will be unlocked and it will be stored unencrypted at the file level. The graphical utility seahorse (also called Passwords and Keys) can be used to set a blank password on your GNOME Login keyring.
Lookout and other use-cases
Upcoming articles will explore how to use FIDO2/U2F keys for unlocking LUKS-encrypted disks using the U2F Dracut plugin.
OpenSSH 8.2+ supports the use of ed25519-sk security keys. This topic has already been touched upon in the previous article titled “How to use a YubiKey with Fedora Linux“.
Note that FIDO2/U2F is an authentication standard. There are other use-cases for security tokens (primarily established by Yubico) like (T)OTP, PIV (for x509 key management) or OpenPGP which are not covered in general but on a hardware by hardware basis.
Fedora Linux Workstation features a GNOME desktop environment which is an easy to use, intuitive, and efficient desktop environment. But this is not the only option if you would like to use Fedora Linux. There are other spins that provide alternative desktop environments like KDE, XFCE, Cinnamon, etc. This article describes how you can try different desktop environments if you are using an OSTree based Fedora Linux spins.
Main version of Fedora Workstation
If you installed a non-OSTree Fedora Workstation or one of the Spins and would like to try different desktop environment, you have some possibilities:
install different desktop environment using dnf
dual boot multiple spins of Fedora
If you choose the first option, you have to install another desktop environment by using the dnf install command. This technique enables you to select which desktop environment you would like to use on the login screen after system boots. Using this method will pull in a lot of dependencies. This is especially true when you have a GTK based desktop environment (like GNOME) and install a QT based (like KDE), or vice-versa. It can be difficult to completely uninstall one of the installed desktop environment if you are not satisfied with them.
Another issue with this is that system apps may be doubled in the application menu on each environment. For example, if you have installed GNOME and install KDE, you have Nautilus and Dolphin for browsing files, GNOME Terminal and Konsole for terminal emulation, etc. You have to remember which app to use on which environment, because apps from KDE behave worse on GNOME and vice-versa.
If you choose the second option, you have to make some free unpartitioned space on your hard drive to install another Fedora spin alongside one you are currently using. In this way, the systems are separated from each other and the system apps will not be doubled. You can decide to share the /home partition between them. This technique enables you select the system to use in the bootloader menu before system boots. But if you use this method, you have to maintain these systems separately (for example installing updates) and it consumes a lot of free space on the hard drive.
OSTree based version of Fedora Workstation
Some variants of Fedora Linux are OSTree based. OSTree provides immutability and transactional upgrades with the possibility of rollback in case something goes wrong. You can read more about it in this great article. Right now, we have three OSTree based Fedora Workstation variants:
Silverblue – provides GNOME desktop environment
Kinoite – provides KDE Plasma desktop environment
Sericea – provides Sway window manager (not recommended for beginners)
If you are running one of these variants of Fedora Linux, you can easily switch your system to another OSTree compatible one to try different desktop environment. This process is similar to doing a system upgrade. OSTree guarantees that the operation is transactional (finishes successfully or nothing is changed) and you are able to rollback if you are not satisfied with the change. The operation does not consume much space on the hard drive, and system apps are not doubled.
How to use OSTree rebase to switch to a new variant
To start, I recommend executing the following command to pin the current deployment. This makes certain it will not be deleted automatically in the future and provides the ability to roll back to it.
$ sudo ostree admin pin 0
If you have a pending update, the command may fail with the message:
error: Cannot pin staged deployment
In this case, reboot your system to apply pending updates, and try again.
After pinning the deployment, execute:
$ ostree remote refs fedora
It outputs a list of all available branches that you can rebase into. Every branch has an architecture, version, and the name of the variant. Select carefully. In the following examples I assume you would like to rebase into the current stable version of Fedora for x86_64 (version 38).
for Fedora Silverblue, use fedora:fedora/38/x86_64/silverblue
for Fedora Kinoite, use fedora:fedora/38/x86_64/kinoite
for Fedora Sericea, use fedora:fedora/38/x86_64/sericea
Choose the branch you wish to rebase into and execute the following command (change the branch name provided in the example if necessary):
$ rpm-ostree rebase fedora:fedora/38/x86_64/kinoite
When this command succeeds, restart the system to begin using the new desktop environment. If it fails, the system should continue to work unmodified thanks to transactional updates provided by OSTree.
Undo the rebase into an OSTree variant
If you are not satisfied with the new environment the following command will return you to your original variant:
rpm-ostree rollback
Restart your system once again to switch back to the previous variant of Fedora.
If you filter Fedora Linux AWS images using a script, you might notice a change in the image names. The Fedora Cloud SIG recently updated the image publishing configuration to use the latest generation storage option and simplify the image listings.
This involves two changes:
Replacing gp2 storage with gp3 storage by default for new images
Removing standard storage from new images
What’s the benefit of these changes?
The gp3 storage type appeared in 2020 and switching to that storage type for Fedora Linux users means more consistent performance for a lower cost. (For more details, read Corey Quinn’s helpful blog post.)
Removing standard storage from new image uploads means we’re creating half the AMIs we created before and it reduces the number of images you need to review when launching an instance. Finding the right Fedora Linux image for your deployment should be a little easier.
What if I really like the other storage types?
When you launch your instance, you can choose any storage type that is compatible with your instance in your preferred region. Although Fedora Linux images will have gp3 set as the default, you can choose from any other storage type at launch time.
How should I adjust my scripts that look for Fedora Linux images on AWS?
The format of the image names remains the same, but you’ll notice a new string in the storage type portion of the image name. As an example, here’s what you would see before the change was made:
The Fedora Cloud SIG wants to make the Fedora Linux cloud experience the best it can possibly be on every public cloud platform. This change gives Fedora Linux a better performing default storage option at a lower cost, reduces the overhead from creating AMIs on AWS, and simplifies the Fedora Linux image listings.
The kernel team is working on final integration for Linux kernel 6.3. This version was just recently released, and will arrive soon in Fedora Linux. As a result, the Fedora Linux kernel and QA teams have organized a test week from Sunday, May 07, 2023 to Sunday, May 14, 2023. Refer to the wiki page in this article for links to the test images you’ll need to participate. Please continue reading for details.
How does a test week work?
A test week is an event where anyone can help make sure changes in Fedora Linux work well in an upcoming release. Fedora community members often participate, and the public is welcome at these events. If you’ve never contributed before, this is a perfect way to get started.
To contribute, you only need to be able to do the following things:
Download test materials, which include some large files
Read and follow directions step by step
The wiki page for the kernel test day has a lot of good information on what and how to test. After you’ve done some testing, you can log your results in the test day web application. If you’re available on or around the days of the event, please do some testing and report your results. We have a document which provides all the necessary steps.
Happy testing, and we hope to see you on one of the test days.
Back in late January, we distributed a survey focusing on partitioning preferences for Anaconda Installer (OS Installer for RHEL, CentOS, and Fedora). We were able to get 1269 responses! Thank you to all who participated. The data we collected will help the Anaconda team continue to provide an installer that best suits the majority’s needs.
Given the high participation rate, we’re excited to share the main results and findings with you!
Who are our users?
First, we wanted to understand who the users are. The most common answers to demographic-style questions gave us the following results:
96% (of 1138 responses) are desktop/workstation Linux users
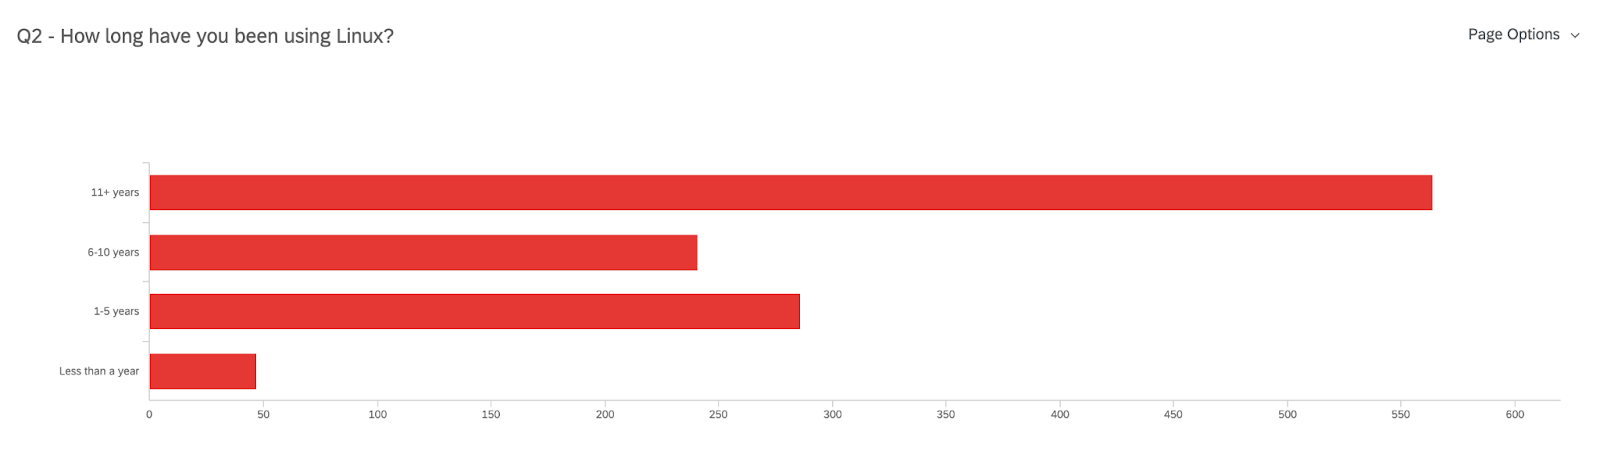
Have 11+ years of experience using Linux (50% of 1138 responses)
90% use Fedora (sometimes in combination with RHEL, CentOS, Ubuntu, or Debian)
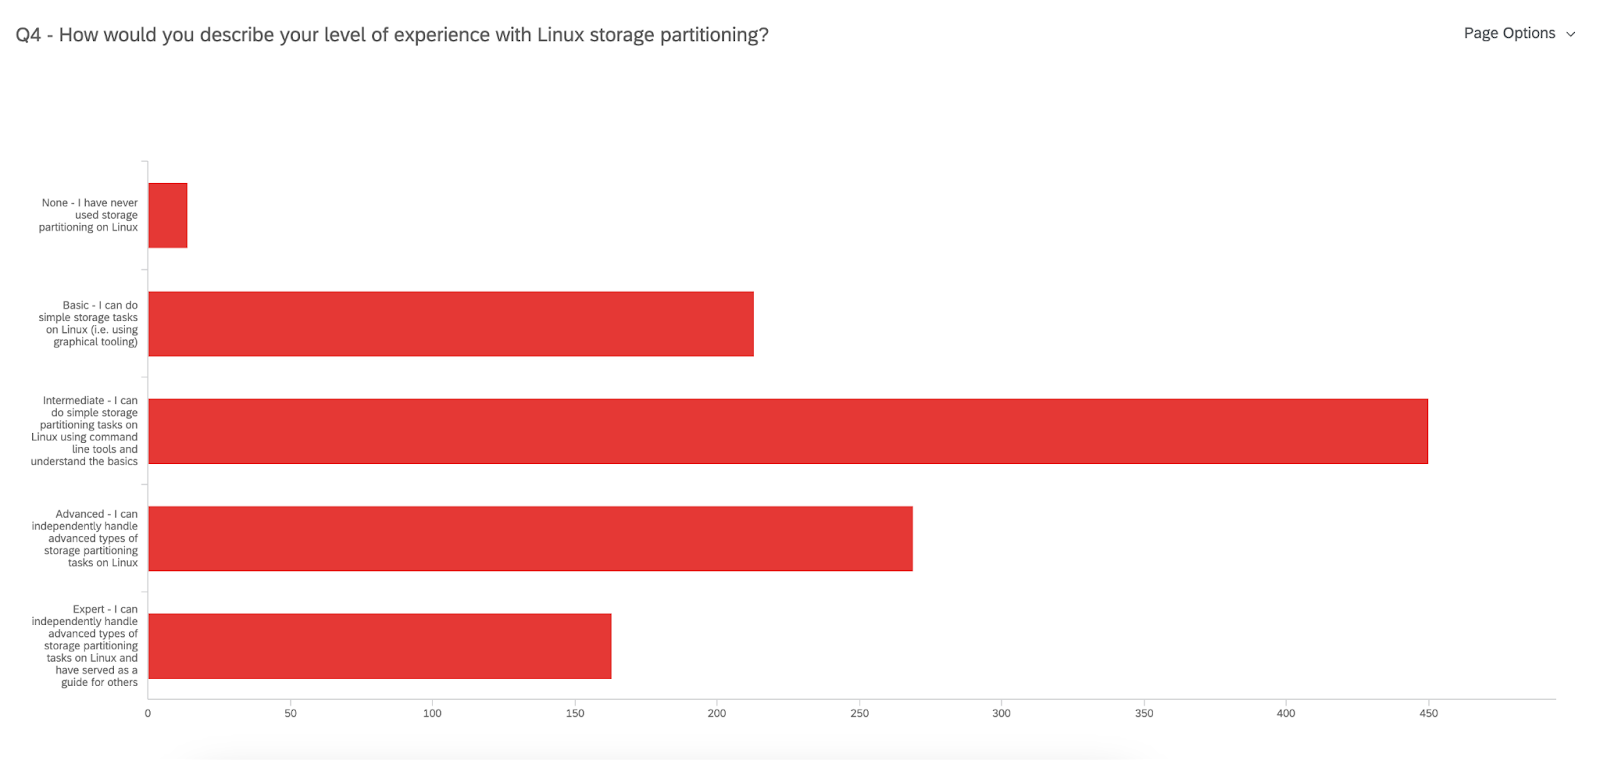
450 users identify as having an Intermediate level of expertise with Linux storage partitioning
n=1138
n=1109
These data points mean that most of you have been using Linux with Fedora (not exclusively) on a desktop/workstation for over a decade! That’s impressive! But when it comes to Linux storage partitioning there is still quite a bit to learn – and we are here to make that easier.
What storage and partitioning is used?
Storage
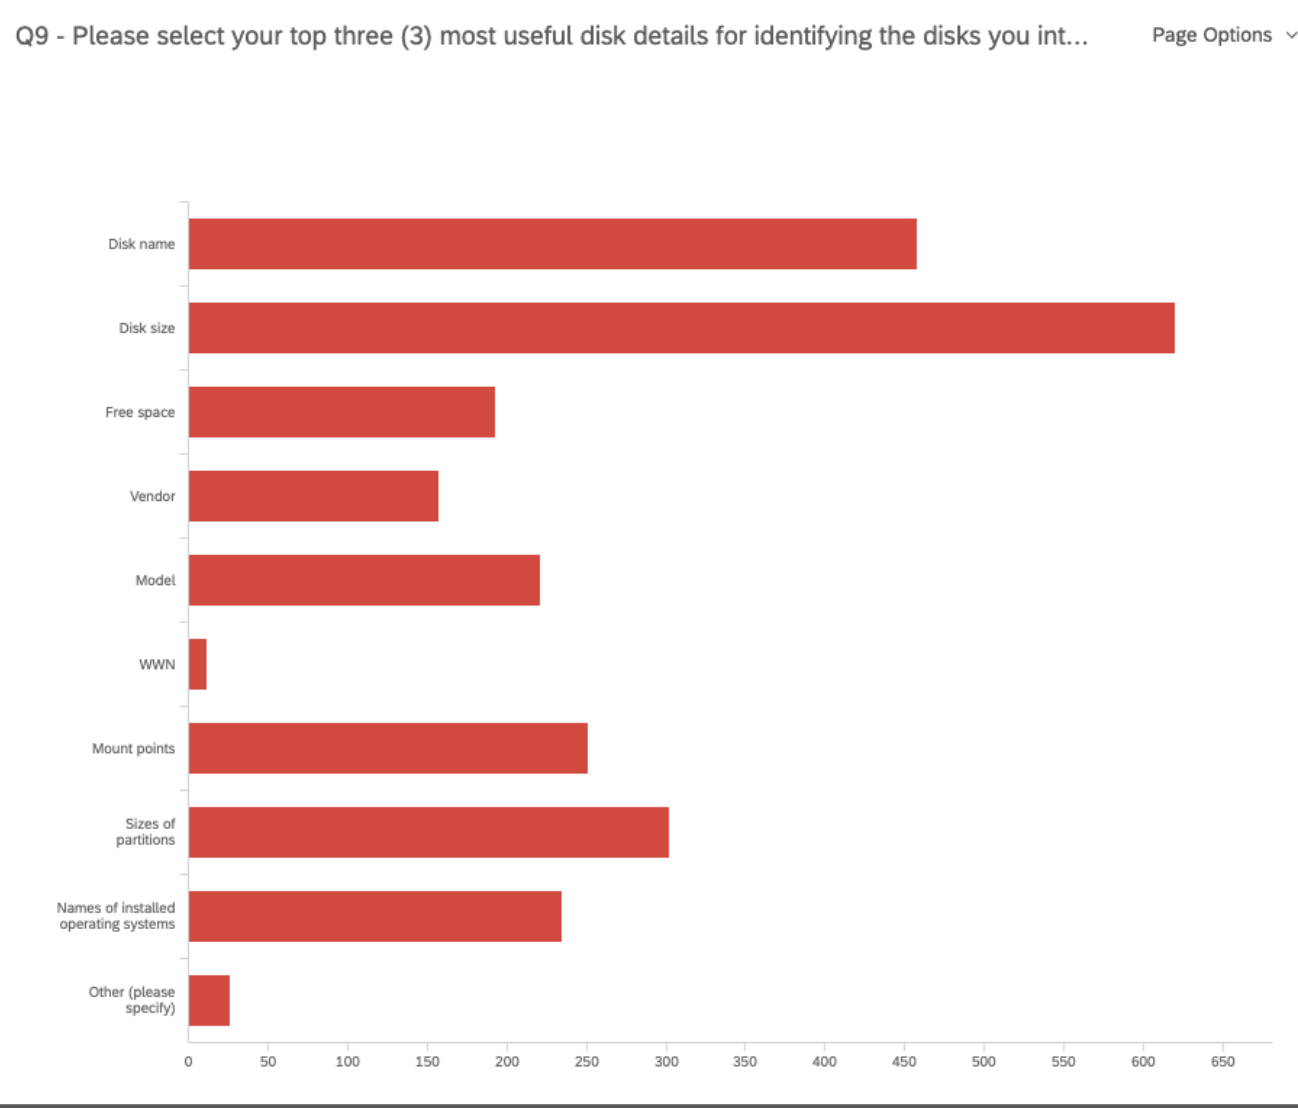
Once we got a better picture of who our participants were, we asked questions regarding your current storage and partitioning set up. For example, we uncovered that when it comes to identifying the disks you will use for your installation, most of you are mainly interested in the disk name, size, and the sizes of partitions. This helps the team decide which data is more helpful to present on the disk selection screen.
n=969
Partitioning
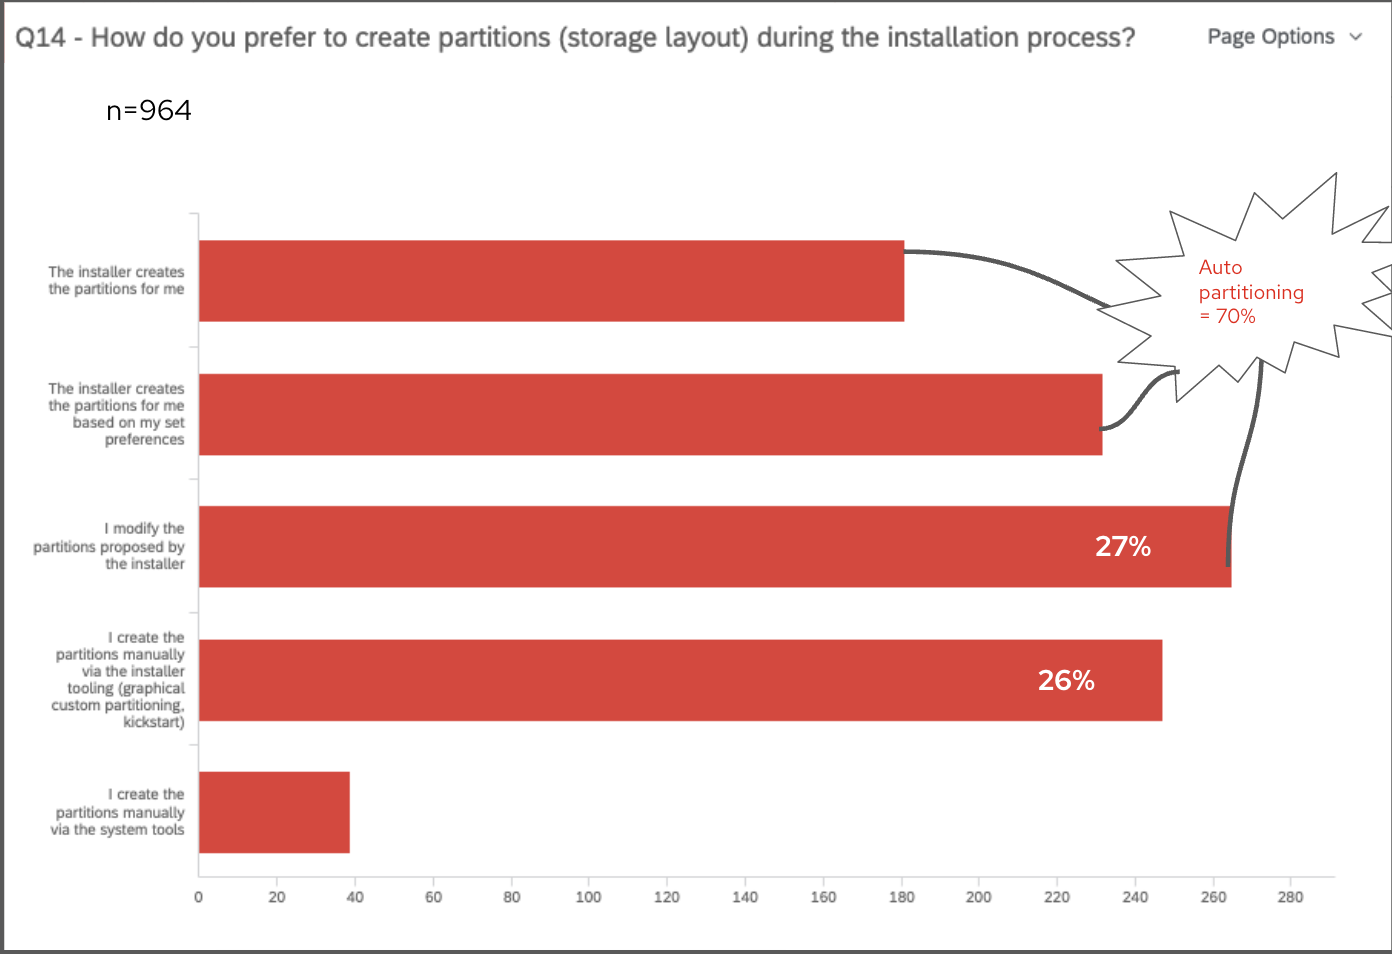
Then, we asked questions about your preferences and expectations regarding partitioning. From studies in the past, we kept seeing an almost even preference for auto-partitioning and custom partitioning because of the different needs they each fulfill. However, this survey clarified that there is a slightly stronger preference for auto-partitioning, but many of you made it clear that you need the Installer to allow some customizations to partitioning. The team is certainly keeping this in mind. In fact, we asked you “How do you prefer to create partitions (storage layout) during the installation process?” and most of the multiple-choice responses were split between “Installer creates the partitions for me”, “Installer creates partitions based on my set preferences”, or “I modify the partitions proposed by the installer”. These three options indicate some form of auto-partition, leading to the combined 70% of 964 responses preferring auto-partitioning.
Next steps for Anaconda
Finally, we wanted your input on what the next steps for Anaconda should be. The team has been considering a few different approaches, and most of you ranked the “Ability to select pre-defined partitioning configuration options with streamlined steps” as your #1 choice, closely followed by “Ability to customize details of partitioning”. This tells us that you are expecting a more guided experience for partitioning, especially given that most of you also feel there is a lot left to learn about Linux storage partitioning. Be on the lookout for what’s next with Anaconda!
Thanks to all who participated
Again, thank you to all who took the time to fill out the survey. You have provided the team with plenty of data to consider for the future of Anaconda Installer.
The Community Platform Engineering team is a Red Hat-sponsored team dedicated to the Fedora Project and CentOS Project that contributes to developing limited-scoped projects called initiatives, maintaining the community infrastructure, and helping manage releases of our offerings. As a remote-only team, the members were unable to get many opportunities to strategize the next big thing as a team and to bond with their fellow teammates beyond the scope of the designated work. Owing to the fact that the last team face-to-face meeting took place in Waterford City, Ireland in 2019, it became necessary for the team to meet up again when the travel restrictions started loosening up. After all, the popular saying “absence makes the heart grow fonder” applies to everyone — even to community members and teammates, right?
Barcelona, Spain was selected as the destination for the team face-to-face meeting and the duration was picked to be from 20th March 2023 to 23rd March 2023. As this was going to be one of the first times that people started embarking on travels again after a long spell of inactivity during COVID-19, the management made sure to begin the travel planning and event management well in advance to account for everyone in the team. This was no small feat to achieve considering the fact that the team had grown significantly since the last team face-to-face meeting; both in terms of member counts and scope diversity. The common accommodation point was chosen to be Hotel Abba Balmoral, Barcelona for the entire team, which is located at the very heart of the city and around a walking distance from the nearest Red Hat office.
Day 0
Whilst a few team members flew into Barcelona on Sunday, many flew in throughout the day and took a cab to the hotel on Monday. As nothing was planned on the agenda for the day, it was spent by the teammates mostly getting to know each other, snacking on regional delicacies, and resting after the long flights people had gone through to get here. It was surprising to see just how many team members were getting to meet each other for the first time here and could not before, either because they were new to the team or were working on greatly different things. Some members decided to recce the Red Hat office located close by to the hotel at Travessera de Garcia, Barcelona, and snacking joints while others decided to rest up during the afternoon before heading together to the planned dinner at 1930 in a local Indian restaurant.
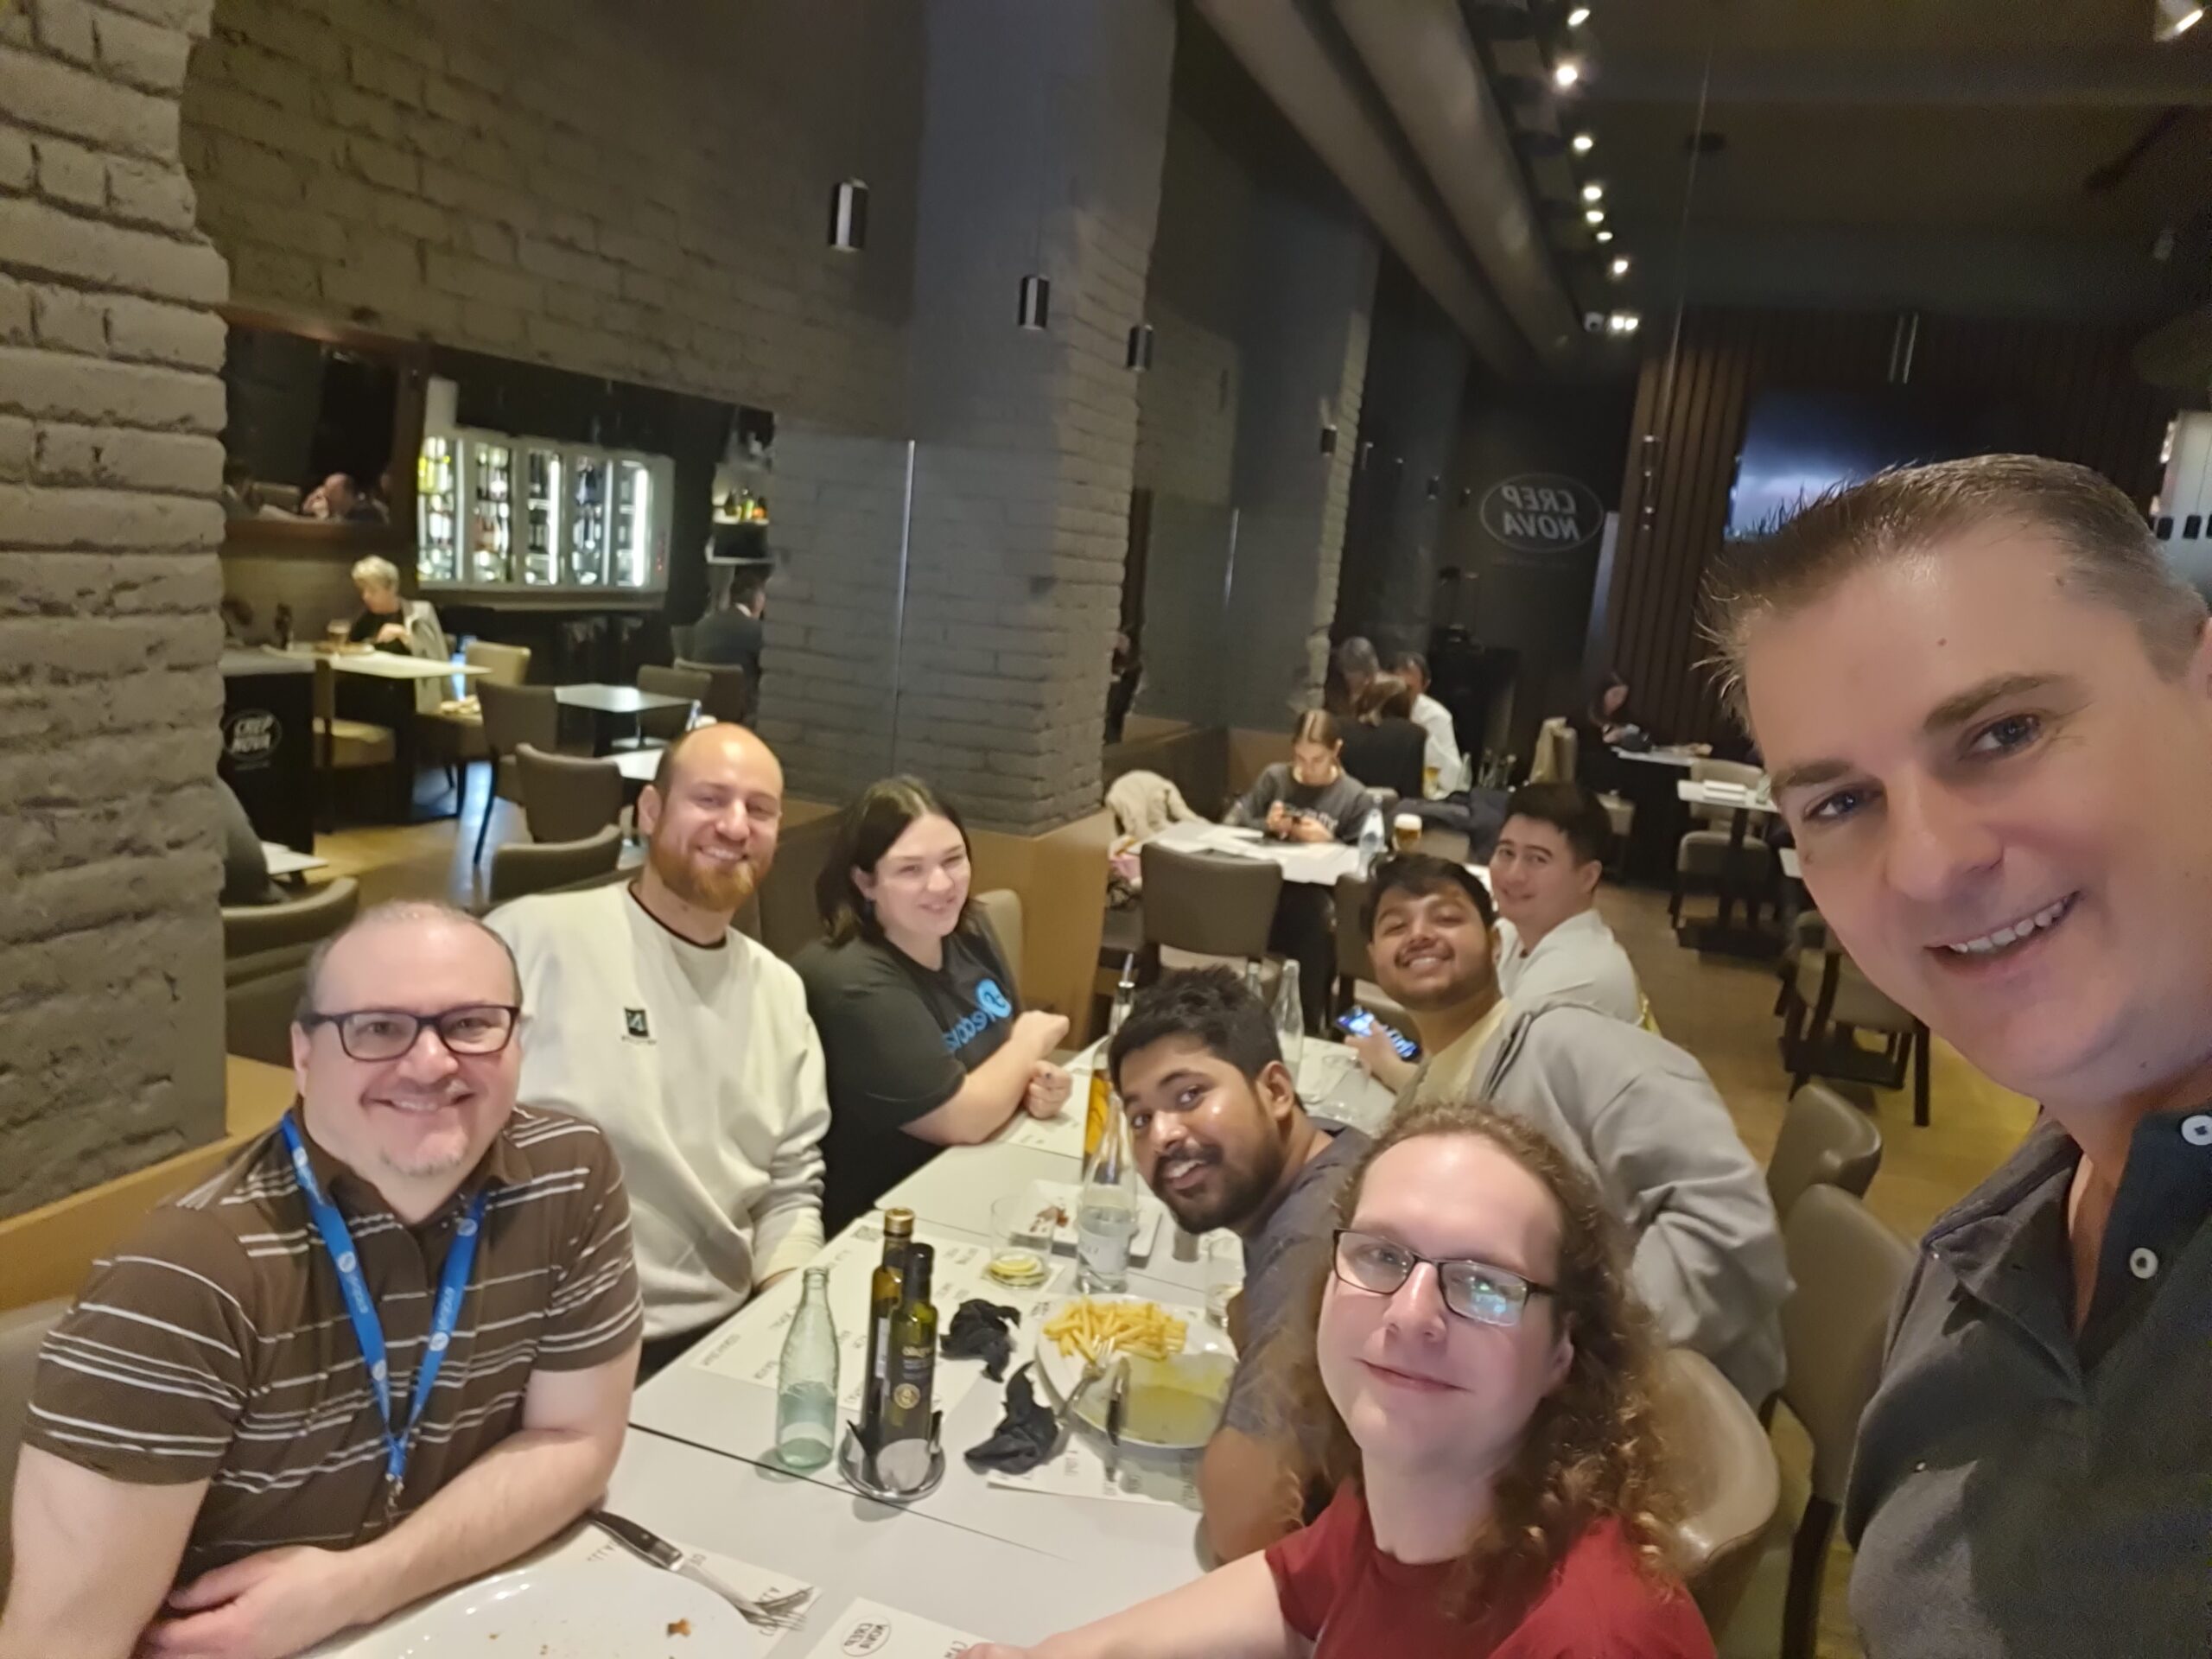
With the evening finding its way into the day, the team united at the hotel lobby at 1900 and started heading over to the authentic Indian restaurant called Bar Bar, which was again a walking distance from the hotel. Being a cuisine that most of the teammates did not try previously, Akashdeep Dhar volunteered to guide folks through the menu – suggesting delicacies to try (or avoid) based on their preferences of flavor. For a team consisting of members hailing from across a variety of time zones and countries, having food and sharing anecdotes was indeed a magically unifying experience. After the dinner got over, some people stayed back to click pictures with the friends they made, some headed off for some more snacks in a nearby cafe and the remaining folks returned back to the hotel to get some much-needed respite.
Day 1
After the team had a joint breakfast from around 0700 to 0900, the members started heading off to the office in small groups to start off with the first (official) day of the event. Once all members settled down in a meeting room, the face-to-face meeting started off with the opening delivered by Stefan Mattejiet, following which a fun session was conducted to understand how well the members know each other by drawing each other’s faces. The next session was conducted by Akashdeep Dhar where he talked about the importance of mentorship within the team as well as in the community and organized an activity where the team, divided into multiple subteams, were asked to enact different scenarios of mentor-mentee interactions. Following that they dispersed into small groups and headed to their preferred places for lunch.
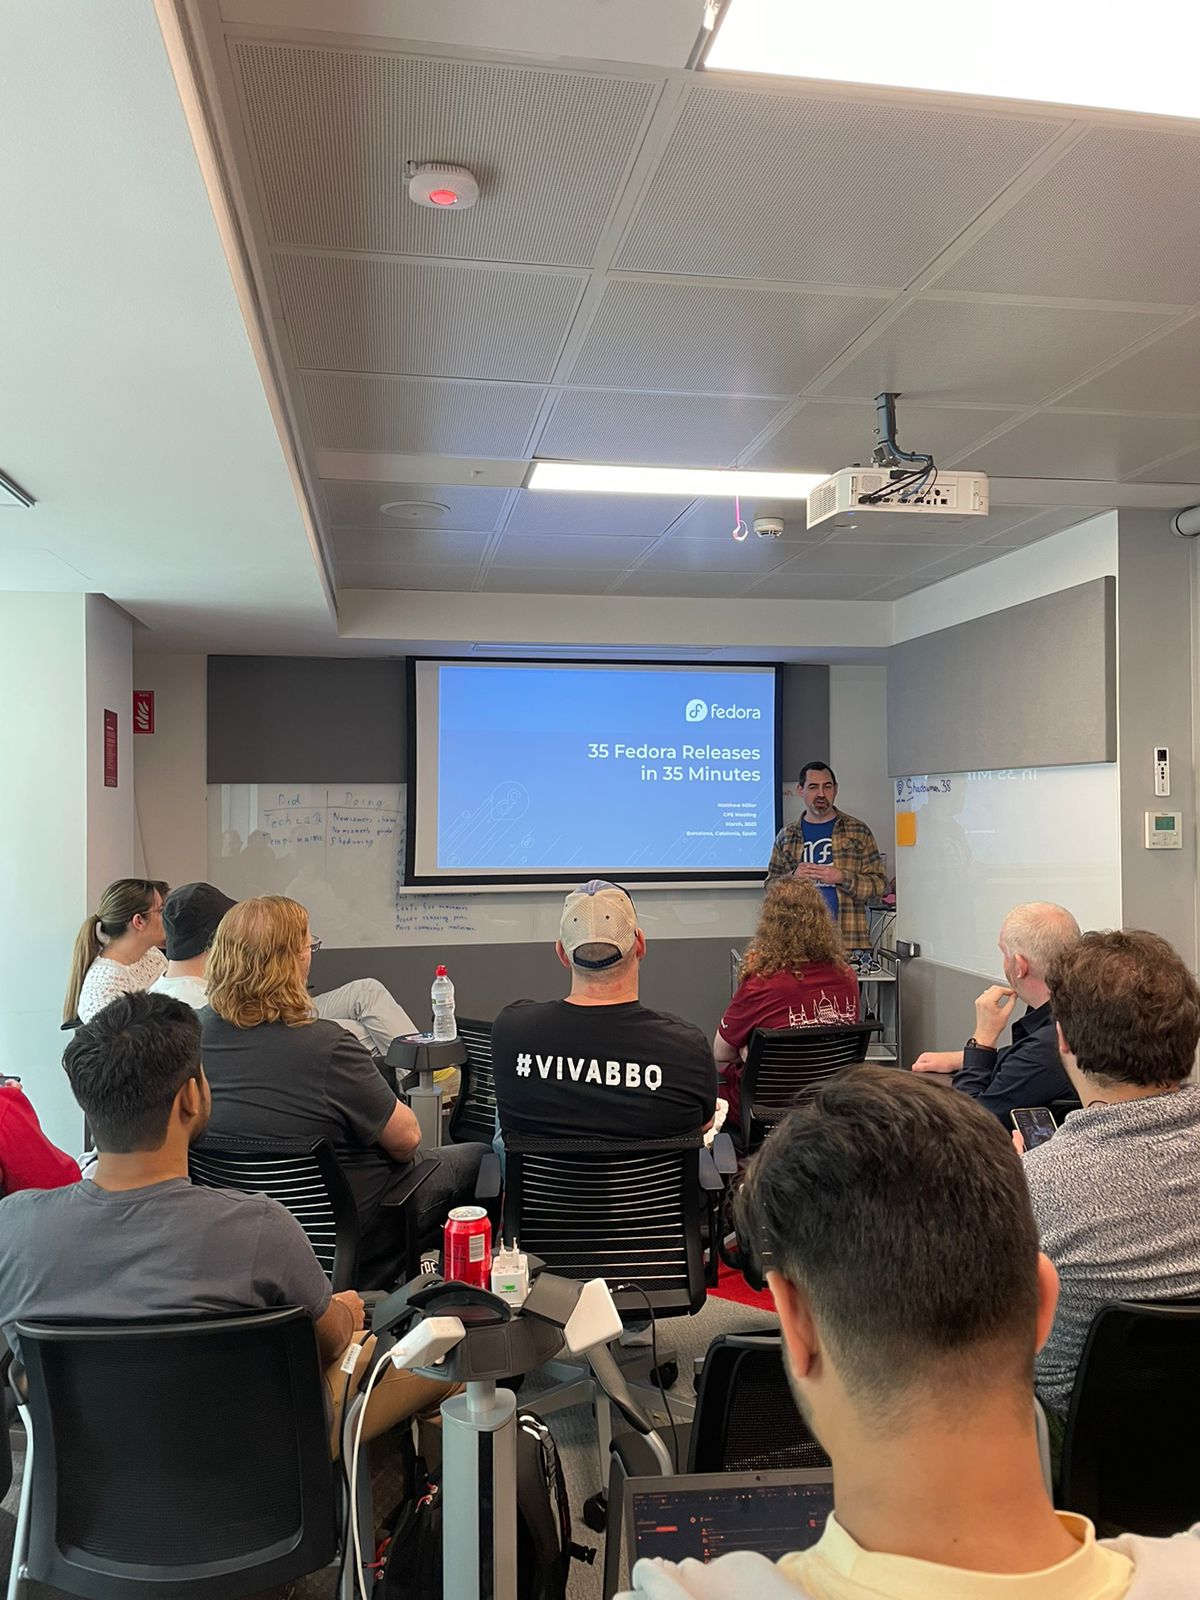
Once the team members were back in the office, Michal Konecny started off the next session about how knowledge can be effectively shared in the team, which proved to be really helpful. This was added to by the next session conducted jointly by Aoife Moloney, Kevin Fenzi, and Julia Bley, around understanding what the team skills are and what their interests lie in. The members were lining up their creative thoughts as sticky notes that were grouped under a certain focus topic. As we moved on to the later parts of the day, Troy Dawson organized a group story session where we came together to come up with fun stories and it was really surprising to see how creative people could get using just one or two words. Finally, Matthew Miller gave us a brief yet interesting run through the history of 35 Fedora Linux releases in around 35 minutes.
Matthew Miller giving a run-through of 35 releases of Fedora Linux in 35 minutes
With the last talk having been completed, the team members headed back to the hotel for a brief respite before they reunited again for a touring walk at 1630. When the team got to Plaça de Catalunya, the members were divided into two groups and were provided with a couple of tour guides who took them through the famous historical structures of Barcelona. It was an enriching experience to get to know about the history that led to the creation of these fascinating architectural creations and the team members took plenty of photographs to retain the memories. The tour got over by around 1930 after which the team members went to a local restaurant, Taller de Tapas to enjoy regional Spanish cuisine. A wide variety of mouth-watering Tapas delicacies were served with drinks, culminating the first day of the meeting on a high note.
Red Hat is excited to announce significant changes to ELN kernel RPM NVR in the kernel-ark project. This change will be to limited to the kernel-ark ELN RPMs and does not impact Fedora. If you don’t use Fedora ELN builds you can likely stop reading as this change won’t affect you.
What is the kernel-ark project?
The kernel-ark project is an upstream kernel-based repository from which the Fedora kernel RPMs are built (contributions welcomed!). This project is also used by the Centos Stream and Red Hat Enterprise Linux (RHEL) maintainers to implement, test, and verify code that is destined to be used in Centos Stream and RHEL. In other words, the kernel-ark repository contains code that is enabled to build several different kernels which may contain unique code for different use cases. The kernel RPMs used for CentOS Stream and RHEL are commonly referred to as the ‘ELN’ (Enterprise Linux Next) RPMs.
Why are there ELN RPMs? Why can’t Centos Stream and Red Hat use Fedora RPMs?
While Fedora Linux is the source of a lot of code that lands in CentOS Stream and later RHEL, the kernel configuration used in each operating system is unique. Fedora Linux is configured to achieve its specific goals and targets. CentOS Stream and RHEL do the same but for a slightly different set of goals and targets.
The differences are significant enough that the Fedora Linux, Centos Stream, and RHEL kernel maintainers recognized the need for separate RPMs targeted for Fedora and those targeted for Centos Stream and RHEL. Examples of these differences are BTRFS is enabled in Fedora Linux but not in ELN and there are some specific devices that are disabled in ELN but are enabled in Fedora Linux.
Red Hat uses kernel-ark’s ELN RPMs to continuously test upstream changes with a Red Hat specific configuration. This enables Red Hat to monitor performance and resolve issues before they make it into a Red Hat Enterprise Linux (RHEL) release. In accordance with Red Hat’s long established ‘upstream first’ policy, all fixes and suggestions for improvements are sent back to the upstream kernel community. This benefits the entire Linux community with improvements due to issues resolved in ELN.
This structure also allows Red Hat to test and make changes without affecting the Fedora Linux kernel except in a positive or desired way, such as through bug fixes. Fedora Linux, CentOS Stream, and RHEL have the opportunity to accept or reject changes easily.
What ELN NVR changes are being made?
Before explaining the changes to the ELN kernel rpm NVR, it is important to understand what an NVR is. All RPMs have Name, Version, and Release (NVR) directives that describe the RPM package. In the case of the Fedora Linux kernel RPMs the Name is ‘kernel’ and the Version is the kernel’s uname (aka UTSNAME or the kernel version). The last field, the Release, contains additional upstream tagging information (release candidate tags), a monotonically increasing build number, and a distribution tag. The NVR is separate from the kernel’s uname and the uname is not generated from it. Instead, we have traditionally generated the NVR from the uname.
For example, for a recent Fedora Linux kernel build,
In the next few weeks, the Centos Stream and RHEL maintainers will introduce ELN RPMs that have new kernel Name, Version, and Release (NVR) directives that are unique to the ELN builds. This change has no impact on the kernel uname. The net result of the change is that the version number will have more meaning to CentOS Stream and RHEL builds, instead of being solely based on the kernel uname. For example, an ELN kernel may have NVR kernel-redhat-1.0.39.eln which packages a kernel with a kernel uname of 6.3.0-39.eln.
We have already decided that the new ‘Name’ directive for the ELN kernel NVR will be changed from ‘kernel’ to ‘kernel-redhat’. More information on the Version and Release directive changes will be released in the following months as they are finalized by the Centos Stream and RHEL kernel maintainers. You can follow these discussions on the Fedora Kernel Mailing List.
Why is the ELN NVR being changed?
The new ELN NVR will allow for better coordination of feature introduction, bug fixes, and CVE resolutions in future versions of Centos Stream and RHEL. More information on these improvements to the Centos Stream and RHEL ecosystems will be released in the upcoming months.
How is Fedora Linux impacted?
Fedora Linux is not impacted by these changes.
Since the inception of the kernel-ark project, the Fedora Linux, Centos Stream, and RHEL maintainers have been extraordinarily careful to ensure that Fedora Linux kernel builds are not impacted by ELN kernel builds (and vice-versa) in the kernel-ark project. The commitment to prevent cross-OS issues is strictly enforced by the maintainers. Due to the maintainers continued diligence, there is no impact to Fedora Linux.