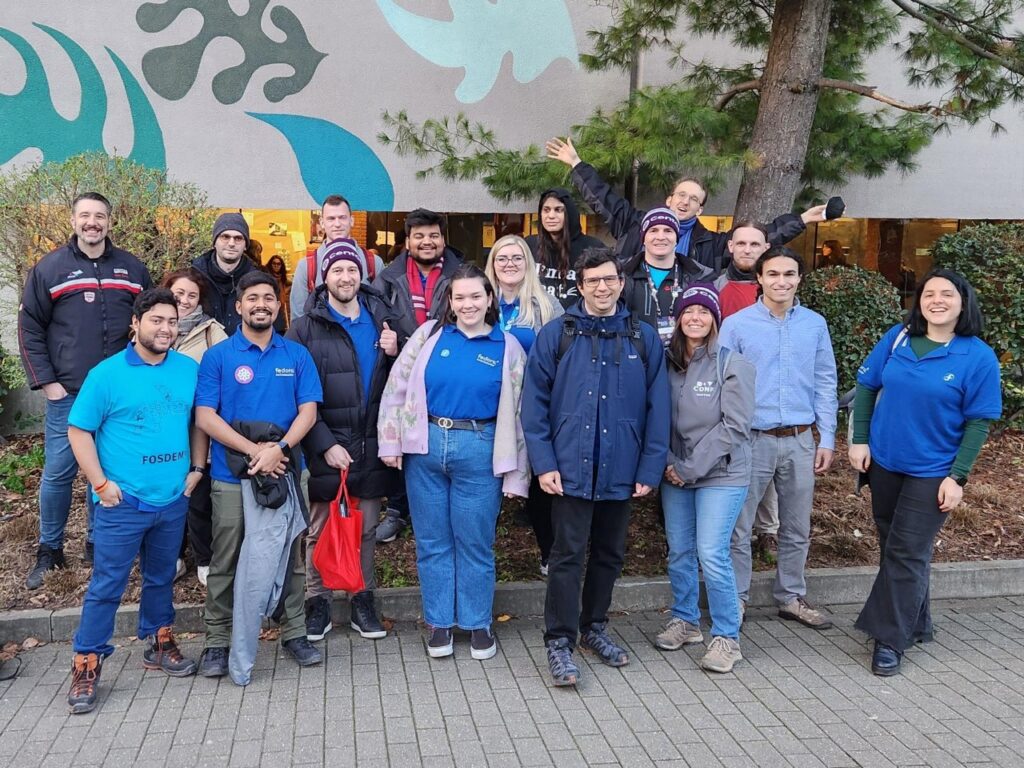
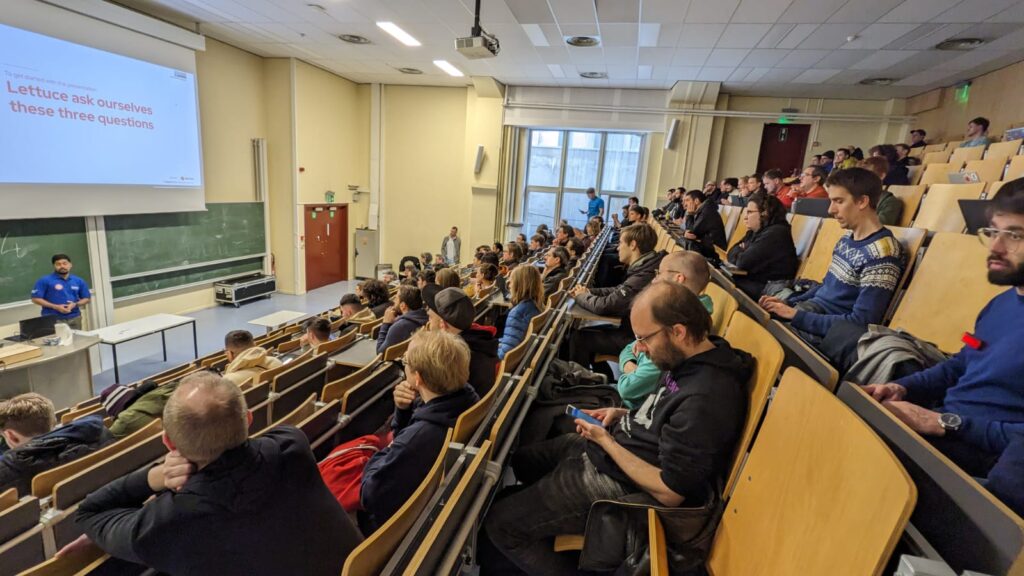
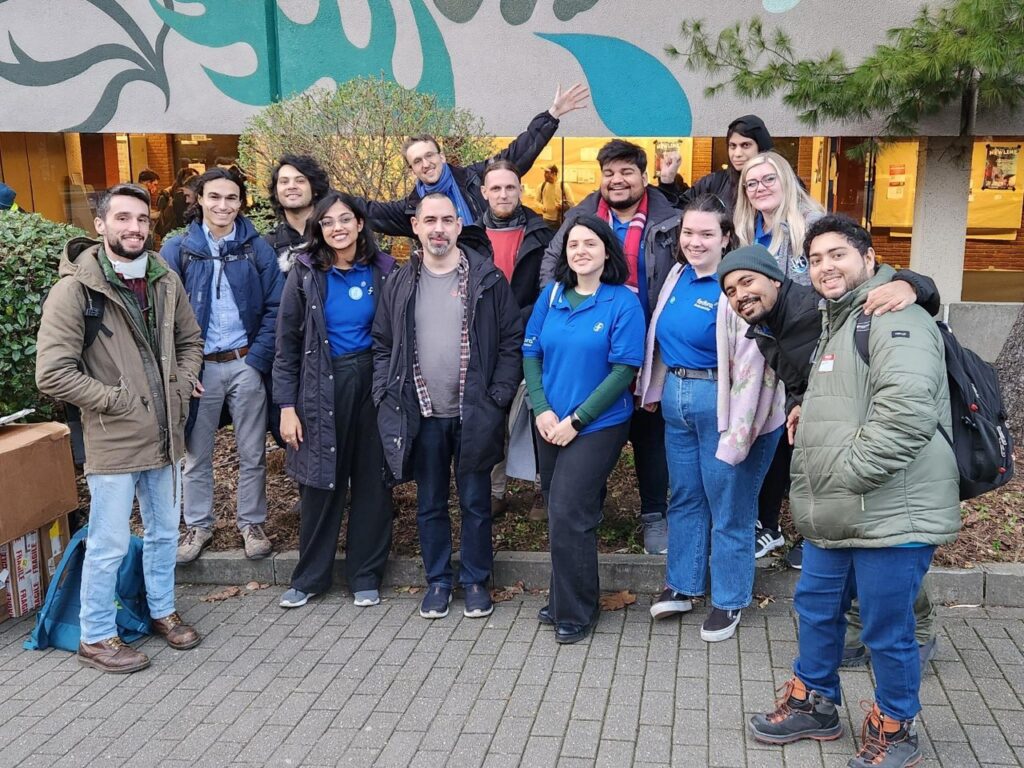
A measure of growth is most apparent when scaled across a span of different times and situations. That applies to folks getting to see you after a long time, to vegetation left alone to spread and of course, to communities having their first meetup after a prolonged spell of online-bound interactions. FOSDEM 23 happened to be one of the first times after around three years that community members from across the world met in person with each other in Brussels, Belgium. With new and old faces alike, their time was well spent representing the community, exhibiting to the wider free and open-source communities the good stuff that they have been keeping themselves busy with and most importantly, bonding with their Fedora friends.
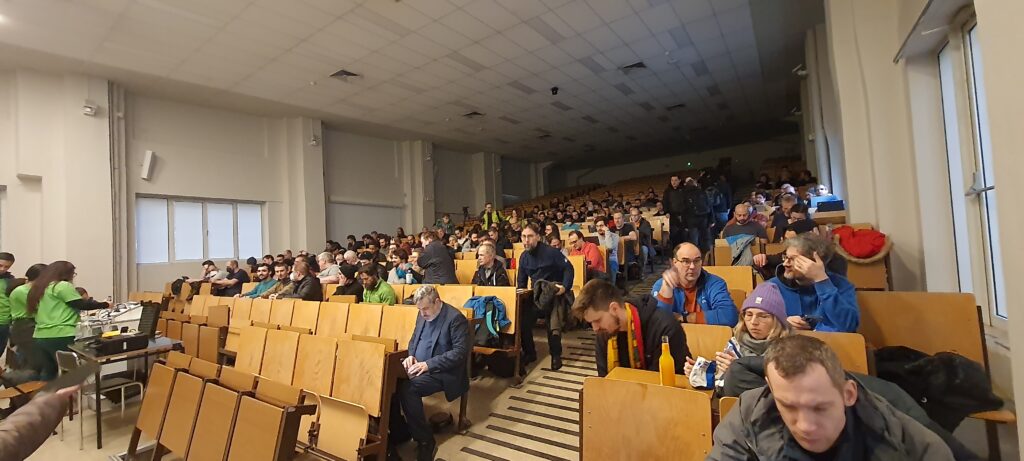
This year FOSDEM took place on 4th February ’23 and 5th February ’23 at Université Libre de Bruxelles, Campus du Solbosch, Avenue F. D. Roosevelt 50, 1050 Bruxelles, Belgium. This free event was participated by over 8000 software engineering enthusiasts from across the world, had around 36 lightning talks and around 771 talks spanning 55 designated devrooms. Contributors from our community did not restrict their participation in the event as just attendees but they also enthusiastically volunteered to be stand keepers in the Fedora Project booth, speakers for a variety of talks and lectures, organizers for a set of devrooms and even as ground staff for making FOSDEM 23 a grand success.
Representation in booth
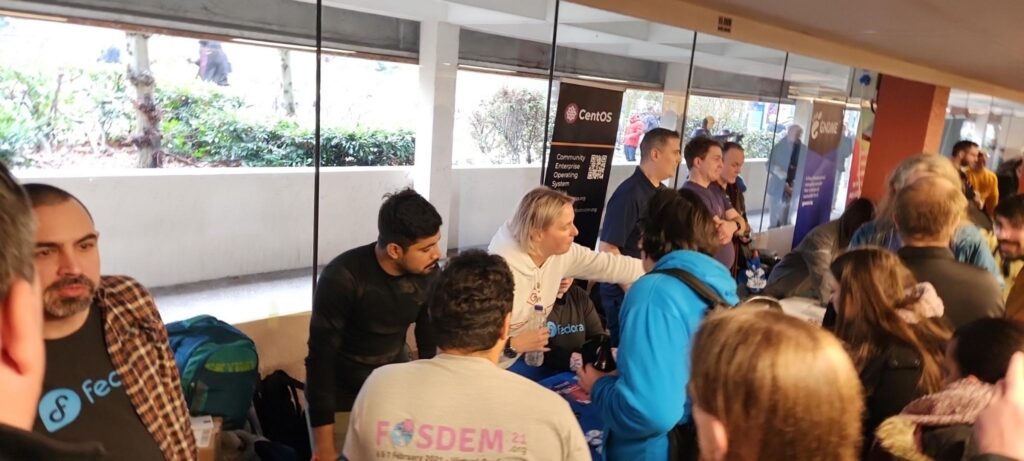
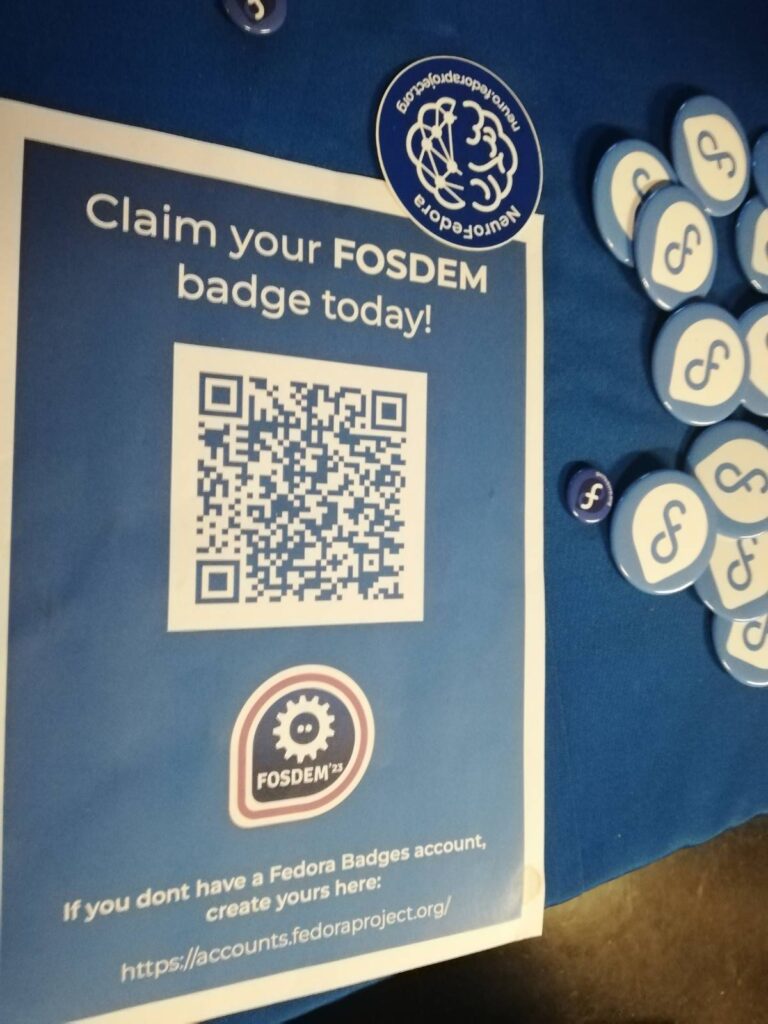
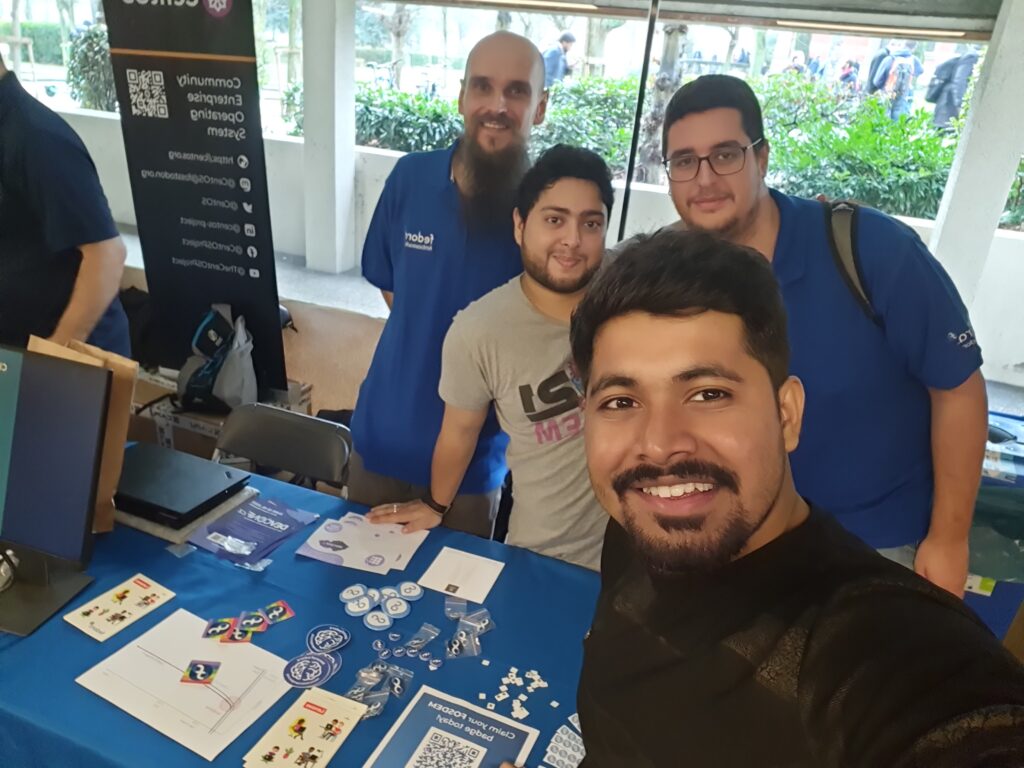
Fedora Project had its official booth in Building H of the Université Libre de Bruxelles campus, near the booths belonging to our friends at CentOS Project and GNOME Project. The desks were set up on time with a display showing the FOSDEM 23 attendee badge QR code and an assorted set of Fedora Project swags for taking (like keycaps with the Fedora logo, USB flash drives with Fedora branding, stickers and clips with the branding of Fedora subteams/SIGs/workgroups like NeuroFedora and Workstation, webcam covers with the Fedora logo and much more). We were also thankfully provided with a jar of jelly bears to offer to our booth attendees and a set of stickers from our friends at the AlmaLinux community.
With a designated booth duty schedule planned beforehand by our community members, the booth was constantly looked after by at least three staff members at any point in time and attended to hundreds of booth visitors throughout the course of the event. The booth visitors were excited to interact with our booth staff members, shared their own fun experiences of using Fedora Linux for a purpose of their choice and asked questions about participating in the community. We also teamed up with our friends from CentOS Project to combine our efforts into managing our booths together and moving our resources to/from the FOSDEM locker room. To sum it up, we really appreciate the community’s participation in our official booth.
Speaking about innovation
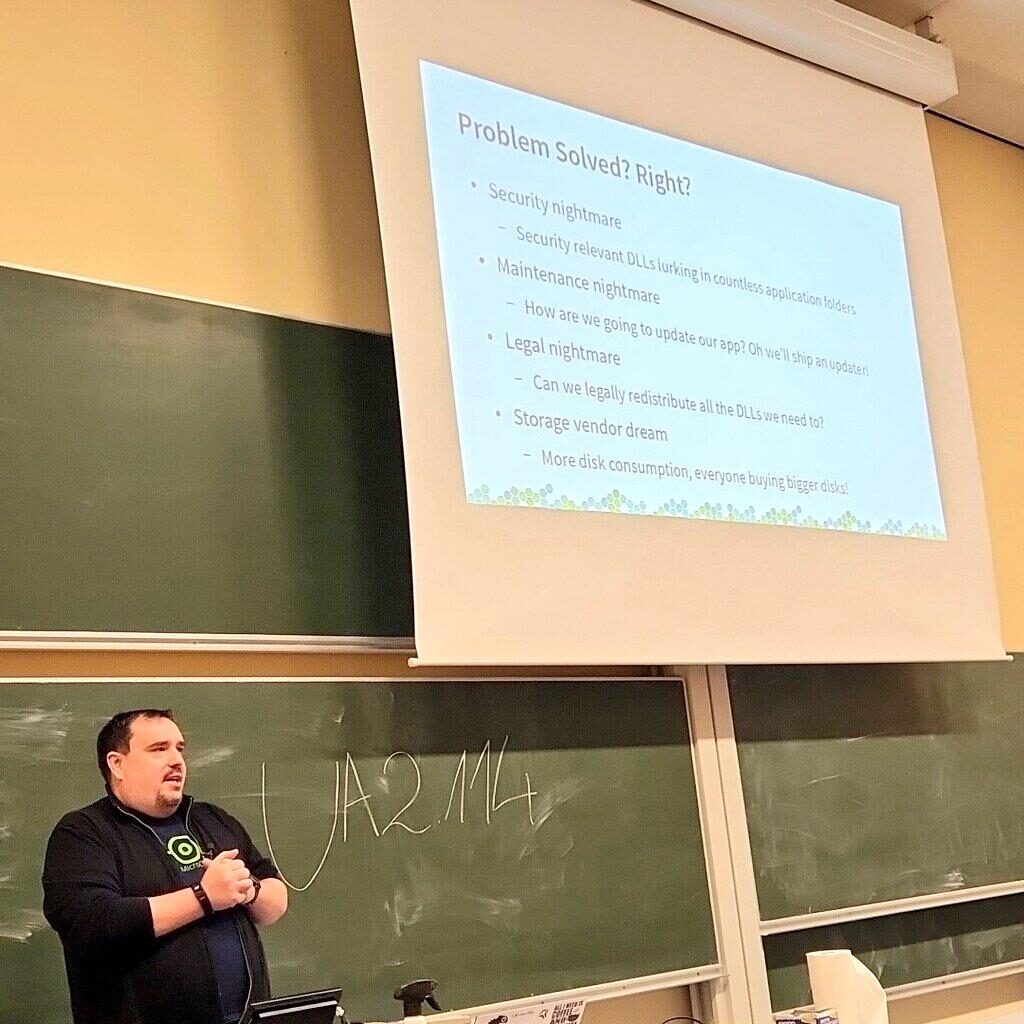
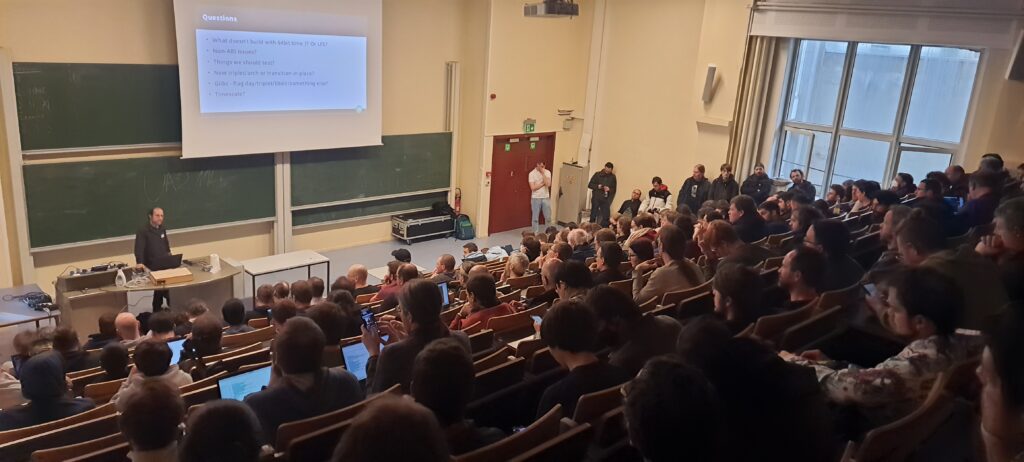
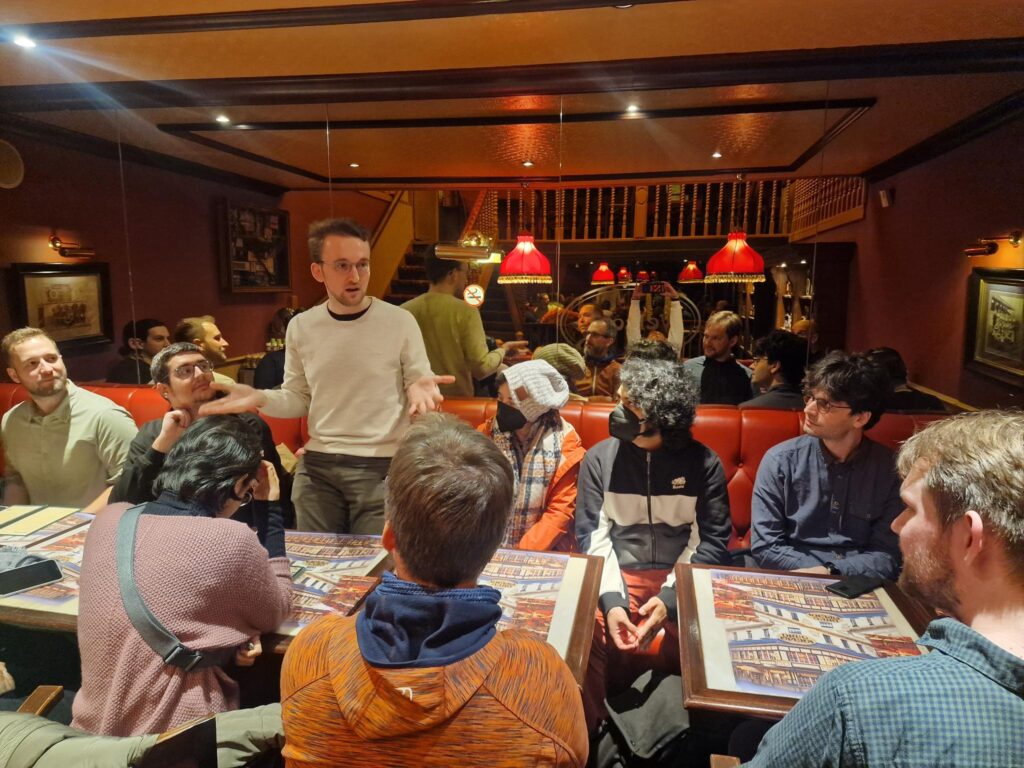
Contributors participating in the Fedora Project community were eager to share what they know about what they have been working and that took place in the form of multiple talks/lectures for a variety of devrooms during FOSDEM 23. Ranging from the latest Fedora Linux remix running on Apple Silicon hardware to improving the experience of video gaming on GNU/Linux distributions, from summing up the helpful outcomes of one of the first open-source creative conferences to building a web-based installer for Fedora Linux, our members were involved in providing a great deal of quality content and were met by wide acclaim from halls filled with enthusiastic attendees.
The delivered talks/lectures were not only useful in letting others know about all the cool things we have been working on but also instrumental in garnering feedback from the wider free and open-source software communities as to how we can do better. The attendees were eager to ask their questions at the end of the respective talks and curious to know about the directions that our projects, activities and developments were headed, thereby helping the speaker establish their network and also, potentially onboarding contributors. The following is the list of talks/lectures associated with the Fedora Project, the links of which can be followed to access the recordings and shared presentation assets.
Being a volunteer-driven conference with only a few people working around the year to make it happen, FOSDEM entirely relies on free and open-source enthusiasts to contribute their efforts to organizing and running a variety of devrooms. FOSDEM has set up internet connectivity and projectors to ensure the teams can meet, discuss, hack and publicly showcase their latest developments in the form of lightning talks, news, discussions, talks and lectures. These devrooms cover a wide range of diverse topics, giving all enthusiasts a platform to show what they have been working on, learn what is current in the field of their interest and benefit from the discussions that take place about their topic.
Ranging from language-specific devrooms to those about community governance, contributors participating in the Fedora Project community got involved in not only delivering talks/lectures in these devrooms but also volunteering to make these a grand success. From running a live microphone for attending to popping up questions to flagging flashcards to show speakers how much time they have left, from setting up the wireless microphone for every new speaker coming to the stage to cleaning up everything after the event is wrapped up – FOSDEM appreciates the community participation and we are all about it. Following is a list of devrooms that were helped by Fedora Community members.
Donning the bright orange FOSDEM volunteer tees are our proud force of FOSDEM ground staff who devote their time to making sure that everything goes smoothly while organizing the conference. From introducing speakers before their talk/lecture begins to running cash registers at the counter selling official FOSDEM tee, from attending to the FOSDEM cloakroom containing booth and devroom assets to providing directions to the lost speakers rushing to their devrooms – needless to mention that FOSDEM would not have been possible without them. Here as well, one of our long-time Fedora Project contributors, Bogomil Shopov volunteered during FOSDEM 23 as their official ground staff.
Other events
Beyond FOSDEM 23, the contributors participating in the Fedora Project community participated in a bunch of meetups happening around the same time which further helped enrich the networking opportunities for our members. This not only led to our community spanning far and wide to those of others like OpenSUSE, GNOME etc. but to also learning and adapting from what the other communities do best while collaborating with them. We participated in the day-long CentOS Connect event on 3rd February ’23, Google’s FLOSS Foundations Dinner 2023 on 3rd February ’23, Google’s Mentorship Meetup and Fedora & CentOS Friends Dinner on 4th February ’23, and GitHub’s SustainOSS Meetup on 5th February ’23.
Everyone uses their computer in different ways, according to their needs. You may work as a designer, so you need various design software on your computer. Or maybe you’re a gamer, so you need an operating system that supports the games you like. Sometimes we don’t have enough time to prepare an operating system that supports our needs. Fedora Linux Lab editions are here for you for that reason. Fedora Labs is a selection of curated bundles of purpose-driven software and content curated and maintained by members of the Fedora Community. This article will go into a little more detail about the Fedora Linux Lab editions.
Fedora Astronomy is made for both amateur and professional astronomers. You can do various activities related to astronomy with this Fedora Linux. Some of the applications in Fedora Astronomy are Astropy, Kstars, Celestia, Virtualplanet, Astromatic, etc. Fedora Astronomy comes with KDE Plasma as its default desktop environment.
Fedora Comp Neuro was created by the NeuroFedora Team to support computational neuroscience. Some of the applications included in Fedora Linux are Neuron, Brian, Genesis, SciPy, Moose, NeuroML, NetPyNE, etc. Those applications can support your work, such as modeling software, analysis tools, and general productivity tools.
This Fedora Linux is for you if you are a designer. You will get a complete Fedora Linux with various tools for designing, such as GIMP, Inkscape, Blender, Darktable, Krita, Pitivi, etc. You are ready to create various creative works with those tools, such as web page designs, posters, flyers, 3D models, videos, and animations. This Fedora Design Suite is created by designers, for designers.
Playing games is fun, and you can do it with Fedora Games. This Fedora Linux is comes with various game genres, such as first-person shooters, real-time and turn-based strategy games, and puzzle games. Some of the games on Fedora Linux are Extreme Tux Racer, Wesnoth, Hedgewars, Colossus, BZFlag, Freeciv, Warzone 2011, MegaGlest, and Fillets.
Almost everyone likes music. Some of you may be a musician or music producer. Or maybe you are someone who likes to play with audio. Then this Fedora Jam is for you, as it comes with JACK, ALSA, PulseAudio, and various support for audio and music. Some of the default applications from Fedora Jam are Ardor, Qtractor, Hydrogen, MuseScore, TuxGuitar, SooperLooper, etc.
Fedora Python Classroom will make your work related to Python easier, especially if you are a Python developer, teacher, or instructor. Fedora Python Classroom is supported by various important stuff pre-installed. Some of the default applications on Fedora Linux are IPython, Jypyter Notebook, git, tox, Python 3 IDLE, etc. Fedora Python Classroom has 3 variants, namely you can run it graphically with GNOME, or with Vagrant or Docker containers.
Fedora Security Lab is Fedora Linux for security testers and developers. Xfce comes as a default desktop environment with customizations to suit the needs of security auditing, forensics, system rescue, etc. This Fedora Linux provides several applications that are installed by default to support your work in the security field, such as Etherape, Ettercap, Medusa, Nmap, Scap-workbench, Skipfish, Sqlninja, Wireshark, and Yersinia.
Fedora Robotic Suite is Fedora Linux with a wide variety of free and open robotics software packages. This Fedora Linux is suitable for professionals or hobbyists related to robotics. Some of the default applications are Player, SimSpark, Fawkes, Gazebo, Stage, PCL, Arduino, Eclipse, and MRPT.
Your scientific and numerical work will become easier with Fedora Scientific. This Fedora Linux features a variety of useful open source scientific and numerical tools. KDE Plasma is the default desktop environment along with various applications that will support your work, such as IPython, Pandas, Gnuplot, Matplotlib, R, Maxima, LaTeX, GNU Octave, and GNU Scientific Library.
You have many choices of Fedora Linux to suit your work or hobby. Fedora Labs makes that easy. You don’t need to do a lot of configuration from scratch because Fedora Labs will do it for you. You can find complete information about Fedora Labs at https://labs.fedoraproject.org/.
Fedora test days are events where anyone can help make sure changes in Fedora work well in an upcoming release. Fedora community members often participate, and the public is welcome at these events. If you’ve never contributed to Fedora before, this is a perfect way to get started.
There are five upcoming test days in the upcoming weeks:
Sunday 05 March through Sunday 12 March, is to test the Kernel 6.2.
Monday March 06 through March 10 , two test day periods focusing on testing GNOME Desktop and Core Apps.
Tues March 07 through March 13 , is to test i18n .
Tues March 14, is to test DNF 5.
Come and test with us to make the upcoming Fedora 38 even better. Read more below on how to do it.
Kernel 6.2 test week
The kernel team is working on final integration for kernel 6.2. This recently released version will arrive soon in Fedora. As a result, the Fedora kernel and QA teams have organized a test week.
Sunday 05 March through Sunday 12 March will be the Kernel test week. Refer to the wiki page for links to the test images you’ll need to participate. This document clearly outlines the steps.
GNOME 44 test week
GNOME is the default desktop environment for Fedora Workstation and thus for many Fedora users. As a part of the planned change, GNOME 44 landed on Fedora and will ship with Fedora 38. Since GNOME is such a huge part of user experience and requires a lot of testing, the Workstation WG and Fedora QA team have decided to split the test week into two parts:
Mon March 06 through Wed March 8, we will be testing GNOME Desktop and Core Apps. You can find the test day page here. Thurs March 09 and Fri March 10, the focus will be to test GNOME Apps in general. This will be shipped by default. The test day page is here.
i18n test week
The i18n test week focuses on testing internationalization features in Fedora Linux.
The test week is Tuesday 7 March through Monday 13 March. The test week page is available here.
DNF 5
Since the brand new dnf5 package has landed in F38, we would like to organize a test day to get some initial feedback on it. We will be testing DNF 5 to iron out any rough edges.
The test day will be Tuesday 14 March. The test day page is available here .
How do test days work?
A test day is an event where anyone can help make sure changes in Fedora Linux work well in an upcoming release. Fedora community members often participate, and the public is welcome at these events. If you’ve never contributed before, this is a perfect way to get started.
To contribute, you only need to be able to download test materials (which include some large files) and then read and follow directions step by step.
Detailed information about both test days is available on the wiki pages mentioned above. If you’re available on or around the days of the events, please do some testing and report your results. All the test day pages receive some final touches which complete about 24 hrs before the test day begins. We urge you to be patient about resources that are in most cases uploaded hours before the test day starts.
Come and test with us to make the upcoming Fedora 38 even better.
This article explains how to configure Yubico’s YubiKey, a hardware security token, and Fedora Linux Workstation for typical use-cases such as logging into GDM, authentication for the sudo command, OpenSSH authentication and key management, or as a second-factor on the web.
Motivation
In times of sophisticated malware and always-and-everything-on(line), software based storage of credentials becomes at least unsettling. Hardware security tokens are a physical, cryptographically secured storage for secrets. Such a token and its secrets can not be copied by large malware attacks.
Applications and services that have to authenticate your access can use a physical token as a factor of ownership and identification. These tokens require extreme dedication, time and money to forge or maliciously acquire.
Nowadays hardware security tokens are quite versatile and can be used for a variety of interesting things. Use-cases are roughly divided into two categories: convenience and added security. Convenience covers anything from using the hardware token to unlock your LUKS encrypted disk to logging in to your Fedora Workstation with the press of a button. Added security on the other hand covers multi-factor authentication (MFA) scenarios as well as storing private credentials.
Always setup a backup key
As soon as you start working with security tokens you have to account for the potential to lock yourself out of accounts tied to these tokens. As hardware security tokens are unique and designed to be extremely hard to copy you can’t just make a backup of it as with software vaults like Keepass or AndOTP. All registrations you do with a primary key you should do with a second backup key which you store in a secure location like a safe or at least leave at home.
In practice you register both hardware tokens with your linux and web accounts, generate private keys on both keys, and configure their public keys at remote services.
Security considerations
Most features of the key can be used either with button press only or require entering an additional PIN. Keep in mind that without a PIN YubiKey authentication is only a button press away. This means that presence is required but is also enough. For example if configured to work as an alternative login factor it is enough to be in front of the machine with the key slotted to login.
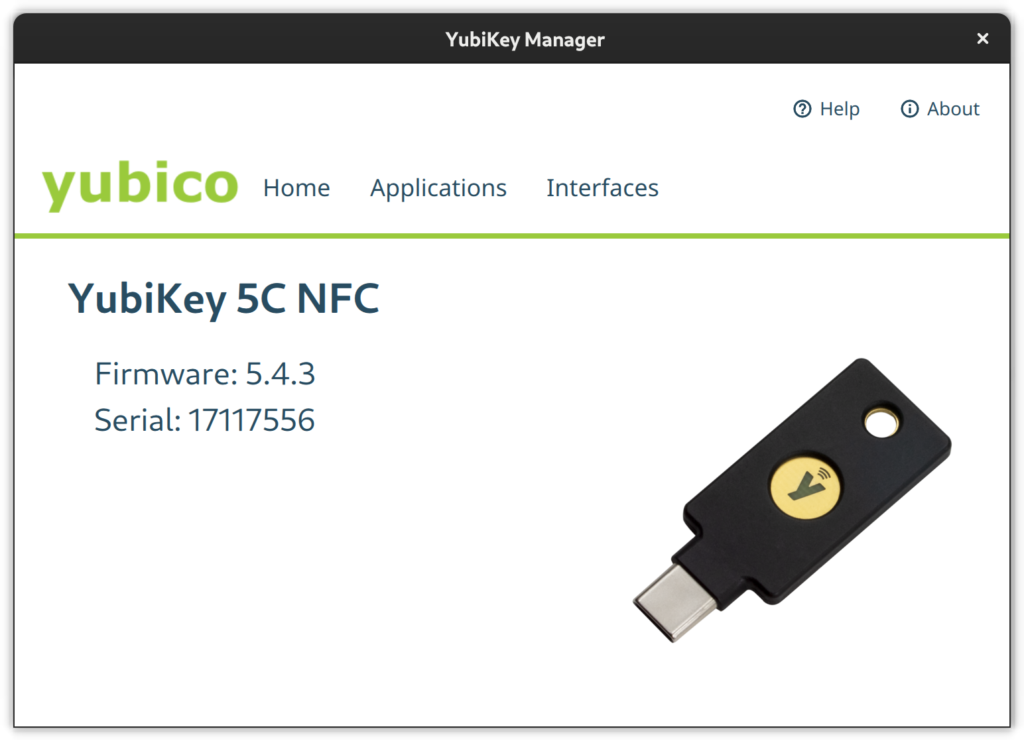
YubiKey models and features
Yubico offers multiple models of the YubiKey with different connectors (USB A/C, NFC) and supported features. Depending on the model, the device can be used for a variety of things.
With OTP (One Time Password) you can:
Log into the system via terminal
Log into GDM
Use sudo
The OATH TOTP (Time-based One-Time Passwords) feature is an alternative to Google Authenticator (or andOTP). OATH (Open Authorization) is an organization that specifies two open authentication standards: TOTP and HOTP (HMAC- or Hash-based Message Authentication Code One-Time Password).
The PIV (Personal Identity Verification) module let’s you:
Store OpenSSL certificates and private keys
Store OpenSSH private keys
With FIDO U2F (Fast IDentity Alliance Universal 2nd Factor) you can use the key as second-factor in web browser authentication flows. The web page, or more specifically the browser, will ask you to insert the key and press the button on login if you configured the key as second-factor. This is an alternative to OTP that does not require you to lookup a 6-digit code in an Authenticator-App.
In the FIDO2 / WebAuthn module you can store ssh public keys or register your smart card as a password-less authentication method at supporting services, as opposed to it being “just” a second factor alongside a password. FIDO2 is a combined standard consisting of WebAuthn and CTAP2 (Client to Authenticator Protocol 2).
In general the YubiKey can act as either an alternative or second factor. The difference is that an alternative factor may make the input of another factor like a passphrase obsolete while a second factor is required in addition to, for example, a passphrase or a fingerprint.
Storage limitations
For some features, private keys and other secrets are stored on the YubiKey. Each feature has its own storage space and hence maximum number of credential slots:
OTP – Unlimited, as only one secret per key is required
FIDO U2F – Unlimited, as only one secret per key is required
FIDO2 – 25 credentials / identities
OATH – 32 credentials
PIV – 24 X.509 certificates and their respective private keys
OpenPGP – 3 keys; one for encryption, signing and authentication each
Prerequisites
First, install the management applications to configure the YubiKey. With these you can disable or reconfigure features, set PINs, PUKs, and other management passphrases.
For System Authentication install the yubico PAM module:
sudo dnf install -y pam_yubico
The OpenSSH agent and client support YubiKey without further changes.
For OATH you need the yubioath-desktop application and/or a mobile client:
sudo dnf install -y yubioath-desktop
Configuration of the YubiKey
A YubiKey comes pre-configured for Yubico OTP and uses public default PINs for all other modules which you are strongly advised to change. Use either the yubikey-manager CLI or yubikey-manager GUI application to configure the YubiKey.
Select the Applications button in the YubiKey Manager and a drop-down will appear to navigate to the single module configuration pages. Via the Interfaces button you open a page full of check-boxes where you can activate/deactivate single features on a per physical connector basis (e.g., USB C or NFC).
YubiKey Manager desktop application from the yubikey-manager-qt package.
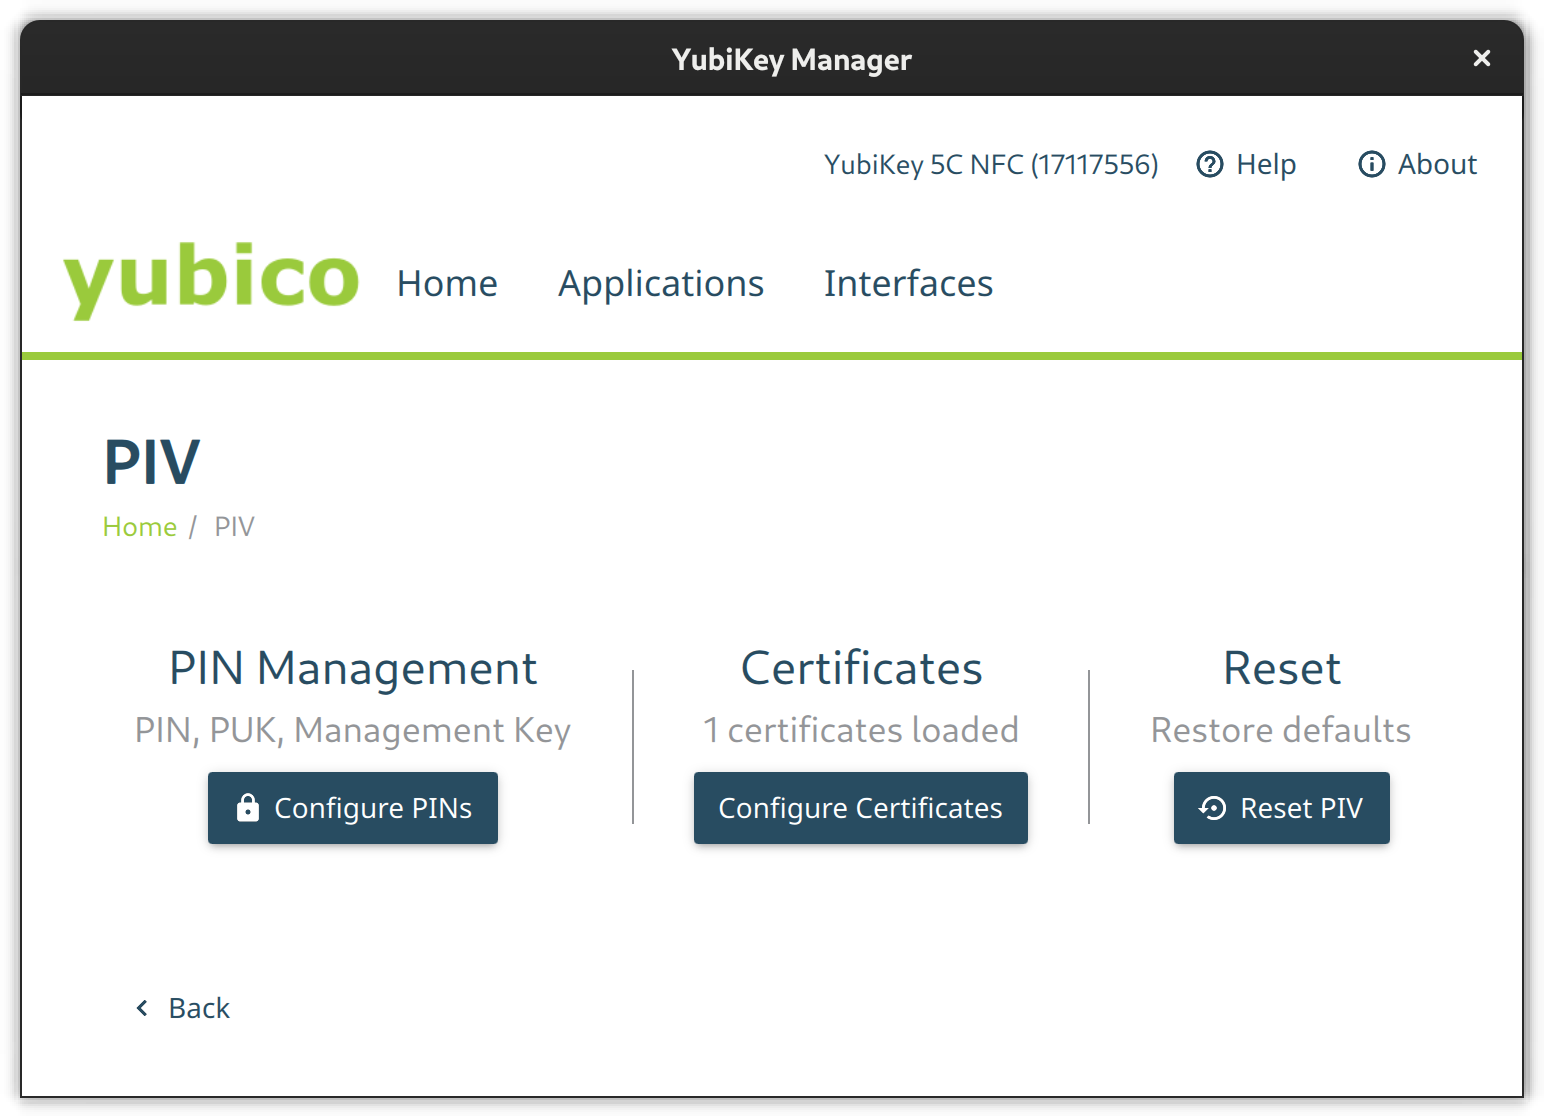
PIV
Go to the PIV configuration page and configure PIN and PUK. Their default values are 123456 and 12345678 respectively. Then set a new management key protected by your previously set pin.
The PIV configuration page from the YubiKey Manager GUI
Using the CLI tool change the default PIN like so:
$ ykman piv access change-pin
Enter the current PIN: 123456
Enter the new PIN: ********
Repeat for confirmation: ********
New PIN set.
Change the default PUK:
$ ykman piv access change-puk
Enter the current PUK: 12345678
Enter the new PUK: ********
Repeat for confirmation: ********
New PUK set.
Generate a new random management key, protect it with our previously set PIN, and replace the default key:
$ ykman piv access change-management-key --generate --protect
Enter the current management key [blank to use default key]:
Enter PIN: ********
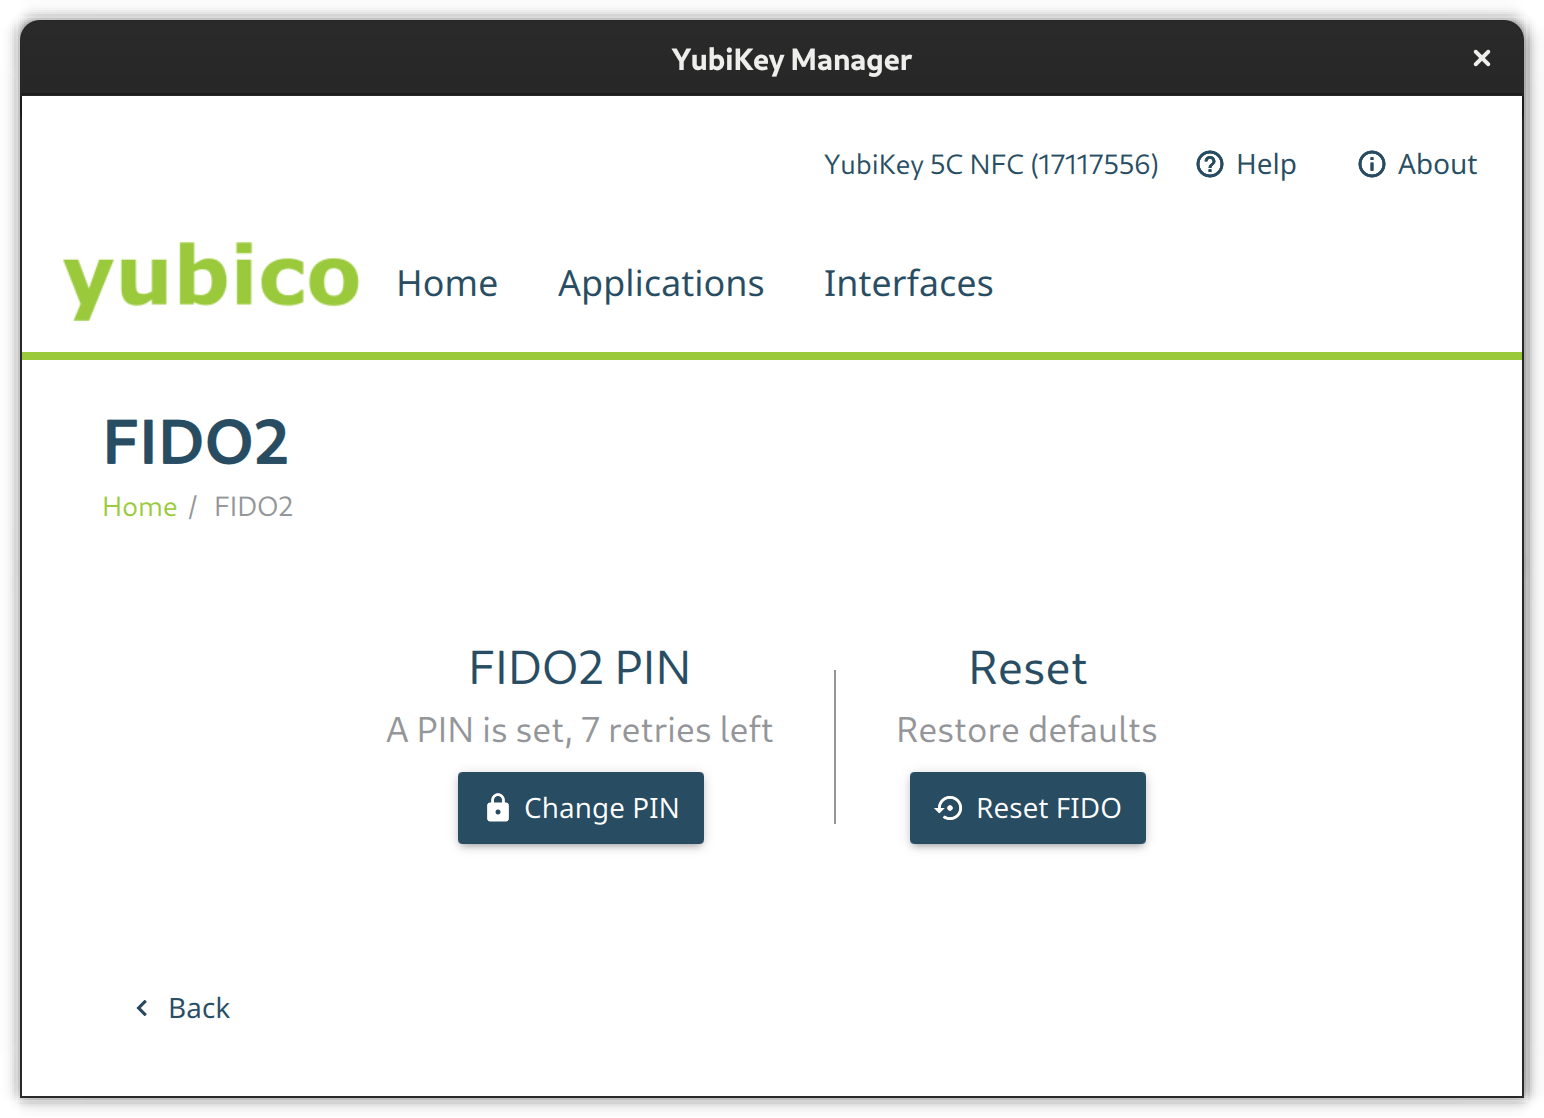
FIDO2
Go to the FIDO2 page and set a pin.
The FIDO2 configuration page from the Yubikey Manager GUI
Set the FIDO2 pin on a terminal like this:
$ ykman fido access change-pin
Enter the current PIN: 123456
Enter the new PIN: ********
Repeat for confirmation: ********
New PIN set.
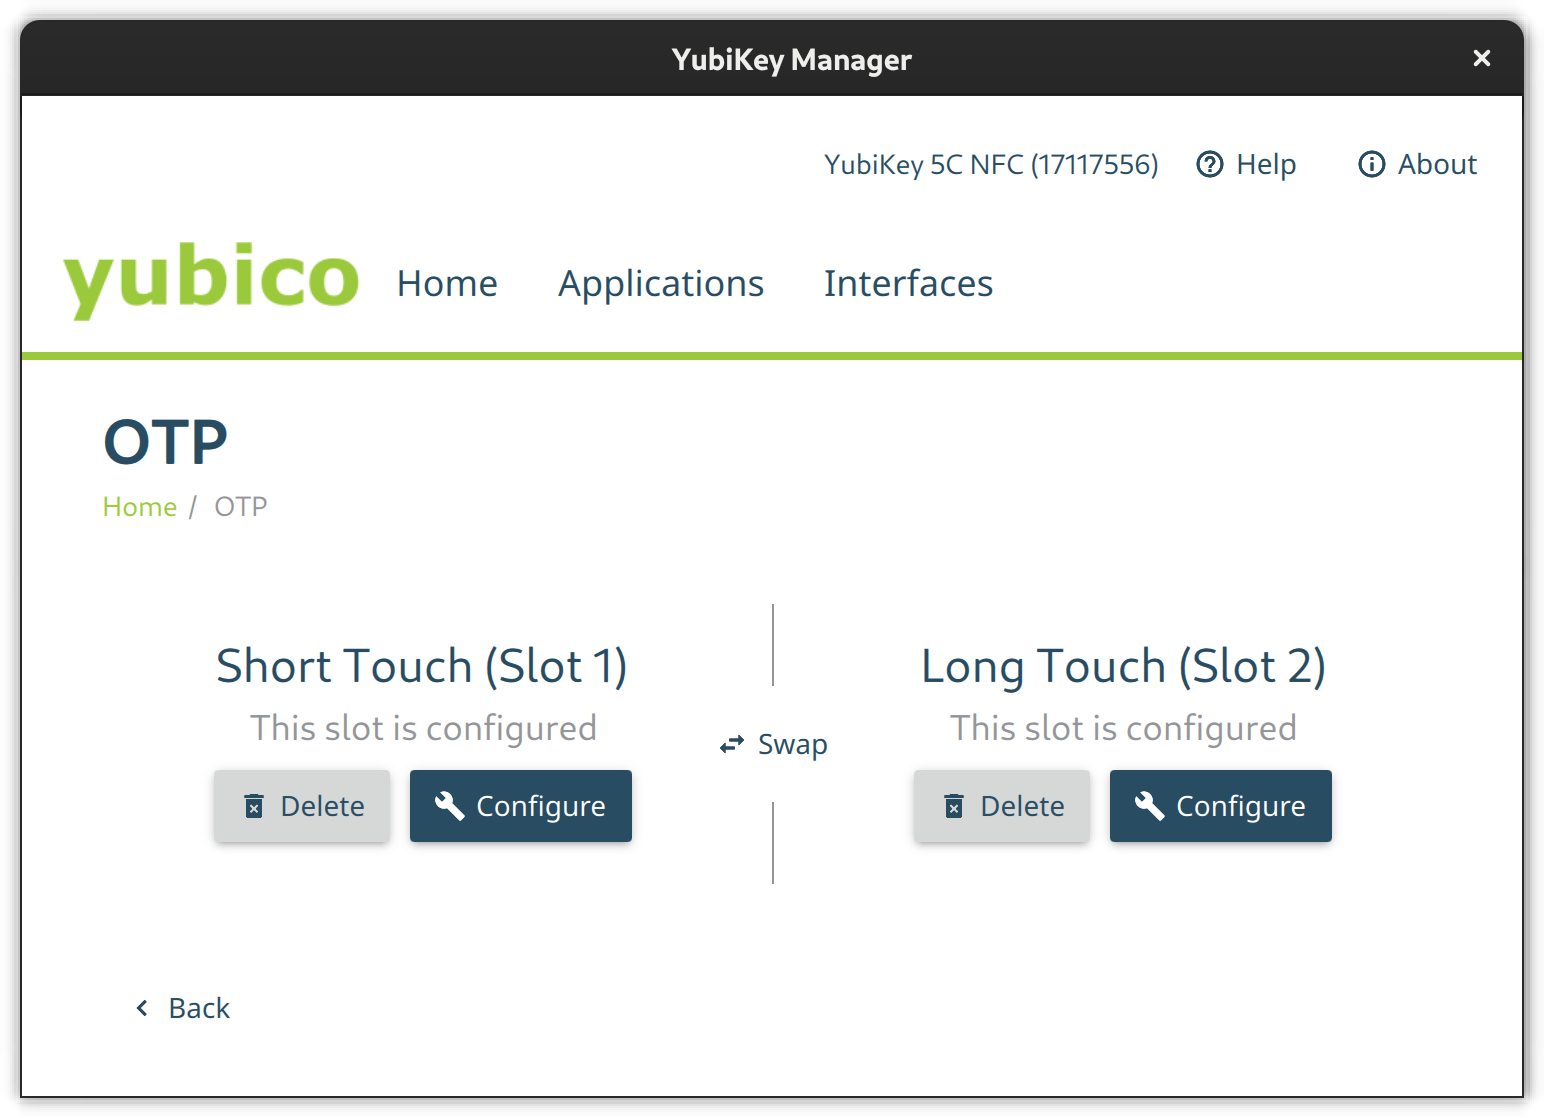
OTP
The OTP feature is configured out-of-the-box. There is nothing to do here except to configure Slot 2 if you like. Slot 1 is used for challenge-response by default. Slot 2, however, is empty at first. You can configure it to output a static key of your liking on a long touch of the YubiKey’s button (approximately 2.5 seconds).
The OTP configuration page from the Yubikey Manager GUI
If you like, set the second slot from a terminal via ykman otp static like this:
ykman otp static --keyboard-layout US 2 u25bohg87bmtj247ts725v5f
OATH
Use the OATH module to store TOTP codes. By default, this module does not have a passphrase. But you can assign one. Without a passphrase you can query all stored credentials and get TOTP codes without additional authentication.
The GUI does not have the means to change the passphrase so the CLI is required.
ykman oath access change
You can configure your device to remember the YubiKey so you only have to enter the passphrase once.
ykman oath access remember
In the same way, let your device forget the YubiKey OATH credential.
ykman oath access forget
Local (PAM) authentication via OTP
Add the YubiKey to local system authentication through PAM (Pluggable Authentication Modules). You can either do this using the default online or an alternative offline method. The online method uses the Yubico servers to validate the OTP tokens and thus requires an online connection while the offline method uses challenge-response.
Create base configuration files
Create two base configuration files using the pam_yubico module. One which instructs PAM to consider the YubiKey an alternative factor and one so PAM requires the key as an additional factor.
For the online YubiCloud method use the appropriate command shown here:
/etc/pam.d/yubikey-required
#%PAM-1.0
auth required pam_yubico.so id=[Your API Client ID] key=[Your API Client Key] /etc/pam.d/yubikey-sufficient
#%PAM-1.0
auth sufficient pam_yubico.so id=[Your API Client ID] key=[Your API Client Key]
You need to register your YubiKey at YubiCloud and obtain an API key. The module will work without an API key but then the client will not verify OpenSSL certificates and be susceptible to MitM (Man in the Middle) Attacks.
Note: This authentication method will not work if your device is offline or it cannot connect to the YubiCloud.
For offline challenge-response use the appropriate command shown here:
After the base configuration files are setup nothing has really changed — yet. It is advised that you now register your YubiKey(s) with the respective user accounts on your machines before changing the active PAM configuration of your systems.
If you use the online YubiCloud method you need the ID of your YubiKey. To find this just enter the key and retrieve an OTP code with a short press on the button and extract the first 12 characters – this is your key ID:
cccccbcgebif | bclbtjihhbfbduejkuhgvhkehnicrfdj
Next create a configuration file in ~/.yubico/authorized_yubikeys and add all authorized key IDs after your username separated by colons:
fedora-user:cccccbcgebif[:<another-key-id>]
If you go for the offline challenge-response method, you need at least one slot configured for challenge-response. Let’s assume Slot 1 is used in its default configuration with YubiCloud OTP for other things. So configure the 2nd slot for challenge-response:
ykman otp chalresp --generate --touch 2
Now register a connected YubiKey with your user account via challenge-response:
ykpamcfg -2
This creates a file in ~/.yubico/challenge-<key-serial> that contains a challenge response configuration for the key.
Choose PAM configuration
Now choose the PAM modules to consider the YubiKey and then include the respective configuration file, either before or after the system-auth import depending on whether sufficient or required is what you want:
/etc/pam.d/login – For console logins
/etc/pam.d/sudo – For sudo authentication
/etc/pam.d/gdm-password – For GNOME authentication
/etc/pam.d/ssh – SSH authentication against a local OpenSSH Server
For YubiKey as additional / required factor:
auth include system-auth
...
auth include yubikey-required
For YubiKey as alternative / sufficient factor:
auth include yubikey-sufficient
...
auth include system-auth
Note: If you add the YubiKey as a factor in sudo authentication, make certain to have a root shell open and test it thoroughly in another shell. Otherwise you could lose the ability to use sudo.
Lock the system on YubiKey removal
Wouldn’t it be cool to lock your Gnome session when removing the YubiKey? If that behavior fits your style just add a script which does just that and let udev trigger it.
Create an udev rule to catch the device detach event with a shell script. The model ID in this example might differ so please check your lsusb output to confirm it. Save the following udev rule into /etc/udev/rules.d/20-yubikey.rules:
Add the following script to the /usr/local/bin/lockscreen.sh file:
#!/bin/sh
#Author: https://gist.github.com/jhass/070207e9d22b314d9992 for bus in /run/user/*/bus; do uid=$(basename $(dirname $bus)) if [ $uid -ge 1000 ]; then user=$(id -un $uid) export DBUS_SESSION_BUS_ADDRESS=unix:path=$bus if su -c 'dbus-send --session --dest=org.freedesktop.DBus --type=method_call --print-reply /org/freedesktop/DBus org.freedesktop.DBus.ListNames' $user | grep org.gnome.ScreenSaver; then su -c 'dbus-send --session --type=method_call --dest=org.gnome.ScreenSaver /org/gnome/ScreenSaver org.gnome.ScreenSaver.Lock' $user fi fi done
Add execution permission to this script and reload udev:
$ sudo chmod +x /usr/local/bin/lockscreen.sh
$ sudo udevadm control -R
OpenSSH with PIV and FIDO2
Your YubiKey can store OpenSSH private keys in the PIV module, generate public keys from them, and require PIN and touch of the YubiKey button upon use.
Generate a private key (e.g. ED25519) with touch and pin requirement in the 9aslot:
$ ykman piv keys generate --algorithm ED25519 --pin-policy ONCE --touch-policy ALWAYS 9a public.pem
Enter PIN: ********
The slot 9A is for “PIV Authentication”.
Create a self-signed certificate for that key. The only use for the X.509 certificate is to satisfy PIV/PKCS #11 lib. It is needed to extract the public key from the smart card.
$ ykman piv certificates generate --subject "CN=OpenSSH" --hash-algorithm SHA384 9a pubkey.pem
Enter PIN: ********
Touch your YubiKey…
Use OpenSSH ssh-keygen to generate a public key you can later use in authorized_keys files on remote systems. The following generates such a key directly on the YubiKey in a FIDO2 slot, making it portable.
The resident option instructs ssh-keygen to store the key handle on the YubiKey, making it easier to use the key across multiple systems as ssh-add can load and use the ssh keys from the YubiKey directly. The application option assigns a designated name for the this specific private-public-key-pair and is useful if working with different ssh identities. The verify-required option is mandatory for resident keys and adds requirement to enter a pin on key usage.
If the key is generated with a touch requirement, only omit the verify-required option. If you don’t want to use FIDO2 slots, omit the resident and application options and make sure to backup generated public keys.
Caching OpenSSH connections
In the OpenSSH default configuration, every time you connect to a machine via ssh you’ll be prompted to touch your key. To let your OpenSSH client cache connections even after you close the session and thus no longer need to touch the key again, add the following option to your ~/.ssh/config:
Host * ControlMaster auto ControlPath ~/.ssh/S.%r@%h:%p ControlPersist 5m
Introspection
Get information on the PIV slot 9a:
$ ykman piv info
PIV version: 5.4.3
PIN tries remaining: 3/3
Management key algorithm: TDES
CHUID:	REDACTED
CCC: No data available.
Slot 9a: Algorithm:	RSA2048 Subject DN:	CN=SSH key Issuer DN:	CN=SSH key Serial: REDACTED Fingerprint: REDACTED Not before:	2022-01-01 20:00:00 Not after:	2023-01-01 20:00:00
List stored FIDO2 public keys with:
$ ykman fido credentials list
ssh:fedora 0000000000000000000000000000000000000000000000000000000000000000 openssh
Authenticating in the web
YubiKey Authenticator is a TOTP application for Desktop and Android and is similar to Google Authenticator and AndOTP. However, it uses the YubiKey as storage device. Either scan a QR code or enter the secret directly, choose a name and that’s it. Just keep in mind that the storage on a YubiKey is limited to 32 TOTP codes.
Since the TOTP codes are stored on the YubiKey they are portable and you may access them e.g. via USB C on desktop or via NFC on the android application.
Use the yubikey-manager to add a TOTP credential:
ykman oath accounts add fedora <TOTP secret>
Then retrieve a TOTP code with:
ykman oath accounts code fedora
WebAuthn and U2F as alternative
WebAuthn and U2F are modern alternatives to TOTP which just requests the presence of your key and a button press through your browser of preference. If previously registered at the web service in question, you can use it as a far more convenient factor than TOTP codes.
This feature is supported at least in Firefox but not in Gnome Web.
The difference between FIDO U2F and FIDO2 WebAuthn is that the latter stores an identity in the keys storage and thus the application or service can extract the user identity and authentication from the key without the need of an identity server.
Other use cases
There are more use cases not covered in this article which might be worth revisiting at some point. These Include but are not limited to:
OpenPGP to encrypt, sign or authenticate
x509 certificate management for Public Key Infrastructure
LUKS disk decryption
What other use-cases do you have in mind? Let us know in the comments.
This article introduces four new projects available in Copr, with installation instructions.
Copr is a build-system for anyone in the Fedora community. It hosts thousands of projects for various purposes and audiences. Some of them should never be installed by anyone, some are already being transitioned to the official Fedora Linux repositories, and the rest are somewhere in between. Copr gives you the opportunity to install 3rd party software that is not available in Fedora Linux repositories, try nightly versions of your dependencies, use patched builds of your favorite tools to support some non-standard use-cases, and just experiment freely.
This article takes a closer look at interesting projects that recently landed in Copr.
Sticky
Do you always forget your passwords, write them on sticky notes and post them all around your monitor? Well, please don’t use Sticky for that. But it is a great note-taking application with support for checklists, text formatting, spell-checking, backups, and so on. It also supports adjusting note visibility and organizing notes into groups.
Installation instructions
The repo currently provides Sticky for Fedora 36, 37, 38, and Fedora Rawhide. To install it, use these commands:
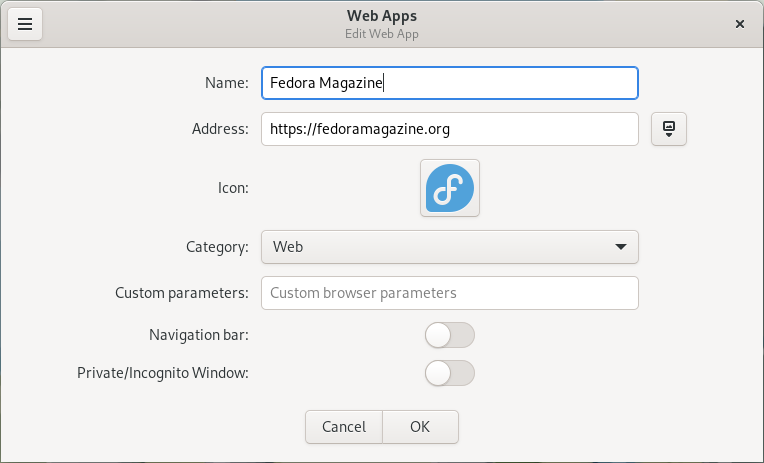
Generations of programmers spent over three decades creating, improving, and re-inventing window managers for us to disregard all of that, and live inside of a web browser with dozens of tabs. Webapp-manager allows you to run websites as if they were applications, and return to the previous paradigm.
Installation instructions
The repo currently provides webapp-manager for Fedora 36, 37, 38, and Fedora Rawhide. To install it, use these commands:
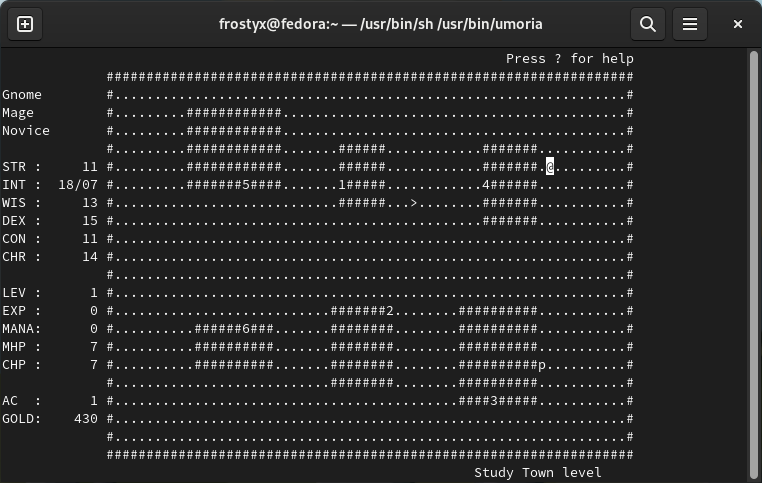
Umoria (The Dungeons of Moria) is a single-player dungeon crawl game inspired by J. R. R. Tolkien’s novel The Lord of the Rings. It is considered to be the first roguelike game ever created. A player begins their epic adventure by acquiring weapons and supplies in the town level and then descends to the dungeons to face the evil that lurks beneath.
Installation instructions
The repo currently provides Umoria for Fedora 36, 37, 38, and Fedora Rawhide. To install it, use these commands:
JetBrains PyCharm is a popular IDE for the Python programming language. It provides intelligent code completion, on-the-fly error checking, quick fixes, and much more. The phracek/PyCharm repository is a great example of a well-maintained project that lives in Copr and has for a long time. Created eight years ago for Fedora 20, it provided support for every subsequent Fedora release. It is now a part of the Third-Party Repositories that can be opted into during the Fedora installation.
Installation instructions
The repo currently provides PyCharm for Fedora 36, 37, 38, Fedora Rawhide, EPEL 7, 8, and 9. To install it, use these commands:
This article showcases rpmdistro-repoquery, and describes how to use it to simplify doing RPM-based package operations across multiple distributions. This does not require using SSH to log into another host or starting a container or VM.
Introduction
Whether you’re a packager, system administrator, or a user of Fedora Linux, CentOS Stream, or their derivatives (RHEL, AlmaLinux, Rocky Linux etc.), you might already be familiar with dnf repoquery. This tool allows you to query the repositories configured on the system for information about available packages, whether or not they are currently installed on the local machine.
This is great, within limits. For instance, on Fedora Linux, you can query packages built for stable and branched Fedora Linux releases and, if you install fedora-repos-rawhide, packages in the development branch. Sufficient care is required to make sure you don’t enable repos meant for different Fedora Linux releases by default and thus accidentally upgrade the running system.
Enter rpmdistro-repoquery: it comes with a set of repo definitions for different RPM-based distributions, but instead of putting them in /etc/yum.repos.d with the repositories meant for actual use, put them in /usr/share/rpmdistro-repoquery (or, if you so choose, you can clone the repository and use definitions that come in the checkout). DNF is then invoked with a custom configuration file and a custom cache location that points at one of the repos for one of the distributions rather than the default location.
The various supported distributions come with the relevant repositories enabled by default. Some have additional repositories that need to be enabled explicitly. For example, source repos are off by default. Also, CentOS Stream configurations come with additional repos for SIG packages that are off by default.
This opens up a lot of use cases. I highlight some of them below.
Note: The primary author of this tool, Neal Gompa, works on a lot of RPM-based Linux distributions. I became involved using it in ebranch.
Real-life rpmdistro-repoquery use cases
Quickly seeing if a CentOS Stream update has made it to the mirrors
In Fedora’s build system, updates go through Bodhi, and once they are marked testing or stable that means there is a compose containing those updates, and they tend to hit mirrors shortly after.
In CentOS Stream, the situation is more complicated, as the QA process is not visible to the public. Take clang for example: given a commit, and a matching Koji build on January 27th, can we be sure this is pushed out to the mirrors?
It turns out, as of February 9th, it’s not in the mirrors yet:
Comparing what is packaged in different distributions
Scenario: you use / manage a heterogeneous fleet of different distributions. You want to find out if all the packages you need are available (because you might need to package what’s missing).
Let’s see if myrepos is available on openSUSE Tumbleweed (the rolling distribution):
Searching by the Fedora Linux package name yields nothing, but in this case, searching by the binary shows a match (since those are in the RPM metadata): myrepos is available, but you’ll need a different package name in your configuration management.
ebranch
This is a special case of the former. ebranch is a tool for branching Fedora Linux packages for EPEL.
Given that CentOS Stream (and its downstreams, such as Red Hat Enterprise Linux, AlmaLinux and Rocky Linux) only carries the subset of Fedora Linux packages that Red Hat is committed to supporting, EPEL provides a way for the community to maintain additional packages built against RHEL (or CentOS Stream).
A major problem here is dealing with dependency hell: a missing package might have several missing dependencies, which in turn have more missing dependencies… Getting retsnoop in EPEL 9 involves branching 189 packages in total!
ebranch utilizes rpmdistro-repoquery to compare what is available in Rawhide (rpmdistro-repoquery fedora rawhide) with what is available in CentOS Stream + EPEL (rpmdistro-repoquery centos-stream-legacy 8 and rpmdistro-repoquery centos-stream 9) to build up a transitive closure of missing dependencies and report on any dependency loops. ebranch also computes a chain build order for the missing dependencies, grouping packages that can be built in parallel.
mkosi is a tool for generating OS images; currently it contains the logic for different distributions (e.g. Fedora, CentOS), but this makes it hard to, for example, build an image for CentOS SIGs such as Hyperscale.
With Daan De Meyer’s refactor rpmdistro-repoquery’s repo files can now be reused by mkosi so in the future, tailoring what repositories are used to build an OS image should be much easier.
Conclusion
The contributors for this tool have found it very useful in our Linux distribution work, and we hope this article can help introduce it to others who likewise find it useful.
Please try it yourself — on Fedora Linux, and on any CentOS Stream or derivatives with EPEL enabled, simply do:
$ sudo dnf install rpmdistro-repoquery
If the distro you want to work with is not supported, pull requests are welcome! Likewise with suggestions or requests. If you want to package rpmdistro-repoquery in a different distribution, feel free to use the Fedora packaging as reference.
This article will explore transparent filesystem compression in Btrfs and how it can help with saving storage space. This is part of a series that takes a closer look at Btrfs, the default filesystem for Fedora Workstation, and Fedora Silverblue since Fedora Linux 33.
Most of us have probably experienced running out of storage space already. Maybe you want to download a large file from the internet, or you need to quickly copy over some pictures from your phone, and the operation suddenly fails. While storage space is steadily becoming cheaper, an increasing number of devices are either manufactured with a fixed amount of storage or are difficult to extend by end-users.
But what can you do when storage space is scarce? Maybe you will resort to cloud storage, or you find some means of external storage to carry around with you.
In this article I’ll investigate another solution to this problem: transparent filesystem compression, a feature built into Btrfs. Ideally, this will solve your storage problems while requiring hardly any modification to your system at all! Let’s see how.
Transparent compression explained
First, let’s investigate what transparent compression means. You can compress files with compression algorithms such as gzip, xz, or bzip2. This is usually an explicit operation: You take a compression utility and let it operate on your file. While this provides space savings, depending on the file content, it has a major drawback: When you want to access the file to read or modify it, you have to decompress it first.
This is not only a tedious process, but also temporarily defeats the space savings you had achieved previously. Moreover, you end up (de)compressing parts of the file that you didn’t intend to touch in the first place. Clearly there is something better than that!
Transparent compression on the other hand takes place at the filesystem level. Here, compressed files still look like regular uncompressed files to the user. However, they are stored with compression applied on disk. This works because the filesystem selectively decompresses only the parts of a file that you access and makes sure to compress them again as it writes changes to disk.
The compression here is transparent in that it isn’t noticeable to the user, except possibly for a small increase in CPU load during file access. Hence, you can apply this to existing systems without performing hardware modifications or resorting to cloud storage.
Comparing compression algorithms
Btrfs offers multiple compression algorithms to choose from. For technical reasons it cannot use arbitrary compression programs. It currently supports:
zstd
lzo
zlib
The good news is that, due to how transparent compression works, you don’t have to install these programs for Btrfs to use them. In the following paragraphs, you will see how to run a simple benchmark to compare the individual compression algorithms. In order to perform the benchmark, however, you must install the necessary executables. There’s no need to keep them installed afterwards, so you’ll use a podman container to make sure you don’t leave any traces in your system.
Because typing the same commands over and over is a tedious task, I have prepared a ready-to-run bash script that is hosted on Gitlab (https://gitlab.com/hartang/btrfs-compression-test). This will run a single compression and decompression with each of the above-mentioned algorithms at varying compression levels.
[INFO] Using file 'glibc-2.36.tar' as compression target
[INFO] Target file 'glibc-2.36.tar' not found, downloading now...
################################################################### 100.0%
[ OK ] Download successful!
[INFO] Copying 'glibc-2.36.tar' to '/tmp/tmp.vNBWYg1Vol/' for benchmark...
[INFO] Installing required utilities
[INFO] Testing compression for 'zlib' Level | Time (compress) | Compression Ratio | Time (decompress)
-------+-----------------+-------------------+------------------- 1 | 0.322 s | 18.324 % | 0.659 s 2 | 0.342 s | 17.738 % | 0.635 s 3 | 0.473 s | 17.181 % | 0.647 s 4 | 0.505 s | 16.101 % | 0.607 s 5 | 0.640 s | 15.270 % | 0.590 s 6 | 0.958 s | 14.858 % | 0.577 s 7 | 1.198 s | 14.716 % | 0.561 s 8 | 2.577 s | 14.619 % | 0.571 s 9 | 3.114 s | 14.605 % | 0.570 s [INFO] Testing compression for 'zstd' Level | Time (compress) | Compression Ratio | Time (decompress)
-------+-----------------+-------------------+------------------- 1 | 0.492 s | 14.831 % | 0.313 s 2 | 0.607 s | 14.008 % | 0.341 s 3 | 0.709 s | 13.195 % | 0.318 s 4 | 0.683 s | 13.108 % | 0.306 s 5 | 1.300 s | 11.825 % | 0.292 s 6 | 1.824 s | 11.298 % | 0.286 s 7 | 2.215 s | 11.052 % | 0.284 s 8 | 2.834 s | 10.619 % | 0.294 s 9 | 3.079 s | 10.408 % | 0.272 s 10 | 4.355 s | 10.254 % | 0.282 s 11 | 6.161 s | 10.167 % | 0.283 s 12 | 6.670 s | 10.165 % | 0.304 s 13 | 12.471 s | 10.183 % | 0.279 s 14 | 15.619 s | 10.075 % | 0.267 s 15 | 21.387 s | 9.989 % | 0.270 s [INFO] Testing compression for 'lzo' Level | Time (compress) | Compression Ratio | Time (decompress)
-------+-----------------+-------------------+------------------- 1 | 0.447 s | 25.677 % | 0.438 s 2 | 0.448 s | 25.582 % | 0.438 s 3 | 0.444 s | 25.582 % | 0.441 s 4 | 0.444 s | 25.582 % | 0.444 s 5 | 0.445 s | 25.582 % | 0.453 s 6 | 0.438 s | 25.582 % | 0.444 s 7 | 8.990 s | 18.666 % | 0.410 s 8 | 34.233 s | 18.463 % | 0.405 s 9 | 41.328 s | 18.450 % | 0.426 s [INFO] Cleaning up...
[ OK ] Benchmark complete!
It is important to note a few things before making decisions based on the numbers from the script:
Not all files compress equally well. Modern multimedia formats such as images or movies compress their contents already and don’t compress well beyond that.
The script performs each compression and decompression exactly once. Running it repeatedly on the same input file will generate slightly different outputs. Hence, the times should be understood as estimates, rather than an exact measurement.
Given the numbers in my output, I decided to use the zstd compression algorithm with compression level 3 on my systems. Depending on your needs, you may want to choose higher compression levels (for example, if your storage devices are comparatively slow). To get an estimate of the achievable read/write speeds, you can divide the source archives size (about 260 MB) by the (de)compression times.
The compression test works on the GNU libc 2.36 source code by default. If you want to see the results for a custom file, you can give the script a file path as the first argument. Keep in mind that the file must be accessible from inside the container.
Feel free to read the script code and modify it to your liking if you want to test a few other things or perform a more detailed benchmark!
Configuring compression in Btrfs
Transparent filesystem compression in Btrfs is configurable in a number of ways:
As mount option when mounting the filesystem (applies to all subvolumes of the same Btrfs filesystem)
With Btrfs file properties
During btrfs filesystem defrag (not permanent, not shown here)
With the chattr file attribute interface (not shown here)
I’ll only take a look at the first two of these.
Enabling compression at mount-time
There is a Btrfs mount option that enables file compression:
$ sudo mount -o compress=<ALGORITHM>:<LEVEL> ...
For example, to mount a filesystem and compress it with the zstd algorithm on level 3, you would write:
$ sudo mount -o compress=zstd:3 ...
Setting the compression level is optional. It is important to note that the compress mount option applies to the whole Btrfs filesystem and all of its subvolumes. Additionally, it is the only currently supported way of specifying the compression level to use.
In order to apply compression to the root filesystem, it must be specified in /etc/fstab. The Fedora Linux Installer, for example, enables zstd compression on level 1 by default, which looks like this in /etc/fstab:
Another way of specifying compressions is via Btrfs filesystem properties. To read the compression setting for any file, folder or subvolume, use the following command:
$ btrfs property get <PATH> compression
Likewise, you can configure compression like this:
$ sudo btrfs property set <PATH> compression <VALUE>
For example, to enable zlib compression for all files under /etc:
$ sudo btrfs property set /etc compression zlib
You can get a list of supported values with man btrfs-property. Keep in mind that this interface doesn’t allow specifying the compression level. In addition, if a compression property is set, it overrides other compression configured at mount time.
Compressing existing files
At this point, if you apply compression to your existing filesystem and check the space usage with df or similar commands, you will notice that nothing has changed. That is because Btrfs, by itself, doesn’t “recompress” all your existing files. Compression will only take place when writing new data to disk. There are a few ways to perform an explicit recompression:
Wait and do nothing: As files are modified and written back to disk, Btrfs compresses the newly written file contents as configured. At some point, if we wait long enough, an increasing part of our files are rewritten and, hence, compressed.
Move files to a different filesystem and back again: Depending on which files you want to apply compression to, this can become a rather tedious operation.
Perform a Btrfs defragmetation
The last option is probably the most convenient, but it comes with a caveat on Btrfs filesystems that already contain snapshots: it will break shared extent between snapshots. In other words, all the shared content between two snapshots, or a snapshot and its’ parent subvolume, will be present multiple times after a defrag operation.
Hence, if you already have a lot of snapshots on your filesystem, you shouldn’t run a defragmentation on the whole filesystem. This isn’t necessary either, since with Btrfs you can defragment specific directories or even single files, if you wish to do so.
You can use the following command to perform a defragmentation:
For example, you can defragment your home directory like this:
$ sudo btrfs filesystem defragment -r "$HOME"
In case of doubt it’s a good idea to start with defragmenting individual large files and continuing with increasingly large directories while monitoring free space on the file system.
Measuring filesystem compression
At some point, you may wonder just how much space you have saved thanks to file system compression. But how do you tell? First, to tell if a Btrfs filesystem is mounted with compression applied, you can use the following command:
If you get a result, the filesystem at the given mount point is using compression! Next, the command compsize can tell you how much space your files need:
$ sudo compsize -x /path/to/examine
On my home directory, the result looks like this:
$ sudo compsize -x "$HOME"
Processed 942853 files, 550658 regular extents (799985 refs), 462779 inline.
Type Perc Disk Usage Uncompressed Referenced
TOTAL 81% 74G 91G 111G
none 100% 67G 67G 77G
zstd 28% 6.6G 23G 33G
The individual lines tell you the “Type” of compression applied to files. The “TOTAL” is the sum of all the lines below it. The columns, on the other hand, tell you how much space our files need:
“Disk Usage” is the actual amount of storage allocated on the hard drive,
“Uncompressed” is the amount of storage the files would need without compression applied,
“Referenced” is the total size of all uncompressed files added up.
“Referenced” can differ from the numbers in “Uncompressed” if, for example, one has deduplicated files previously, or if there are snapshots that share extents. In the example above, you can see that 91 GB worth of uncompressed files occupy only 74 GB of storage on my disk! Depending on the type of files stored in a directory and the compression level applied, these numbers can vary significantly.
Additional notes about file compression
Btrfs uses a heuristic algorithm to detect compressed files. This is done because compressed files usually do not compress well, so there is no point in wasting CPU cycles in attempting further compression. To this end, Btrfs measures the compression ratio when compressing data before writing it to disk. If the first portions of a file compress poorly, the file is marked as incompressible and no further compression takes place.
If, for some reason, you want Btrfs to compress all data it writes, you can mount a Btrfs filesystem with the compress-force option, like this:
$ sudo mount -o compress-force=zstd:3 ...
When configured like this, Btrfs will compress all data it writes to disk with the zstd algorithm at compression level 3.
An important thing to note is that a Btrfs filesystem with a lot of data and compression enabled may take a few seconds longer to mount than without compression applied. This has technical reasons and is normal behavior which doesn’t influence filesystem operation.
Conclusion
This article detailed transparent filesystem compression in Btrfs. It is a built-in, comparatively cheap, way to get some extra storage space out of existing hardware without needing modifications.
The next articles in this series will deal with:
Qgroups – Limiting your filesystem size
RAID – Replace your mdadm configuration
If there are other topics related to Btrfs that you want to know more about, have a look at the Btrfs Wiki [1] and Docs [2]. Don’t forget to check out the first three articles of this series, if you haven’t already! If you feel that there is something missing from this article series, let me know in the comments below. See you in the next article!
Podman is a tool which runs, manages and deploys containers under the OCI standard. Running containers with rootless access and creating pods (a Pod is a group of containers ) are additional features of Podman. This article describes and explains how to use checkpointing in Podman to save the state of a running container for later use.
Checkpointing Containers : Checkpoint / Restore In User-space, or CRIU, is Linux software available in the Fedora Linux repository as the “criu” package. It can freeze a running container (or an individual application) and checkpoint its state to disk (Reference : https://criu.org/Main_Page). The saved data can be used to restore the container and run it exactly as it was during the time of the freeze. Using this, we can achieve live migration, snapshots, or remote debugging of applications or containers. This capability requires CRIU 3.11 or later installed on the system.
Podman Checkpoint
# podman container checkpoint <containername>
This command will create a checkpoint of the container and freeze its state. Checkpointing a container will stop the running container as well. If you do podman ps there will be no container existing named <containername>.
You can export the checkpoint to a specific location as a file and copy that file to a different server
This section describes how to migrate a container from client1 to client2 using the podman checkpoint feature. This example uses the https://lab.redhat.com/tracks/rhel-system-roles playground provided by Red Hat as it has multiple hosts with ssh-keygen already configured.
The example will run a container with some process on client1, create a checkpoint, and migrate it to client2. First run a container on the client1 machine with the commands below:
podman run --name=demo1 -d docker.io/httpd
podman exec -it demo1 bash
sleep 600& (run a process for verification )
exit
The above snippet runs a container as demo1 with the httpd process which runs a sleep process for 600 seconds ( 10 mins ) in background. You can verify this by doing:
U.S. politician Daniel Webster described the U.S. government as, “… the people’s government, made for the people, made by the people, and answerable to the people.”[1] Similarly, the Fedora Project is “a community of people working together”[2] and it is “led by contributors from across the community.”[3] In other words, “It is what you make of it.”[4]
The Fedora community invites you to join the conversation and help advance the Fedora Project and free software in general. Traditionally much of the collaboration in the Fedora Project had occurred over IRC. And IRC support will continue for the foreseeable future. But Fedora is also rolling out some newer technologies that we think might improve the user experience. Fedora has moved primary communications to Matrix for real time communication and collaboration. If you haven’t already done so, we encourage you to sign up for a Fedora account, open the Fedora Matrix space at chat.fedoraproject.org, and explore the vast world that is the Fedora Project via Matrix. As much as possible, the Fedora Project strives to be an open community. Anyone can contribute to Fedora and everyone of good will is welcome to join.
A high-level overview of the Fedora communication channels
As the saying goes, “Communication is key.” But communication comes in many forms. One subdivision of the various forms of communiction is synchronous and asynchronous. Traditionally, the Fedora Project has used email for asynchronous communication and IRC for synchronous communication. The forum discussion.fedoraproject.org is a new option for asynchronous communication and Matrix via chat.fedoraproject.org is a new option for synchronous communication.
Regarding the synchronous — asynchronous differentiation: It is good and important to differentiate our instruments in this dimension, and also to explain something. Synchronous does not mean that you get a reaction immediately, it can take a few days, if only because of the different time zones. But you can also “ping” someone specifically or invite them to a direct conversation. After some time, however, the topic will often be forgotten about on the timeline. Asynchronous tools, on the other hand, are organized thematically, bringing a topic to the front again and again as something is added to it. This provides a more systematic approach.
Importantly, the new tools are being provided as an option that you can choose. There is no requirement to use the new tools. You can expect both email and IRC to be around for a long time to come.
Blog posts are yet another form of communication that will continue to be available at communityblog.fedoraproject.org and fedoramagazine.org. The former provides information expected to be of interest to the Fedora developers and Fedora special interest groups (SIGs). Posts about the tools used to build Fedora Linux, for example, are often found on the Community Blog. In contrast, this site — fedoramagazine.org — hosts articles expected to be of interest to the general Fedora community.
In a way, blog posts can be thought of as a super-asynchronous form of communication. The trade-off, as the forms of communication go from less-synchronous to more-synchronous, is that they tend to become somewhat lower in quality. That is, you can expect a much quicker response on IRC or chat.fedoraproject.org than if you request that a blog post be written about a subject on communityblog.fedoraproject.org. But of course, there is no guarantee that you will get a response on any of the channels. All contributions to the Fedora Project are voluntary. No one is ever obliged to provide any service to anyone else. But also don’t take a lack of response personally. Your question might just be outside the area of expertise of those who noticed it.
I like to think of the relationship between the various forms of communication that the Fedora Project uses as having an inversely proportional relation between frequency and contemplativeness.
The point is that these communication methods each serve different needs but they are complementary. You won’t want to limit yourself to just one of the communications channels. If you need rapid responses to simple questions, use the chat server. If you want to go in-depth on a complex topic, it might be something that would make a good blog post. And the forum is for everything in between.
So what are you waiting for! Sign up! Explore the community! If you come across something you think you can help out with or even just something that you think you might want to get involved with, jump in and offer to help! And above all, have FUN!
This is Carlos Soriano, Engineering Manager at the GPU team at Red Hat. I’m here together with Sebastian Wick, primary HDR developer at Red Hat, and Niels de Graef, GPU team Product Owner at Red Hat, to announce that we’re organizing the Display/HDR hackfest in Brno in the Czech Republic, April 24-26! The focus will be on planning and development of the technical infrastructure needed for various display technologies, specifically those that need GNOME Shell to work in tandem with the GPU stack. One of the main examples of this is HDR support, which we know you have all been waiting for!
Details
The purpose of the hackfest is to bring together contributors from across the display/GPU stack. Attendees will include those from projects such as Freedesktop, GNOME, KDE, Mesa, Wayland and the Linux kernel. This is going to be a great opportunity to meet and collaborate on the holistic approach necessary to make these technologies work well across various vendors and projects.
The proposed length of the hackfest is 2 full days, and a third day for wrapping up during the morning and doing a local activity during the afternoon.
Now, you might be asking why are these technologies, such as HDR, important for us? And what is the plan to integrate them in Fedora? Well, let’s take HDR as a primary example, and start by explaining what HDR is.
What is HDR? – By Sebastian Wick
When most people talk about High Dynamic Range (HDR) they often refer not only to HDR but also to Wide Color Gamut (WCG). Both of these terms describe an improvement of display technologies.
The dynamic range of a display describes the ratio of the lowest luminance to the highest luminance it can produce at the same time. A high dynamic range thus means an increase in the highest luminance (colloquially called brighter whites) or a decrease of the lowest luminance (darker blacks), or both.
The color gamut of a display describes the colors it is able to reproduce. If a gamut is “wide”, it means the display is able to reproduce more chromaticities compared to a small gamut. To put it colloquially, it can show more colors.
We humans are able to perceive images which have up to a certain dynamic range and color gamut. The closer displays get to those capabilities the more immersive the resulting images are. HDR, in its broader meaning, is therefore all about being able to show more colors, and we can use HDR modes on displays to unlock their full potential.
From a technical perspective, enabling those modes and presenting content is not hard, as long as the display only has to show a single source. While this may work for some use cases, a general purpose desktop requires composition of various Standard Dynamic Range (SDR) signals, color managed SDR signals and various HDR signals to various SDR displays, color managed displays and HDR displays at the same time. You can take a look at Apple’s EDR concept if you want to see how this looks when done right.
There are no industry standards yet for this kind of composition and most HDR modes, unfortunately all the common modes, are also not designed for this use case. Instead they focus on presenting a single HDR source.
With the increase in composition complexity, offloading the composition and achieving a zero-copy direct-scanout scenario becomes much harder. But this is required to keep power consumption in check and thus improve battery life.
Wow, that sounds complex
Yeah, this all sounds more complex than someone could imagine, but we’re confident we can get there. Now, why is HDR important for us, and what is our plan for integrating it in Fedora once it is ready? Niels de Graef has been working as the primary HDR feature owner at Red Hat for a couple of months now and can help us understand that.
Why is HDR important for us, and what is our plan for integrating it in Fedora? – By Niels de Graef
By adding support for HDR, we want to be an enabler for several key groups.
On one hand, we want to support content creators who see HDR as a very interesting feature. It allows them to present their work to people the way they intend it to be seen, eliminating the effect of “washed down” colors due to the monitor only supporting a relatively small color space. For example: as an artist, you might want to specify exactly how bright the sun in a desert scene should look while making sure the rest of the scene does not degrade in detail.
As content creators go, an important stakeholder is the VFX industry, which consists of big players like Disney. Red Hat closely collaborates with the industry, which also recommends Red Hat Enterprise Linux (RHEL) as their choice of distribution. We want to make certain we get the industry’s feedback so we can incorporate it in this story and make sure we get this right from the start.
On the other hand, we want to enable Linux users. Hardware that supports HDR is becoming more commonplace and is becoming more affordable as of late. HDR is becoming more supported, and an increasing amount of content is making use of it. As long as we don’t have HDR support, Linux users will have a degraded experience compared to Windows and Mac users.
Finally, supporting HDR fits into the foundations of Fedora, where we want to do the right thing, making sure everyone is free to enjoy the latest innovations and features. This follows our move to Wayland, which, as a modern graphics stack, allows us to build new features like this.
Wrapping up
We hope that you enjoy the work we’re doing to enable the Linux ecosystem and users to make use of the latest technologies. We’re definitely excited with what we are aiming to achieve. Thanks to everyone who is contributing to this effort, and the organization of the hackfest.