Today at Flock, we announced that Fedora Linux will soon be available on Apple Silicon Macs. Developed in close collaboration with the Fedora Asahi SIG and the Asahi Linux project, the Fedora Asahi Remix will provide a polished experience for Workstation and Server usecases on Apple Silicon systems. The Asahi Linux project has also announced that the new Asahi Linux flagship distribution will be Fedora Asahi Remix.
We are using a Remix as opposed to delivering this support in Fedora Linux proper because this ecosystem is still very fast moving and we believe a Remix will offer the best user experience for the time being. Also, the Remix will allow us to integrate hardware support as it becomes available. Nonetheless, as much of this work as possible is being conducted upstream, with several key components being developed, maintained and packaged in Fedora Linux upstream. Ultimately, we expect Apple Silicon support to be integrated in Fedora Workstation and Fedora Server in a future release, and are working towards this goal. This approach is in line with the overarching goal of the Asahi project itself to integrate support for these systems in the relevant upstream projects.
The first official release of Fedora Asahi Remix is slated to be available by the end of August 2023. Development builds are already available for testing at https://fedora-asahi-remix.org/, though they should be considered unsupported and likely to break until the official release.
A letter from Fedora Project Leader Matthew Miller
Hello Fedora friends! In just about a week, we will kick off Flock to Fedora — our annual contributor conference. I hope you’re as excited as I am! For the last three years, we’ve run this as a virtual event — we stayed cozy at home with Nest. Now, we’re back to in-person, and I can’t wait to see so many of you again as we flock together to meet in Cork, Ireland.
Flock is different from other conferences — it’s not a showcase or sales pitch, and it’s not a corporate event where we stand up for or root for the companies we work for or are fans of. Of course, we are grateful for our sponsors and our employers, but in Fedora in general — and especially at Flock! — that’s not what things are about. We come together in a positive spirit to collaborate and build. We’re a community of people, and friendship is a cornerstone value. Fedora is our community, and Flock is where we come together.
This year, we’re combining forces with our friends at the CentOS Project: CentOS Connect will be co-located with Flock. CentOS is a different kind of project, but the same approach applies: this is about community. I know there are a lot of strong feelings around Red Hat and CentOS and rebuilds and downstreams lately. Fedora doesn’t control any of that, but it affects us — so, I’m sure we’ll talk about it. (We even have a session related to the topic.) As we talk, though, let’s all keep in mind the spirit of our projects: working together collaboratively to build a better world with free and open source software for everyone.
The Nest events were wonderful: the best virtual events during the whole pandemic, I think. While I obviously am biased about this, I think it’s fair, since I didn’t really do any of the organizing work. (Thanks to everyone who did, and especially to Marie Nordin!) This year, while we wish everyone could be there in person, we want to make the event as accessible as possible to those who can’t be there, so we will live-stream and record the sessions. I hope you’ll join as many sessions as your local time zone permits.
I look forward to talking about our in-progress strategy, and our goal of doubling the number of active Fedora contributors. I want to hear what all of you are working on, all the ideas you have, all the proposals and plans for the future. Most of all, though, I’m looking forward to seeing so many of my friends again, and making new connections. I hope you are too!
Be sure to check out the schedule. If you haven’t registered yet, don’t forget to do that!
If you’re interested in running Linux on your Android device, you’re in luck! It’s possible to install Fedora Linux on Android using Termux. Termux is a terminal emulator for Android that allows you to run Linux commands and utilities on your phone or tablet. It does not replace Android. In this article, we’ll walk you through the process of installing Fedora Linux on Android using Termux and show you how to keep it up to date with the latest versions.
Step by step process
Step 1: Install Termux
To get started, you need to install Termux from the Google Play Store. Once you have Termux installed, open it up and type the following command to update the package list:
pkg update
Note: Termux requires Android >= 7 to run. Support for Android 5 and 6 was dropped at v0.83 on 2020-01-01, but you can find old builds on archive.org ( https://archive.org/details/termux-repositories-legacy/ ) if needed.
Step 2: Install Proot-Distro
Next, you’ll need to install Proot-Distro. Proot-Distro is a tool that allows you to install and run Linux distributions in a chroot environment. To install Proot-Distro, run the following command:
pkg install proot-distro
Step 3: Install Fedora
With Proot-Distro installed, you can now use it to install Fedora. To install Fedora, run the following command:
proot-distro install fedora
This will download and install the latest version of Fedora.
Step 4: Configure dnf
Now that you have Fedora installed, you’ll need to configure dnf, Fedora’s package manager. By default, dnf may try to install SELinux packages, which won’t work properly in a chroot environment. To prevent this, exclude SELinux packages installation by editing the dnf configuration file. Run the following command to open the dnf configuration file for editing :
cd ../usr/var/lib/proot-distro/installed-rootfs/fedora/etc/dnf
vi dnf.conf
You may substitute the nano editor for vi, if it is more to your liking. Once you’re in the file, find the line that says excludepkgs= and add *selinux* to the end of the line, like so:
excludepkgs=*selinux*
It may be necessary to add the excludepkgs line. Save these changes and exit the editor.
Step 5: Install a Desktop Environment (Optional)
Fedora comes with a number of desktop environments to choose from. If you’d like to install a desktop environment, you can do so with the following commands:
This will switch from termux into the chroot Fedora installation and install the GNOME desktop environment, along with a number of other packages. If you prefer a different desktop environment, you can replace Fedora Workstation with the name of the group for your preferred environment.
Step 6: Install VNC Server (Optional)
If you plan on using your Fedora installation with a graphical interface, you’ll need to install a VNC server. This will allow you to connect to the Fedora desktop from another computer or device. To install the TigerVNC server, run the following command:
dnf install tigervnc-server.aarch64 -y
This will install the VNC server, along with any necessary dependencies.
Step 7: Upgrading Fedora
Now that you have Fedora installed, you’ll want to keep it up to date with the latest versions. To upgrade Fedora, run the following commands:
First command sudo dnf upgrade –refresh refreshes the package cache and updates any installed packages.
The second command sudo dnf install dnf-plugin-system-upgrade installs the dnf-plugin-system-upgrade package, needed for the upgrade process.
The third command sudo dnf system-upgrade download –releasever=37 downloads the necessary packages for the upgrade to version 37 of Fedora. Replace 37 with the desired release version.
The fourth command export DNF_SYSTEM_UPGRADE_NO_REBOOT=1 sets an environment variable to prevent the system from rebooting after the upgrade.
The fifth command sudo -E dnf system-upgrade reboot reboots the system to start the upgrade process. Make sure to save any important work before running this command.
The sixth command sudo -E dnf system-upgrade upgrade performs the upgrade process.
Finally, the seventh command sudo dnf upgrade –refresh updates any remaining packages and ensures that your system is fully up to date.
Errors Encountered
During the installation and upgrade process, you may encounter errors. Two common errors are described below, along with their solutions.
Error 1: sudo: /etc/sudo.conf is owned by uid 1001, should be 0 Solution: This error occurs when the ownership of the sudo.conf file is incorrect. To fix this, run the following command:
chmod +s /usr/bin/sudo
This sets the setuid bit on the sudo command, which allows it to run with root privileges.
Error 2: filesystem package didn’t get upgraded post OS upgrade Solution: This error occurs when the filesystem package is not upgraded during the upgrade process. To fix this, run the following commands:
The first command removes the filesystem package, and the second command downloads the latest version of the package. If you encounter any errors during the upgrade process, you can use rpmrebuild to rebuild the package with any necessary modifications.
Conclusion
In this article, we’ve shown you how to install Fedora Linux on Android using Termux and how to keep it up to date with the latest versions. While there may be some errors to overcome during the installation and upgrade process, following the steps outlined in this article should help you get Fedora up and running on your Android device in no time.
Packit is an open-source project aiming to ease the integration of your project with Fedora Linux, CentOS Stream, and other distributions. Projects that use Packit usually build RPM packages. This article will introduce new features. The new user onboarding process is available here.
Testing Farm execution
From Packit you can easily trigger your tests on Testing Farm without building the RPMs. This is very handy for projects that basically may not build RPMs, but just want to use these two services for verifying the code. As a good example, we refer to the Strimzi project where users consume container images.
In such cases, the users just want to trigger the tests, verify the code and see some output. This option is available from the beginning. Users can easily define when the tests will be executed – for every pull request, for every commit, or for releases. That sounds pretty cool. However, when you have complex tests (5h+ per test run as we have in Strimzi) you probably don’t want to trigger all tests for each commit. So how can the users achieve that?
Manual Trigger
We introduced a new configuration option, manual_trigger, to enable triggering Packit jobs only manually. With this new configuration of Packit jobs, users can easily enable the manual triggering of a job. The job will NOT automatically trigger when, for example, a new commit arrives to pull a request.
Users need to specify manual_trigger in the test’s job description. The value for this option must be boolean and will default to False. The following is an example of the use of this option. A more complete example is available here.
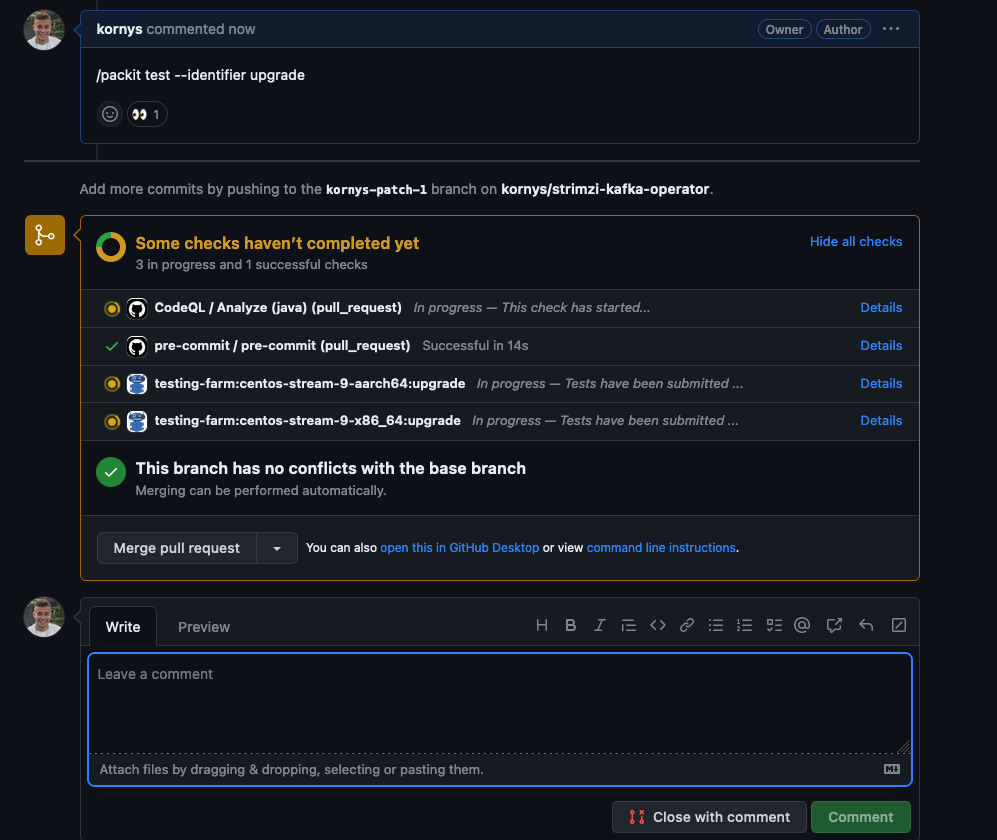
This new configuration option allows users to utilize a new flow. When a pull request is opened (for example in draft mode), users push new commits and fixes, or when they are about to finish the pull request, they can easily type /packit test as a pull request comment and all jobs defined in packit.yaml for pull request will be triggered.
Labeling and identifying
The above solution is very easy to use. There might be use cases, however, where users don’t want to trigger all the jobs. For example, when you have 10 jobs defined with different test scopes, you probably don’t want to trigger acceptance and regression tests at the same time since acceptance could be a subset of regression.
There are now two options to trigger a specific job. The first one is to trigger the job based on an identifier. If the user specifies identifier: test-1 in the job configuration, Packit comment command for execution of the tests will look like this /packit test –identifier test1. This command will execute jobs with the specific identifier (test-1) and nothing else.
The second option for triggering specific jobs allows you to execute more than one job based on their identifiers. You can use multiple identifiers in a comma-separated list but it might be cumbersome to specify long lists of identifiers every time. To add a better user experience we’ve introduced the labels configuration that allows grouping together multiple jobs. The command /packit test –labels upgrade,regression will trigger all jobs that contain upgrade or regression in the list of labels in the job configuration.
Conclusion
If you hesitated to utilize Packit due to the limitation of missing manual triggering of the jobs or missing labeling, you can start now! As mentioned, Packit is an open-source service and these improvements were done as contributions from outside of the Packit team, everyone can contribute so if you are missing some features, feel free to open a pull request!
For more information about newly added options you should check the documentation. In case you are new to Packit you can also view the talk from the Packit team from DevConf 2023 or DevConf Mini 2023.
Fedora Alt Downloads is a remarkable resource provided by the Fedora Project, offering alternative distribution options for users seeking specific requirements or unique use cases. This article will delve into the diverse selection of Fedora Alt Downloads, highlighting their significance and how they cater to different needs within the Fedora community. You can find an overview of all the Fedora Linux variants in my previous article Introduce the different Fedora Linux editions.
Network Installer
The Fedora Network Installer is an efficient and flexible tool for installing Fedora Linux. This is Fedora’s online installer. Unlike the baked-in Live images that the main editions use, this installer allows you to customize which software packages will be installed at installation time. However, because the packages to be installed are not baked into this installer image, network access will be required at installation time to download the selected packages.
Don’t confuse this with network booting which is a method of initiating an operating system or operating system installer from a small Preboot Execution Environment. (Though it is possible for that sort of bootloader to chain-load Fedora’s network installer.)
Torrent Downlods
Fedora Torrent Downloads utilize the BitTorrent protocol, which is a peer-to-peer file sharing protocol. Instead of relying on a central server for downloads, BitTorrent enables users to download Fedora Linux images from multiple sources simultaneously. This decentralized approach enhances download speeds and reduces strain on individual servers, resulting in a faster and more reliable download experience. Fedora Torrent Downloads offer a fast, reliable, and community-driven method for obtaining Fedora Linux images. By harnessing the power of the BitTorrent protocol, Fedora leverages the collective bandwidth and resources of users worldwide, resulting in faster downloads and improved reliability.
Fedora Alternate Architectures is an initiative by the Fedora Project that aims to expand the compatibility of the Fedora Linux operating systems by offering a range of architecture options. In addition to the standard x86_64 architecture, Fedora Alternate Architectures provides support for alternative architectures, including ARM AArch64, Power, and s390x. This initiative allows you to select the architecture that best suits their hardware requirements, enabling Fedora Linux to run on a diverse range of devices and systems. Whether you have a Raspberry Pi, a server with Power processors, or other specialized hardware, Fedora Alternate Architectures ensures that you have a tailored Fedora Linux experience that meets your specific needs.
After I wrote my initial post in this series that introduced the main Fedora Linux editions, Fedora Cloud was restored to full edition status. There are still some links to the Fedora Cloud images on the Fedora Alt Downloads page. But they will be removed soon. The correct place to get the latest Fedora Cloud images is now https://fedoraproject.org/cloud/download/.
Fedora Cloud images are a collection of images provided by the Fedora Project for use in cloud environments. Fedora Cloud images are specifically designed to run applications in the cloud with efficiency and optimal performance. By using Fedora Cloud images, you can quickly deploy and run applications in the cloud without the need to spend time configuring the operating system from scratch. Fedora Cloud images also provide flexibility in terms of scalability, allowing you to easily adjust the size and capacity of resources according to the needs of your applications.
Testing Images
Fedora Testing Images are a collection of specialized system images designed for testing and contributing to the development of Fedora Linux. These images allow you to test the latest features, explore the recent changes in Fedora Linux, and report any issues encountered. By using Fedora Testing Images, you can actively participate in the development of Fedora Linux by providing valuable feedback and contributions.
Your participation in testing and contributing to Fedora Testing Images plays a vital role in maintaining and improving the quality and reliability of Fedora Linux. By reporting issues, testing software, and providing feedback, you can assist Fedora developers in fixing bugs, enhancing performance, and identifying areas for further improvement and development. Fedora Testing Images provide an easy and secure way for you to engage directly in the development of Fedora Linux, strengthening the community and resulting in a better and more reliable operating system for all Fedora users.
Rawhide
Fedora Rawhide is the development branch of the Fedora Linux operating system. It provides a continuously evolving and cutting-edge version of the Fedora Linux OS. It serves as a testing ground for new features, enhancements, and software updates that are targeted for inclusion in future stable releases of Fedora Linux. Fedora Rawhide offers early access to the latest software packages, allowing users to stay at the forefront of technology and contribute to the testing and refinement of Fedora Linux.
Using Fedora Rawhide comes with both benefits and considerations. On one hand, it provides a platform for early adopters, developers, and contributors to test and provide feedback on upcoming features and changes. This helps identify and address issues before they are included in stable releases. On the other hand, since Fedora Rawhide is constantly under development, it may encounter bugs, instability, and compatibility issues. Therefore, it is recommended only for experienced users who are comfortable with troubleshooting and actively contributing to the Fedora community.
Fedora Alt Downloads provides an impressive array of alternative distributions, catering to diverse needs within the Fedora community. Whether it’s through Fedora Spins, Fedora Labs, Fedora Remixes, Fedora Silverblue, or ARM editions, users can find specialized distributions that suit their requirements, preferences, and use cases. This versatility and community-driven approach makes Fedora Alt Downloads a valuable resource for Fedora Linux enthusiasts, fostering innovation, and customization within the Fedora ecosystem. You can find complete information about Fedora Alt Downloads at https://alt.fedoraproject.org/
The kernel team is working on final integration for Linux kernel 6.4. This version was just recently released, and will arrive soon in Fedora Linux. As a result, the Fedora Linux kernel and QA teams have organized a test week from Sunday, July 09, 2023 to Sunday, July 16, 2023. The wiki page in this article contains links to the test images you’ll need to participate. Please continue reading for details.
How does a test week work?
A test week is an event where anyone can help ensure changes in Fedora Linux work well in an upcoming release. Fedora community members often participate, and the public is welcome at these events. If you’ve never contributed before, this is a perfect way to get started.
To contribute, you only need to be able to do the following things:
Download test materials, which include some large files
Read and follow directions step by step
The wiki page for the kernel test day has a lot of good information on what and how to test. After you’ve done some testing, you can log your results in the test day web application. If you’re available on or around the days of the event, please do some testing and report your results. We have a document which provides all the necessary steps.
Happy testing, and we hope to see you on one of the test days.
If you have not already – now is the best time to read through the first part of the event report before getting into the second part here.
From left to right – Actually, never mind – there are too many people there.
Day 2 Wednesday, 22nd March 2023 The team members decided to start a bit late on the second day to ensure that everyone gets enough rest after the adventurous first day. Once the joint breakfast was completed in the hotel restaurant, the members started heading off to the office by 10 in the morning. They were were gracefully served Catalonian snacks by Lenka Segura, Japanese souvenirs by David Kirwan, and German sweets by Julia Bley for the duration of the meeting. Matthew Miller started the second day with his talk about the Fedora Project strategy and how Community Platform Engineering fits into the picture. This talk was followed by the one by Tomas Hrcka about how the Fedora Release Engineering team addresses its responsibilities. The team took a short break after the first couple of sessions, before heading into the next set.
After a short break, the team continued with three lightning talks delivered about OpenShift operators by David Kirwan, Packit by Frantisek Lachman and Laura Barcziova, and Pulp by Miroslav Suchy. Miroslav Suchy delivered a thought-provoking talk about the scope of tooling for the Community Platform Engineering team, and how it contributes to Fedora Linux. With that, the folks dispersed into small groups for lunch. Once they were back in the office, Hunor Csomortáni delivered a talk about revisiting source-git and the plans for unifying package sources in the pipeline. This was followed by a talk by Carl George about the EPEL 10 plans for improvements that would be coming very soon. The final interesting talk of the day was delivered by Brian Stinson about the expectations of RHEL from Fedora Linux and CentOS Stream.
In the evening, at around 19:00, the team members left for a regional burger restaurant, Tio Joe’s. This had been booked in advance and was near the hotel premises . With toasts made to the team members that were now united after a long time, they not only enjoyed the appetizing food that was served but also the company of the friends that they had bonded with over the course of the last couple days.
Once the dinner was over, at around 21:30, some folks headed back to the hotel for a respite. The remainder went to the Trompos Karaoke Bar to participate in the fun karaoke night session organized by Aurelien Bompard. People queued up their songs and soon began to collaborate in performing their favorite songs in duos and in choirs. This was a fitting end to the night, as late as 02:00, and a fun look at their singing preferences.
Day 3 Thursday, 23rd March 2023
This was the day of departure for a lot of people. Since they would miss out on the sessions on this third day, it was incredibly light in terms of the agenda and activities. Many of the team members checked out of their hotel rooms after breakfast at 09:00 and left their luggage with the hotel before leaving for the office.
Stefan Mattejiet started off the last day with his discussion session about CPE Futurespective, and understanding what direction the team should head in the coming times. The interesting discussion felt a lot inspired by the established logic model planning structure used for Fedora Council community initiatives. This structure starts off with planning the general objectives first and then going back to the implementation details later.
The next session was hosted by Aoife Moloney who kicked off an interesting discussion about the limited-scope projects that the team undertakes and the maintainers for the applications that the team takes care of. The members participated in pointing out the things that currently work great and those that could use some improvements. This was the last planned session for the day and the group assembled to be a part of the “Community Platform Engineering family picture”. After that, they dispersed into small groups to have their lunches in their preferred places.
With no more planned talks after lunchtime, the team members were divided into smaller groups for breakout rooms to participate in more detailed discussions. Michal Konecny lead the one for the infrastructure and release engineering team.
The team started slowly thinning down even more in the late afternoon, with the members bidding farewell to each other in the office and returning to the hotel. Some members decided to stay longer to explore Barcelona a bit more. Others began collecting their luggage from the hotel and leaving for the airport. With “goodbyes” waved to teammates and “resolves” about the next thing, the members departed from the face-to-face meeting with a new zeal and energy to contribute in an even better way to the community.
Even with minor hiccups and some teammates not being able to join the event, the meeting event turned out to be a grand success – both in uniting the members and in strategizing the team’s efforts. The members of the team surely look forward to the next time they get together.
Back in 2018, a previous article demonstrated how to use LVM to clone the root filesystem before upgrading Fedora Linux so as to have a fallback in the unlikely event that something goes wrong. Today, the default Fedora Workstation install uses Btrfs. Now you can use a Btrfs snapshot to make creating a bootable fallback much easier. Note that converting or migrating a system to Btrfs from another filesystem is outside the scope of this article.
Check that root filesystem is Btrfs
This example uses a Pinebook aarch64 laptop. Before proceeding, first make sure that Btrfs is being used for the root (system) filesystem. Not every spin or image uses Btrfs by default.
The above example output shows that the file system mounted on “root” (“/”) is type Btrfs. Notice that three mountpoints show the same backing device and the same Used and Available blocks. This is because they are parts (subvolumes) mounted from a single Btrfs filesystem. The /f34 subvolume is my bootable snapshot from last year.
A default Fedora Btrfs install creates one Btrfs filesystem with two subvolumes — root and home — mounted on / and /home respectively. Let’s see what other subvolumes I’ve added:
$ sudo btrfs subvol list /
ID 272 gen 110428 top level 5 path root
ID 273 gen 110426 top level 5 path home
ID 300 gen 109923 top level 5 path f34
ID 301 gen 95852 top level 5 path home.22Jul26
ID 302 gen 95854 top level 5 path f36.22Jul26
There is an f34 subvol from the last system-upgrade and two readonly snapshots of home and f36. The easiest way to add and delete snapshots is to mount the Btrfs root. I will update the system and create a new snapshot of the current f36 root subvolume. If you have renamed your root subvolume, then you presumably know enough to adjust the following example accordingly for your system.
Create the Btrfs fallback snapshot
$ sudo dnf update --refresh
... lots of stuff updated (reboot if kernel updated)
$ sudo mkdir -p /mnt/root
$ sudo mount /dev/mmcblk2p3 /mnt/root
$ cd /mnt/root
$ ls
f34 f36.22Jul26 home home.22Jul26 root
$ sudo btrfs subvol snapshot root f36
Create a snapshot of 'root' in './f36'
Because Btrfs snapshots are filesystem based, it is not necessary to “sync” before the snapshot, as I recommended for LVM. To boot from the new subvol as a fallback, you will need to edit /mnt/root/f36/etc/fstab with your favorite editor. If you are a beginner, nano is a dirt simple text editor with minimal features. Here are some lines from my fstab file:
Change subvol=root to subvol=f36. This change is to the file in the snapshot, not your production fstab. You can compare them with diff /etc/fstab /mnt/root/f36/etc/fstab. In my case, I also deleted my f34 snapshot from last year with sudo btrfs subvol delete f34.
Test the Btrfs fallback snapshot
Now you are ready to test the fallback. You could use grubby or edit an entry in /boot/loader/entries to change subvol=root to subvol=f36. But in the interest of safety for beginners, I will have you edit the GRUB entry at boot time instead. Checkout this article on GRUB for tips on getting to the GRUB menu. Once you are there, press the e key to edit the default kernel entry. Don’t worry — your changes are in volatile memory only. If you mess up, reboot to start over. Just like with fstab, find subvol=root and change it to subvol=f36. Press F10 or Ctrl+X to boot your modified entry. With these changes, the system should boot into your new snapshot. Look at /etc/fstab to make sure you are booting from the right subvol, or enter mount | grep subvol to see what subvolume is mounted on “/”.
Do the Fedora Linux system upgrade
If your fallback is working, reboot back to your normal root filesystem (and confirm as above). Then proceed with the standard system-upgrade outlined on the wiki page. TIP: Before running dnf system-upgrade reboot, make another snapshot of root. Call it something like root.dl. That way, you don’t have to download five gigabytes of packages again should you discover that there wasn’t enough free space. The snapshot will not take up any additional space because all but the downloaded packages are shared with root and f36. About that sharing of disk blocks …
dnf system-upgrade gets confused about free space as reported by Btrfs because the f36 files in the root subvolume use the same disk locations as the same files in the f36 subvolume. So removing them from the root subvolume during the upgrade process doesn’t actually free up any space. If you run out of space, and you reboot — the graphical user interface (GUI) won’t start. Use Ctrl+Alt+F2 to login on a text console and practice your command line interface skills. Figuring out what to remove to free up space or how to expand the root filesystem is beyond the scope of this article (mine is often on an LVM volume and can be expanded). Having more than 50% free for the upgrade is a safe bet.
Recovery
Should something go wrong, you can reboot and edit the GRUB entry to boot the fallback. If you are a beginner, you’ll want some hand holding if you do end up needing to change the GRUB entry on disk (so you don’t have to edit at each boot). It is straight forward to delete or rename the broken root subvol. Snapshot the f36 subvol (or the root.dl snapshot) to try the system-upgrade process again. Here is an example of starting over after booting into the fallback system on subvol f36:
$ mount | grep subvol
$ sudo mount /dev/mmcblk2p3 /mnt/root
$ cd /mnt/root
$ sudo mv root root.failed
$ sudo btrfs subvol snapshot f36 root
Create a snapshot of 'f36' in './root' Don't forget to edit /mnt/root/root/etc/fstab to change the subvol mounted on "/" to "root".
As it turns out, the new kernel-6.2.11 for f38 did not boot on my Pinebook after the system-upgrade! (Don’t worry, ARM is an alternative CPU architecture for Fedora Linux — this is very unlikely to happen to you on a mainstream device.) I was indeed able to boot back to f36 by editing the GRUB entry for kernel-6.2.10 at boot time as described above. I am now using f38 again — but with kernel-6.2.10 from f36.
Update: kernel-6.2.12 is out and it works on the Pinebook.
Expiration
As you update the f38 system, it will eventually want to delete the last f36 kernel from /boot. That is normally not a problem, as by that time you have settled into f38, and the f36 snapshot is just an archive. If you want to keep your fork (f36 snapshot) bootable indefinitely, you should preserve a working f36 kernel under /boot. The simplest way to do so is to set installonly_limit=0 in /etc/dnf/dnf.conf and manually remove old kernels. It is simple and safe (but annoying).
Outline of a more complex solution (not for beginners): Run find /boot -name "*fc36*" to list all the kernel and GRUB files for your f36 subvolume snapshot that are under /boot (which is not in the snapshot). Copy them to a backup location (I would mount the f36 subvolume and copy to a backup directory there). While booted from f38, for each f36 kernel version, use dnf to remove that specific kernel version (for example, dnf remove kernel-core-5.19.11-200.fc36). Do not remove the f38 kernels! Now restore the f36 kernels you saved to /boot. The f38 system doesn’t know about f36 kernels anymore, and it will not remove them from /boot.
The problem with that method is the danger of accidentally removing the running f38 kernel. If anyone has a better method, let me know in the comments.
Future directions
Those comfortable with modifying GRUB entries might consider creating a snapshot subvolume named f38, modifying the current GRUB entry to boot into that, rebooting, and running the system-upgrade in that subvolume. Then always name the subvol for the root filesystem after the Fedora Linux release it contains. I did not do that for this article for two reasons.
Naming the current active subvolume root matches the Fedora Linux default.
Sticking with root for the current subvol does not require any permanent changes outside of the normal system-upgrade procedure.
As this article has demonstrated, readonly snapsnots are useful as local restore points in case things go wrong when making significant system changes (such as a system release upgrade). These snapshots can also be sent to a remote backup using Btrfs’ send subcommand. (And if the remote backup device already contains previous backups, Btrfs can do an incremental send that only transmits changed files to save time and space.) If you intend to archive these snapshots long term, the key to not getting confused about which ones are which and what order to restore them is to use a consistent naming convention. See the article on Btrfs snapshots for backup for more information about using Btrfs’ send command to create backups.
A FIDO U2F security key is a small USB and/or NFC based device. It is a hardware security token with modules for many security related use-cases. There are several brands of FIDO compliant keys, including NitroKey, SoloKey v2, and YubiKey. FIDO, in contrast to proprietary protocols like Yubico OTP, is hardware token agnostic and the tools used are manufacturer independent.
This post introduces the FIDO protocol(s) and shows how to install and enable a FIDO U2F security key as an alternative authentication factor for logging into a terminal, GDM, or authenticating for sudo.
This post will not cover storing OpenPGP keys or X.509 certificates because those features are hardware dependent and not part of the FIDO U2F standard.
Keep a backup security key
As soon as you start working with security tokens you have to account for the potential to lock yourself out of accounts tied to these tokens. As hardware security tokens are unique and designed to be extremely hard to copy you cannot just make a backup of it like you can with software vaults like KeePass or AndOTP. Consequently, all registrations you make with your primary key you should immediately repeat with a second backup key that you will store in a secure location, maybe even a safe.
In practice this means you will need to register both hardware tokens with your Linux and web accounts, generate OpenSSH private keys twice, and upload both OpenSSH public keys to the servers and services you use (for example, GitHub).
Should you lose a key, you’ll want to use your second key to sign in on every service the keys are registered with, remove the lost key, and register a new one. This is especially true for password-less logins using a FIDO2 protocol.
FIDO2, U2F and the FIDO Alliance
FIDO2 is a collection of standards maintained by the FIDO Alliance. The FIDO Alliance hopes to eventually get rid of passwords altogether and instead provide procedures to authenticate users securely through multiple factors but without the need for passwords.
The standard consists of the World Wide Web Consortium’s (W3C) Web Authentication (WebAuthn) and the FIDO Alliance’s Client-to-Authenticator Protocol (CTAP). WebAuthn is a standard API to request and process public key challenges for authentication. With this, browsers send a challenge to a client which then produces a response with a private key that the challenger then verifies using a previously exchanged public key. How the challenge answer is produced is unknown to the service and it is controlled by the CTAP. The user might be prompted for several verification methods like biometrics, PIN, or presence check (or some combination of these methods). These checks are the same for authentication as they are when registering the key with the service.
A access PIN to protect any interaction with the hardware token is optional and it is unset by default. Most keys will self-invalidate after eight sequential failed attempts at entering the access PIN. The only way to recover an invalidated key and set a new PIN is to reset the key. However, when a key is reset, all its service registrations will be lost!
A FIDO2 key also supports the FIDO U2F protocol (now renamed CTAP1). This protocol is designed for second- or multi-factor (but not password-less) authentication. Linux’s PAM authentication system can also be configured to use the U2F protocol. Although FIDO U2F is not designed for password-less authentication, the U2F PAM module does allow password-less authentication.
Security implications
FIDO2 / U2F works by tying the security key to your user account. Most keys have a basic presence-check which is enabled / used by default. They typically perform a presence-check by lighting up and prompting you to touch the key. A FIDO2 PIN is optional and it will be unset by default. When the key is registered for signing in to your Linux account or for using sudo, it is sufficient to have the device and key physically present. A FIDO2 PIN is an important additional verification step to ensure that only you can use the key for authentication.
Wait! Now I have to keep track of an additional PIN? Isn’t this just a shorter password?
The concerned reader
A FIDO2 PIN is not a password. It is a short, easy-to-remember phrase. This is not a problem because:
You need physical access to the key and you need to know the PIN.
Failing to enter the PIN eight times will invalidate the key which makes it hard to brute-force.
On the contrary, you can now use a secure password stored in a password manager that you don’t need to remember.
Local system authentication uses Pluggable Authentication Modules (PAM). The PAM module for U2F devices (and hence authentication) is pam_u2f. Whether your key supports FIDO2 or FIDO U2F will depend on its firmware version and hardware model.
The setup is as follows:
Install the PAM module.
Register a key with your user account.
Use authselect to activate smart card support in PAM.
Authselect is a tool for configuring PAM with reproducible profiles. By using authselect’s profiles, manually altering configuration files under the /etc/pam.d directory can be avoided.
Dependencies
The required packages are available in the official repositories.
The FIDO2 standard defines an optional PIN for access protection. There is no PUK or other way to restore a lost or invalidated PIN so make sure you have a backup approach for authentication. If the PIN is invalidated through sequential entry of invalid PINs, the only way to recover is to reset the key. However, resetting your key removes all its credentials and disconnects it from all previously registered services.
The fido2-tools package contains a tool to set the FIDO2 PIN of your key: fido2-token. Get a list of currently connected FIDO2 devices with fido2-token -L and set a new pin with fido2-token -C </path/to/device>:
[…]$ fido2-token -L
/dev/hidraw1: vendor=0x1050, product=0x0407 (Yubico YubiKey OTP+FIDO+CCID)
[…]$ fido2-token -C /dev/hidraw1
Enter current PIN for /dev/hidraw1: Enter new PIN for /dev/hidraw1:
Register the security key with your local account(s)
Use the tool pamu2fcfg to retrieve a configuration line that goes into ~/.config/Yubico/u2f_keys. pam_u2f is a Yubico-provided, generic module for U2F keys, hence the Yubico specific default configuration path. Each configuration line in this file consists of a username and a key-specific credential / config part separated by colons. Be sure to only use one line per user.
fedora-user:owBYtPIH2yzjlSQaRrVcxB...Pg==,es256,+presence+pin[:another key for this user]
If the key is PIN protected you’ll be asked to enter the PIN for this operation. Use the following for the initial registration of your first key:
pam_u2f also supports the use of a central authentication file. In that case, be sure to use one line per user and to keep all the keys of a given user on the same line. If two lines reference the same username only the last one will be used! Have a look at the pam_u2f man page for all available options.
Configure PAM with authselect
authselect is a tool for controling your system’s PAM configuration. It introduces profiles as an additional layer of abstraction. One authselect profile can change several PAM configuration files. Profiles have parameters that control additional features and behaviors like enabling FIDO U2F security keys. A detailed tour of authselect is planned for a future article.
Display the currently active authselect profile. With the SSSD (System Security Service Daemon) profile selected and U2F support enabled, the output might resemble the following:
[…]$ authselect current
Profile ID: sssd
Enabled features:
- with-pam-u2f
Activate FIDO U2F support in PAM using authselect with the with-pam-u2f flag:
[…]$ sudo authselect select sssd with-pam-u2f
If you also want to use your fingerprint reader you have to enable both features:
This activates the sssd profile with pam_u2f and fingerprint reader support. For example, when using sudo on a terminal with the above authselect profile configuration, you’ll first be asked for a fingerprint and if that fails for the U2F key. GDM, however, will use the U2F key first.
Unlocking the GNOME keyring daemon
When using biometrics, a U2F key, or any other method that does not require a passphrase to sign in to GNOME, the Login keyring cannot be unlocked automatically. This is because, by default, the keyring passphrase is set to the same value as your login passphrase. Normally, PAM passes your login passphrase to the keyring daemon. Since you are not entering a passphrase when authenticating via methods such as biometrics or U2F keys, there is no passphrase for PAM to pass to the keyring daemon. There is no straight forward solution to this problem.
If you use LUKS encryption for your home partition and operate a single-user system, you could remove the passphrase from your keyring. This will leave your gnome keyring unencrypted at the file level. But it will still be encrypted at the block level by LUKS. LUKS encryption is equivalent to the default file-based keyring encryption on a single-user system since the keyring’s encryption is only designed to protect its contents from offline access. The keyring will be decrypted / unlocked after login either way and any runtime application or malware can potentially access the keyring’s contents after it is unlocked. Since LUKS is also an offline protection mechanism, it can be considered an equivalent alternative to the keyring’s normal file-based encryption.
LUKS encryption and the keyring’s normal file-based encryption are not equivalent if your system is used by multiple users. In the case of a multi-user system with the keyrings protected only by LUKS, any user with authorization to decrypt the disk and boot the system will be able to access any other user’s keyring on that same system.
Removing the GNOME Login keyring passphrase is straight forward. Just set a new empty password and the keyring will be unlocked and it will be stored unencrypted at the file level. The graphical utility seahorse (also called Passwords and Keys) can be used to set a blank password on your GNOME Login keyring.
Lookout and other use-cases
Upcoming articles will explore how to use FIDO2/U2F keys for unlocking LUKS-encrypted disks using the U2F Dracut plugin.
OpenSSH 8.2+ supports the use of ed25519-sk security keys. This topic has already been touched upon in the previous article titled “How to use a YubiKey with Fedora Linux“.
Note that FIDO2/U2F is an authentication standard. There are other use-cases for security tokens (primarily established by Yubico) like (T)OTP, PIV (for x509 key management) or OpenPGP which are not covered in general but on a hardware by hardware basis.
Fedora Linux Workstation features a GNOME desktop environment which is an easy to use, intuitive, and efficient desktop environment. But this is not the only option if you would like to use Fedora Linux. There are other spins that provide alternative desktop environments like KDE, XFCE, Cinnamon, etc. This article describes how you can try different desktop environments if you are using an OSTree based Fedora Linux spins.
Main version of Fedora Workstation
If you installed a non-OSTree Fedora Workstation or one of the Spins and would like to try different desktop environment, you have some possibilities:
install different desktop environment using dnf
dual boot multiple spins of Fedora
If you choose the first option, you have to install another desktop environment by using the dnf install command. This technique enables you to select which desktop environment you would like to use on the login screen after system boots. Using this method will pull in a lot of dependencies. This is especially true when you have a GTK based desktop environment (like GNOME) and install a QT based (like KDE), or vice-versa. It can be difficult to completely uninstall one of the installed desktop environment if you are not satisfied with them.
Another issue with this is that system apps may be doubled in the application menu on each environment. For example, if you have installed GNOME and install KDE, you have Nautilus and Dolphin for browsing files, GNOME Terminal and Konsole for terminal emulation, etc. You have to remember which app to use on which environment, because apps from KDE behave worse on GNOME and vice-versa.
If you choose the second option, you have to make some free unpartitioned space on your hard drive to install another Fedora spin alongside one you are currently using. In this way, the systems are separated from each other and the system apps will not be doubled. You can decide to share the /home partition between them. This technique enables you select the system to use in the bootloader menu before system boots. But if you use this method, you have to maintain these systems separately (for example installing updates) and it consumes a lot of free space on the hard drive.
OSTree based version of Fedora Workstation
Some variants of Fedora Linux are OSTree based. OSTree provides immutability and transactional upgrades with the possibility of rollback in case something goes wrong. You can read more about it in this great article. Right now, we have three OSTree based Fedora Workstation variants:
Silverblue – provides GNOME desktop environment
Kinoite – provides KDE Plasma desktop environment
Sericea – provides Sway window manager (not recommended for beginners)
If you are running one of these variants of Fedora Linux, you can easily switch your system to another OSTree compatible one to try different desktop environment. This process is similar to doing a system upgrade. OSTree guarantees that the operation is transactional (finishes successfully or nothing is changed) and you are able to rollback if you are not satisfied with the change. The operation does not consume much space on the hard drive, and system apps are not doubled.
How to use OSTree rebase to switch to a new variant
To start, I recommend executing the following command to pin the current deployment. This makes certain it will not be deleted automatically in the future and provides the ability to roll back to it.
$ sudo ostree admin pin 0
If you have a pending update, the command may fail with the message:
error: Cannot pin staged deployment
In this case, reboot your system to apply pending updates, and try again.
After pinning the deployment, execute:
$ ostree remote refs fedora
It outputs a list of all available branches that you can rebase into. Every branch has an architecture, version, and the name of the variant. Select carefully. In the following examples I assume you would like to rebase into the current stable version of Fedora for x86_64 (version 38).
for Fedora Silverblue, use fedora:fedora/38/x86_64/silverblue
for Fedora Kinoite, use fedora:fedora/38/x86_64/kinoite
for Fedora Sericea, use fedora:fedora/38/x86_64/sericea
Choose the branch you wish to rebase into and execute the following command (change the branch name provided in the example if necessary):
$ rpm-ostree rebase fedora:fedora/38/x86_64/kinoite
When this command succeeds, restart the system to begin using the new desktop environment. If it fails, the system should continue to work unmodified thanks to transactional updates provided by OSTree.
Undo the rebase into an OSTree variant
If you are not satisfied with the new environment the following command will return you to your original variant:
rpm-ostree rollback
Restart your system once again to switch back to the previous variant of Fedora.