Posted on Leave a comment

Docker and Fedora 37: Migrating to Podman

In previous installments (Fedora 32, Fedora 35), there was a strong focus on making things work with Docker on Fedora Linux. This article will focus on the final stage of this long journey. It will focus on migrating a cross-platform production set-up from Docker to Podman.

Background

Docker and Podman use the same open standard for containers. On top of this container standard, there are multiple ways of organizing containers together. Docker-Compose and Kubernetes are the two main technologies for this, although tools like Ansible are also popular.

On the business side though, there are strong differences. Docker is distributed with a non-free application called Docker Desktop, while Podman historically never had a UI. Docker started live in 2013 and had its rise to prominence in 2016. Podman started in 2018 and it has only become more popular in the last two years.

Podman was certainly not the first on the scene, and it has been fighting an uphill battle. Still, in many ways, this has been an opportunity. Podman can avoid some of the architectural errors that Docker made, and it can integrate with other tools that didn’t exist yet when Docker started.

Personal background

The previous articles about Docker and Fedora are based on the author’s professional life. At the company were I work, we heavily relied on Docker when I came on board. This meant that I needed Docker, and I started to document my struggles which ultimately lead to the first article. The second article was a follow-up to inform readers that most hurdles from the past were no longer a problem.

Podman Destkop

The game-changer in this whole story is Podman Desktop. It is a cross-platform UI that allows teams on Linux, macOS and Windows to collaborate. It works the same way as Docker Desktop, including a bundled VM and WSL support. This also means that Podman now offers a complete package for software companies. While software developers on Linux could use Podman in the past, it’s now possible to migrate an entire team across environments!

Migrating Docker

So, let’s start migrating from Docker to Podman. First, you’ll need to make sure that you have podman and podman-compose installed. You can easily download Podman Desktop from Flathub.

Image files

Image files are good as they are! They are identical because of the open standards behind containers.

One thing that you will see now is that there are a plethora of companies and groups that offer their own image-repositories.

  • hub.docker.com (alias, docker.io) is the offering from Docker, which their tooling conveniently defaults to.
  • registry.gitlab.com is the registry of GitLab’s commercial offering. Community editions follow this same syntax resulting in, for example: registry.gitlab.gnome.org
  • registry.fedoraproject.org is Fedora’s Registry. This registry is also used for flatpaks from the Fedora repository.
  • Quay.io is the offering from Red Hat, which contains all of Podman’s tooling, but also CentOS images.

The biggest change that you’ll have to adapt to, when switching from Docker to Podman, is that you’ll be encouraged to write full image addresses instead of just stubs: `postgres:14-alpine` becomes `docker.io/library/postgres:14-alpine`.

Docker-Compose files

Compose files are Docker specific and they can’t be used with Podman. What you can use, though, is podman-compose. Better yet, you can start your docker-based platform and then use Podman Desktop to export your current configuration to a Kubernetes file.

$ podman-compose -f ./docker-compose-platform.yaml up --detach

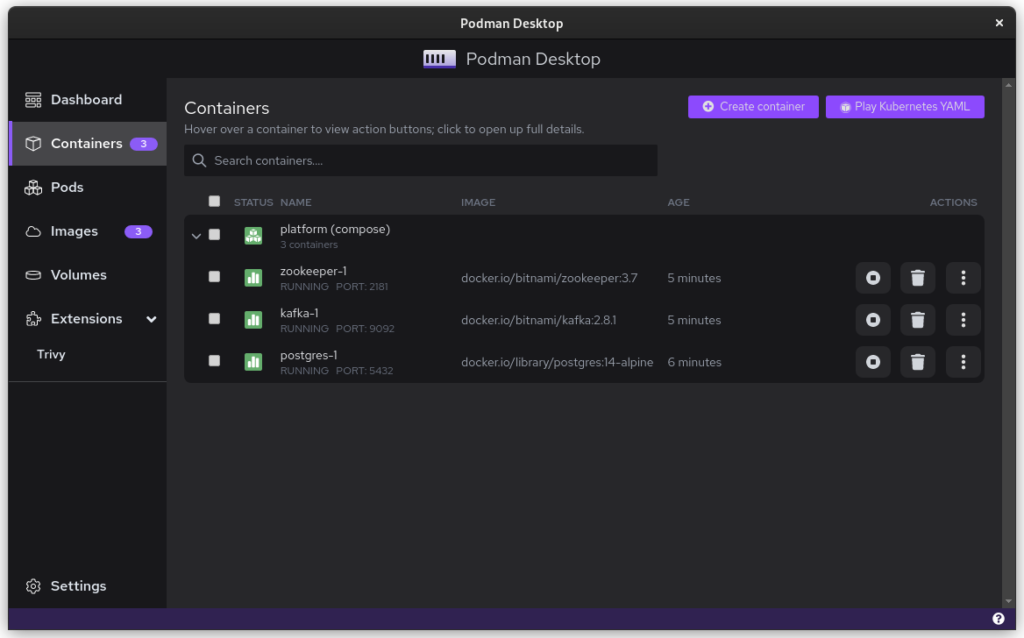
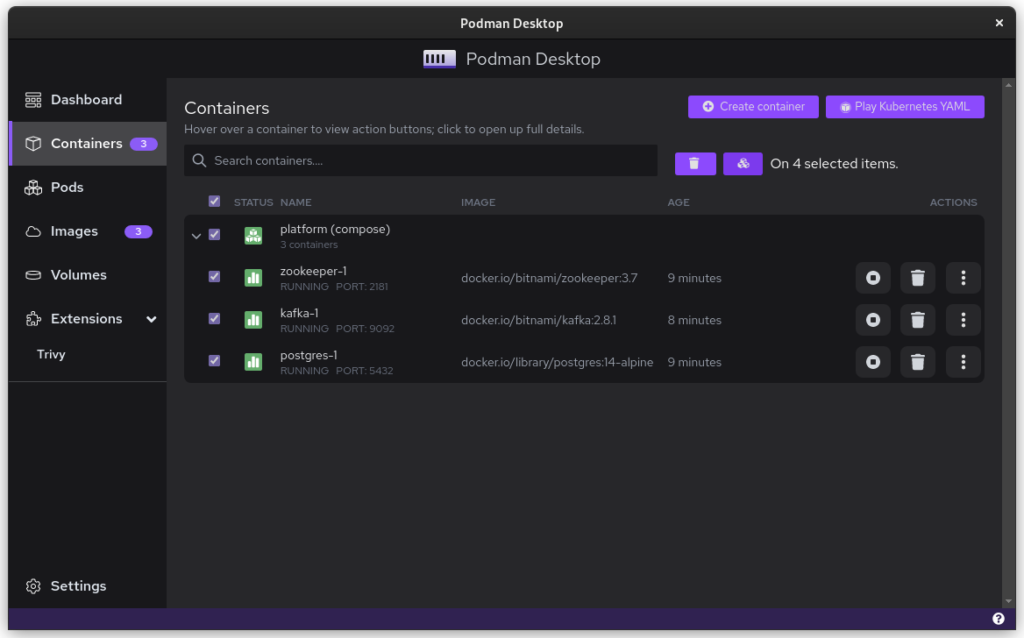
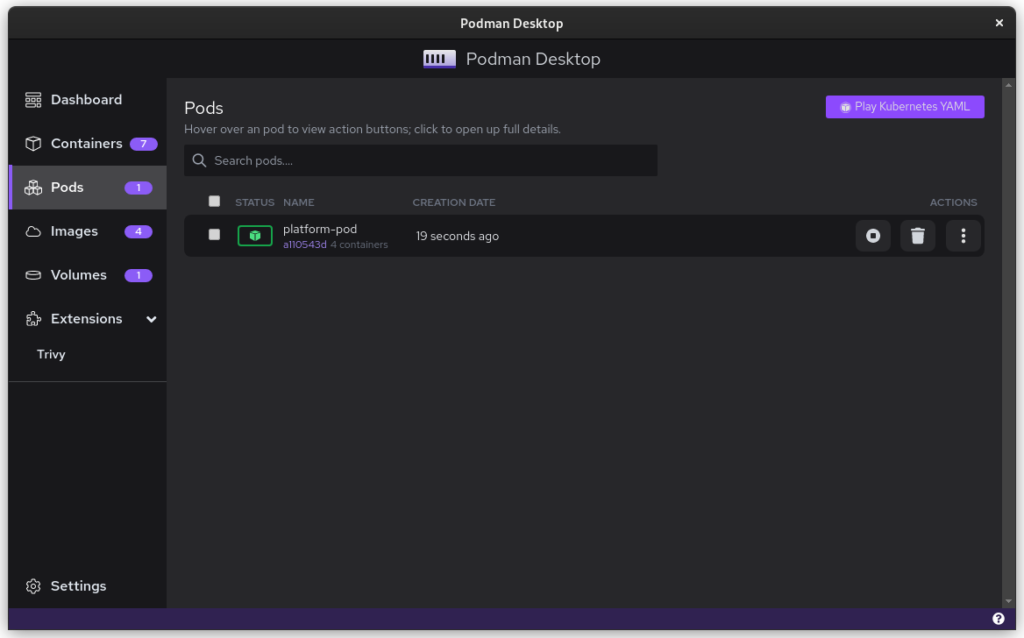
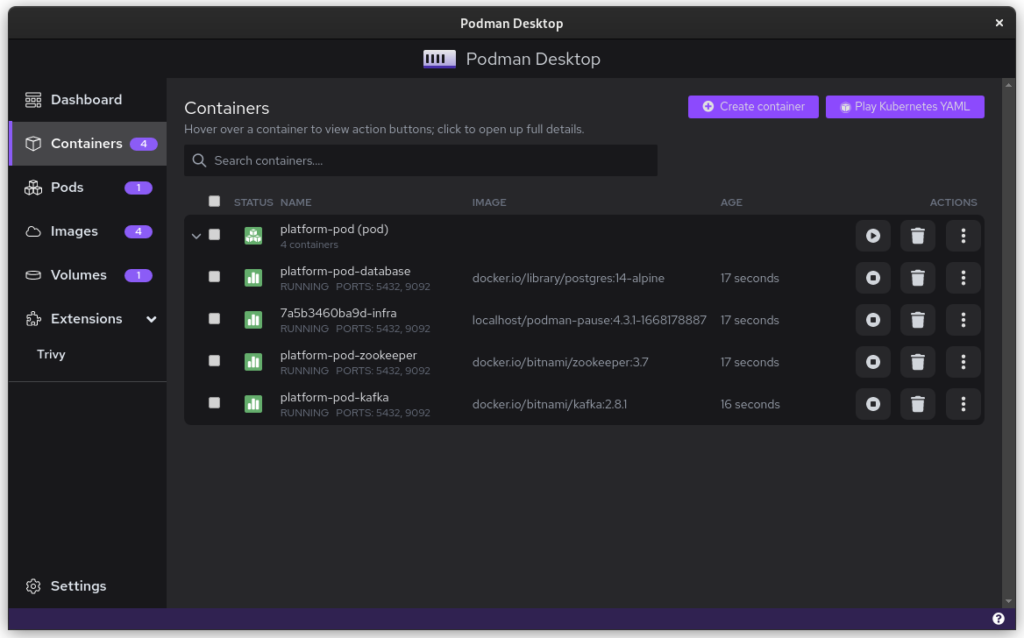
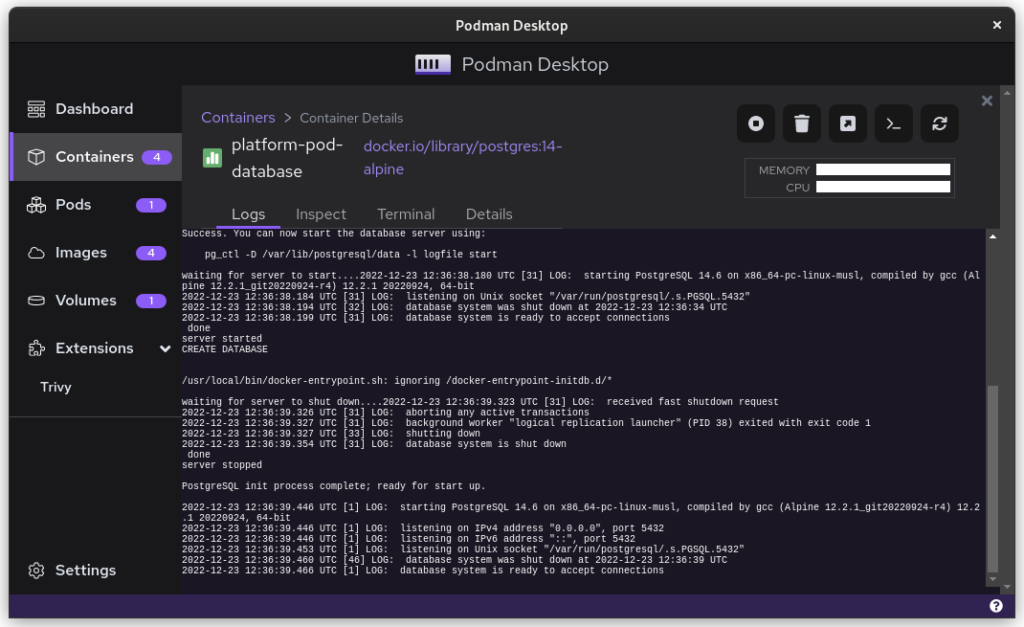
Once you start podman-compose with your old docker-compose .yaml file, you’ll see that you have a number of containers running in one ‘compose’ group. This is how things translate into the world of Podman. From here, you can select the containers and create a Pod. A Pod is a collection of containers that run in their own network.

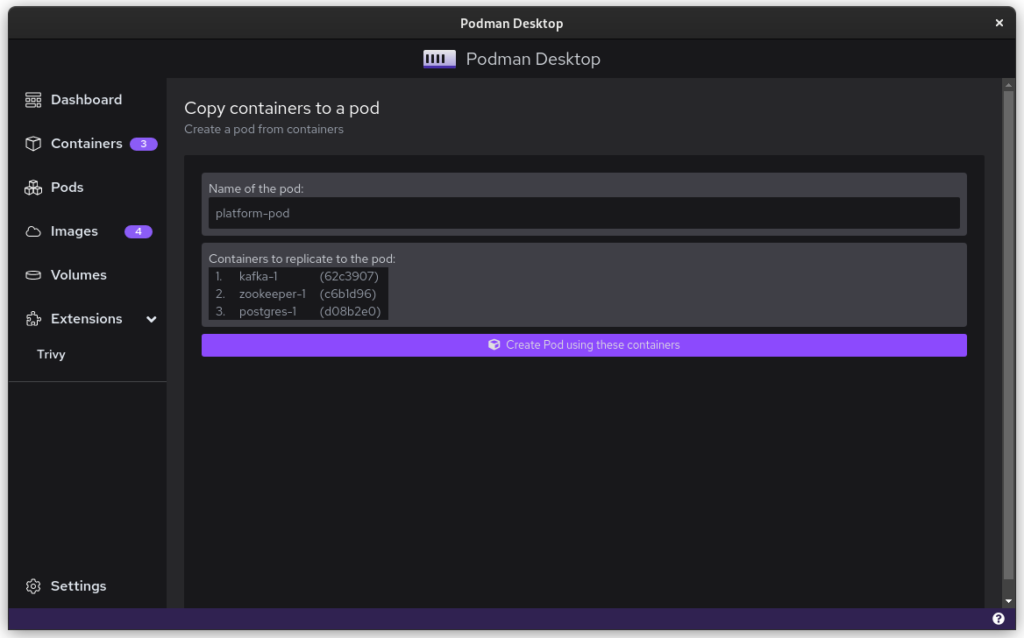
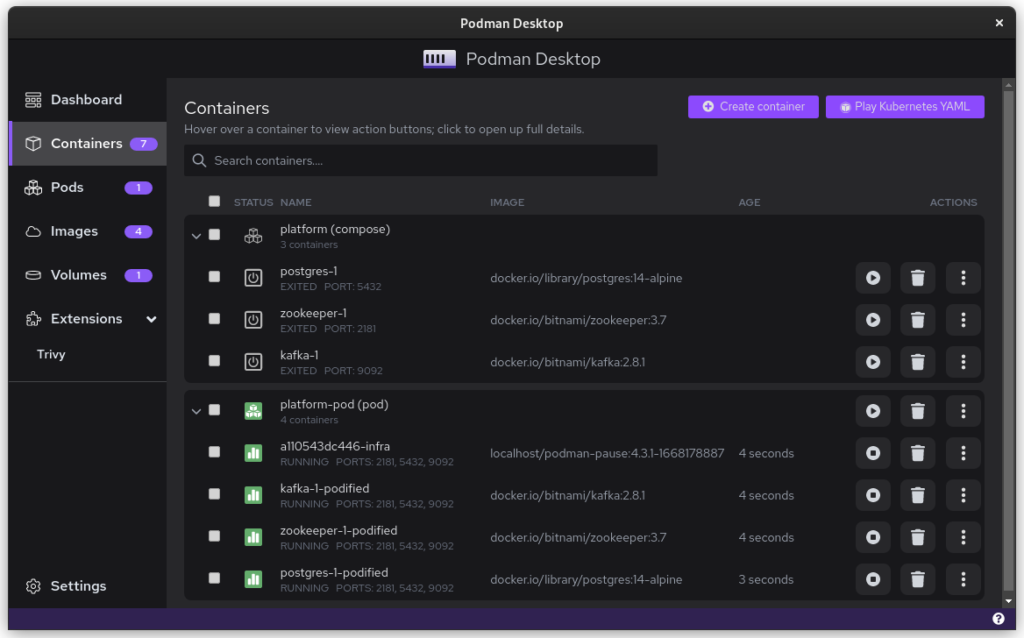
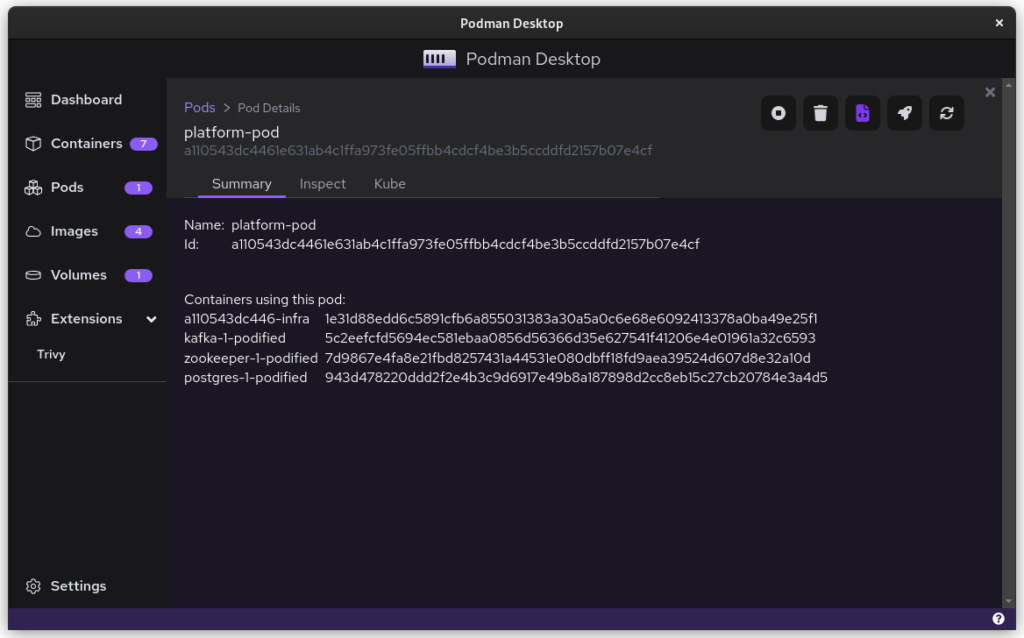
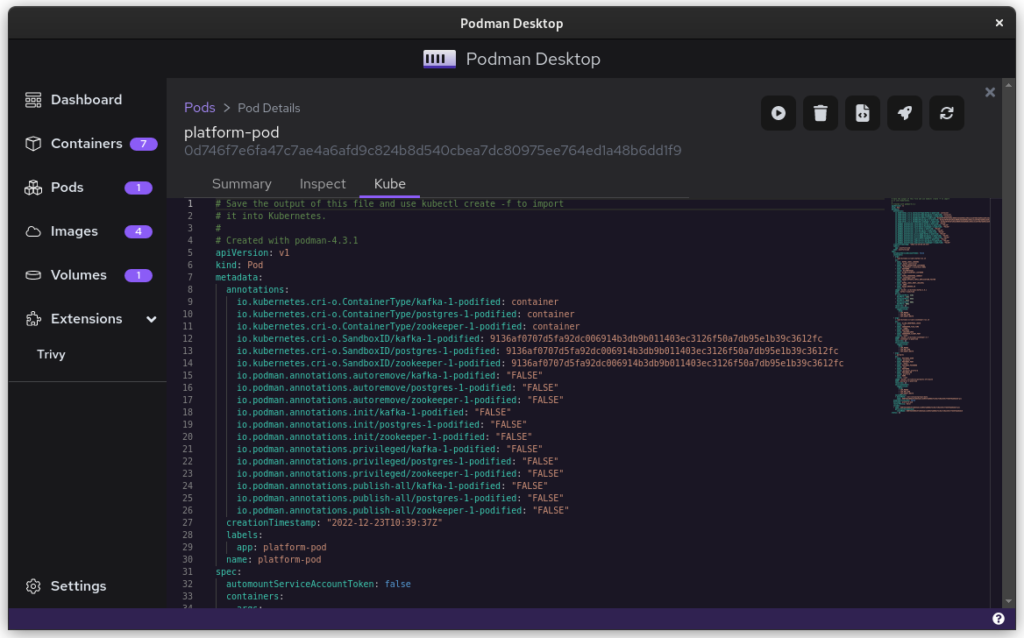
Once you inspect the Pod, you have a Kube file that represents this container collection. Save it somewhere and give it another critical look. You can likely remove some stuff without impacting the functioning of the system. After all, auto-generated documents will have some artifacts.

All three files from the demonstration can be seen here:

That’s it. You have now migrated from Docker to Podman. To start up Podman with the Kubernetes file simply do:

$ podman play kube podman-kube-platform-cleanup.yaml --replace

GitLab CI/CD

GitLab has a great set of open source and commercial offerings that allow you to automatically deploy and test your system. In the past, people working with Docker inside GitLab had to resort to a Docker-in-Docker solution. That gives many engineers headaches. A migration from Docker to Podman will resolve that problem.

For example, you can use Podman’s official image to easily build your own product image:

runner-setup: image: quay.io/podman/stable:latest stage: setup script: - podman login registry.gitlab.com -u ${COMPANY_CI_USERNAME} -p ${COMPANY_CI_PASSWORD} - podman build --pull --no-cache -t registry.gitlab.com/company/platform:latest -f ./distribute/image . - podman push registry.gitlab.com/company/platform:latest

In this example we use the official Podman stable image based on Fedora Linux 37. We use that to build the latest version of our platform based on the ./distribute/image file. We can do this all without ever having to set up Docker.

Tooling and integrations

Finally, we have to talk about certain tooling. Not all tooling will work equally well from the start. For example, the login that Amazon’s AWS CLI provides is hardcoded for Docker. Still, you can easily login to AWS by doing this:

$ aws ecr get-login-password --region $REGION | podman login --username AWS --password-stdin $AWS_REPO_NAME

Similarly, you can cache your registry credentials for both Podman and Docker. Do this with a single command like:

$ podman login registry.gitlab.com –authfile=${HOME}/.docker/config.json

Alternatives/Workarounds

Perhaps all of this sounds good, but you need more time to convince your team and company that embracing open source tools is great. In that case, you can add the following snippet to .bashrc and use Podman without changing the tooling of your team.

#Ensure that these aliases also affect other scripts
shopt -s expand_aliases alias docker=podman
alias docker-compose=podman-compose

This also offers you a chance to test the set-up that you have, in case of technical incompatibilities. You can also use the package podman-docker (available via dnf) to automatically convert Docker commands into Podman commands.

Company experience

The migration from Docker to Podman has been well received within my development team. The desktop experience for macOS and Windows users has improved since they no longer have to struggle with a tool that is closed source. The improvements to the CI system also help in maintaining the pipeline and it makes the integration tests run faster.

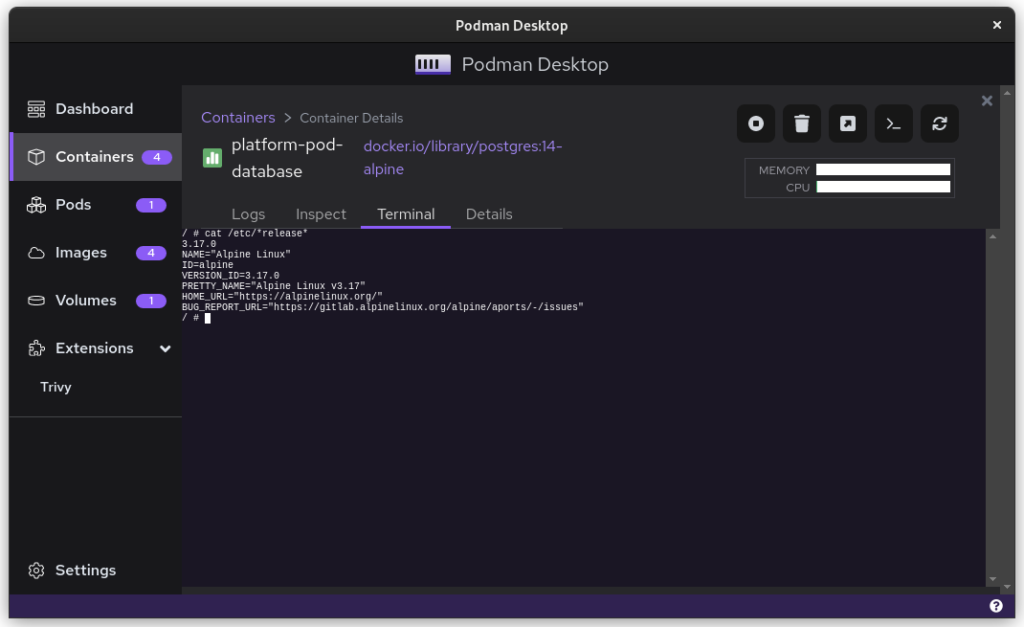
In day to day work, the team is really enthusiastic about the ease with which they can inspect running containers, manage images, and clean temporary volumes.

In the big picture, the migration from Docker to Podman further aids the company in limiting financial liabilities. Developers on macOS and Windows are no longer dependent on a closed-source product. Finally, it also means that the team gets some experience in Kubernetes, which will certainly pay off in the future.

Summary

The gains from switching to Podman really outweigh the bit of time it takes to set up and to migrate. The future is bright for Podman and Podman Desktop, and it offers a great solution to the problems that come with Docker.

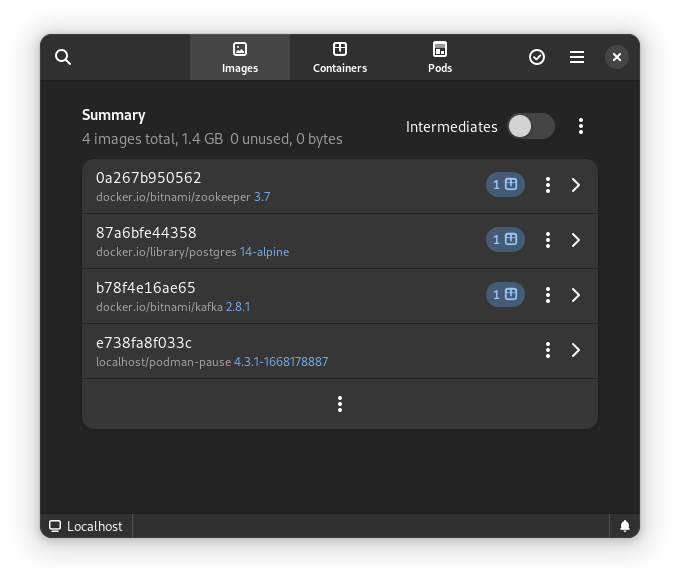
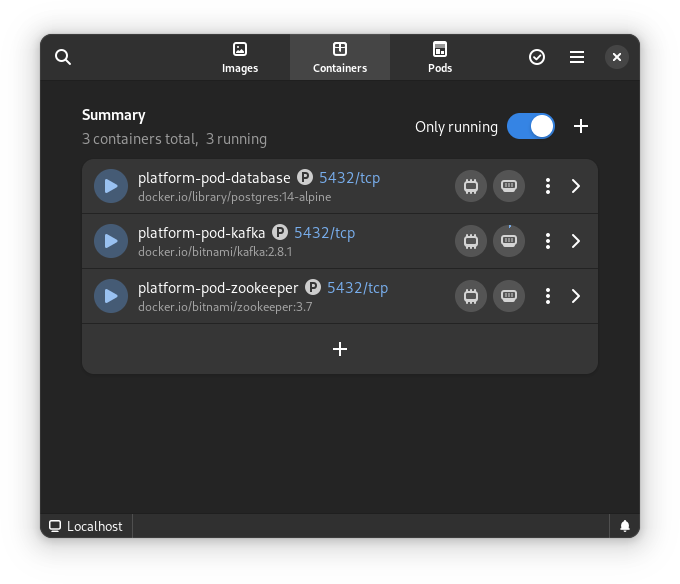
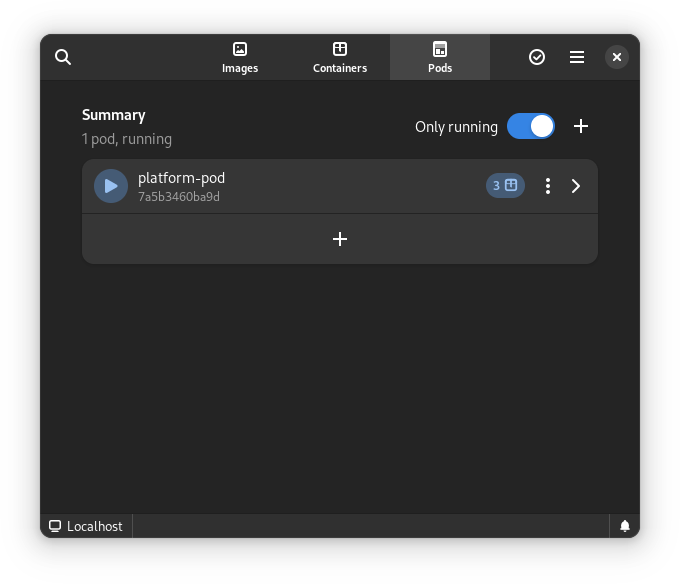
Finally, for us Fedora Linux users, there is another great benefit. There is some beautiful tooling in development that can make our lives so much easier. The following screenshots are of the application Pods. This is currently in active development but will certainly prove to be a useful tool in the future.

This article has been made possible by my employer, Bold Security Technologies. Got your own migration stories to share? Let us know in the comments.

Posted on Leave a comment

MLCube and Podman

MLCube is a new open source container based infrastructure specification introduced to enable reproducibility in Python based machine learning workflows. It can utilize tools such as Podman, Singularity and Docker. Execution on remote platforms is also supported. One of the chairs of the MLCommons Best Practices working group that is developing MLCube is Diane Feddema from Red Hat. This introductory article explains how to run the hello world MLCube example using Podman on Fedora Linux.

Yazan Monshed has written a very helpful introduction to Podman on Fedora which gives more details on some of the steps used here.

First install the necessary dependencies.

sudo dnf -y update
sudo dnf -y install podman git virtualenv \ policycoreutils-python-utils

Then, following the documentation, setup a virtual environment and get the example code. To ensure reproducibility, use a specific commit as the project is being actively improved.

virtualenv -p python3 ./env_mlcube source ./env_mlcube/bin/activate
git clone https://github.com/mlcommons/mlcube_examples.git cd ./mlcube_examples/hello_world
git checkout 5fe69bd
pip install mlcube mlcube-docker
mlcube describe

Now change the runner command from docker to podman by editing the file $HOME/mlcube.yaml so that the line

docker: docker

becomes

docker: podman

If you are on a computer with x86_64 architecture, you can get the container using

mlcube configure --mlcube=. --platform=docker

You will see a number of options

? Please select an image: ▸ registry.fedoraproject.org/mlcommons/hello_world:0.0.1 registry.access.redhat.com/mlcommons/hello_world:0.0.1 docker.io/mlcommons/hello_world:0.0.1 quay.io/mlcommons/hello_world:0.0.1

Choose docker.io/mlcommons/hello_world:0.0.1 to obtain the container.

If you are not on a computer with x86_64 architecture, you will need to build the container. Change the file $HOME/mlcube.yaml so that the line

build_strategy: pull

becomes

build_strategy: auto

and then build the container using

mlcube configure --mlcube=. --platform=docker

To run the tests, you may need to set SELinux permissions in the directories appropriately. You can check that SELinux is enabled by typing

sudo sestatus

which should give you output similar to

SELinux status: enabled
...

Josphat Mutai, Christopher Smart and Daniel Walsh explain that you need to be careful in setting appropriate SELinux policies for files used by containers. Here, you will allow the container to read and write to the workspace directory.

sudo semanage fcontext -a -t container_file_t "$PWD/workspace(/.*)?"
sudo restorecon -Rv $PWD/workspace

Now check the directory policy by checking that

ls -Z

gives output similar to

unconfined_u:object_r:user_home_t:s0 Dockerfile
unconfined_u:object_r:user_home_t:s0 README.md
unconfined_u:object_r:user_home_t:s0 mlcube.yaml
unconfined_u:object_r:user_home_t:s0 requirements.txt
unconfined_u:object_r:container_file_t:s0 workspace

Now run the example

mlcube run --mlcube=. --task=hello --platform=docker
mlcube run --mlcube=. --task=bye --platform=docker

Finally, check that the output

cat workspace/chats/chat_with_alice.txt

has text similar to

Hi, Alice! Nice to meet you.
Bye, Alice! It was great talking to you.

You can create your own MLCube as described here. Contributions to the MLCube examples repository are welcome. Udica is a new project that promises more fine grained SELinux policy controls for containers that are easy for system administrators to apply. Active development of these projects is ongoing. Testing and providing feedback on them would help make secure data management on systems with SELinux easier and more effective.

Posted on Leave a comment

Using pods with Podman on Fedora

This article shows the reader how easy it is to get started using pods with Podman on Fedora. But what is Podman? Well, we will start by saying that Podman is a container engine developed by Red Hat, and yes, if you thought about Docker when reading container engine, you are on the right track. A whole new revolution of containerization started with Docker, and Kubernetes added the concept of pods in the area of container orchestration when dealing with containers that share some common resources. But hold on! Do you really think it is worth sticking with Docker alone by assuming it’s the only effective way of containerization? Podman can also manage pods on Fedora as well as the containers used in those pods.

Podman is a daemonless, open source, Linux native tool designed to make it easy to find, run, build, share and deploy applications using Open Containers Initiative (OCI) Containers and Container Images.

From the official Podman documentation at http://docs.podman.io/en/latest/

Why should we switch to Podman?

Podman is a daemonless container engine for developing, managing, and running OCI Containers on your Linux System. Containers can either be run as root or in rootless mode. Podman directly interacts with an image registry, containers and image storage.

Install Podman:

sudo dnf -y install podman

Creating a Pod:

To start using the pod we first need to create it and for that we have a basic command structure

 
$ podman pod create

The command above contains no arguments and hence it will create a pod with a randomly generated name. You might however, want to give your pod a relevant name. For that you just need to modify the above command a bit.

 
$ podman pod create --name climoiselle

The pod will be created and will report back to you the ID of the pod. In the example shown the pod was given the name ‘climoiselle’. To view the newly created pod is easy by using the command shown below:

 
$ podman pod list
Newly created pods have been deployed

As you can see, there are two pods listed here, one named darshna and the one created from the example named climoiselle. No doubt you notice that both pods already include one container, yet we sisn’t deploy a container to the pods yet.
What is that extra container inside the pod? This randomly generated container is an infra container. Every podman pod includes this infra container and in practice these containers do nothing but go to sleep. Their purpose is to hold the namespaces associated with the pod and to allow Podman to connect other containers to the pod. The other purpose of the infra container is to allow the pod to keep running when all associated containers have been stopped.

You can also view the individual containers within a pod with the command:

 
$ podman ps -a --pod

Add a container

The cool thing is, you can add more containers to your newly deployed pod. Always remember the name of your pod. It’s important as you’ll need that name in order to deploy the container in that pod. We’ll use the official ubuntu image and deploy a container using it running the top command.

 
$ podman run -dt --pod climoiselle ubuntu top

Everything in a Single Command:

Podman has an agile characteristic when it comes to deploying a container in a pod which you created. You can create a pod and deploy a container to the said pod with a single command using Podman. Let’s say you want to deploy an NGINX container, exposing external port 8080 to internal port 80 to a new pod named test_server.

 
$ podman run -dt --pod new:test_server -p 8080:80 nginx
Created a new pod and deployed a container together

Let’s check all pods that have been created and the number of containers running in each of them …

 
$ podman pod list
List of the containers, their state and number of containers running into them

Do you want to know a detailed configuration of the pods which are running? Just type in the command shown below:

 
podman pod inspect [pod's name/id]

Make it stop!

To stop the pods, we need to use the name or ID of the pod. With the information from podman’s pod list command, we can view the pods and their infra id. Simply use podman with the command stop and give the particular name/infra id of the pod.

 
$ podman pod stop climoiselle

Hey take a look!

My pod climoiselle stopped

After following this short tutorial, you can see how quickly you can use pods with podman on fedora. It’s an easy and convenient way to use containers that share resources and interact together.

Further reading

The fedora Classrom article https://fedoramagazine.org/fedora-classroom-containers-101-podman/. A good starting point for beginners https://developers.redhat.com/blog/2018/02/22/container-terminology-practical-introduction/. An article on capabilities and podman https://fedoramagazine.org/podman-with-capabilities-on-fedora/. Podman’s documentation site http://docs.podman.io/en/latest/.

Posted on Leave a comment

Podman with capabilities on Fedora

Containerization is a booming technology. As many as seventy-five percent of global organizations could be running some type of containerization technology in the near future. Since widely used technologies are more likely to be targeted by hackers, securing containers is especially important. This article will demonstrate how POSIX capabilities are used to secure Podman containers. Podman is the default container management tool in RHEL8.

Determine the Podman container’s privilege mode

Containers run in either privileged or unprivileged mode. In privileged mode, the container uid 0 is mapped to the host’s uid 0. For some use cases, unprivileged containers lack sufficient access to the resources of the host machine. Technologies and techniques including Mandatory Access Control (apparmor, SELinux), seccomp filters, dropping of capabilities, and namespaces help to secure containers regardless of their mode of operation.

To determine the privilege mode from outside the container:

$ podman inspect --format="{{.HostConfig.Privileged}}" <container id>

If the above command returns true then the container is running in privileged mode. If it returns false then the container is running in unprivileged mode.

To determine the privilege mode from inside the container:

$ ip link add dummy0 type dummy

If this command allows you to create an interface then you are running a privileged container. Otherwise you are running an unprivileged container.

Capabilities

Namespaces isolate a container’s processes from arbitrary access to the resources of its host and from access to the resources of other containers running on the same host. Processes within privileged containers, however, might still be able to do things like alter the IP routing table, trace arbitrary processes, and load kernel modules. Capabilities allow one to apply finer-grained restrictions on what resources the processes within a container can access or alter; even when the container is running in privileged mode. Capabilities also allow one to assign privileges to an unprivileged container that it would not otherwise have.

For example, to add the NET_ADMIN capability to an unprivileged container so that a network interface can be created inside of the container, you would run podman with parameters similar to the following:

[root@vm1 ~]# podman run -it --cap-add=NET_ADMIN centos
[root@b27fea33ccf1 /]# ip link add dummy0 type dummy
[root@b27fea33ccf1 /]# ip link

The above commands demonstrate a dummy0 interface being created in an unprivileged container. Without the NET_ADMIN capability, an unprivileged container would not be able to create an interface. The above commands demonstrate how to grant a capability to an unprivileged container.

Currently, there are about 39 capabilities that can be granted or denied. Privileged containers are granted many capabilities by default. It is advisable to drop unneeded capabilities from privileged containers to make them more secure.

To drop all capabilities from a container:

$ podman run -it -d --name mycontainer --cap-drop=all centos

To list a container’s capabilities:

$ podman exec -it 48f11d9fa512 capsh --print

The above command should show that no capabilities are granted to the container.

Refer to the capabilities man page for a complete list of capabilities:

$ man capabilities

Use the capsh command to list the capabilities you currently possess:

$ capsh --print

As another example, the below command demonstrates dropping the NET_RAW capability from a container. Without the NET_RAW capability, servers on the internet cannot be pinged from within the container.

$ podman run -it --name mycontainer1 --cap-drop=net_raw centos
>>> ping google.com (will output error, operation not permitted)

As a final example, if your container were to only need the SETUID and SETGID capabilities, you could achieve such a permission set by dropping all capabilities and then re-adding only those two.

$ podman run -d --cap-drop=all --cap-add=setuid --cap-add=setgid fedora sleep 5 > /dev/null; pscap | grep sleep

The pscap command shown above should show the capabilities that have been granted to the container.

I hope you enjoyed this brief exploration of how capabilities are used to secure Podman containers.

Thank You!

Posted on Leave a comment

Running Rosetta@home on a Raspberry Pi with Fedora IoT

The Rosetta@home project is a not-for-profit distributed computing project created by the Baker laboratory at the University of Washington. The project uses idle compute capacity from volunteer computers to study protein structure, which is used in research into diseases such as HIV, Malaria, Cancer, and Alzheimer’s.

In common with many other scientific organizations, Rosetta@home is currently expending significant resources on the search for vaccines and treatments for COVID-19.

Rosetta@home uses the open source BOINC platform to manage donated compute resources. BOINC was originally developed to support the SETI@home project searching for Extraterrestrial Intelligence. These days, it is used by a number of projects in many different scientific fields. A single BOINC client can contribute compute resources to many such projects, though not all projects support all architectures.

For the example shown in this article a Raspberry Pi 3 Model B was used, which is one of the tested reference devices for Fedora IoT. This device, with only 1GB of RAM, is only just powerful enough to be able to make a meaningful contribution to Rosetta@home, and there’s certainly no way the Raspberry Pi can be used for anything else – such as running a desktop environment – at the same time.

It’s also worth mentioning at this point that the first rule of Raspberry Pi computing is to get the recommended power supply. It is important to get as close to the specified 2.5A as you can, and use a good quality micro-usb cable.

Getting Fedora IoT

To install Fedora IoT on a Raspberry Pi, the first step is to download the aarch64 Raw Image from the iot.fedoraproject.org download page.

Then use the arm-image-installer utility (sudo dnf install fedora-arm-installer) to write the image to the SD card. As always, be very sure which device name corresponds to your SD Card before continuing. Check the device with the lsblk command like this:

$ lsblk
NAME MAJ:MIN RM SIZE RO TYPE MOUNTPOINT
sdb 8:16 1 59.5G 0 disk
└─sdb1 8:17 1 59.5G 0 part /run/media/gavin/154F-1CEC
nvme0n1 259:0 0 477G 0 disk
├─nvme0n1p1 259:1 0 600M 0 part
...

If you’re still not sure, try running lsblk with the SD card removed, then again with the SD card inserted and comparing the outputs. In this case it lists the SD card as /dev/sdb. If you’re really unsure, there are some more tips described in the Getting Started guide.

We need to tell arm-image-installer which image file to use, what type of device we’re going to be using, and the device name – determined above – to use for writing the image. The arm-image-installer utility is also able to expand the filesystem to use the entire SD card at the point of writing the image.

Since we’re not going to use the zezere provisioning server to deploy SSH keys to the Raspberry Pi, we need to specify the option to remove the root password so that we can log in and set it at first boot.

In my case, the full command was:

sudo arm-image-installer --image ~/Downloads/Fedora-IoT-32-20200603.0.aarch64.raw.xz --target=rpi3 --media=/dev/sdb --resizefs --norootpass

After a final confirmation prompt:

= Selected Image: = /var/home/gavin/Downloads/Fedora-IoT-32-20200603.0.aarc...
= Selected Media : /dev/sdb
= U-Boot Target : rpi3
= Root Password will be removed.
= Root partition will be resized
===================================================== *****************************************************
*****************************************************
******** WARNING! ALL DATA WILL BE DESTROYED ********
*****************************************************
***************************************************** Type 'YES' to proceed, anything else to exit now 

the image is written to the SD Card.

...
= Installation Complete! Insert into the rpi3 and boot.

Booting the Raspberry Pi

For the initial setup, you’ll need to attach a keyboard and mouse to the Raspberry Pi. Alternatively, you can follow the instructions for connecting with a USB-to-Serial cable.

When the Raspberry Pi boots up, just type root at the login prompt and press enter.

localhost login: root
[root@localhost~]#

The first task is to set a password for the root user.

[root@localhost~]# passwd
Changing password for user root.
New password: Retype new password:
passwd: all authentication tokens updated successfully
[root@localhost~]#

Verifying Network Connectivity

To verify the network connectivity, the checklist in the Fedora IoT Getting Started guide was followed. This system is using a wired ethernet connection, which shows as eth0. If you need to set up a wireless connection this can be done with nmcli.

ip addr will allow you to check that you have a valid IP address.

[root@localhost ~]# ip addr
1: lo: <LOOPBACK,UP,LOWER_UP> mtu 65536 qdisc noqueue state UNKNOWN group default qlen 1000
link/loopback 00:00:00:00:00:00 brd 00:00:00:00:00:00
inet 127.0.0.1/8 scope host lo
valid_lft forever preferred_lft forever
inet6 ::1/128 scope host
valid_lft forever preferred_lft forever
2: eth0: <BROADCAST,MULTICAST,UP,LOWER_UP> mtu 1500 qdisc fq_codel state UP group default qlen 1000
link/ether b8:27:eb:9d:6e:13 brd ff:ff:ff:ff:ff:ff
inet 192.168.178.60/24 brd 192.168.178.255 scope global dynamic noprefixroute eth0
valid_lft 863928sec preferred_lft 863928sec
inet6 fe80::ba27:ebff:fe9d:6e13/64 scope link
valid_lft forever preferred_lft forever
3: wlan0: <NO-CARRIER,BROADCAST,MULTICAST,UP> mtu 1500 qdisc fq_codel state DOWN group default qlen 1000
link/ether fe:d3:c9:dc:54:25 brd ff:ff:ff:ff:ff:ff

ip route will check that the network has a default gateway configured.

[root@localhost ~]# ip route
default via 192.168.178.1 dev eth0 proto dhcp metric 100 192.168.178.0/24 dev eth0 proto kernel scope link src 192.168.178.60 metric 100 

To verify internet access and name resolution, use ping

[root@localhost ~]# ping -c3 iot.fedoraproject.org
PING wildcard.fedoraproject.org (8.43.85.67) 56(84) bytes of data.
64 bytes from proxy14.fedoraproject.org (8.43.85.67): icmp_seq=1 ttl=46 time=93.4 ms
64 bytes from proxy14.fedoraproject.org (8.43.85.67): icmp_seq=2 ttl=46 time=90.0 ms
64 bytes from proxy14.fedoraproject.org (8.43.85.67): icmp_seq=3 ttl=46 time=91.3 ms --- wildcard.fedoraproject.org ping statistics ---
3 packets transmitted, 3 received, 0% packet loss, time 2003ms
rtt min/avg/max/mdev = 90.043/91.573/93.377/1.374 ms

Optional: Configuring sshd so we can disconnect the keyboard and monitor

Before disconnecting the keyboard and monitor, we need to ensure that we can connect to the Raspberry Pi over the network.

First we verify that sshd is running

[root@localhost~]# systemctl is-active sshd
active

and that there is a firewall rule present to allow ssh.

[root@localhost ~]# firewall-cmd --list-all
public (active) target: default icmp-block-inversion: no interfaces: eth0 sources: services: dhcpv6-client mdns ssh ports: protocols: masquerade: no forward-ports: source-ports: icmp-blocks: rich rules: 

In the file /etc/ssh/sshd_config, find the section named

# Authentication

and add the line

PermitRootLogin yes

There will already be a line

#PermitRootLogin prohibit-password

which you can edit by removing the # comment character and changing the value to yes.

Restart the sshd service to pick up the change

[root@localhost ~]# systemctl restart sshd

If all this is in place, we should be able to ssh to the Raspberry Pi.

[gavin@desktop ~]$ ssh [email protected]
The authenticity of host '192.168.178.60 (192.168.178.60)' can't be established.
ECDSA key fingerprint is SHA256:DLdFaYbvKhB6DG2lKmJxqY2mbrbX5HDRptzWMiAUgBM.
Are you sure you want to continue connecting (yes/no/[fingerprint])? yes
Warning: Permanently added '192.168.178.60' (ECDSA) to the list of known hosts.
[email protected]'s password: Boot Status is GREEN - Health Check SUCCESS
Last login: Wed Apr 1 17:24:50 2020
[root@localhost ~]#

It’s now safe to log out from the console (exit) and disconnect the keyboard and monitor.

Disabling unneeded services

Since we’re right on the lower limit of viable hardware for Rosetta@home, it’s worth disabling any unneeded services. Fedora IoT is much more lightweight than desktop distributions, but there are still a few optimizations we can do.

Like disabling bluetooth, Modem Manager (used for cellular data connections), WPA supplicant (used for Wi-Fi) and the zezere services, which are used to centrally manage a fleet of Fedora IoT devices.

[root@localhost /]# for serviceName in bluetooth ModemManager wpa_supplicant zezere_ignition zezere_ignition.timer zezere_ignition_banner; do sudo systemctl stop $serviceName; sudo systemctl disable $serviceName; sudo systemctl mask $serviceName; done

Getting the BOINC client

Instead of installing the BOINC client directly onto the operating system with rpm-ostree, we’re going to use podman to run the containerized version of the client.

This image uses a volume mount to store its data, so we create the directories it needs in advance.

[root@localhost ~]# mkdir -p /opt/appdata/boinc/slots /opt/appdata/boinc/locale

We also need to add a firewall rule to allow the container to resolve external DNS names.

[root@localhost ~]# firewall-cmd --permanent --zone=trusted --add-interface=cni-podman0 success [root@localhost ~]# systemctl restart firewalld

Finally we are ready to pull and run the BOINC client container.

[root@localhost ~]# podman run --name boinc -dt -p 31416:31416 -v /opt/appdata/boinc:/var/lib/boinc:Z -e BOINC_GUI_RPC_PASSWORD="blah" -e BOINC_CMD_LINE_OPTIONS="--allow_remote_gui_rpc" boinc/client:arm64v8 
Trying to pull...
...
... 787a26c34206e75449a7767c4ad0dd452ec25a501f719c2e63485479f...

We can inspect the container logs to make sure everything is working as expected:

[root@localhost ~]# podman logs boinc
20-Jun-2020 09:02:44 [---] cc_config.xml not found - using defaults
20-Jun-2020 09:02:44 [---] Starting BOINC client version 7.14.12 for aarch64-unknown-linux-gnu
...
...
...
20-Jun-2020 09:02:44 [---] Checking presence of 0 project files
20-Jun-2020 09:02:44 [---] This computer is not attached to any projects
20-Jun-2020 09:02:44 Initialization completed

Configuring the BOINC container to run at startup

We can automatically generate a systemd unit file for the container with podman generate systemd.

[root@localhost ~]# podman generate systemd --files --name boinc
/root/container-boinc.service

This creates a systemd unit file in root’s home directory.

[root@localhost ~]# cat container-boinc.service 
# container-boinc.service
# autogenerated by Podman 1.9.3
# Sat Jun 20 09:13:58 UTC 2020 [Unit]
Description=Podman container-boinc.service
Documentation=man:podman-generate-systemd(1)
Wants=network.target
After=network-online.target [Service]
Environment=PODMAN_SYSTEMD_UNIT=%n
Restart=on-failure
ExecStart=/usr/bin/podman start boinc
ExecStop=/usr/bin/podman stop -t 10 boinc
PIDFile=/var/run/containers/storage/overlay-containers/787a26c34206e75449a7767c4ad0dd452ec25a501f719c2e63485479fbe21631/userdata/conmon.pid
KillMode=none
Type=forking [Install]
WantedBy=multi-user.target default.target

We install the file by moving it to the appropriate directory.

[root@localhost ~]# mv -Z container-boinc.service /etc/systemd/system
[root@localhost ~]# systemctl enable /etc/systemd/system/container-boinc.service
Created symlink /etc/systemd/system/multi-user.target.wants/container-boinc.service → /etc/systemd/system/container-boinc.service.
Created symlink /etc/systemd/system/default.target.wants/container-boinc.service → /etc/systemd/system/container-boinc.service.

Connecting to the Rosetta Stone project

You need to create an account at the Rosetta@home signup page, and retrieve your account key from your account home page. The key to copy is the “Weak Account Key”.

Finally, we execute the boinccmd configuration utility inside the container using podman exec, passing the Rosetta@home url and our account key.

[root@localhost ~]# podman exec boinc boinccmd --project_attach https://boinc.bakerlab.org/rosetta/ 2160739_cadd20314e4ef804f1d95ce2862c8f73

Running podman logs –follow boinc will allow us to see the container connecting to the project. You will probably see errors of the form

20-Jun-2020 10:18:40 [Rosetta@home] Rosetta needs 1716.61 MB RAM but only 845.11 MB is available for use.

This is because most, but not all, of the work units in Rosetta@Home require more memory than we have to offer. However, if you leave the device running for a while, it should eventually get some jobs to process. The polling interval seems to be approximately 10 minutes. We can also tweak the memory settings using BOINC manager to allow BOINC to use slightly more memory. This will increase the probability that Rosetta@home will be able to find tasks for us.

Installing BOINC Manager for remote access

You can use dnf to install the BOINC manager component to remotely manage the BOINC client on the Raspberry Pi.

[gavin@desktop ~]$ sudo dnf install boinc-manager

If you switch to “Advanced View” , you will be able to select “File -> Select Computer” and connect to your Raspberry Pi, using the IP address of the Pi and the value supplied for BOINC_GUI_RPC_PASSWORD in the podman run command, in my case “blah“.

Press Shift+Ctrl+I to connect BOINC manager to a remote computer

Under “Options -> Computing Preferences”, increase the value for “When Computer is not in use, use at most _ %”. I’ve been using 93%; this seems to allow Rosetta@home to schedule work on the pi, whilst still leaving it just about usable. It is possible that further fine tuning of the operating system might allow this percentage to be increased.

Using the Computing Preferences Dialog to set the memory threshhold

These settings can also be changed through the Rosetta@home website settings page, but bear in mind that changes made through the BOINC Manager client override preferences set in the web interface.

Wait

It may take a while, possibly several hours, for Rosetta@home to send work to our newly installed client, particularly as most work units are too big to run on a Raspberry Pi. COVID-19 has resulted in a large number of new computers being joined to the Rosetta@home project, which means that there are times when there isn’t enough work to do.

When we are assigned some work units, BOINC will download several hundred megabytes of data. This will be stored on the SD Card and can be viewed using BOINC manager.

We can also see the tasks running in the Tasks pane:

The client has downloaded four tasks, but only one of them is currently running due to memory constraints. At times, two tasks can run simultaneously, but I haven’t seen more than that. This is OK as long as the tasks are completed by the deadline shown on the right. I’m fairly confident these will be completed as long as the Raspberry Pi is left running. I have found that the additional memory overhead created by the BOINC Manager connection and sshd services can reduce parallelism, so I try to disconnect these when I’m not using them.

Conclusion

Rosetta@home, in common with many other distributed computing projects, is currently experiencing a large spike in participation due to COVID-19. That aside, the project has been doing valuable work for many years to combat a number of other diseases.

Whilst a Raspberry Pi is never going to appear at the top of the contribution chart, I think this is a worthwhile project to undertake with a spare Raspberry Pi. The existence of work units aimed at low-spec ARM devices indicates that the project organizers agree with this sentiment. I’ll certainly be leaving mine running for the foreseeable future.

Posted on Leave a comment

Manage your passwords with Bitwarden and Podman

You might have encountered a few advertisements the past year trying to sell you a password manager. Some examples are LastPass, 1Password, or Dashlane. A password manager removes the burden of remembering the passwords for all your websites. No longer do you need to re-use passwords or use easy-to-remember passwords. Instead, you only need to remember one single password that can unlock all your other passwords for you.

This can make you more secure by having one strong password instead of many weak passwords. You can also sync your passwords across devices if you have a cloud-based password manager like LastPass, 1Password, or Dashlane. Unfortunately, none of these products are open source. Luckily there are open source alternatives available.

Open source password managers

These alternatives include Bitwarden, LessPass, or KeePass. Bitwarden is an open source password manager that stores all your passwords encrypted on the server, which works the same way as LastPass, 1Password, or Dashlane. LessPass is a bit different as it focuses on being a stateless password manager. This means it derives passwords based on a master password, the website, and your username rather than storing the passwords encrypted. On the other side of the spectrum there’s KeePass, a file-based password manager with a lot of flexibility with its plugins and applications.

Each of these three apps has its own downsides. Bitwarden stores everything in one place and is exposed to the web through its API and website interface. LessPass can’t store custom passwords since it’s stateless, so you need to use their derived passwords. KeePass, a file-based password manager, can’t easily sync between devices. You can utilize a cloud-storage provider together with WebDAV to get around this, but a lot of clients do not support it and you might get file conflicts if devices do not sync correctly.

This article focuses on Bitwarden.

Running an unofficial Bitwarden implementation

There is a community implementation of the server and its API called bitwarden_rs. This implementation is fully open source as it can use SQLite or MariaDB/MySQL, instead of the proprietary Microsoft SQL Server that the official server uses.

It’s important to recognize some differences exist between the official and the unofficial version. For instance, the official server has been audited by a third-party, whereas the unofficial one hasn’t. When it comes to implementations, the unofficial version lacks email confirmation and support for two-factor authentication using Duo or email codes.

Let’s get started running the server with SELinux in mind. Following the documentation for bitwarden_rs you can construct a Podman command as follows:

$ podman run -d \ 
--userns=keep-id \
--name bitwarden \
-e SIGNUPS_ALLOWED=false \
-e ROCKET_PORT=8080 \
-v /home/egustavs/Bitwarden/bw-data/:/data/:Z \
-p 8080:8080 \
bitwardenrs/server:latest

This downloads the bitwarden_rs image and runs it in a user container under the user’s namespace. It uses a port above 1024 so that non-root users can bind to it. It also changes the volume’s SELinux context with :Z to prevent permission issues with read-write on /data.

If you host this under a domain, it’s recommended to put this server under a reverse proxy with Apache or Nginx. That way you can use port 80 and 443 which points to the container’s 8080 port without running the container as root.

Running under systemd

With Bitwarden now running, you probably want to keep it that way. Next, create a unit file that keeps the container running, automatically restarts if it doesn’t respond, and starts running after a system restart. Create this file as /etc/systemd/system/bitwarden.service:

[Unit]
Description=Bitwarden Podman container
Wants=syslog.service

[Service]
User=egustavs
Group=egustavs
TimeoutStartSec=0
ExecStart=/usr/bin/podman run 'bitwarden'
ExecStop=-/usr/bin/podman stop -t 10 'bitwarden'
Restart=always
RestartSec=30s
KillMode=none

[Install]
WantedBy=multi-user.target

Now, enable and start it using sudo:

$ sudo systemctl enable bitwarden.service && sudo systemctl start bitwarden.service
$ systemctl status bitwarden.service
bitwarden.service - Bitwarden Podman container
Loaded: loaded (/etc/systemd/system/bitwarden.service; enabled; vendor preset: disabled)
Active: active (running) since Tue 2019-07-09 20:23:16 UTC; 1 day 14h ago
Main PID: 14861 (podman)
Tasks: 44 (limit: 4696)
Memory: 463.4M

Success! Bitwarden is now running under system and will keep running.

Adding LetsEncrypt

It’s strongly recommended to run your Bitwarden instance through an encrypted channel with something like LetsEncrypt if you have a domain. Certbot is a bot that creates LetsEncrypt certificates for us, and they have a guide for doing this through Fedora.

After you generate a certificate, you can follow the bitwarden_rs guide about HTTPS. Just remember to append :Z to the LetsEncrypt volume to handle permissions while not changing the port.


Photo by CMDR Shane on Unsplash.

Posted on Leave a comment

Use udica to build SELinux policy for containers

While modern IT environments move towards Linux containers, the need to secure these environments is as relevant as ever. Containers are a process isolation technology. While containers can be a defense mechanism, they only excel when combined with SELinux.

Fedora SELinux engineering built a new standalone tool, udica, to generate SELinux policy profiles for containers by automatically inspecting them. This article focuses on why udica is needed in the container world, and how it makes SELinux and containers work better together. You’ll find examples of SELinux separation for containers that let you avoid turning protection off because the generic SELinux type container_t is too tight. With udica you can easily customize the policy with limited SELinux policy writing skills.

SELinux technology

SELinux is a security technology that brings proactive security to Linux systems. It’s a labeling system that assigns a label to all subjects (processes and users) and objects (files, directories, sockets, etc.). These labels are then used in a security policy that controls access throughout the system. It’s important to mention that what’s not allowed in an SELinux security policy is denied by default. The policy rules are enforced by the kernel. This security technology has been in use on Fedora for several years. A real example of such a rule is:

allow httpd_t httpd_log_t: file { append create getattr ioctl lock open read setattr };

The rule allows any process labeled as httpd_t to create, append, read and lock files labeled as httpd_log_t. Using the ps command, you can list all processes with their labels:

$ ps -efZ | grep httpd
system_u:system_r:httpd_t:s0 root 13911 1 0 Apr14 ? 00:05:14 /usr/sbin/httpd -DFOREGROUND
...

To see which objects are labeled as httpd_log_t, use semanage:

# semanage fcontext -l | grep httpd_log_t
/var/log/httpd(/.)? all files system_u:object_r:httpd_log_t:s0
/var/log/nginx(/.)? all files system_u:object_r:httpd_log_t:s0
...

The SELinux security policy for Fedora is shipped in the selinux-policyRPM package.

SELinux vs. containers

In Fedora, the container-selinux RPM package provides a generic SELinux policy for all containers started by engines like podman or docker. Its main purposes are to protect the host system against a container process, and to separate containers from each other. For instance, containers confined by SELinux with the process type container_t can only read/execute files in /usr and write to container_file_t files type on host file system. To prevent attacks by containers on each other, Multi-Category Security (MCS) is used.

Using only one generic policy for containers is problematic, because of the huge variety of container usage. On one hand, the default container type (container_t) is often too strict. For example:

  • Fedora SilverBlue needs containers to read/write a user’s home directory
  • Fluentd project needs containers to be able to read logs in the /var/log directory

On the other hand, the default container type could be too loose for certain use cases:

  • It has no SELinux network controls — all container processes can bind to any network port
  • It has no SELinux control on Linux capabilities — all container processes can use all capabilities

There is one solution to handle both use cases: write a custom SELinux security policy for the container. This can be tricky, because SELinux expertise is required. For this purpose, the udica tool was created.

Introducing udica

Udica generates SELinux security profiles for containers. Its concept is based on the “block inheritance” feature inside the common intermediate language (CIL) supported by SELinux userspace. The tool creates a policy that combines:

  • Rules inherited from specified CIL blocks (templates), and
  • Rules discovered by inspection of container JSON file, which contains mountpoints and ports definitions

You can load the final policy immediately, or move it to another system to load into the kernel. Here’s an example, using a container that:

  • Mounts /home as read only
  • Mounts /var/spool as read/write
  • Exposes port tcp/21

The container starts with this command:

# podman run -v /home:/home:ro -v /var/spool:/var/spool:rw -p 21:21 -it fedora bash

The default container type (container_t) doesn’t allow any of these three actions. To prove it, you could use the sesearch tool to query that the allow rules are present on system:

# sesearch -A -s container_t -t home_root_t -c dir -p read 

There’s no allow rule present that lets a process labeled as container_t access a directory labeled home_root_t (like the /home directory). The same situation occurs with /var/spool, which is labeled var_spool_t:

# sesearch -A -s container_t -t var_spool_t -c dir -p read

On the other hand, the default policy completely allows network access.

# sesearch -A -s container_t -t port_type -c tcp_socket
allow container_net_domain port_type:tcp_socket { name_bind name_connect recv_msg send_msg };
allow sandbox_net_domain port_type:tcp_socket { name_bind name_connect recv_msg send_msg };

Securing the container

It would be great to restrict this access and allow the container to bind just on TCP port 21 or with the same label. Imagine you find an example container using podman ps whose ID is 37a3635afb8f:

# podman ps -q
37a3635afb8f

You can now inspect the container and pass the inspection file to the udica tool. The name for the new policy is my_container.

# podman inspect 37a3635afb8f > container.json
# udica -j container.json my_container
Policy my_container with container id 37a3635afb8f created!

Please load these modules using:
# semodule -i my_container.cil /usr/share/udica/templates/{base_container.cil,net_container.cil,home_container.cil}

Restart the container with: "--security-opt label=type:my_container.process" parameter

That’s it! You just created a custom SELinux security policy for the example container. Now you can load this policy into the kernel and make it active. The udica output above even tells you the command to use:

# semodule -i my_container.cil /usr/share/udica/templates/{base_container.cil,net_container.cil,home_container.cil}

Now you must restart the container to allow the container engine to use the new custom policy:

# podman run --security-opt label=type:my_container.process -v /home:/home:ro -v /var/spool:/var/spool:rw -p 21:21 -it fedora bash

The example container is now running in the newly created my_container.process SELinux process type:

# ps -efZ | grep my_container.process
unconfined_u:system_r:container_runtime_t:s0-s0:c0.c1023 root 2275 434 1 13:49 pts/1 00:00:00 podman run --security-opt label=type:my_container.process -v /home:/home:ro -v /var/spool:/var/spool:rw -p 21:21 -it fedora bash
system_u:system_r:my_container.process:s0:c270,c963 root 2317 2305 0 13:49 pts/0 00:00:00 bash

Seeing the results

The command sesearch now shows allow rules for accessing /home and /var/spool:

# sesearch -A -s my_container.process -t home_root_t -c dir -p read
allow my_container.process home_root_t:dir { getattr ioctl lock open read search };
# sesearch -A -s my_container.process -t var_spool_t -c dir -p read
allow my_container.process var_spool_t:dir { add_name getattr ioctl lock open read remove_name search write }

The new custom SELinux policy also allows my_container.process to bind only to TCP/UDP ports labeled the same as TCP port 21:

# semanage port -l | grep 21 | grep ftp
ftp_port_t tcp 21, 989, 990
# sesearch -A -s my_container.process -c tcp_socket -p name_bind
allow my_container.process ftp_port_t:tcp_socket name_bind;

Conclusion

The udica tool helps you create SELinux policies for containers based on an inspection file without any SELinux expertise required. Now you can increase the security of containerized environments. Sources are available on GitHub, and an RPM package is available in Fedora repositories for Fedora 28 and later.


Photo by Samuel Zeller on Unsplash.