It doesn’t have to be difficult to make your Mac automatically perform repetitive or tedious tasks for you. Apple’s free Automator app on every Mac has a plethora of functions that take one step to set up and then work for you forever.
None of us have that much time in the day to fiddle about adjusting some setting or other on our Macs. Yet, if you do make yourself take a few minutes today, you can save much more time every single day from now on. You will unquestionably get through your work faster and you very easily may be able to save time for your colleagues too.
The Mac is able to take over tasks that are tedious and you do every day with Automator. Macs can also take over tasks that you do so rarely that you always have to ask someone how to do it.
If you’re ever stopping to think that you may have got some important step wrong, you need to do this. When you find yourself wishing there were a faster way to do something, you should look at this.
Anything that speeds up your work on a Mac is called automation and usually when you hear that word, it’s followed by a supremely powerful, delightfully clever and unfortunately a bit fiddly series of instructions.
Except today. Call this a handy guide, call it a way to ease you into the power of automation, but today we’re going to show you a slew of one-step jobs. Each one does something really handy. Each one requires you to do precisely one thing. And each one is using Automator, a tool that comes on every Mac.
Get this into your head first
Everything we’re about to tell you works exactly the same way. You’ll open Automator, you’ll tell it the one thing you want it to do, and then you’ll save that instruction. You’ll save it to somewhere you’ll always remember, somewhere you’ll always be able to find. Frankly, you’re going to save it to your Desktop.
For all of the following, you’re going to be saving an application. It’s a very small application but it’s one that you will later be able to drag files onto.
To create an application, launch Automator from your Applications folder.
Make sure you choose Application. This is what makes something you can later drag files onto instead of always opening Automator
This is what you’ll see when you open Automator, except that it will have defaulted to highlighting Workflow. Ignore that. Click on Application instead, and then Choose.
Whatever you chose, the next screen would look the same and it would act the same. All you’ve chosen here is what you will eventually save to your desktop. If you click Choose and then have any doubt that you may have slipped and picked something other than Application, look at the top line of the next screen.
The main screen of Apple’s free Automator app
That top line will say Untitled (Application) or Untitled (Workflow), something like that. If it says anything but the Application one, close it and choose File, New to start again.
You’re thinking that it’s a pretty big Application button to click on, you’re not likely to miss it. Yet look at the large, blank right hand side of the Automator window. Regardless of whether you’ve chosen Workflow or not, it will always say Drag actions or files here to build your workflow and that will throw you.
Despite having that large empty area, Automator has otherwise quite a busy window. In the top corner there are buttons marked Library and Media. Make sure that Library is selected and then forget these two.
Similarly, right underneath these you have sections called Actions and Variables. For what we want, just check that it’s Actions that is highlighted.
Then right below that word, there is a second Library heading. This is a word that has a disclosure triangle next to it and yours may or may not be open. Whether it is or not, make sure that the line saying Library is highlighted.
This Library is part of Automator’s plan to make things easy. If you click to open that disclosure triangle, you’ll see two dozen different sections underneath it. Each one contains ten, twenty or more different actions that Automator can do for you. So in theory if you knew which section you wanted, you’d just go to that. Most of the time, though, you’re either not sure yet what you’re looking for or you are but Automator’s put it in an unexpected section.
So invariably, we ignore all of this and instead once we’ve made sure that Library, Actions and then the word Library are selected, we go to the search box that’s on the right of the word Variables.
In each of the following examples, you will type a word into that search box and then Automator will show you every action that matches.
Example search
Search for a word to do with your task rather than trying to categorize what you want
In this case we’ve typed ‘event’ into the search box and Automator has shown us six things it can do. You may see more, depending on what other applications you have on your Mac, but you’ll always get a short list.
We’ll tell you the key ones to pick in a moment, but in every case what you’ll do when you’ve chosen an action, is you’ll move it to the large blank area. You can do that either by dragging the action over to it. However, you can also just double-click on it and Automator will move it for you.
That doesn’t sound like a difference that makes much of a difference but today we’re only looking at single steps. For a single step, you can drag or double-click as you like. If you get into Automator more, you’ll end up making lists of actions and there the sequence of them will be vital so dragging one to precisely where you want it is best.
Again, though, we’re only doing Automator actions that require precisely one step so just dragging or double-clicking means you’re practically finished. Some of the following examples will have little details or options that you might want to adjust, but the next step is always to save the application.
Once you’ve done that, you end up with Automator applications wherever you saved them and you may never need to go back into this app ever again. You’ll certainly not need to think about how they work, you’ll just drag a document or a file on top of their icon and let them do what they do.
And with all that said, here our favorite and most-used single-step Automator actions.
Quickly create thumbnail images
If you’re a Photoshop user then you might already have made your own Droplet where you can automatically create small thumbnail versions of any image you drop on it. Photoshop’s Droplets are like everything else in that app, though, in that alongside immense power there does come quite a bit of complexity.
Not with Automator. When you open a new Application, click in the search box and look for ‘thumbnail’. You’ll get a couple of options including Create Thumbnail Images.
Remember, you just move that action over to the large, blank window and you’re done.
There’s not a lot to this Automator action. The only things you can adjust are how Automator names these thumbnail versions of the image —you don’t want it overwriting the full-size original so it automatically saves back with a new name —and the size. Even the size isn’t a comprehensive choice. You can’t enter any value you like, you can solely pick from 72, 96 or 128 pixels wide.
Save this Automator application. Then find any images you like on your Mac and drag them all to the icon for this Automator application. Before you’re even sure that you’ve let go of dragging these images, there will now be new thumbnail images. They’ll be wherever your original images were.
Set desktop wallpaper
It’s not as if it’s arduous having to open System Preferences, choose Desktop & Screen Saver and then schlep through the options —but it is a bit of a pain. Enough so that it’s handier to just have an application that you can drag any image onto and know that it your Mac will immediately display it as your wallpaper.
Search for ‘Desktop’ and Automator will offer you Set the Desktop Picture and that’s the action you want. Incidentally, this is one of the cases where Automator has put the action somewhere you might not expect. Rather than being in Automator’s Photos section, it comes under Files & Folders.
It’s things like that which just make us automatically use the search feature instead of hunting around through the sections.
Do this and from now on you can just drag an image to set your wallpaper
Save this new Automator application and from now on, any time you drag any image onto your application’s icon, it will become your Mac’s wallpaper.
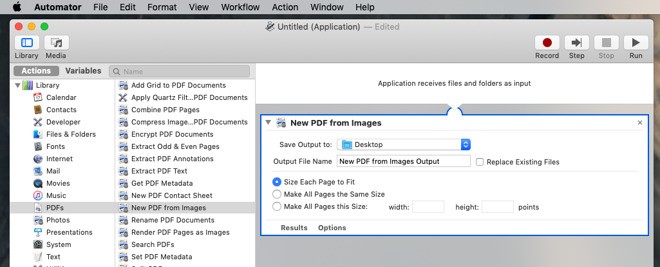
Create PDFs
Macs are great. From any application and with any document, you can create a PDF version just by choosing File, Print and selecting PDF. That’s not so great when what you want the PDF to be is a collection of images.
Rather than opening each image in, say, Pixelmator Pro, and saving them out as a PDF, you can run an Automator action instead.
Take two, ten, a thousand images and make a single PDF out of them
Combine PDFs
There are many PDF apps for the Mac and even Apple gets in on the act with Preview. If you’re compiling one new PDF out of many existing ones, then actually Preview is the way to go. It lets you drag individual pages from one PDF to another.
When you just want to join a few PDFs together, though, that’s fiddly enough to be irritating. So just search for the word ‘combine’ and then pick Combine PDF Pages.
Combine multiple PDFs into one
When you do pick this action, though, one of the options you get is to combine the PDF documents by Shuffling pages. We can’t think of an occasion when you’d want to do that but clearly you can.
Renaming files
We can easily think of occasions when you want to rename files but keep the originals too. Automator knows that’s pretty common, too, because if you pick Rename Finder items then it will give you a warning about how you are going to, well, rename Finder items.
It offers to set up your Automator application so that before it renames anything, it makes a copy. That can be extremely handy but it does turn this into a two-step application and we don’t need that for now.
So when you ignore the warning, you get detailed options of how you want to do this file renaming.
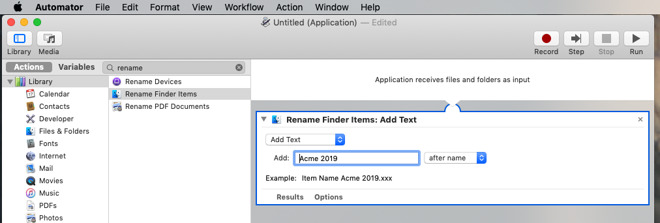
Rename any file you drag onto your new app
Say you’re organized or maybe your boss is and now you’re going to be including your company name in every single file you ever create. Choose this Rename Finder Items action and then from the many, many options inside it, select Add Text from the dropdown menu.
You can say that you want files to keep their existing name but have Acme at the end plus a year. If you then save this action, you can have an application on your desktop that renames any file you like. Drag one, drag all, it makes no difference —except to their filename.
Unfortunately, Acme just got bought out by Emca Corporation. Go back into Automator, create a new Application and use this same Rename Finder Items but choose Replace Text from the drop down.
Now if you drag one or a thousand files onto this application and they have Acme in their names, they will now have Emca instead.
Deep breath
That Rename Finder Items is a useful single-step tool you can create for yourself using Automator but it does have dozens of different options.
The more you dig into all of this, the more options and choices you get. And Automator is a very powerful tool —but we’re not just showing you the one-step option because it’s simple.
Automator has rather fallen behind and it feels as if even Apple isn’t paying a great deal of attention to it. So while we use it for these one-step actions and it is extremely useful for them, if we want more, we do go elsewhere.
So try these or any other one-step actions that you find on the way. See how quick they are to set up and how much time they save. You could and probably will dig a little deeper to find two- and three-step applications you can create, but after that, stop.
To do work with files and folders, consider Automator an on-ramp to Hazel. This is a third-party app which overall is actually easier to use than Automator and is geometrically more powerful. We do have Hazel settings that rename files for us, but they automatically rename them to include the name of the folder the file was in —and then archive them off somewhere else.
Or Keyboard Maestro. We’d be here all day if you let us talk about Keyboard Maestro. You can use that for everything we’ve described here, including the Hazel actions, and then do so much more that we’re still learning it.
That’s all very nice for us, though, and it could be very nice for you. For now, though, just take a few minutes to look at the possibilities in even one-step Automator actions and you will get hooked.
Keep up with AppleInsider by downloading the AppleInsider app for iOS, and follow us on YouTube, Twitter @appleinsider and Facebook for live, late-breaking coverage. You can also check out our official Instagram account for exclusive photos.